
Login

Shoutbox
You must login to post a message.
renatoa
04/18/2024 12:36 AM
greyberry2, N C, 
renatoa
04/17/2024 9:27 AM
 , branchu
renatoa
04/14/2024 5:56 AM
TheOtherJim and papajim,
 !
!
!allenb
04/11/2024 6:33 PM
Zemona

renatoa
04/11/2024 9:19 AM
Mrbones and sgupta,  ?
?
?Forum Threads
Newest Threads
Rainfrog's Roastmast...War on Farmers by Su...
Kaleido Roaster PID ...
Green coffee sellers
Wet beans - Estimati...
Hottest Threads
| Skywalker roaster... | [292] |
| Skywalker, the AL... | [214] |
| Skywalker Roasts | [94] |
| Rainfrog's Roastm... | [53] |
| My first popcorn ... | [47] |
In Memory Of Ginny

Donations
Latest Donations
dmccallum - 10.00
JackH - 25.00
snwcmpr - 10.00
Anonymous - 2.00
Anonymous - 5.00
dmccallum - 10.00
JackH - 25.00
snwcmpr - 10.00
Anonymous - 2.00
Anonymous - 5.00
Users Online
Guests Online: 3
Members Online: 0
Total Members: 8,210
Newest Member: N C
Members Online: 0
Total Members: 8,210
Newest Member: N C
View Thread
Who is here? 1 guest(s)
 Tri-Clamp Roaster
|
|
| tofublock |
Posted on 04/01/2020 2:36 AM
|
 Newbie  Posts: 9 Joined: March 31, 2020 |
Quote The shopping list above was incredibly annoying to assemble, so even better if it comes handy to somebody else as well. Of course, finding Jesse's post BEFORE my dive down the rabbithole could have saved me a quite a bit of trouble. :) |
|
|
|
| JackH |
Posted on 04/01/2020 5:21 AM
|
 Administrator Posts: 1809 Joined: May 10, 2011 |
Post #18 is not going anywhere! Having a shopping list at all is a luxury! We appreciate you posting one. Edited by JackH on 04/01/2020 5:59 AM ---Jack
KKTO Roaster. |
|
|
|
| allenb |
Posted on 04/01/2020 6:02 AM
|
 Administrator Posts: 3858 Joined: February 23, 2010 |
Nice list!  Everyone be sure to check out our parts and supplies list as well. Hoping most of the links still work but it's been a while since I tested them. If not, let us know and we'll update.
allenb attached the following image:

1/2 lb and 1 lb drum, Siemens Sirocco fluidbed, presspot, chemex, cajun biggin brewer from the backwoods of Louisiana
|
|
|
|
| Buildit |
Posted on 04/01/2020 9:10 PM
|
|
Newbie Posts: 4 Joined: March 28, 2020 |
Thanks Renatoa (I guessed the cyclone spec. may be wrong) but I am looking to have the ability to do 100% recycle on the exhaust so 3um would be much much better for my setup (I will post pic and parts list when it done but still ordering parts and drawing plans and doing the math). First part arrived today the fan (which I need to add a cool section between the blades and motor) but it has a 145mm inlet which is much much bigger than than the 35mm outlet on the cyclone. I am looking to do up to 100% recirculation.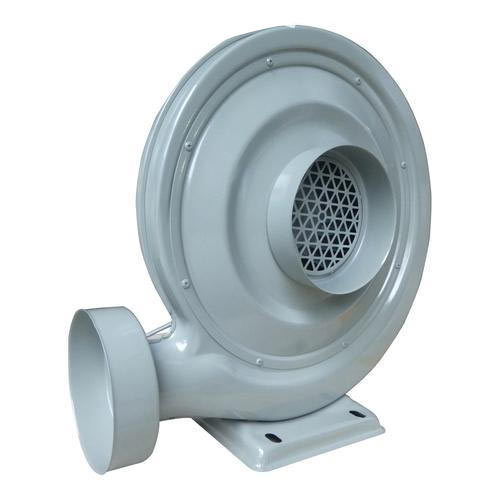 I don't want to hijack this thread, for my cyclone ?'s But thanks AllenB for the parts link it has a couple of links I missed 1st time through |
|
|
|
| renatoa |
Posted on 04/02/2020 4:12 AM
|
|
Administrator Posts: 3005 Joined: September 30, 2016 |
Do you have any design guidelines that relate cyclone size/power to the particle size ? I would feel much safer to use a filter, under a certain particle size, than rely on separation due to centrifugal force. Also, you can do recirculation with a heat exchanger setup, thus two complete separate airflows, instead recirculate the smoke/gases resulting from the roast. I don't expect nice flavors if roasting with second hand smoke...  |
|
|
|
| CanMan |
Posted on 04/13/2020 9:33 AM
|
|
Newbie Posts: 5 Joined: April 13, 2020 |
Hi guys, Another first time builder about to go the Tri clamp route here. I'm pretty interested in what you said here tofublock, about these cheap Chinese SCRs being controlled by a 0-5v signal? "I think the control issues could be solved by using something like this to reduce motor speed https://www.ebay....3593033976 Untested, but should properly "dim" AC motors without hiccups if various forums can be trusted. The regulator I linked to should be controllable via 0-5V analog voltage." Any chance of pointing me towards these forums, can't seem to find much info about this anywhere. Is it just a case of changing that faceplate with a microcontroller and PWMing the signal line? Thanks! Edited by JackH on 04/13/2020 10:48 AM |
|
|
|
| renatoa |
Posted on 04/13/2020 11:32 AM
|
|
Administrator Posts: 3005 Joined: September 30, 2016 |
The faceplate IS a voltage generator, no idea if the chip is a microcontroller or an asic, because functionality is fairly simple: a two digits counter, a LED driver, and a DAC that converts the counter digital outputs into a control voltage for the SCR. The SCR itself was been originally sold on eBay with a pot, you still can find the pot version if you search, and the two versions SCR bodies are almost identical. The voltage output of the faceplate goes in the same pad where the potentiometer cursor was been originally wired. So yes, I think you can control this unit by a PWM GPIO followed by a low pass RC filter, that averages the PWM duty cycle into a variable voltage. Alternatively, you can have a look at RobotDyn dimmer, is the most cost/feature effective solution, packing in the same board the SSR and ZCD, so you can use it for any of the PWM/ICC/PAC control methods, covering all the needs for a TC4 based solution. The SCR we discuss above is the best for manual control only. |
|
|
|
| CanMan |
Posted on 04/13/2020 11:43 AM
|
|
Newbie Posts: 5 Joined: April 13, 2020 |
Thanks for the quick reply renatoa I see the pot versions yeah, they must be different though right? Obviously a pot is a variable resistance so injecting a voltage can't be a direct substitute for that? Those robotdyn dimmers look far better method of phase angle control using a microcontroller, great find. Looks at a glance to be missing a snubber though? More suited to resistive loads than inductive I suspect... Have you tested it with an AC motor? Thanks |
|
|
|
| renatoa |
Posted on 04/13/2020 12:54 PM
|
|
Administrator Posts: 3005 Joined: September 30, 2016 |
Nope, only with the heater. Do you still need a snubber when using ICC, so full (half)sine passed to the load, thus no transients ? Can't be added the snubber components externally, if needed? A pot can be used as a voltage divider too, probably more usage than a variable resistance: https://en.wikipedia.org/wiki/Potentiometer |
|
|
|
| CanMan |
Posted on 04/13/2020 2:52 PM
|
|
Newbie Posts: 5 Joined: April 13, 2020 |
Since the current is out of phase with the voltage by up to 90 degrees, when the half sin gets skipped the current hasn't stopped which can prevent the triac from breaking the circuit, so you'll still need the snubber. You're right though, you can add those components externally which is what I think I'll do for fan control. Not sure we're on the same wavelength as far as the pot goes...but not to derail the thread any further! Thanks for your help Edited by CanMan on 04/13/2020 5:34 PM |
|
|
|
| tofublock |
Posted on 04/15/2020 3:03 AM
|
|
Newbie Posts: 9 Joined: March 31, 2020 |
As far as I've seen, the designs with a pot use it directly from mains to control the gate voltage to the MOSFET, that's why I ruled those out in the first place. Maybe there are other ones that have a TTL level control input but it didn't seem very likely so I went with the one that definitely has (=seems to have) a control voltage input. As Renatoa said, I think it's a little controller board with a few buttons and a DAC. The wonders of Ebay. ;) I have ordered it before I wrote my post. I'll tell you how it goes when it gets here. If all fails and it doesn't work as intended I'd be okay controlling the blower manually for now. And sorry, I don't have any links. I just did some digging around and that was the gist of it. I didn't save anything. I have not come across the RobotDyn during my ventures, but a snubber circuit is definitely missing and I doubt the power rating a little bit, although my intuition could be off. A rough calculation puts the power dissipation of the FET around 30W (1200W motor, Rdson 1 Ohm). Here's what a 30W heatsink looks like: https://www.cree....-sinks/30w Not sure. Have you looked into blowers yet, CanMan? What have you found so far? |
|
|
|
| CanMan |
Posted on 04/15/2020 3:40 AM
|
|
Newbie Posts: 5 Joined: April 13, 2020 |
Exactly the problem, my first reaction was to try to put a digital pot into that circuit but its not a very elegant solution. I'm very interested to hear how you get on with the little faceplate ones! I doubted it at first, but it seems the triac certainly is rated for a constant 16A draw. On the RobotDyn website (and on the bottom of the dimmer board) theyre only claiming it can handle 2A continuous, but looking at the components on the board I believe the only reason for that is the tiny heat sink they've put on there. I think a bigger heatsink along with mounting this in some 3D printed housing connected to the air intake of the blower could provide adequate cooling. I looked into using hoover motors, but after pulling apart 2 old hoovers and neither being suitable (designed for suction...duh), so far I think I'm going to go with an amazon leaf blower, probably this one: https://www.amazo...B00BKXW6S0 and its looking to me like the least hassle option is going to be the faceplate SCR from ebay. Or manual, like you say, not exactly a huge hassle. I already have an microcontroller communicating over serial with artisan so can use the PID there or just pull the SV through and run the PID on the arduino. So if i cant automate fan speed just yet, the heater power should respond just fine as is to me messing about with the fan manually. You must be approaching build day now? How's everything getting on? |
|
|
|
| renatoa |
Posted on 04/15/2020 4:07 AM
|
|
Administrator Posts: 3005 Joined: September 30, 2016 |
With original heatsing I am using it for more than one year to drive an 1300W heater from 230V AC, so about 6 Amps. The heatsink temperature don't exceed 60C, estimated based on ASTM C1055 test (skin touch possible for some seconds at 140F/60C) Anyway, at this level of tinkering, changing heatsink is a fact of life, imo. Regarding PID operating a roast, as previously discussed in some places, I think you are too optimistic. PID is simply not suitable to control a roast machine, at the level of pickiness is required to get an usable and realistic RoR. Just think that for one digit measurement, i.e. 0.1 C degree resolution, you need a 6 seconds averaging windows, to be able to have a 10% RoR precision, i.e. to tell the 10 value you read is statistically between 9.5 and 10.5. During development phase, when average RoR is even smaller, in the 5 C ballpark, this window increase to 12 seconds... good luck react at flack/crash, in right time, in the smallest time window that define the coffee character in the greatest degree. More than this... 0.1 C resolution is just for the math, the measurement noise due to the chaotic mix of air and beans can led to a 0.3-0.4 degrees temperature jumps easily. An averaging to get an usable value could be longer than a minute. You get much more consistent roasts based on knowing your machine natural curve, and a collection of some fixed steps heater values, than (hypothetically) following a profile, using an algorithm that, ironically, needs a permanent error value to be able to follow a curve... Edited by renatoa on 04/15/2020 4:25 AM |
|
|
|
| tofublock |
Posted on 04/15/2020 6:30 AM
|
|
Newbie Posts: 9 Joined: March 31, 2020 |
Quote You're right, of course. ;) We'll see how the one I ordered works. You raise interesting points regarding PID control derived from BT measurement vs. set heater profile. I'm very much at the same level as CanMan when it comes to roasting. My naive approach was that thermal inertia irons out the hiccups of a nervous PID well enough to not make much of a difference. So far my results have seemed pretty consistent to me (popcorn popper with TC4+ and PID firmware), but my tastebuds are not a good benchmark by a long shot. ;) I'll have to find those threads you mentioned and read up on it. CanMan, exactly my thinking with the hoover and leaf blower, although the one you linked to is a funny design that I haven't seen before - most have the inlet to the side. My components are slowly starting to trickle in, but all the tri-clamp parts are still in transit so there's not much I can do at the moment other than practice roasting with the popper. ;) |
|
|
|
| renatoa |
Posted on 04/15/2020 7:25 AM
|
|
Administrator Posts: 3005 Joined: September 30, 2016 |
Ah, I forgot we are in the FB subforum... my rant was about the high inertia machines, like a drum. Funny that FB machines are the lowest inertia designs, and for this reason they play well with a (well tuned) PID. A FB is a machine where heater power is increased gradually, in small steps, without turning point, or other inflexions that are so difficult to follow, due to over or undershoots inherent of a PID functionality. For example, when using a drum. you jump at TP the heater/burner from 20 to 80% in a second, and the result is seen 2 minutes later, when RoR tops and start decrease. Try to do this with a popper and will end with charcoal :) |
|
|
|
| tofublock |
Posted on 04/15/2020 7:31 AM
|
|
Newbie Posts: 9 Joined: March 31, 2020 |
Quote renatoa wrote: Ah, I forgot we are in the FB subforum... my rant was about the high inertia machines, like a drum. Funny that FB machines are the lowest inertia designs, and for this reason they play well with a (well tuned) PID. A FB is a machine where heater power is increased gradually, in small steps, without turning point, or other inflexions that are so difficult to follow, due to over or undershoots inherent of a PID functionality. For example, when using a drum. you jump at TP the heater/burner from 20 to 80% in a second, and the result is seen 2 minutes later, when RoR tops and start decrease. Try to do this with a popper and will end with charcoal :) That makes a lot more sense to me now. Thanks for clarifying! :) |
|
|
|
| CanMan |
Posted on 04/15/2020 9:21 AM
|
|
Newbie Posts: 5 Joined: April 13, 2020 |
Quote tofublock wrote: CanMan, exactly my thinking with the hoover and leaf blower, although the one you linked to is a funny design that I haven't seen before - most have the inlet to the side. Just different types of impeller, this design i imagined being easier to mount due to the inlet/outlet placement, also the highest power available I've seen on amazon..though I'm now thinking this may be too high powered for my tiny flat! Thats interesting stuff (and gave me a heart attack for a minute!). I'm a total roasting noob as well, looking forward to getting a build cobbled together to start to learn all this. RIP to all the delicious beans which will never reach their potential in the process Quote tofublock wrote: My components are slowly starting to trickle in, but all the tri-clamp parts are still in transit so there's not much I can do at the moment other than practice roasting with the popper. ;) Looking forward to seeing the build come together! |
|
|
|
| tofublock |
Posted on 04/15/2020 11:31 AM
|
|
Newbie Posts: 9 Joined: March 31, 2020 |
Quote CanMan wrote: though I'm now thinking this may be too high powered for my tiny flat! Not an issue if you can dim it properly! ;) I'm leaning towards this one at the moment or maybe this one. The only part that has arrived so far is the cyclone separator and it works incredibly well separating out absolutely everything. Just in time for warmer weather, too. My neighbours will love not having chaff blown in. A friend of mine just recommended this thing to directly control AC motor speed with PWM. Might be a good fit for you with the 900W blower? Most of what I can find here seems to be quite a bit stronger (2500W) but I'll have another look. The little board looks promising. |
|
|
|
| jessep |
Posted on 04/18/2020 3:17 AM
|
|
Newbie Posts: 33 Joined: January 05, 2019 |
Quote Buildit wrote: Jessep, I am also looking to build something like yours but have a couple of questions. Where did you buy the cyclone? is the RC a pyrex or? One comment on the bean load & unload, have you seen (near the end) https://www.youtube.com/watch?v=kgDHWPh0QRw A Tri-clamp TEE with a cap atop (in place of the 180) and a 1" long tube to use as a Vacume- (Blower pressure out) for the beans, but may need to seal around where the 1" goes down in the 1.5" Sorry guys, I didn't look for a week or so and a bunch of people asked questions.. I think it's Borosilicate? Either way it seems to be doing just fine. I did see that video (the corrected link)! I thought that was really cool. I think I could rig up something here, but just blasting them out without inserting a tube seems to work for now. |
|
|
|
| jessep |
Posted on 04/18/2020 3:19 AM
|
|
Newbie Posts: 33 Joined: January 05, 2019 |
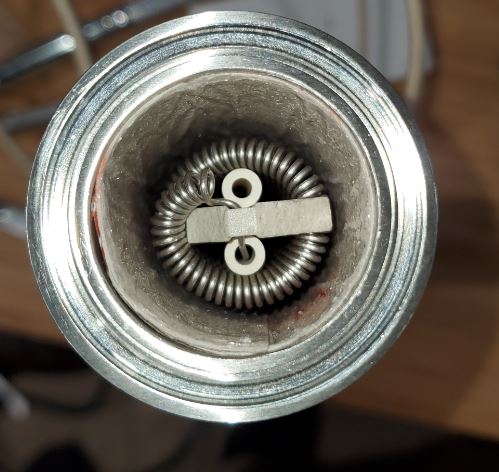
Quote tofublock wrote:  Well, this is interesting. I started looking into components for a fluid bed roaster build and fairly quickly arrived at the tri-clamp system. Two quarantine days and a LOT of painful Aliexpress search queries later I have ordered almost all my parts just a few hours ago - and they look eerily like yours. Down to the heating element crammed into the 1.5" pipe ("Will it fit? I'll probably be able to make it fit, with appropriate force if need be.") Maybe I should have searched forums earlier, could have saved me some headache. :) Here's the parts I ordered: - Heating element https://www.aliex...09009.html - Tube 1.5" for heating element https://www.aliex...29764.html - Reducer 1.5" to 3" (opted for the bowl) https://www.aliex...21509.html - 3" Meshed gasket as "bed" https://www.aliex...10026.html (also got a 1.5", might work before the reducer as well) - Tube 3" with thermowell https://www.aliex...03344.html - 90mm glass tube 3", 122mm length https://www.aliex...25199.html - Aluminum cyclone https://www.aliex...16520.html - Some gaskets, clamps, mica paper What I'm missing (on paper) is the blower, bits of tubing here and there, a chaff bin. And then, once all the parts have arrived and are working well enough, a nice method of inserting and extracting the beans of course. Nice! I have a list of my parts as well: https://docs.google.com/spreadsheets/d/1Hc7_ZDkrS1C5GDnRAmfEUgQ1heftZke5fH6aZnZk8ZI/edit?usp=sharing Aliexpress is a bit of a chore eh? |
|
|
|
| Ooij01 |
Posted on 04/19/2020 7:24 AM
|
|
Newbie Posts: 21 Joined: June 25, 2018 |
any ideas about the best way to get two elements in your build? |
|
|
|
| jessep |
Posted on 04/19/2020 2:08 PM
|
|
Newbie Posts: 33 Joined: January 05, 2019 |
Quote Just run them in series in a longer 1.5" pipe.. Someone here did that... |
|
|
|
| jessep |
Posted on 04/19/2020 2:18 PM
|
|
Newbie Posts: 33 Joined: January 05, 2019 |
I also installed a better speed control this weekend. https://www.tindie.com/products/bugrovs2012/pwm-2a-ac-light-dimmer-module-50hz-60hz-120v-240v/ You can use the TC4 in PWM mode and it has an integrated ZCD for phase angle contorl. Worked a charm once I got the wiring and my broken Arduino sorted. It didn't work the first time I tried to use it, but I think it was actually my Arduino that was having issues as I replaced that a while ago and now it worked great.. Fortunately that's one of the cheapest and easiest to get parts of the whole roaster!  Also made a nice new case:    |
|
|
|
| Ooij01 |
Posted on 04/20/2020 4:46 AM
|
|
Newbie Posts: 21 Joined: June 25, 2018 |
Quote Yup i don't know why that didn't cross my mind |
|
|
|
| jbrux4 |
Posted on 04/20/2020 7:59 PM
|
|
1/4 Pounder  Posts: 139 Joined: October 26, 2019 |
Quote jooi123 wrote: Quote Yup i don't know why that didn't cross my mind I did my build with two elements in line in a 12" x 1.5" pipe. What I have learned through trial and error with my configuration is that it should be two 6" separate lengths of pipe separated by a gasket/clamp. This is because my power lines egress the pipe through holes. It is hard to deal with maintenance/repair with the one pipe. It would be easier to have each element in its own pipe. heck, this way, I can add a 3rd and 4th element in line - haha.
jbrux4 attached the following images:


R/
Jared |
|
|
|

| Jump to Forum: |
Similar Threads
| Thread | Forum | Replies | Last Post |
|---|---|---|---|
| Kaleido Roaster PID parameters | Roasting Coffee | 2 | 04/13/2024 3:07 PM |
| Skywalker roaster mods | Other Roasters | 293 | 04/07/2024 4:31 PM |
| Skywalker, the ALM chinese one pound roaster | Other Roasters | 215 | 04/02/2024 1:48 AM |
| My first popcorn mod roaster (vahegan) | Fluidbed Roaster | 48 | 03/24/2024 12:04 PM |
| Fatamorgana electric drum roaster | Other Roasters | 2 | 03/24/2024 10:03 AM |
Powered by PHP-Fusion Copyright © 2024 PHP-Fusion Inc
Released as free software without warranties under GNU Affero GPL v3
Designed with ♥ by NetriXHosted by skpacman