
Login

Shoutbox
You must login to post a message.
renatoa
04/17/2024 9:27 AM
 , branchu
renatoa
04/14/2024 5:56 AM
TheOtherJim and papajim,
 !
!
!allenb
04/11/2024 6:33 PM
Zemona

renatoa
04/11/2024 9:19 AM
Mrbones and sgupta,  ?
?
?renatoa
04/10/2024 1:09 AM
 , Ed K
Forum Threads
Newest Threads
War on Farmers by Su...Kaleido Roaster PID ...
Green coffee sellers
Wet beans - Estimati...
Skywalker roaster mods
Hottest Threads
| Skywalker roaster... | [292] |
| Skywalker, the AL... | [214] |
| Skywalker Roasts | [94] |
| My first popcorn ... | [47] |
| War on Farmers by... | [39] |
In Memory Of Ginny

Donations
Latest Donations
dmccallum - 10.00
JackH - 25.00
snwcmpr - 10.00
Anonymous - 2.00
Anonymous - 5.00
dmccallum - 10.00
JackH - 25.00
snwcmpr - 10.00
Anonymous - 2.00
Anonymous - 5.00
Users Online
Guests Online: 1
Members Online: 0
Total Members: 8,208
Newest Member: branchu
Members Online: 0
Total Members: 8,208
Newest Member: branchu
View Thread
Who is here? 1 guest(s)
 Copper door & lower hinges completed - 3/4 lb, heating element, drum type build log
|
|
| rcwarship |
Posted on 04/26/2009 2:11 PM
|
 1/4 Pounder  Posts: 143 Joined: April 22, 2009 |
Since there are invariably tech problems, need for ideas & at times encouragement; I thought I would try my hand at a build log. My goal: 1 lb of beans, halogen bulb heat source, horizontal drum roaster using stainless & aluminum. Progress to date: Drum is an Ikea4 3/4" dia. x 7" cuttlery caddy $4.99 (part no. 301.317.16) Here's a link to their 5" one, I went with the 7" http://www.ikea.com/us/en/catalog/products/30011832 Used perforated commercial cooking tray $8.99 Edited by rcwarship on 09/11/2009 10:40 PM |
|
|
|
| rcwarship |
Posted on 04/26/2009 4:06 PM
|
|
1/4 Pounder Posts: 143 Joined: April 22, 2009 |
Raw materials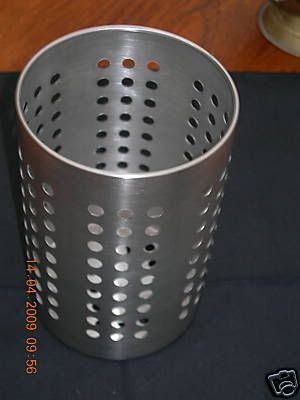 Perforated aluminum, commercial baking tray, 18" x 26" 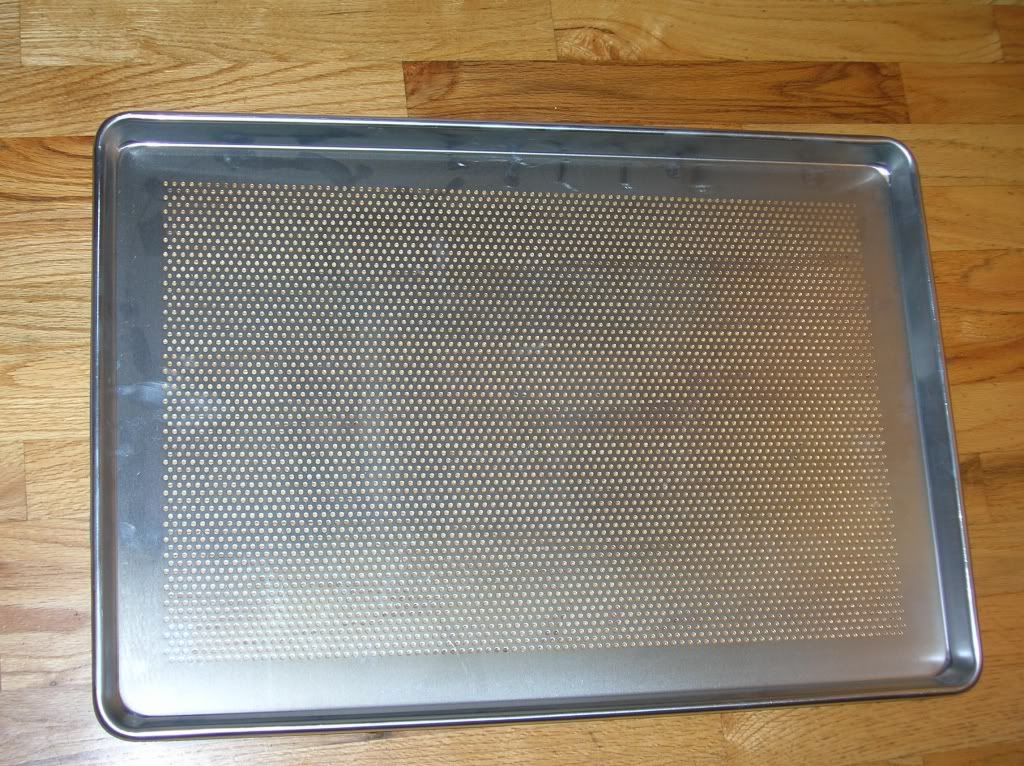 Completed drum: 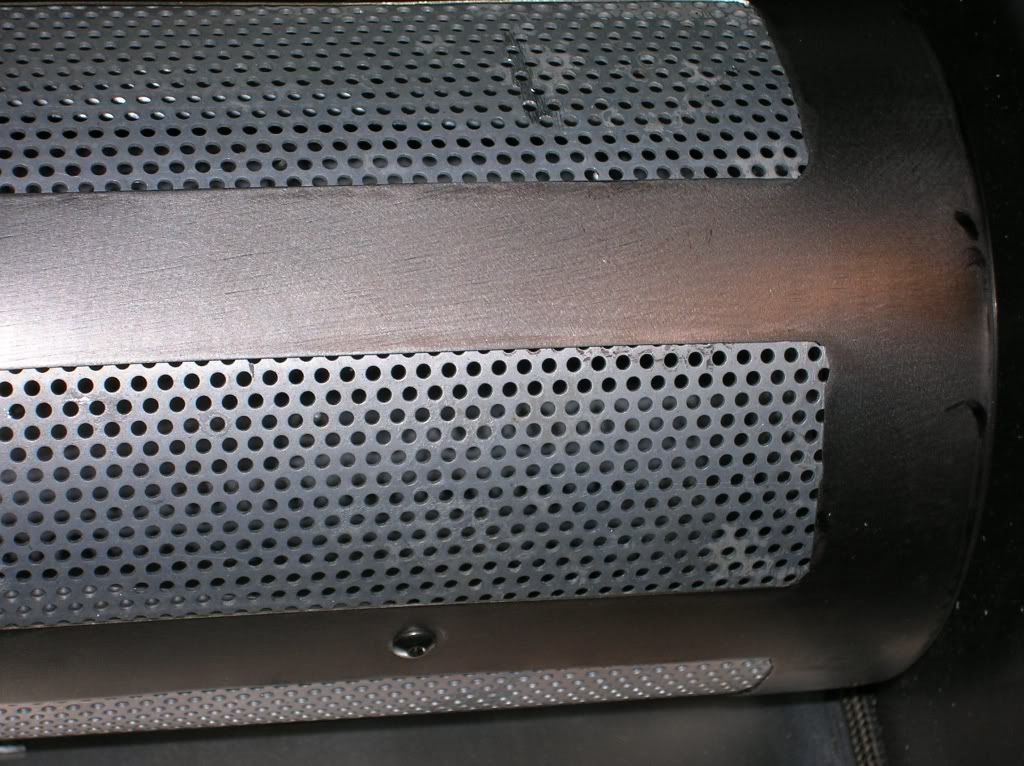
Edited by rcwarship on 06/20/2009 8:25 PM Tell me and I forget, show me and I remember, involve me and I understand.
|
|
|
|
| seedlings |
Posted on 04/26/2009 4:21 PM
|
 1 1/2 Pounder  Posts: 4226 Joined: June 27, 2007 |
AWESOME, I really like your great ideas from locally available items! Throw some stirring tines in there and a top and bottom, and you're in business! CHAD Roaster: CoffeeAir II 2# DIY air roaster
Grinder: Vintage Grindmaster 500 Brewers: Vintage Cory DCU DCL, Aeropress, Press, Osaka Titanium pourover |
|
|
|
| Koffee Kosmo |
Posted on 04/26/2009 5:42 PM
|
 Administrator Posts: 1620 Joined: December 31, 2008 |
That's an excellent idea RC to keep a photo journal of the build it gives others that follow an idea. A spark in time with great use of materials This is how I presented my roaster design to HR http://forum.home...ad_id=1142 May I suggest that the holes in the cutlery caddy may be to large and the beans may fall out Get a hold of some green coffee beans and try an experiment I have found by trial and error that 1/4 inch holes are the best size KK Edited by Koffee Kosmo on 04/26/2009 5:43 PM I home roast and I like it. Designer of the KKTO
Roaster Build information https://homeroast...ad_id=1142 https://docs.goog...lide=id.i0 Blog - http://koffeekosm...gspot.com/ Bezzera Strega, Mazzer Robur Grinder, Pullman Tamper Convex, (KKTO) Turbo Oven Home Roaster. |
|
|
|
| rcwarship |
Posted on 04/30/2009 11:10 PM
|
|
1/4 Pounder Posts: 143 Joined: April 22, 2009 |
The $25 motor arrived today from ebay: 15 RPM, 120V AC with a very quiet internal gear set. Next up: internal tines, shafting and coupling. Then a trial fit/operation to see how the tines will work at moving the beans around & ejecting (or not) from the basket. More fun than a grown man should be allowed to have! Best Regards to All, Jon 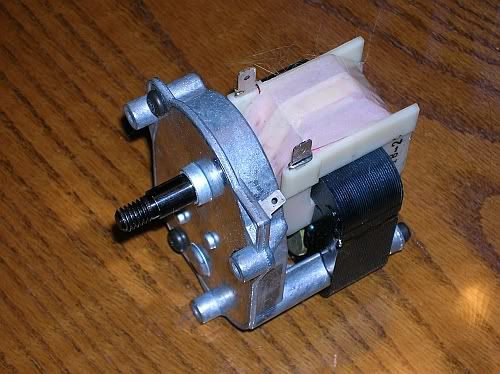
Tell me and I forget, show me and I remember, involve me and I understand.
|
|
|
|
| rcwarship |
Posted on 05/09/2009 5:55 PM
|
|
1/4 Pounder Posts: 143 Joined: April 22, 2009 |
Started in on the internal end bulkheads for the roasting chamber. I wanted stiff ones due to the cut outs for the shafting and also for the unloading chute. I had some 0.080" thick aluminum from another project and used it. I think thinner would have been easier to work, but the cost was right. I used two forms, sandwiched the material between it and made maybe 7 or 8 passes to get it formed over. This Yahoo movie was the inspiration for giving it a try: Here's a shot of the start of the process, followed by some intermediate & completed shots: Starting to bend it over  Taking it slow and easy 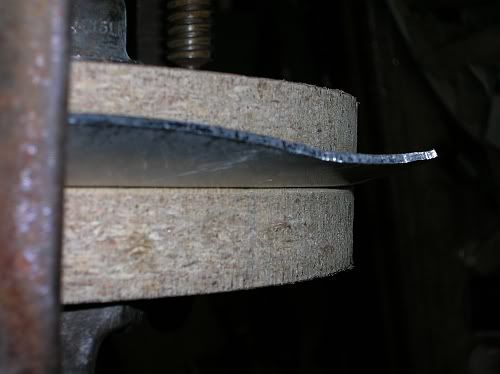 The compound curve caused buckling that needed additional hammering 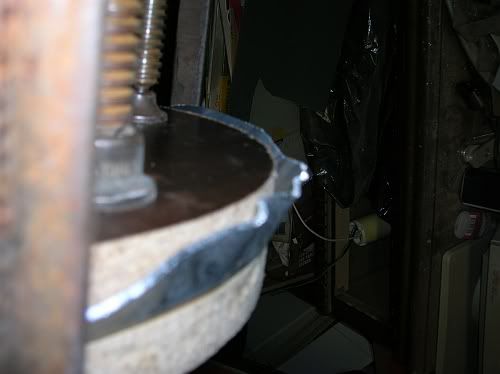 Finished project 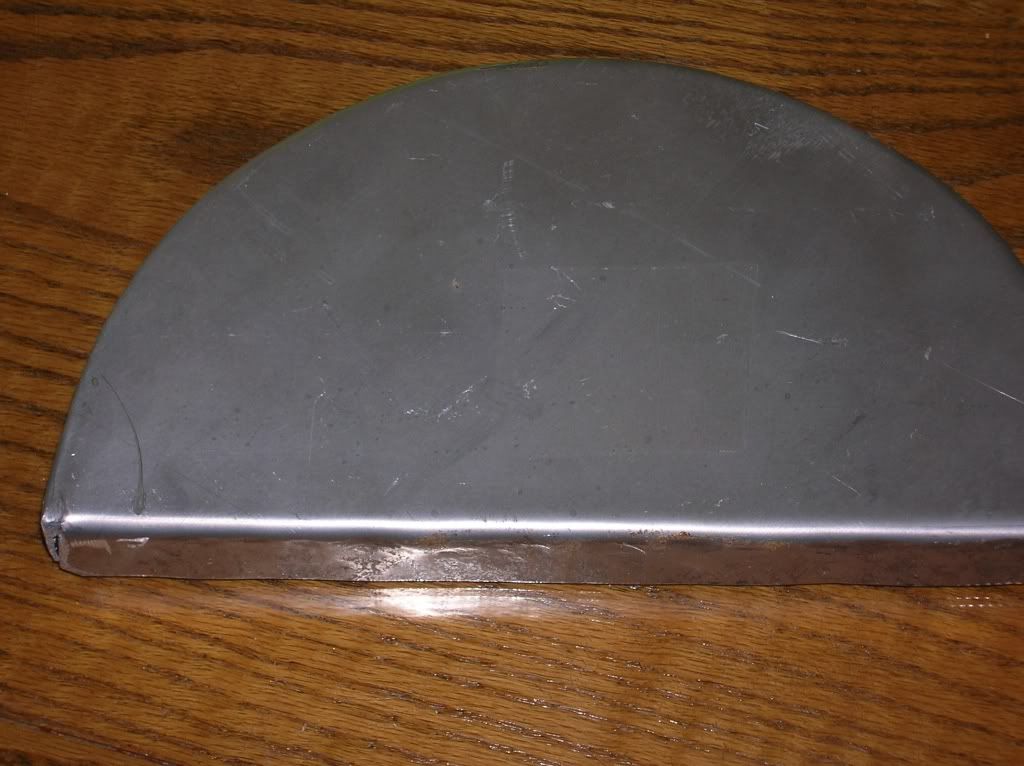 Shot of the rough end. It and the other end cap will be covered with a polished finish piece when it's completed 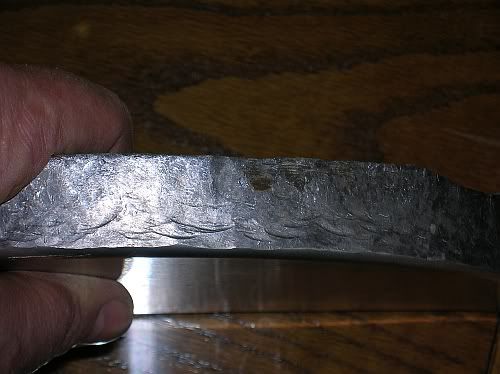
Tell me and I forget, show me and I remember, involve me and I understand.
|
|
|
|
| seedlings |
Posted on 05/10/2009 7:43 PM
|
|
1 1/2 Pounder Posts: 4226 Joined: June 27, 2007 |
Pow! Nice stuff. I love to watch the progress. CHAD Roaster: CoffeeAir II 2# DIY air roaster
Grinder: Vintage Grindmaster 500 Brewers: Vintage Cory DCU DCL, Aeropress, Press, Osaka Titanium pourover |
|
|
|
| rcwarship |
Posted on 05/10/2009 11:51 PM
|
|
1/4 Pounder Posts: 143 Joined: April 22, 2009 |
KK, Great thought on the holes being too big, the pictures are kind of deceptive, the holes are 1/8" at their narrow point and almost a 1/4" at the longest. Should be good I think. Chad, I appreciate your kind words, and am looking forward to a test of the stirring tines inside the basket tomorrow or Tuesday. I'm in process of looking for a fan to provide cooling air after dumping the beans. Anyone have any idea of what CFM would be needed for a pound of beans? The cooling fan in my computer is around 35 CFM or so & I believe that 10x that much or more would be needed. The computer fan is pretty anemic. I also found some 1/2" x 5"cylindrical heating elements, that I am going to try; as it would allow a much smaller roasting chamber than halogen lights. I got 2 500W ones off of Ebay for $22. Figured even if they didn't work out, I couldn't go wrong at that price. I had originally thought to put one of them in the drum, however with the drum only 4.75", I am afraid of scorching the beans. I have a 600W light dimmer switch to control one of them, figuring that if needed, one could be on full bore with fine tuning provided by the dimmer connected to the other element. Here's a shot of one of them setting on the stove while under power. 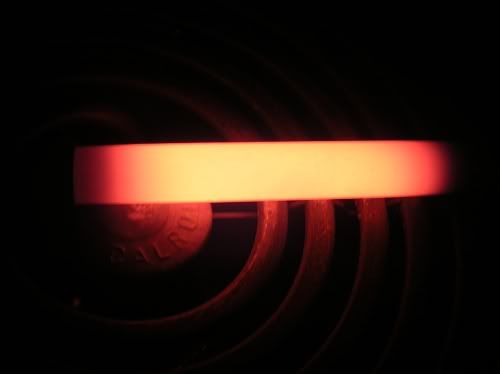 Here's a shot of them both, with the electric plug for scale. 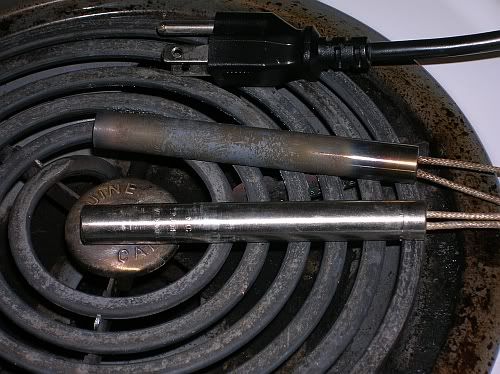 Best Regards To All, Jon Tell me and I forget, show me and I remember, involve me and I understand.
|
|
|
|
| seedlings |
Posted on 05/11/2009 8:26 AM
|
|
1 1/2 Pounder Posts: 4226 Joined: June 27, 2007 |
1000W to roast a pound is VERY effecient... you may find that you need almost double that. Also, be sure the roaster keeps the heat in, and has very little extra air to heat. Cooling... 1lb isn't too much to cool. A popular method is to put a collander inside a 5gal bucket, then attach your shopvac to the base of the bucket. Cools fast. Or, you can get a small blower to mount inside said bucket. Check out the coolers from our Bean Cooler Contest: http://forum.home...orum_id=67 CHAD Roaster: CoffeeAir II 2# DIY air roaster
Grinder: Vintage Grindmaster 500 Brewers: Vintage Cory DCU DCL, Aeropress, Press, Osaka Titanium pourover |
|
|
|
| rcwarship |
Posted on 05/11/2009 11:11 AM
|
|
1/4 Pounder Posts: 143 Joined: April 22, 2009 |
Yepper Chad, you are right on the money! Good point about extra air, I will need to be providing a way to get the smoke out of the chamber & also figure that air will provide some fine tuning on the temperature settings. I am building the roaster double wall - aluminum inside with either brass or copper for the exterior pretty stuff, with 1" Superwool (Kaowool by another name) insulation from a pottery place. I really didn't want to spring for the insulation as I wanted to keep the building costs below $75.00, however, I wanted to keep the power requirements down so that a 15 Amp circuit could handle the load. So far I have 3 Amps for the motor and 8.3 Amps for the heating elements. I can add another 500 W without any problems and still have power for the blower. My initial test was using a 375 W halogen lamp as per original design parameters, the inside temp got up to 425 degrees F on an oven thermometer that was being bombarded by the light. A separate thermometer that was not in the direct light measured 400 . I need to purchase a thermocouple probe and reader. The chamber consisted of the superwool wrapped around a couple of metal end caps to provide an approximation of my intended sized roaster. Best Regards To All, Jon Tell me and I forget, show me and I remember, involve me and I understand.
|
|
|
|
| scotchale |
Posted on 05/11/2009 11:15 AM
|
|
Newbie  Posts: 13 Joined: May 11, 2009 |
Slick ! That may work for a future trial-run in a weber Q200 grill I have in mind. I'm using a regular large BBQ grill, but my wife and I are about to spend a year in an RV, so things are getting smaller. I'll use an air-popper at that time, but I'm wanting to tinker with fabricating a custom topper for roasting on the 200 that we'll keep with the RV. Bryan |
|
|
|
| seedlings |
Posted on 05/11/2009 1:11 PM
|
|
1 1/2 Pounder Posts: 4226 Joined: June 27, 2007 |
Now that I think about it, you're building a home-made Behmor, which uses 1630W... or a toaster-oven with rotisserie... One more thought, be sure to mount the heaters far enough away that the air temperature measured at the bean mass is less than about 550F, or scorching may result. You can do it! CHAD Here's an idea for loading/unloading... just at thought,
seedlings attached the following image:

Edited by seedlings on 05/11/2009 1:26 PM Roaster: CoffeeAir II 2# DIY air roaster
Grinder: Vintage Grindmaster 500 Brewers: Vintage Cory DCU DCL, Aeropress, Press, Osaka Titanium pourover |
|
|
|
| John Despres |
Posted on 05/11/2009 3:16 PM
|
 Administrator Posts: 2221 Joined: January 09, 2008 |
Hi, Jon. I think you're on to something that will work quite well. My experience building my halogen roaster, with the lights inside the drum and focused down onto the beans told me I needed 1000 watts for a half pound. One pound was difficult, however, possible, but difficult. If you haven't looked at it, the building thread is here: http://forum.home...post_7975. At one point, one of the lamps self extinguished (burned out), leaving me under powered to roast the beans in a timely fashion. I don't remember the time, but I recall it being much to long - maybe upward of 18 or 20 minutes. It could have been drum size, drum RPM or something else I don't understand or remember. All of your thoughts and ideas seem right on the money! I can't wait for the next addition to your progress. Have fun. John Respect the bean.
John Despres Fresh Roast 8, Gene Cafe, JYTT 1k, Quest M3, Mazzer Mini, Technivorm, various size presses and many more brewers. |
|
|
|
| rcwarship |
Posted on 05/11/2009 6:19 PM
|
|
1/4 Pounder Posts: 143 Joined: April 22, 2009 |
Initial test results are good, 550+ degrees in 5 to 6 minutes with a single element at full bore. My exterior thermometer (placed at estimated bean height) did not go high enough, so I pulled the plug. The blanket is encasing the roaster, to simulate it's future working conditioins. The 1 end cap is left without insulation, the other is insulated. 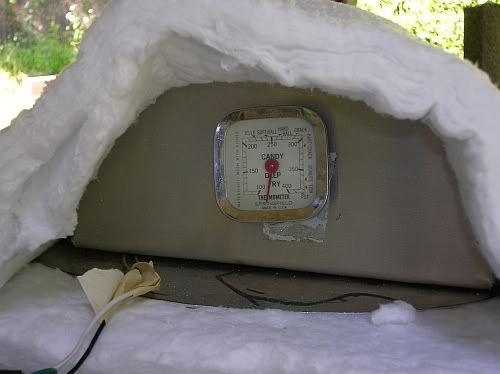 Internals were placed under the insulation in their approximate locations. I would have built the enclosure smaller yet, however, I was afraid of scorching the beans and wanted to leave room to move the element around. 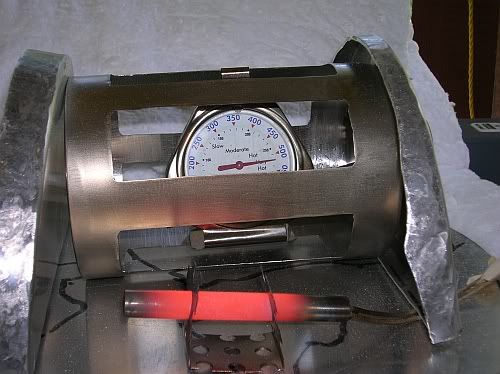 Ambient Temperature: 68 degrees F The temp is from the exterior thermometer, the inside one is 50 degrees higher (I don't know which one is accurate, or if they are each way off). Temp Time (F) (Minutes) 100 1:58 150 2:38 200 3:13 250 3:47 300 4:18 350 4:42 400 5:23 455 6:01 Tell me and I forget, show me and I remember, involve me and I understand.
|
|
|
|
| rcwarship |
Posted on 05/14/2009 11:58 PM
|
|
1/4 Pounder Posts: 143 Joined: April 22, 2009 |
John, Thank you both very much for your comments & suggestions. I hope that I can generate enough heat out of a single element. If not, it can increase it to 3 if needed, while still remain withing the 15 amp self imposed limit. We'll have to see how it goes after I introduce air into the equation. I enjoyed your build log and thought that your design/build is great. Good stuff, thanks for sharing. Chad, I love the load/unload feature. Great idea, I just couldn't think of any way to include it in my build. Maybe in the next roaster! I've made some progress over the past few days, shafting completed for the drum and couplings made. I am not too sure of my ability to get things lined up, so I figured I'd use leather to couple the shafts. 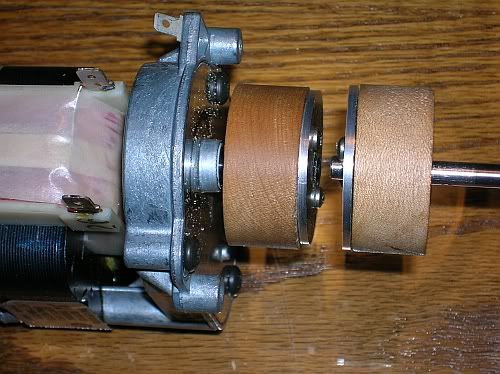 I turned a couple of maple rounds, roughed out a "trough", hammered a pin (coat hook) in each one so that the pin is just above the surface of the maple. After drilling a hole through the shafts for the pin, a big washer with a couple of screws in it holds it all together & the couplings are done. Just need to add the leather straps after mounting the motor. If the maple fails due to heat, I'll have to find some phenolic or something else (I don't have a way to mill anything, so I can't use metal).  Rollers, the drum internals next followed by mounting the oven & motor. Then the long awaited trial to see how the beans move around (angle on the internal vanes, no angle, etc). Best regards to all, Jon Tell me and I forget, show me and I remember, involve me and I understand.
|
|
|
|
| seedlings |
Posted on 05/15/2009 8:23 AM
|
|
1 1/2 Pounder Posts: 4226 Joined: June 27, 2007 |
See - isn't roasting coffee simple? I would love to share your metallurgy skills! CHAD Roaster: CoffeeAir II 2# DIY air roaster
Grinder: Vintage Grindmaster 500 Brewers: Vintage Cory DCU DCL, Aeropress, Press, Osaka Titanium pourover |
|
|
|
| rcwarship |
Posted on 05/16/2009 12:04 AM
|
|
1/4 Pounder Posts: 143 Joined: April 22, 2009 |
Chad, You know the more I research coffee roasting, the more I realize what I don't know. I do know one thing however; I am having fun. When I hit 45 (about 7 years ago), I discovered that I wasn't having much fun anymore. So I decided that no matter what I was doing it had to be interesting, since then I've been exploring new things to do & build. If it's not fun, I don't do it unless absolutely necessary. So what does that have to do with building stuff? Actually lots, I used to bang stuff together quickly, to get it done. Now I take my time, & make each component to the best of my ability. I have found that if I build each piece well, the whole project turns out well........unless my design sucks of course. lol My build pace has slowed dramatically, and my enjoyment has expanded exponentially. Anyways, I'm not sure that my metallurgical skills are that great, but my willingness to do good work is. What I admire about you is that you are an idea factory, you contribute and are always helping & working with others. You Are The Man. Best Regards, Jon Tell me and I forget, show me and I remember, involve me and I understand.
|
|
|
|
| rcwarship |
Posted on 05/16/2009 7:44 PM
|
|
1/4 Pounder Posts: 143 Joined: April 22, 2009 |
Drum support completed, the other end is supported by the motor shaft. It was drawn in a CAD program, Scotch 777 aerosol glue (double stick carpet tape also works well), was used to stick it to the aluminum. 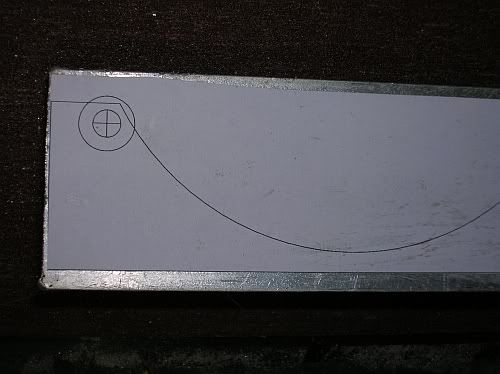 Jig saw cut out, followed by flapper wheeling to smooth it out, shoulder bolts and a couple of bushings (available at the hardware store if one doesn't have a lathe). 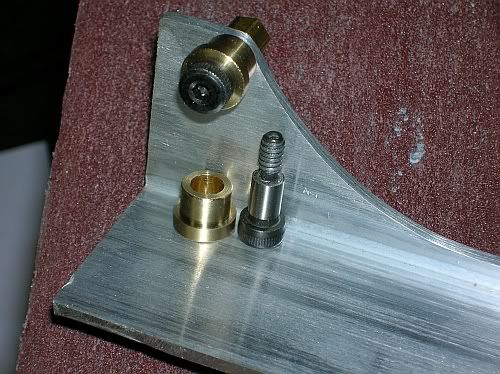 Finished project with the drum in place. There is so little weight that probably a couple of solid contact points would have worked well (round screw heads or something like that). Anyways, it was fun to do. 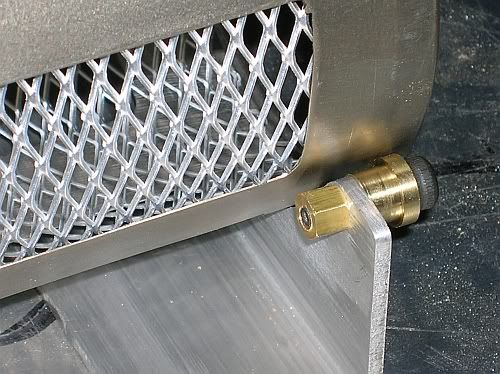
Tell me and I forget, show me and I remember, involve me and I understand.
|
|
|
|
| seedlings |
Posted on 05/17/2009 7:27 PM
|
|
1 1/2 Pounder Posts: 4226 Joined: June 27, 2007 |
 WOW! WOW!That should do the trick! CHAD Roaster: CoffeeAir II 2# DIY air roaster
Grinder: Vintage Grindmaster 500 Brewers: Vintage Cory DCU DCL, Aeropress, Press, Osaka Titanium pourover |
|
|
|
| rcwarship |
Posted on 05/18/2009 11:25 PM
|
|
1/4 Pounder Posts: 143 Joined: April 22, 2009 |
I have decided to go for a black & copper look on this roaster, and have just purchased my cooling tray. In addition to the copper, the other major reason that I got this unit is for the builders plaque, it just looks cool. It's a sieve that is used to sift out the aggregate from concrete samples, they come from something like 1" mesh down to 400 or so mesh per square inch. I'll be needing to have a heavier perforated plate on the inside to keep the screen from being damaged. 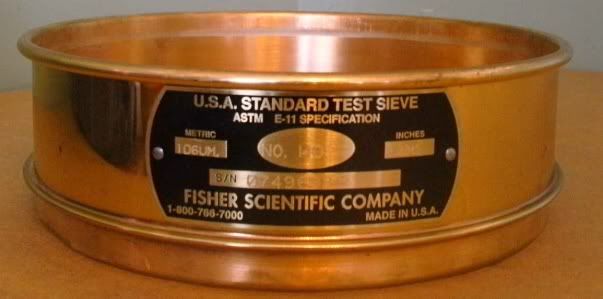 Best Regards To All, Jon Tell me and I forget, show me and I remember, involve me and I understand.
|
|
|
|
| rcwarship |
Posted on 05/23/2009 12:05 PM
|
|
1/4 Pounder Posts: 143 Joined: April 22, 2009 |
I am thinking through a thermocouple for the bean mass & wonder if anyone has any experience with bending one of these types?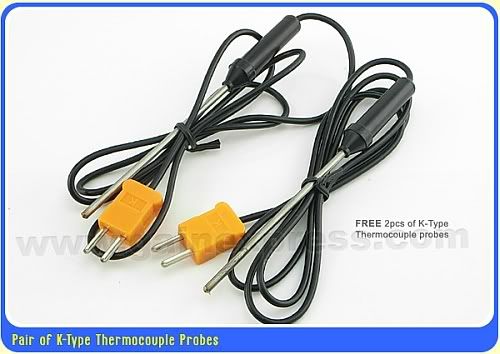 I can also make up my own probe using stainless tubing & am contemplating: 1. Leave the thermoprobe "unbent", have a mount in the bean dump door. Insert the probe during roasting & pull it out when ready to dump beans. 2. Bend a thermoprobe like the one pictured & leave it permanently mounted above the dump door. 3. Make up my own probe, bend it & leave it permanently in place. If I go this route, do I need to ensure that the bare thermocouple wire does not touch the stainless steel tubing I'll be using for the probe? If so, any idea of material that I can use to center the thermocouple wire tip in the stainless tubing? Any thoughts, ideas suggestions would be greatly appreciated. Thanks, Jon Tell me and I forget, show me and I remember, involve me and I understand.
|
|
|
|
| bvwelch |
Posted on 05/23/2009 3:44 PM
|
 1 1/2 Pounder Posts: 1064 Joined: December 27, 2007 |
Bending is probably OK, but allowing the probe to touch other metals probably will not work. See notes here: http://www.omega..../faq1.html Edited by seedlings on 05/25/2009 9:50 AM |
|
|
|
| David |
Posted on 05/23/2009 4:07 PM
|
 1 1/2 Pounder Posts: 690 Joined: October 27, 2005 |
Quote rcwarship wrote:The $25 motor arrived today from ebay: 15 RPM, 120V AC with a very quiet internal gear set.] Hope I'm not too late with this suggestion: Not saying that the 15RPM motor wont do, but 40-60 RPM is more the norm for home-built drum roasters. The roasts are more even, with less inclination to scorching. Here is a start to some building ideas in this area: http://forum.home...ead_id=625 http://forum.home...ead_id=643 Edited by seedlings on 05/25/2009 9:50 AM |
|
|
|
| rcwarship |
Posted on 05/23/2009 8:25 PM
|
|
1/4 Pounder Posts: 143 Joined: April 22, 2009 |
Hi BV & Dave, Thanks to you both for the replies, I appreciate it greatly. BV, your article gave me some great buzz words, which led to another article that states that either the thermocouple or the meter can be grounded. Thermocouple grounding is preferred, however they both cannot be simultaneously grounded. So, with a hand held meter, I will be building my own thermocouple out of some stainless tubing, with the thermocouple wires twisted at the end & the stainless tubing hammered shut & compressing the twisted pair. Awesome, thanks for your help. Dave, I do have the 15 rpm motor in hand & mounted. If there are scorching issues, I can increase the number of internal stirring vanes from 3 to 6. If the issue persists, I have bookmarked & also saved the motor model number so I can order it. It's always great to have a plan "B", thanks for letting me know. Again, thanks to you both. Jon Tell me and I forget, show me and I remember, involve me and I understand.
|
|
|
|
| rcwarship |
Posted on 05/24/2009 12:36 AM
|
|
1/4 Pounder Posts: 143 Joined: April 22, 2009 |
Dave thanks again for letting me know about a faster motor, I had this motor running for about 1 minute, it got hot & then nothing. Thought I had popped a breaker, but nooooooooooo, motor's fried. Bummer, oh well, 50 rpm motor ordered. This coupling is plenty forgiving of misalignment, I bet one could be 1/8" or greater out of line & there would be no problems. Wooohoooo. I need to cut the leather shorter and reseat it when it is in place, too loose now. 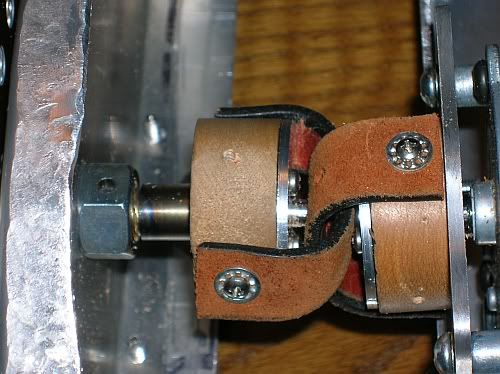 Anyways in addition to the couplings, I got a box fan motor modified to fit a 7.5" diameter fan for bean cooling & air for the roaster. Other progress also included a thrust collar for the shaft, motor mounts, and plans started for the outer shell. Tell me and I forget, show me and I remember, involve me and I understand.
|
|
|
|

| Jump to Forum: |
Similar Threads
| Thread | Forum | Replies | Last Post |
|---|---|---|---|
| Fatamorgana electric drum roaster | Other Roasters | 2 | 03/24/2024 10:03 AM |
| Dereks 1-2Kg drum roaster build | Drum Roasters | 116 | 03/14/2024 7:16 AM |
| Jborks 2kg drum roaster build | Drum Roasters | 6 | 01/20/2024 12:15 PM |
| Potential LOT of Build Supplies | JAVA TRADING COMPANY | 9 | 12/18/2023 10:21 AM |
| Advice needed for type roaster to build. | WHAT SHOULD I BUY OR MAKE | 4 | 12/04/2023 1:22 PM |
Powered by PHP-Fusion Copyright © 2024 PHP-Fusion Inc
Released as free software without warranties under GNU Affero GPL v3
Designed with ♥ by NetriXHosted by skpacman