
Login

Shoutbox
You must login to post a message.
allenb
04/19/2024 8:27 AM
eximwind 
renatoa
04/18/2024 12:36 AM
bijurexim, greyberry2, N C, 
renatoa
04/17/2024 9:27 AM
 , branchu
renatoa
04/14/2024 5:56 AM
TheOtherJim and papajim,
 !
!
!allenb
04/11/2024 6:33 PM
Zemona
Forum Threads
Newest Threads
Rainfrog's Roastmast...War on Farmers by Su...
Kaleido Roaster PID ...
Green coffee sellers
Wet beans - Estimati...
Hottest Threads
| Skywalker roaster... | [292] |
| Skywalker, the AL... | [214] |
| Skywalker Roasts | [94] |
| Rainfrog's Roastm... | [54] |
| My first popcorn ... | [47] |
In Memory Of Ginny

Donations
Latest Donations
dmccallum - 10.00
JackH - 25.00
snwcmpr - 10.00
Anonymous - 2.00
Anonymous - 5.00
dmccallum - 10.00
JackH - 25.00
snwcmpr - 10.00
Anonymous - 2.00
Anonymous - 5.00
Users Online
Guests Online: 4
Members Online: 0
Total Members: 8,212
Newest Member: eximwind
Members Online: 0
Total Members: 8,212
Newest Member: eximwind
View Thread
Who is here? 1 guest(s)
 Brewer to Roaster..blower question...
|
|
| lmclaren |
Posted on 06/30/2011 11:02 PM
|
 1/4 Pounder  Posts: 159 Joined: March 20, 2011 |
Have you considered putting in air bleed holes before the heaters? In my initial testing I was having problems going low enough and too sensitive to change. Also had a problem with the beans exploding into the air as you increased the air from standstill. I put about 4 10mm holes before the heater, this made the control very easy and forgiving, with the added benefit of the motor always getting lots of cooling air passing over it. Your motor may not need. If speed control is a problem with your motor, you could run the motor flat out and just move a flap with a $12 R/C servo. best regards Lee |
|
|
|
| oldgearhead |
Posted on 06/30/2011 11:07 PM
|
 1 1/2 Pounder  Posts: 1128 Joined: February 10, 2011 |
Quote dja wrote: Jim one quick question, whats your opinon now that you have a roast done where you can see so much of the bean mass. I had pressure issues myself with my roaster trying to hold it together when its at 450 degrees ain't no fun cowboy! you don't relize how much pressure these things take to move said beans. David I guess because the only roasting I've done is on my 'hacked' Zach&Dani units, and they have an all-glass RC also, so its the same only more beans. In fact I roasted a kilo on my favorite Z&D Wednesday. It took 2:14 hours/min (7 - 150 gram loads). At this point, I'm sure I have more control with the Z&D. With the Z&D I: 1) Dry for 2 minutes at 230F BMT (500-100 watts) 2) Ramp to first crack (545 watts) till 330 BMT 3) Reduce input energy to 350 watts until temperature rise is less than 1F/5 sec, then: 4) Finish roast at 500 Watts. (total time to Full-City = 11-14 minutes for 150 grams. With the Z&Ds I can stretch first crack an extra minute, but I can't hear it. With the new roaster I can hear it, but I don't know how to stretch it yet.. I think I'm going to need to install my BMT probe into the new roaster.. Edited by oldgearhead on 06/30/2011 11:12 PM No oil on my beans...
|
|
|
|
| oldgearhead |
Posted on 06/30/2011 11:21 PM
|
|
1 1/2 Pounder Posts: 1128 Joined: February 10, 2011 |
Quote lmclaren wrote: Have you considered putting in air bleed holes before the heaters? In my initial testing I was having problems going low enough and too sensitive to change. Also had a problem with the beans exploding into the air as you increased the air from standstill. I put about 4 10mm holes before the heater, this made the control very easy and forgiving, with the added benefit of the motor always getting lots of cooling air passing over it. Your motor may not need. If speed control is a problem with your motor, you could run the motor flat out and just move a flap with a $12 R/C servo. best regards Lee Great idea Lee! I did see a significant rise in the motor temp today.. No oil on my beans...
|
|
|
|
| greencardigan |
Posted on 06/30/2011 11:47 PM
|
 1 1/2 Pounder Posts: 1185 Joined: November 21, 2010 |
Quote greencardigan wrote: Quote seedlings wrote: Speed control doesn't get low enough... I have the same trouble. In disassembling them, though, there is a variable resistor inside. I've wondered if it sets the low on-off threshold? You can access the dial if you take the back off. Maybe I'll play with it sometime if you don't beat me to it. CHAD There's a good chance your router controller has a similar circuit to the DIY version that RoasterRob and myself are using. It has a variable resistor in parallel with the main knob/variable resistor that sets the maximum resistance and therefore minimum power. http://www.epanor...ml#1kw230v Do you have a circuit diagram for the router controller? Chad, you might find this helpful. http://www.epanor...ht-dimmer/ |
|
|
|
| oldgearhead |
Posted on 07/01/2011 2:00 PM
|
|
1 1/2 Pounder Posts: 1128 Joined: February 10, 2011 |
Chad & Green, My Dayton (Grainger) speed control doesn't have a trim pot. It only has a fixed resistor that's kind of hard (but not impossible) to bridge. If I have to, I might tackle it. But Lee's sugestion seems to show the most promise. I cross-drilled the 'cold' side of the manifold with 1/8" drill in two places and although turn-down wasn't improved a whole lot I have a nice spout..I'm going to open the holes more tommorrow. I'll try to post today's video fiasco a bit later this evening. Edited by oldgearhead on 07/01/2011 2:05 PM No oil on my beans...
|
|
|
|
| seedlings |
Posted on 07/01/2011 3:39 PM
|
 1 1/2 Pounder Posts: 4226 Joined: June 27, 2007 |
Are you sure there isn't a hole in the circuit board to adjust trim? All the components are mounted on the knob side of the board, so you won't be able to 'see' it except to find the hole and use a flashlight to see the trim. I've gutted 4 of these to hardwire/mount in different chassis and all of them have had this trim. CHAD Edited by seedlings on 07/01/2011 3:43 PM Roaster: CoffeeAir II 2# DIY air roaster
Grinder: Vintage Grindmaster 500 Brewers: Vintage Cory DCU DCL, Aeropress, Press, Osaka Titanium pourover |
|
|
|
| oldgearhead |
Posted on 07/01/2011 4:17 PM
|
|
1 1/2 Pounder Posts: 1128 Joined: February 10, 2011 |
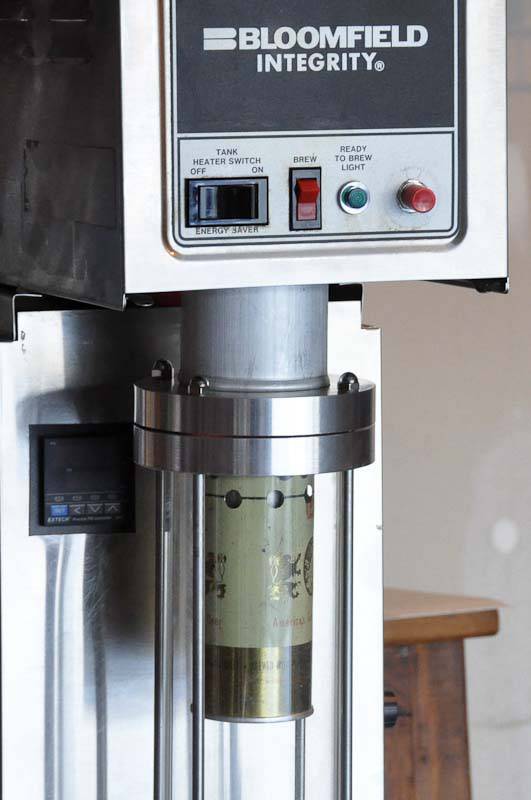
Okay here is this morning's disaster. It started off just fine. I removed the brewer top and installed a tie-down:
oldgearhead attached the following image:

|
|
|
|
| oldgearhead |
Posted on 07/01/2011 4:18 PM
|
|
1 1/2 Pounder Posts: 1128 Joined: February 10, 2011 |
Next I dumped in a pound of Thai beans and started in: [video]http://www.youtube.com/watch?v=LwpzsOdIcj8[/video] No oil on my beans...
|
|
|
|
| oldgearhead |
Posted on 07/01/2011 4:20 PM
|
|
1 1/2 Pounder Posts: 1128 Joined: February 10, 2011 |
OMG what happened! I just got showered with chaff and the beans stopped moving. It looks like I had a 'blow-out' at the top.
oldgearhead attached the following image:
No oil on my beans...
|
|
|
|
| oldgearhead |
Posted on 07/01/2011 4:21 PM
|
|
1 1/2 Pounder Posts: 1128 Joined: February 10, 2011 |
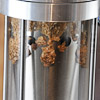
Yep the screen plugged and the pressure 'popped the top'..
oldgearhead attached the following image:

No oil on my beans...
|
|
|
|
| oldgearhead |
Posted on 07/01/2011 6:16 PM
|
|
1 1/2 Pounder Posts: 1128 Joined: February 10, 2011 |
Quote seedlings wrote: Are you sure there isn't a hole in the circuit board to adjust trim? All the components are mounted on the knob side of the board, so you won't be able to 'see' it except to find the hole and use a flashlight to see the trim. I've gutted 4 of these to hardwire/mount in different chassis and all of them have had this trim. CHAD Nope, no trim pot. Are you sure you aren't thinking of the harbor Frieght Router Controller? The one has: 2 - Resistors 100 ohm, and 140K ohm 2 - Caps - .22K microF 1 - Transistor - ? 1 - Triac 1 - big pot about 100K ohm or so. The 100 ohm connects the incoming hot (blk) wire to one leg of C2. The 140K appears to feed the base of the transistor. I might be able to try lowering the value of the 100 ohm by putting another 100 ohm accross it..
oldgearhead attached the following image:
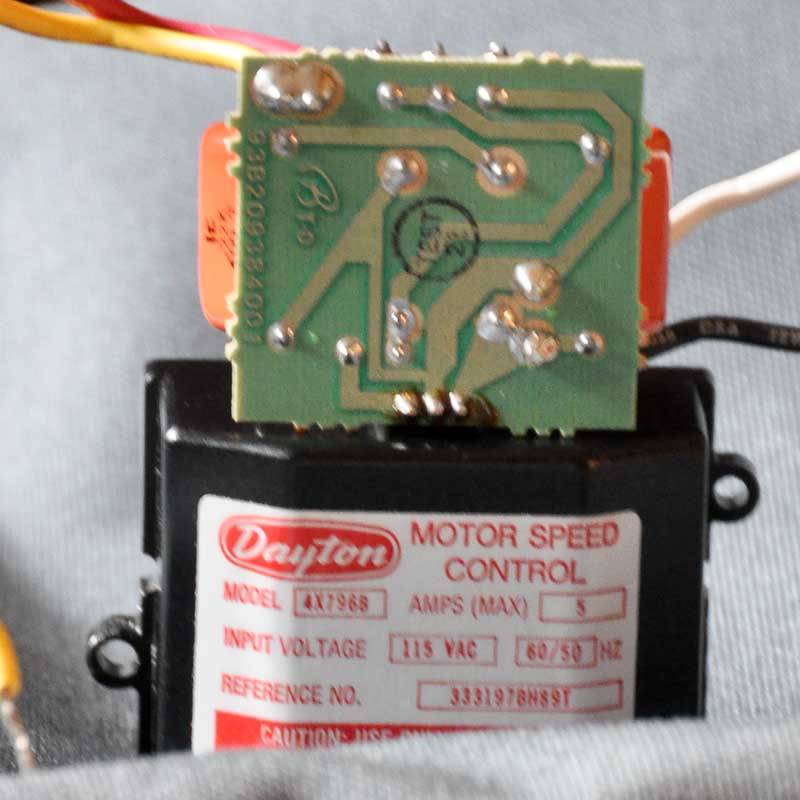
No oil on my beans...
|
|
|
|
| oldgearhead |
Posted on 07/02/2011 12:47 PM
|
|
1 1/2 Pounder Posts: 1128 Joined: February 10, 2011 |
i guess I'll try my coarse screen next time. I got to the bottom of my other major concern today. My motor was rasising the temperature of the air in the manifold by 55F above ambient! This is probably a good thing for roasting the beans but a bad thing for motor brush life. Here is what I found out about the Dayton speed controller: 1) Its low setting is 35V not the 24V as advertised. 2) Its current in amps is very high when compared to its wattage. 3) Miniuum current at the lowest speed setting = 6.0 amps. 4) Current at 72V = 8.0 amps (Variac is only 4.6A at 80V). Conclusions: 1) The Dayton is a real dog, guarenteed to wear out the brushes very quickly. 2) I will be running on the varible-autotransformer until I can purchase a DC drive. I would like to get a KBCC-125, but my budget is closer to a used KBIC-120. 3) I suspect the Harbor Frieght Router control, because its a similiar desigh has some of the same issues. 4) I will sell the Dayton, cheap.. Per Lee's excellent suggestion I did put four 1/4 inch holes in the 'cold' side of the manifold. That little mod lowered motor heating by 20F and gave me back my 'spouting fountain'. Thanks Lee. I'll probably try another roast Tuesday. Happy 4th to all.. Jim Stuart (AKA: oldgearhead) No oil on my beans...
|
|
|
|
| seedlings |
Posted on 07/02/2011 7:09 PM
|
|
1 1/2 Pounder Posts: 4226 Joined: June 27, 2007 |
Sorry Jim, I was thinking you had the harbor freight model. Happy Independence Day to you as well! CHAD Roaster: CoffeeAir II 2# DIY air roaster
Grinder: Vintage Grindmaster 500 Brewers: Vintage Cory DCU DCL, Aeropress, Press, Osaka Titanium pourover |
|
|
|
| oldgearhead |
Posted on 07/04/2011 11:59 AM
|
|
1 1/2 Pounder Posts: 1128 Joined: February 10, 2011 |
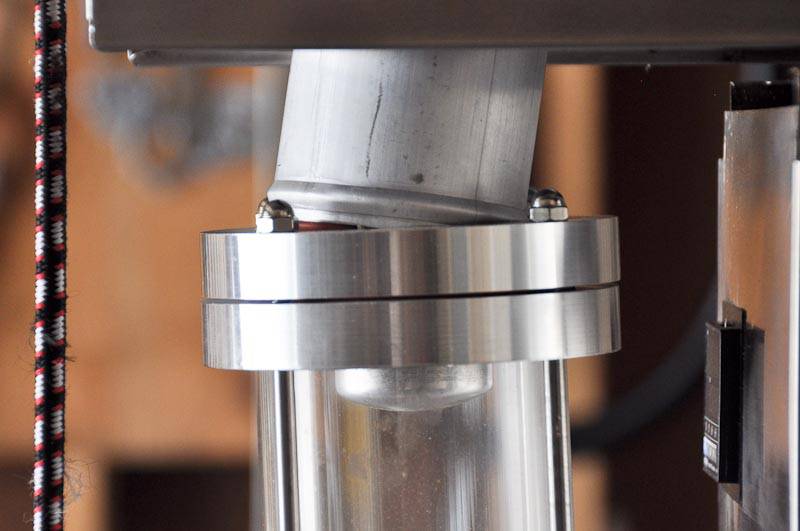
While I'm waiting for the parts I need to built a larger particle separator, I decided to do some temperature tests with my trusty Raytec. I found out that I had a bit more work to do in the air-recycle box, and that my manifold insulation is outstanding. Air recycle off: At 400F manifold temperature after 15 minutes: Ambient -78F PV - 400F (set manually on PID) RC top transition - 118F RC base outside - 270F Switch wires near front of brewer top - 173F Intake screen - 98F Exit screen - 230F Manifold insulation - 99F Manifold 'cold' side - 87F Air recycle on, for only 2 minutes: All numbers about the same at PV=405F, except: Intake air went to 100-130F in 2 minutes! (great). Switch wires near front of brewer top went to 190F (bad)! I added a baffle between the hot air and the wires, lets hope that helps because I would hate to move the switches from their original 'brewer' position. This is good insulation:
oldgearhead attached the following image:

No oil on my beans...
|
|
|
|
| oldgearhead |
Posted on 07/09/2011 3:44 PM
|
|
1 1/2 Pounder Posts: 1128 Joined: February 10, 2011 |
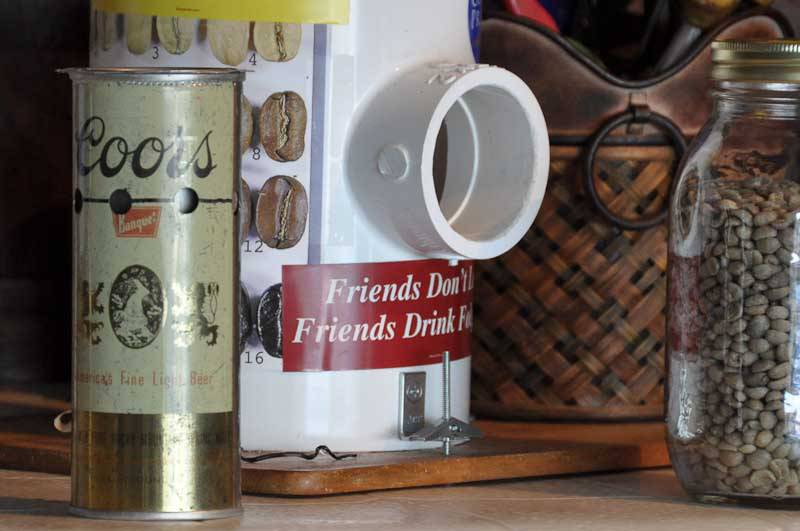
I tried the new separator today. I had a bit of success with a 500 gram roast: 1) No chaff escaped the separator. Its located in the RC. 2) No sign of anything in either the RC outlet screen nor the much finer cool air inlet screen. 3) Beans completed first crack in 15 minutes. 4) I used recycled air to boost the air temperature during the ramp to first crack and again during the 'finishing' stage. Baffle Beer Can Separator:
oldgearhead attached the following image:
No oil on my beans...
|
|
|
|
| oldgearhead |
Posted on 07/09/2011 3:45 PM
|
|
1 1/2 Pounder Posts: 1128 Joined: February 10, 2011 |
Separator in position:
oldgearhead attached the following image:
No oil on my beans...
|
|
|
|
| oldgearhead |
Posted on 07/09/2011 4:06 PM
|
|
1 1/2 Pounder Posts: 1128 Joined: February 10, 2011 |
However! Isn't there always a 'however. One-half of the chaff was stuck on the outside of the separator: [video]http://www.youtube.com/watch?v=kC1NYGLgJLE[/video] No oil on my beans...
|
|
|
|
| oldgearhead |
Posted on 07/09/2011 4:07 PM
|
|
1 1/2 Pounder Posts: 1128 Joined: February 10, 2011 |
..and one-half on the inside:
oldgearhead attached the following image:

No oil on my beans...
|
|
|
|
| oldgearhead |
Posted on 07/09/2011 4:14 PM
|
|
1 1/2 Pounder Posts: 1128 Joined: February 10, 2011 |
I think my baffle may be too close to the entrance-acceration ports (3/8" holes in the beer can). So I'm going to reduce the baffle diameter and see what happens. I may need to increase the diameter of the separator, but if I must do that I have to change everything on top.. Edited by oldgearhead on 07/09/2011 4:15 PM No oil on my beans...
|
|
|
|
| allenb |
Posted on 07/10/2011 12:04 AM
|
 Administrator Posts: 3859 Joined: February 23, 2010 |
Quote oldgearhead wrote: I think my baffle may be too close to the entrance-acceration ports (3/8" holes in the beer can). So I'm going to reduce the baffle diameter and see what happens. I may need to increase the diameter of the separator, but if I must do that I have to change everything on top.. Very interesting chaff collector. Is that an old tin Coors can from long ago? Please describe or post a sketch of the air flow path and internal layout of the Coors chaff collector. I'm trying to figure if it has cyclonic action or just traps the chaff. Allen 1/2 lb and 1 lb drum, Siemens Sirocco fluidbed, presspot, chemex, cajun biggin brewer from the backwoods of Louisiana
|
|
|
|
| greencardigan |
Posted on 07/10/2011 12:23 AM
|
|
1 1/2 Pounder Posts: 1185 Joined: November 21, 2010 |
Your chaff collector looks similar to what I was going to put in my RC. Except I was hoping to have cyclonic airflow by having some vanes to circulate the air after it enters the holes. I'd also like to see a diagram to better understand your airflow through the collector. Edited by greencardigan on 07/10/2011 12:24 AM |
|
|
|
| oldgearhead |
Posted on 07/10/2011 8:02 AM
|
|
1 1/2 Pounder Posts: 1128 Joined: February 10, 2011 |
It is just a simple 'baffle' separator. I don't think a 'cyclone' is necessary for coffee. Besides all of the best 'separation' operations I've been involved with have a 'baffle separator' ahead of the cyclone/s, even some of the huge bag-houses in New Orleans and Iowa. My separator is made of two pieces: 1) A 2.25" x 6.77", 16oz, straight steel, 1970's, beer can with eight .375" holes spaced 45 degrees apart around the circumference. 2) The 'snout' (center piece) from an aluminum angel cake pan. The 'snout' opening is 7.56 sq. inches, and the 8 holes total 2.78 sq. inches. Therefore, the air stream/s enter the beer can, slam into the baffle, change direction, slow down, and (hopefully) the chaff falls to the bottom of the beer can. I have re-assembled the separator using the 'snout' from a 7 inch angel cake pan. It's diameter is much smaller and its opening is only 2.5 sq. inches. I don't think it will work because a baffle separator needs 2:1 exit:entrance area. After testing the small snout I will open the holes in the beer can to .50", re-install the large snout and give 1.5:1 a try. I am also building a 3.5" diameter version from the rest of the cocktail shaker. I'm quite confident this will do the job. If I'm going to re-use the air, I've got to clean it.
oldgearhead attached the following image:

Edited by oldgearhead on 07/10/2011 8:33 AM No oil on my beans...
|
|
|
|
| allenb |
Posted on 07/10/2011 12:04 PM
|
|
Administrator Posts: 3859 Joined: February 23, 2010 |
I think I understand. Instead of the centrifugal action to allow separation of fines and chaff coupled with the velocity drop of a cyclone you're achieving only the velocity drop side of the equation to drop out the chaff in the can. Very clever! Does the brand of beer cause any separation differences? 
1/2 lb and 1 lb drum, Siemens Sirocco fluidbed, presspot, chemex, cajun biggin brewer from the backwoods of Louisiana
|
|
|
|
| oldgearhead |
Posted on 07/11/2011 8:32 AM
|
|
1 1/2 Pounder Posts: 1128 Joined: February 10, 2011 |
Quote allenb wrote: >snip<.... you're achieving only the velocity drop side of the equation to drop out the chaff in the can. Very clever! >snip< Not really clever. The 'baffle separator' is part of any large grain operation. Its usually positioned ahead of the cyclones. Now the Z-corp 3D printer, that's clever! No oil on my beans...
|
|
|
|
| oldgearhead |
Posted on 07/13/2011 11:17 AM
|
|
1 1/2 Pounder Posts: 1128 Joined: February 10, 2011 |
Before i post today's results. I think a recap is in order. My new roaster is a 1.5KW. 120 VAC air roaster that has been designed to use a large amout of recycled air. It is built from a stainless steel 'junk' air-pot brewer, a cocktail shaker, some chrome sink drain, an old wood box, and a spa blower. In order to re-use air from the RC, the air must be cleaned. I am using some very fine mesh screens and a particle separator to do the air cleaning. My three previous atempts resulted in 900 grams of good coffee, 400 grams tossedd out, and plugged screens every time. Here is an image of my latest particle separator. Its the rest of the cocktail shaher:
oldgearhead attached the following image:

No oil on my beans...
|
|
|
|

| Jump to Forum: |
Similar Threads
| Thread | Forum | Replies | Last Post |
|---|---|---|---|
| Kaleido Roaster PID parameters | Roasting Coffee | 2 | 04/13/2024 3:07 PM |
| Skywalker roaster mods | Other Roasters | 293 | 04/07/2024 4:31 PM |
| Skywalker, the ALM chinese one pound roaster | Other Roasters | 215 | 04/02/2024 1:48 AM |
| My first popcorn mod roaster (vahegan) | Fluidbed Roaster | 48 | 03/24/2024 12:04 PM |
| Fatamorgana electric drum roaster | Other Roasters | 2 | 03/24/2024 10:03 AM |
Powered by PHP-Fusion Copyright © 2024 PHP-Fusion Inc
Released as free software without warranties under GNU Affero GPL v3
Designed with ♥ by NetriXHosted by skpacman