
Login

Shoutbox
You must login to post a message.
renatoa
04/18/2024 12:36 AM
bijurexim, greyberry2, N C, 
renatoa
04/17/2024 9:27 AM
 , branchu
renatoa
04/14/2024 5:56 AM
TheOtherJim and papajim,
 !
!
!allenb
04/11/2024 6:33 PM
Zemona

renatoa
04/11/2024 9:19 AM
Mrbones and sgupta,  ?
?
?Forum Threads
Newest Threads
Rainfrog's Roastmast...War on Farmers by Su...
Kaleido Roaster PID ...
Green coffee sellers
Wet beans - Estimati...
Hottest Threads
| Skywalker roaster... | [292] |
| Skywalker, the AL... | [214] |
| Skywalker Roasts | [94] |
| Rainfrog's Roastm... | [53] |
| My first popcorn ... | [47] |
In Memory Of Ginny

Donations
Latest Donations
dmccallum - 10.00
JackH - 25.00
snwcmpr - 10.00
Anonymous - 2.00
Anonymous - 5.00
dmccallum - 10.00
JackH - 25.00
snwcmpr - 10.00
Anonymous - 2.00
Anonymous - 5.00
Users Online
Guests Online: 1
Members Online: 0
Total Members: 8,211
Newest Member: bijurexim
Members Online: 0
Total Members: 8,211
Newest Member: bijurexim
View Thread
Who is here? 1 guest(s)
 PID'ed Gas-fired fluid bed roaster
|
|
| tamarian |
Posted on 09/07/2013 2:11 PM
|
|
1/2 Pounder  Posts: 320 Joined: January 21, 2012 |
Progress so far: I've sourced a black iron pipe, just to be on the safe side. Will drill holes in it for torch, glass window and ignitor. Then got sidetracked with gas safety concerns, in case the flame goes off. Since this is an air tight fluid bed, and any source of access to the torch requires disassembly, I thought I should work on a flame monitoring and re-igniting solution. And found that arduino would fit the bill: http://forum.home...ad_id=3485 The Arduino module is ready and it was a pleasant learning curve. It uses: 1. Arduino Uno board 2. Flame sensor module 3. 1 channel 10A relay module 4. Buzzer module 5 LED + resistor 6 Breadboard These tiny modules range from $2-$4 on Amazon and eBay. A simple sketch modified from basic tutorials taking analog value from sensor and if there's a flame, do nothing. Else, send relay signal to turn on the silicon nitride ignitor, buzzer and LED's for 2 seconds. Will need to modify the values based on actual testing and positioning on the ignitor, glass window and flame sensor. Here's a video of the initial test (note the silicon nitride ignitor held in the vice going on and off): Remaining work: 1. Integrating this flame sensor module and ignitor to the roaster's control panel. 2. Then work (mostly drilling) on the black pipe. 3. Need to position the flame sensor close to the pipe's glass window and tune the module to be sensitive to detect the gas flame, without interface from other light sources. 4. Secure the gas tubing, gauges, regulator and valve to the roaster. 5. Integrate the valve driver to the control panel 6. Assemble the whole thing, mostly screwing it on together and clean up the wiring. 7. Run with old beans for tuning. There's PID tuning, which will differ alot since my heating chamber is no longer insulated. Proportional valve tuning for min and max flow, and flame sensor tuning. If the universe cooperates, I'm hoping for less interruptions so I can get this done within a week, as I'm running low on roasted beans. Wa'il. 1 Kg PID'ed gas-fired fluid bed roaster, GS/3MPS, K10F
|
|
|
|
| tamarian |
Posted on 09/07/2013 2:14 PM
|
|
1/2 Pounder Posts: 320 Joined: January 21, 2012 |
Quote BryanG wrote: Doing a quick search it seems like the boys that are doing home brewing may be doing some of this already, although, it seems their situation is easier with on and off of heat to maintain fluid temps. Our scenario is more complex as we want to alter the flow of gas to change gas temps ... interesting. Yes! I often run into home brewing blogs and threads when I run a search on various aspects of PID's, SSR's and arduino. Wa'il. 1 Kg PID'ed gas-fired fluid bed roaster, GS/3MPS, K10F
|
|
|
|
| tamarian |
Posted on 09/10/2013 12:19 PM
|
|
1/2 Pounder Posts: 320 Joined: January 21, 2012 |
Done with the wiring, Arduino and control box reconfiguration. That was the hard part, since I had to practice soldering a lot and watch tutorials before risking damage to Arduino sensors. Drilling the pipes, I hope, is the easy part, since I've done quite a bit of that on my roasting chamber. Here's how the newly reconfigured control box looks like:  From top left: Fuji PID for electric element; Fuji PID for gas; Proportional valve driver; blower control. Bottom, from the left: separate box for flame sensor (to be directed at flame window); Arduino board; Switches (PID1, PID2, Cooler, light, electric element, Arduini and valve driver); breaker. Bottom most: 16A fuse and 36A fuse (for electric element). Top most: thermocouple sockets, one for each PID. Below the control box is the proportional valve and gauges. It started to get cluttered, since it is meant to control either electric or gas heating chambers. Now that I discovered Arduino, next project is to convert this control box into a much simpler Arduino control box, and reducing a lot of the clutter. But, let me get this thing done first, I'm anxious to get back to actual roasting.
tamarian attached the following image:
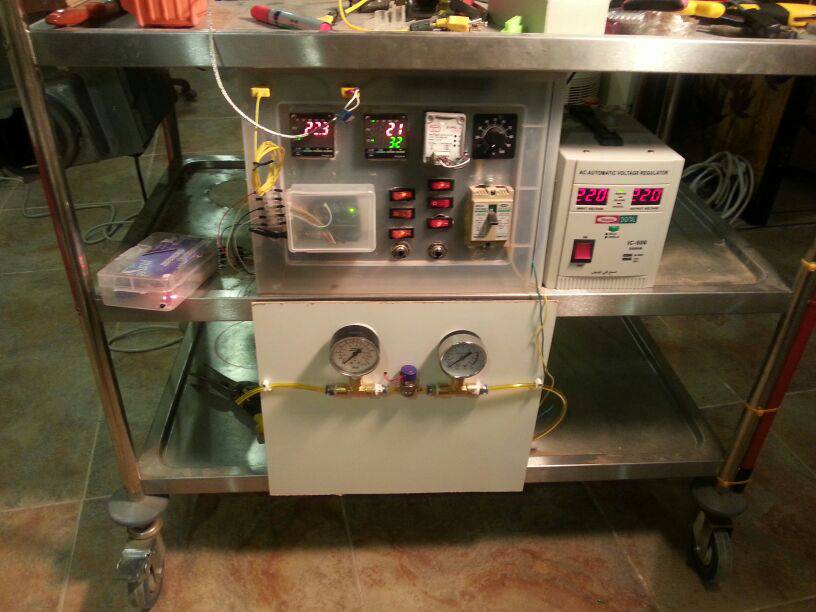
Edited by tamarian on 09/10/2013 12:31 PM Wa'il. 1 Kg PID'ed gas-fired fluid bed roaster, GS/3MPS, K10F
|
|
|
|
| tamarian |
Posted on 09/12/2013 6:45 AM
|
|
1/2 Pounder Posts: 320 Joined: January 21, 2012 |
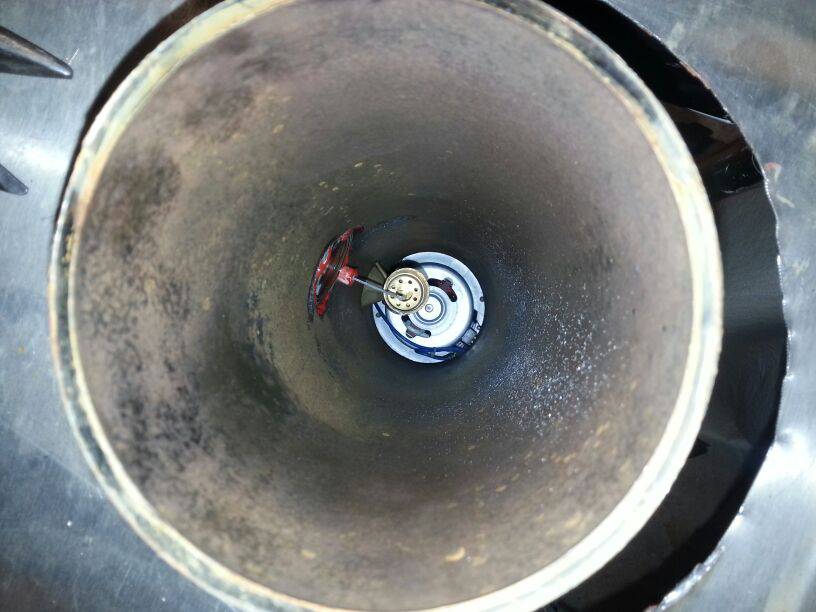
Got the heating chamber drilled for torch, silicon nitride igniter and glass window. The glass window is a small cup, the sides to be covered in tape, to block outside sources of light, and place the flame sensor inside it.
tamarian attached the following images:


Wa'il. 1 Kg PID'ed gas-fired fluid bed roaster, GS/3MPS, K10F
|
|
|
|
| tamarian |
Posted on 09/12/2013 3:54 PM
|
|
1/2 Pounder Posts: 320 Joined: January 21, 2012 |
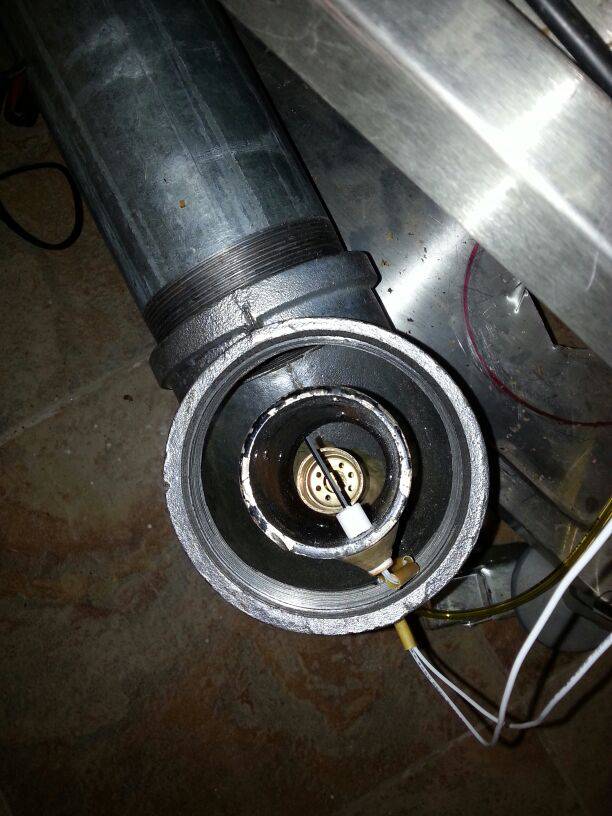
Finally installed the heating chamber to test, but having difficulty igniting the torch with the blower running. Without the blower, it can ignite with a delay, not instantly like the test I ran in the first post, and the delay would cause a scary bang when it ignites. Here's a top view:  The silicon nitride igniter is one inch above the torch. Any tips on igniting to make it more reliable?
tamarian attached the following image:
Wa'il. 1 Kg PID'ed gas-fired fluid bed roaster, GS/3MPS, K10F
|
|
|
|
| allenb |
Posted on 09/12/2013 7:23 PM
|
 Administrator Posts: 3858 Joined: February 23, 2010 |
I love your control package on the cart! Very professional and very high tech looking to boot! On your burner ignition issue. Scary bang bad! Have you tried igniting with the blower barely on instead of full on or totally off? Allen 1/2 lb and 1 lb drum, Siemens Sirocco fluidbed, presspot, chemex, cajun biggin brewer from the backwoods of Louisiana
|
|
|
|
| BryanG |
Posted on 09/12/2013 8:16 PM
|
|
1/4 Pounder  Posts: 96 Joined: March 29, 2013 |
can you put a little deflector shield under the torch to route that high speed air out away from the ignition point a bit? |
|
|
|
| Dan |
Posted on 09/12/2013 10:03 PM
|
|
1 1/2 Pounder  Posts: 1662 Joined: October 24, 2005 |
It seems the the ignition on my water heater and 2 HVAC units are the same. The blower and ignitor come on, and then when the ignitor is hot, the gas valve opens. hope this helps, Dan 1 pound electric sample roaster, 3 pound direct-flame roaster, both handmade; modified Mazzer Mini grinder, LaSpaziale Vivaldi II automatic espresso machine. When the electricity goes out I make vacpot coffee from beans ground on my Zassenhaus hand grinder, and heat the water with a teakettle on the gas range.
|
|
|
|
| tamarian |
Posted on 09/13/2013 2:56 AM
|
|
1/2 Pounder Posts: 320 Joined: January 21, 2012 |
Thanks for the input everyone. It turned out I had the hose restricted/twisted when I screwed on the heating chamber into the blower, possibly giving a restricted, unpredictable flow. But Dan's observation on HVAC ignition seem to be the case here. The ignitor turns bright orange in 2 seconds after being turned on. I need to modify my ignition setup. In addition to the flame sensor turning on igniter, I need a switch to turn on ignition initially before turning on the valve, then turn it off and let the Arduino flame sensor take care of monitoring the flame. Need further tests to see if the Arduino setup can re-ignite the flame if it goes off, maybe by adding a couple more seconds delay. But if it doesn't, it's still good to have the loud alarm in place to do something manually... Next issue is that the roaster may turn out to be a direct flame roaster! I have 15 inches of pipe above the torch, and still see the blue flame coming out of the pipe (I have not yet screwed on the roasting chamber). All in all, it's getting close, and I may start PID tuning with beans by tomorrow, after I add a manual ignition switch Wa'il. 1 Kg PID'ed gas-fired fluid bed roaster, GS/3MPS, K10F
|
|
|
|
| tamarian |
Posted on 09/13/2013 3:05 PM
|
|
1/2 Pounder Posts: 320 Joined: January 21, 2012 |
I couldn't wait till tomorrow! Did a quick test with dry beans and got into a few problems: 1. The valve is too powerful, I may need to cut the max flow in half or more. The thermal tape I had on the de-chaffer started smoking, which it never did in 100+ roast on the electric element. I have pre-set my PID to 10% min, and 80% max, but my need 20% min and 50% max. Lots of tuning to do on the valve and PID. 2. Ignition is troublesome mid-roast when the PID reached set value, the flame goes off, and can't come back on until I slow down the blower. I need another way of insuring flame remains on. I need to stop for a few days to work on the electric element so I can roast a few batches (running out of coffee), then get back to the gas which needs more work and research. Wa'il. 1 Kg PID'ed gas-fired fluid bed roaster, GS/3MPS, K10F
|
|
|
|
| Erichimedes |
Posted on 09/14/2013 4:35 PM
|
 1/4 Pounder Posts: 58 Joined: August 07, 2013 |
This build looks really cool! I'm sorry I've missed it until now. I'm trying to learn how to use Arduino at the moment. I don't have a ton of time to invest in it, so I'm learning slowly. I think it's a fantastic platform for stuff like this, and there's so much (free!) support for it online. As for getting the ignitor to work, I built a blaster style stove for my home distilling setup. It was just a pipe with a high pressure propane jet in the bottom that pulled air up into the chamber and combusted. I found that I couldn't light it near the jet, because the propane had to mix with air before it would combust. It lit best right up at the top. So I'm wondering if moving your ignitor further up the chamber would help. Also, regarding having Arduino re-ignite the flame; I'm not sure if this is a concern, but consider programming it to turn the gas off completely, turn ignitor on, wait 2 seconds, then turn gas back on. I'm just envisioning filling your combustion chamber, roast chamber, and exhaust with a perfect mix of propane and air and then igniting it. Yikes! Awesome build! I'm liking everything you've got going here. |
|
|
|
| tamarian |
Posted on 09/15/2013 12:09 AM
|
|
1/2 Pounder Posts: 320 Joined: January 21, 2012 |
Thanks Erichimedes. I thought my problem was that I needed to bring the igniter even closer. But what you are saying makes sense, I'll try that. Having Arduino turn off the gas valve is doable, by running the valve driver via a relay switch on Arduino. But I'm hoping to avoid that by setting a minimum value where the flame would still be on. I managed to revive an old roaster (made a thread about it, Heat gun + egg beater), so I now have a spare roaster and decent coffee, and don't need to rush this thing. One idea I had is once I find the right location for the ignitor is to keep it on for the entire duration of the roast. If it can last through 20+ roasts (it survived one already), then it will cost less than a $1 per roast. I have a spare, and will see how it goes. I like the peace of mind, despite all the safety measures in place. Wa'il. 1 Kg PID'ed gas-fired fluid bed roaster, GS/3MPS, K10F
|
|
|
|
| allenb |
Posted on 09/15/2013 10:05 AM
|
|
Administrator Posts: 3858 Joined: February 23, 2010 |
In my previous home we had a hot water heater that kept the hot surface ignitor on during the entire heating cycle instead of just at ignition. We were there for 10 years and no ignitor failures. Severe bumps and jolts are more likely to cause these to fail than run time. Allen 1/2 lb and 1 lb drum, Siemens Sirocco fluidbed, presspot, chemex, cajun biggin brewer from the backwoods of Louisiana
|
|
|
|
| Dan |
Posted on 09/15/2013 10:27 AM
|
|
1 1/2 Pounder Posts: 1662 Joined: October 24, 2005 |
Ignitor failures are often a result of some combustible substance on the ignitor's surface. Even the oil from fingerprints can cause the ignitor to fail. Ditto with chaff being sucked into the blower inlet or entering the airflow from a recirculation. New water heaters and furnaces using ignitors have airfilters to prevent premature failure. hope this helps, Dan 1 pound electric sample roaster, 3 pound direct-flame roaster, both handmade; modified Mazzer Mini grinder, LaSpaziale Vivaldi II automatic espresso machine. When the electricity goes out I make vacpot coffee from beans ground on my Zassenhaus hand grinder, and heat the water with a teakettle on the gas range.
|
|
|
|
| tamarian |
Posted on 09/15/2013 11:31 AM
|
|
1/2 Pounder Posts: 320 Joined: January 21, 2012 |
Quote allenb wrote: In my previous home we had a hot water heater that kept the hot surface ignitor on during the entire heating cycle instead of just at ignition. We were there for 10 years and no ignitor failures. Severe bumps and jolts are more likely to cause these to fail than run time. That is good to hear. As an unintended side-effect, the brightness of the ignitor is enough to silence the flame sensor alarm. If it's off, and there's no flame, the alarm will sound. Wa'il. 1 Kg PID'ed gas-fired fluid bed roaster, GS/3MPS, K10F
|
|
|
|
| tamarian |
Posted on 09/17/2013 1:38 PM
|
|
1/2 Pounder Posts: 320 Joined: January 21, 2012 |
We have ignition. First, I've placed the blower sideways with an elbow, just to lower the torch, and increase the distance from igniter. That did not improve ignition, the blower has to be off for ignition to take place. I then read FreshBeans build, and copied parts of his ignition assemble. I placed the torch inside a small pipe to protect it from the blower's air flow. I also drilled some holes into that small pipe to allow some air for combustion. The result is reliable ignition regardless of blower, even at max airflow. With this change, I now have at least 24" between torch and perforated plate.
tamarian attached the following image:
Edited by tamarian on 09/17/2013 1:43 PM Wa'il. 1 Kg PID'ed gas-fired fluid bed roaster, GS/3MPS, K10F
|
|
|
|
| JETROASTER |
Posted on 09/17/2013 1:51 PM
|
 Administrator Posts: 1780 Joined: March 06, 2010 |
Well done! Looking forward to some video. -Scott |
|
|
|
| allenb |
Posted on 09/17/2013 9:54 PM
|
|
Administrator Posts: 3858 Joined: February 23, 2010 |
Wow, you're very good at seeing a roadblock, determining a workaround and implementing it in a very short time frame! This is a great alteration and should give you good flame stability in any situation. Looking forward to video when it's in operation down the road! BTW, I think it 's great that you are blazing a new trail with your arduino based ignition and safety controls. This will be a big improvement in gas fired homeroasting safety for folks not wanting to spend a fortune on industrial burner safety devices. Allen 1/2 lb and 1 lb drum, Siemens Sirocco fluidbed, presspot, chemex, cajun biggin brewer from the backwoods of Louisiana
|
|
|
|
| tamarian |
Posted on 09/18/2013 4:45 AM
|
|
1/2 Pounder Posts: 320 Joined: January 21, 2012 |
Thanks Scott and Allen. I've assembled it and was ready to load up some beans and shoot a video. But while pre-heating, smoke started coming out of the viewing window of the heating chamber at 180C. This could be due to the aluminum tape I had wrapped around the glass to block external light, or the RTV silicon sealing the glass. Some more work to do before this baby gets to work.
Wa'il. 1 Kg PID'ed gas-fired fluid bed roaster, GS/3MPS, K10F
|
|
|
|
| tiopaeng |
Posted on 09/18/2013 5:42 AM
|
 1/4 Pounder Posts: 50 Joined: June 19, 2013 |
I can't wait to see the video. There's a lot of research and development and trials and error with this build but we're all excited and patiently waiting. Great job and thanks for sharing this with us. Tiopaeng |
|
|
|
| tamarian |
Posted on 09/18/2013 11:20 AM
|
|
1/2 Pounder Posts: 320 Joined: January 21, 2012 |
Thanks Tiopaeng and everyone for the encouragement. I could not have done it without all the support and shared knowledge of you folks of Home Roasters. Notice the "have done it" part :) Video uploading! Wa'il. 1 Kg PID'ed gas-fired fluid bed roaster, GS/3MPS, K10F
|
|
|
|
| tamarian |
Posted on 09/18/2013 11:28 AM
|
|
1/2 Pounder Posts: 320 Joined: January 21, 2012 |
Success. I've run two tests today using past crop beans that were saved for such tests. First run was bad. I roasted 700 grams to Full City in 10 minutes, but it did not follow a smooth curve. The valve was either on or off. Here's what it looked like:  Not very smooth and not a steady Rate of Rise (ROR). But I remembered that I have tuned the valve driver for 4 Bar, and now I'm just under 2 bar. So I have re-tuned the driver and the PID and made a second test, and it went perfectly. Alas, Artisan crashed on me while taking the video. But monitoring the PID, PV and SV temps where identical all the way to Full City. Will further fine-tune and adjust pressure, but it is ready for some of the good beans to roast. Since I have placed the torch much lower, the glass window can no longer detect the flame string enough for the sensor, so I may re-drill it below, or find a workaround for it. Also having the torch and igniter inside an internal pipe will further complicate things. But enjoy the video:
tamarian attached the following image:

Edited by tamarian on 09/18/2013 11:35 AM Wa'il. 1 Kg PID'ed gas-fired fluid bed roaster, GS/3MPS, K10F
|
|
|
|
| JETROASTER |
Posted on 09/18/2013 1:27 PM
|
|
Administrator Posts: 1780 Joined: March 06, 2010 |
Nice work! You have proof of concept. From here on in it's tweaks and adjustments. Well done. Cheers, -Scott (thanks for the vid) |
|
|
|
| tiopaeng |
Posted on 09/19/2013 2:46 AM
|
|
1/4 Pounder Posts: 50 Joined: June 19, 2013 |
Great Job, a Success! just a little tweaking and you'll be roasting. Thanks Tiopaeng |
|
|
|
| tamarian |
Posted on 09/20/2013 8:37 AM
|
|
1/2 Pounder Posts: 320 Joined: January 21, 2012 |
Test #3 Using a multimeter, I fine tuned the valve driver max current is close to the valve's max current (180ma). Fixed an error in the fourth ramp segment, which resulted in the hump after first crack in the previous test (photo a couple of posts above). The result is a smooth BT curve, and during the roast PV and SV were so close, rarely above 1 degree difference, which is a lot closer than with electric element. The only exception is in the drying phase, after recovery, which is expected due to the huge drop and rise. Here's a graph from Artisan:  My PID is set to max at 60%, and it still a bit powerful for 750 grams. I'll gradually reduce pressure to 1 bar, from 1.5 bar and gradually raise PID max to 90%, so the control is more refined and suitable for small and large batches, 200 grams to 1 Kg, as was the case with the electric element. Due to the new elbow design, I may just place the electric element in the horizontal pipe, and no longer need to replace elements, just use one or the other, but no hurry on that part since gas seem to work fine, and the electric element seem a luxury. But since I already have all the parts, wiring and old PID, I'll eventually get to it. I have another video uploading with close ups of the flame sensor, sampling trier and dump chute.
tamarian attached the following image:
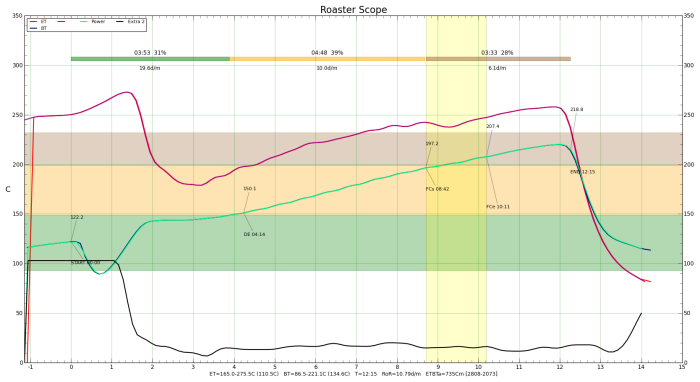
Wa'il. 1 Kg PID'ed gas-fired fluid bed roaster, GS/3MPS, K10F
|
|
|
|

| Jump to Forum: |
Similar Threads
| Thread | Forum | Replies | Last Post |
|---|---|---|---|
| Kaleido Roaster PID parameters | Roasting Coffee | 2 | 04/13/2024 3:07 PM |
| Skywalker roaster mods | Other Roasters | 293 | 04/07/2024 4:31 PM |
| Skywalker, the ALM chinese one pound roaster | Other Roasters | 215 | 04/02/2024 1:48 AM |
| Coffee Crafters Fluid Bed Coffee Roasters | JAVA TRADING COMPANY | 4 | 03/29/2024 9:41 AM |
| My first popcorn mod roaster (vahegan) | Fluidbed Roaster | 48 | 03/24/2024 12:04 PM |
Powered by PHP-Fusion Copyright © 2024 PHP-Fusion Inc
Released as free software without warranties under GNU Affero GPL v3
Designed with ♥ by NetriXHosted by skpacman