
Login

Shoutbox
You must login to post a message.
renatoa
04/25/2024 2:03 AM
AGZ and Intercolcoffee

allenb
04/23/2024 7:01 PM
Paul Kalb

renatoa
04/23/2024 4:34 AM
Coffee_Rabbit_Hole
and Michaelion,
and Michaelion,
renatoa
04/21/2024 2:35 AM
compactjack and GreenGenie
 ?
?
?allenb
04/19/2024 8:27 AM
eximwind
Forum Threads
Newest Threads
Skywalker roaster modsHello from Montreal ...
War on Farmers by Su...
Kaleido Roaster PID ...
Rainfrog's Roastmast...
Hottest Threads
| Skywalker roaster... | [301] |
| Skywalker, the AL... | [214] |
| Skywalker Roasts | [94] |
| Rainfrog's Roastm... | [54] |
| War on Farmers by... | [40] |
In Memory Of Ginny

Donations
Latest Donations
dmccallum - 10.00
JackH - 25.00
snwcmpr - 10.00
Anonymous - 2.00
Anonymous - 5.00
dmccallum - 10.00
JackH - 25.00
snwcmpr - 10.00
Anonymous - 2.00
Anonymous - 5.00
Users Online
Guests Online: 5
Members Online: 0
Total Members: 8,226
Newest Member: AGZ
Members Online: 0
Total Members: 8,226
Newest Member: AGZ
View Thread
Who is here? 1 guest(s)
Page 1 of 2: 12
|
 New bread machine roaster building thread
|
|
| Kafka-cloud |
Posted on 11/11/2013 3:50 PM
|
|
Newbie  Posts: 35 Joined: November 02, 2013 |
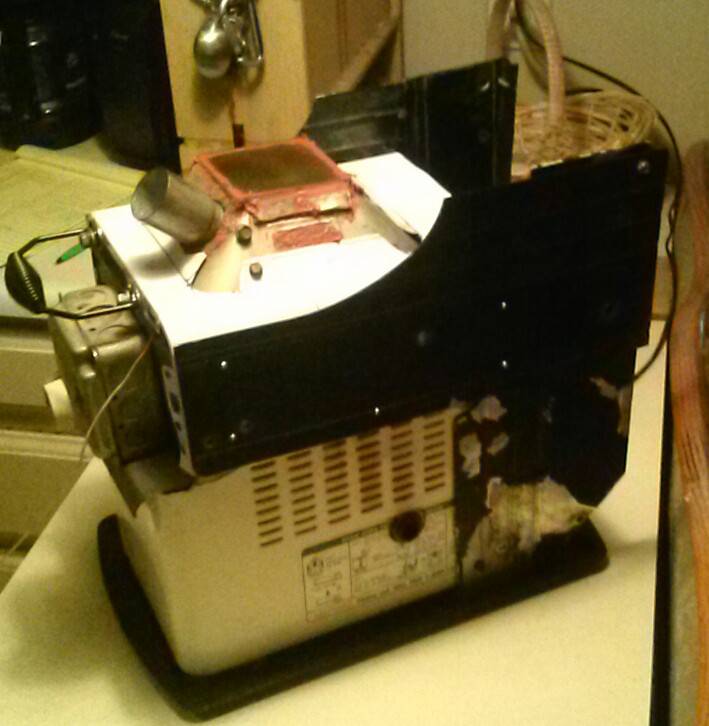
Hello, After realizing that a popcorn machine could only do around 85 g, i had originally decided to build a fluidbed roaster. However, having difficulty to find the basic material to build one, opted for a bm/hg combo. I picked up a citizen breadmachine yesterday, amd i have a wagner ht775 on the way as a heat source. I have stripped down the machine today, leaving the motor, the capacitor, the cooking chamber inner casing. I used an electricity switch and integrated the capacitor in the switchbox. I have scrubbed with a steel wire drill bit to remove the most teflon possible. I have used a dremel and an insert to remove most of the teflon from the stirring arm. I also removed the metal insert in the lid. It contained a window, and an exhaust area. I will be putting a 1 1/2 innch copper tube through the old exhaust branched to the heat gun. I will reseal the window with high temperature silicone I may insulate the chamber with some form of wool. And finally will be doing an exhaust on the side of the rc once i figure out how to make it. I will post some pictures once i have edited them to upload or figured out how to |
|
|
|
| jkoll42 |
Posted on 11/11/2013 4:32 PM
|
 1 1/2 Pounder  Posts: 860 Joined: February 14, 2011 |
Sounds like a plan!
-Jon
Honey badger 1k, Bunn LPG-2E, Technivorm, Cimbali Max Hybrid, Vibiemme Double Domo V3 |
|
|
|
| Kafka-cloud |
Posted on 11/11/2013 7:15 PM
|
|
Newbie Posts: 35 Joined: November 02, 2013 |
Here is the bread machine I got. A citizen, vertical bread maker  |
|
|
|
| Kafka-cloud |
Posted on 11/11/2013 7:22 PM
|
|
Newbie Posts: 35 Joined: November 02, 2013 |
A good trick, before forgetting useful information, TAKE pictures! Saved my from figuring out which wire is which. I took pictures of the diagram before desoldering the capacitor. It helped to figure out which wire was which, because I had made an error transcribing and put down white for two different wires. On the breadboard, you can see how the component is conected to resolder in the same direction.    |
|
|
|
| Kafka-cloud |
Posted on 11/11/2013 7:33 PM
|
|
Newbie Posts: 35 Joined: November 02, 2013 |
Here is the annotated top portion of the breadboard. Here is the bottom of the breadboard  |
|
|
|
| Kafka-cloud |
Posted on 11/11/2013 7:37 PM
|
|
Newbie Posts: 35 Joined: November 02, 2013 |
Desoldered the capacitor, did the same wiring as on the breadboard excluding all the rest except the capacitor. Did a point to point soldering on the capacitor, electric tape around the exposed wires, and inserted at the bottom of my switch box. Crimped anderson powerpole connector on the connection to the motor, and bolted the switchbox to the side bottom.  |
|
|
|
| Kafka-cloud |
Posted on 11/11/2013 7:39 PM
|
|
Newbie Posts: 35 Joined: November 02, 2013 |
Et voila the working BM motor, on a power switch. |
|
|
|
| Kafka-cloud |
Posted on 11/11/2013 7:42 PM
|
|
Newbie Posts: 35 Joined: November 02, 2013 |
I also had an enjoying break of sanding down the pan and arm. Wire brush for the bottom and most side, dremel for the arm. A little scrubbing with sandpaper, Not perfect but I may continue later on removing the tefflon |
|
|
|
| Kafka-cloud |
Posted on 11/11/2013 8:02 PM
|
|
Newbie Posts: 35 Joined: November 02, 2013 |
I am not sure where I should be placing the air exit on this RC. I have read many people talking about on the side near the bottom. If I find a steel tube or a copper tube, with a plate, I would put rivet for fixation and squeeze a mesh wire in between. I am not certain of what would be the optimal height. Also, what is the volume of a pound of green coffee. I am trying to find what would the capacity of this machine be. I'll probably build a TC4 or use an arduino shield and programming to measure temp and display on screen. A possibility would be to control a fan at the exhaust pulling more air if the temperature is warmer than what is optimal. The fan could pulse to ensure that not all heat is evacuated. Sencor, mega oard, screen and other goodies, leftover component of an auquaponic controller that was never built. |
|
|
|
| Lawnmowerman |
Posted on 11/11/2013 10:32 PM
|
 Pounder  Posts: 546 Joined: March 14, 2012 |
Yes air exit should be at bottom. This way the air that has exited the rc has a chance to envelope it on the outside before exit at the bottommost point on the outer shroud you have retained. Imho varying theair being pulled out just adds confusion where there areso msny variables already. But i have considered a damper like drum roasters can have. Im always plreased to ser a breadmaker build. A smart choice. Now if your paddle spins too fast you may loose beans between the shrouding. But you could probably do a pound. I recommend starting at 12 ounces and see how they stir. You may want to make some changes. I keep thinking im done then the need presents itself and i make a change. Usually very sporadically. Helps to learn exactly what that change changed
Bad coffee prevails when good coffee roasters stand by and do nothing.
|
|
|
|
| Kafka-cloud |
Posted on 11/13/2013 9:30 AM
|
|
Newbie Posts: 35 Joined: November 02, 2013 |
Thanks, I thought the exhaust needed to be connected to the rc. Much easier this way |
|
|
|
| Kafka-cloud |
Posted on 11/13/2013 9:06 PM
|
|
Newbie Posts: 35 Joined: November 02, 2013 |
A firend gave me about a foot of 1 inch copper pipe. I'll probably use a reducer or a heat gun nozzle to merge the two. |
|
|
|
| Kafka-cloud |
Posted on 11/16/2013 4:00 PM
|
|
Newbie Posts: 35 Joined: November 02, 2013 |
Updating, i have now finished the coupler fort he heat gun to connect with the 1 inch copper pipe. I have ordered a thermocouple amplifier chip ( max31855 from adafruit), a data logger for arduino and a 15amp relay. Will be connected to a arduino mega, a display screen showing the actual temp, may look at temperature variationin a given interval. I was wondering if shutting the heat gun power ( fan + heat) based on thermocouple temperature reading could effectively control a roast profile. Another option, much more complicated would be to decouple the heat gun and its fan. |
|
|
|
| Lawnmowerman |
Posted on 11/16/2013 8:26 PM
|
|
Pounder Posts: 546 Joined: March 14, 2012 |
A very useful feature you may consider including woulf be a port in your lid so you could just put a funnel in it and add beand with the lid closed. You dont lose any accumulated heat from preheating. Then remove funnel and insert h g.
Bad coffee prevails when good coffee roasters stand by and do nothing.
|
|
|
|
| Kafka-cloud |
Posted on 11/20/2013 7:51 PM
|
|
Newbie Posts: 35 Joined: November 02, 2013 |
My copper tube is 1 inch, and I have found a 1 1/2 inch to 1 inch reducer. I have cut slit in the reducer to be able to reduce the circumference. 1 1/2 inch is big, as this is for the inside diameter of the tube. I needed to reduce it. I will cut the lenght of the pipe going down, when I have beans and a balance to ensure that I can roast my 1 pound and not have any interference from the tube. I have also got some worm clamp, to ensure there is a proper fixation of the HG to the copper tube.   As for my heat gun, it is not disassembled as per my thread on the topic. |
|
|
|
| Airhan |
Posted on 11/20/2013 11:36 PM
|
 1/2 Pounder  Posts: 228 Joined: September 29, 2013 |
Quote Kafka-cloud wrote: I was wondering if shutting the heat gun power ( fan + heat) based on thermocouple temperature reading could effectively control a roast profile. Another option, much more complicated would be to decouple the heat gun and its fan. It's a good thing you separated the fan and heater, after a roast it is good to just blow cool air past the element to cool it down. I know with pop corn poppers that helps prolong the life of the popper, the same is probably true of heat guns. Varying the fan speed can be a good way to control the profile, stopping the fan while the element is hot is not a great idea though Aaron
"Grind it like it did you some great injustice!"D.L.Clark |
|
|
|
| PeteH |
Posted on 11/21/2013 1:40 PM
|
 1/4 Pounder  Posts: 109 Joined: January 29, 2008 |
Just a quick question? Aren't you reducing the CFM air output of your heatgun by over 50% by reducing from 1 1/2" to 1" tubing. 1 1/2" diameter is 1.76625 square inches, 1" is 0.785 square inches. Formula for square inches in the round is pi (3.14) times the radius squared. I think your airflow may be seriously hampered. If I am missing something here please disregard my concerns and ramblings. 
Pete
|
|
|
|
| Kafka-cloud |
Posted on 11/21/2013 9:56 PM
|
|
Newbie Posts: 35 Joined: November 02, 2013 |
Actually, i think it would be the contrary, the fan will blow the same quantity of air, so it will likely increase the cfm by around 30% to 50%. I think that since there will be an opening in my system (exhaust), there will not be the creation of a significant added resistance. I.e., 1 inch tubing doesn't create a bottleneck which would reduce airflow, but would instead accelerate airflow. I think this would increase airflow between 28 to 35. 1 1/2 is the exterior of the heat gun nozzle, so there is actually a smaller diameter of air flowing through. |
|
|
|
| Kafka-cloud |
Posted on 11/21/2013 9:58 PM
|
|
Newbie Posts: 35 Joined: November 02, 2013 |
Airhan, you are right. i have read a little bit about the longevity of coil and there need to be cooled after use. I was. Afraid if i left the fan and heat coil connected together, it would lead to a significant decrease in the longevity of my heat gun. |
|
|
|
| Kafka-cloud |
Posted on 11/21/2013 10:14 PM
|
|
Newbie Posts: 35 Joined: November 02, 2013 |
After looking at my arduino component to pid/ramp. I have started looking at the code and how to program my controller. The bm will switch the bm motor and hg fan fan to on, all through the roast and maybe the cooling in the machine (there may too much heat stored in all the component, copper pipe and container that it would render the fan much too slow to cooldown the bean). My only variable will the heater and a on or off stage using a power switch tail from adafruit rated at 15 amp. I have found my library for i2c, 20x4 screen, max31855 tc reader, sd card and real time clock. It seems that reflow oven have some similarity by needing a ramp/soak cycle. However, it seems my system will need to calibration to make an effective PID. Has anyone auto calibrated the pid value? I am concerned about how much lag i will be getting from on or off of the heating element. This could probably be done by doing a test run and logging the data. |
|
|
|
| Kafka-cloud |
Posted on 11/22/2013 6:12 AM
|
|
Newbie Posts: 35 Joined: November 02, 2013 |
For the speed of the air, since the unit is cfm, it would stay the same. Its a volume unit, and would not be affected.... By the speed at the exit |
|
|
|
| PeteH |
Posted on 11/23/2013 4:47 PM
|
|
1/4 Pounder Posts: 109 Joined: January 29, 2008 |
Quote Kafka-cloud wrote: Actually, i think it would be the contrary, the fan will blow the same quantity of air, so it will likely increase the cfm by around 30% to 50%.. You're restricting the volume of air by over 50% by reducing from 1 1/2" to 1". Think of a garden hose, if you reduce it from 3/4" to 3/8" do you get as many gallons of water per minute through it? Not likely. It may still work but your volume of air is much below the design factor of the heat gun. Good luck! Pete
|
|
|
|
| Airhan |
Posted on 11/23/2013 5:42 PM
|
|
1/2 Pounder Posts: 228 Joined: September 29, 2013 |
Perhaps some calculations are in order? http://ezineartic...;id=935874 Aaron
"Grind it like it did you some great injustice!"D.L.Clark |
|
|
|
| Lawnmowerman |
Posted on 11/23/2013 6:51 PM
|
|
Pounder Posts: 546 Joined: March 14, 2012 |
Heres what you need; the 45degree angle mounting tube is the perfect size for a heat gun nozzle. And the lid pictured in earlier post has a 45 degree angle. They go together quite well.
Lawnmowerman attached the following images:

Bad coffee prevails when good coffee roasters stand by and do nothing.
|
|
|
|
| Lawnmowerman |
Posted on 11/23/2013 6:53 PM
|
|
Pounder Posts: 546 Joined: March 14, 2012 |
The breadmaker pictuted above uses the exact same components
Bad coffee prevails when good coffee roasters stand by and do nothing.
|
|
|
|

Page 1 of 2: 12
| Jump to Forum: |
Similar Threads
| Thread | Forum | Replies | Last Post |
|---|---|---|---|
| Skywalker roaster mods | Other Roasters | 302 | 04/25/2024 9:09 AM |
| Kaleido Roaster PID parameters | Roasting Coffee | 2 | 04/22/2024 1:40 AM |
| Skywalker, the ALM chinese one pound roaster | Other Roasters | 215 | 04/02/2024 1:48 AM |
| My first popcorn mod roaster (vahegan) | Fluidbed Roaster | 48 | 03/24/2024 12:04 PM |
| Fatamorgana electric drum roaster | Other Roasters | 2 | 03/24/2024 10:03 AM |
Powered by PHP-Fusion Copyright © 2024 PHP-Fusion Inc
Released as free software without warranties under GNU Affero GPL v3
Designed with ♥ by NetriXHosted by skpacman