
Login

Shoutbox
You must login to post a message.
renatoa
04/14/2024 5:56 AM
TheOtherJim and papajim,
 !
!
!allenb
04/11/2024 6:33 PM
Zemona

renatoa
04/11/2024 9:19 AM
Mrbones and sgupta,  ?
?
?renatoa
04/10/2024 1:09 AM
 , Ed K
allenb
04/09/2024 5:34 PM
TheJak99
Forum Threads
Newest Threads
War on Farmers by Su...Kaleido Roaster PID ...
Green coffee sellers
Wet beans - Estimati...
Skywalker roaster mods
Hottest Threads
| Skywalker roaster... | [292] |
| Skywalker, the AL... | [214] |
| Skywalker Roasts | [94] |
| My first popcorn ... | [47] |
| War on Farmers by... | [39] |
In Memory Of Ginny

Donations
Latest Donations
dmccallum - 10.00
JackH - 25.00
snwcmpr - 10.00
Anonymous - 2.00
Anonymous - 5.00
dmccallum - 10.00
JackH - 25.00
snwcmpr - 10.00
Anonymous - 2.00
Anonymous - 5.00
Users Online
Guests Online: 4
Members Online: 1
alin
Total Members: 8,205
Newest Member: TheOtherJim
Members Online: 1
alin
Total Members: 8,205
Newest Member: TheOtherJim
View Thread
Who is here? 1 guest(s)
Page 1 of 2: 12
|
 My Winter Project
|
|
| MerlinWerks |
Posted on 02/27/2014 1:08 PM
|
|
Newbie  Posts: 42 Joined: October 10, 2013 |
Well, not all winter  , but for the last month anyway. , but for the last month anyway. First off, I really want to thank everyone for such a great community and Ginny for giving us the platform to share our ideas and experiences. I think I read just about every thread in the BMR forum before beginning this build and picked SunCountry's brain a bit via IM. Thanks. Anyway, I started roasting back in October with a WhirlyPop and was immediately hooked, coffee roasting, like beer making appeals to me on many different levels. The WP worked really well with the exception of a small amount of facing/scorching of some beans so I was looking to clean things up a bit. To that end this winter I've built a couple of different roasters, a small drum originally for use over a gas flame, but I believe it can be probably be used with a heat gun source. I then built a working prototype of KK/HG style roaster and while it roasts well, indoors, chaff containment is still a bit of an issue. I will eventually get back to properly finish that particular roaster, but my focus lately has been on a BM/HG style roaster and I am very pleased with the results. Simple, clean, compact and portable, no muss/no fuss setup and roasts very evenly with no scorching. Since roasting is something I anticipate doing for the rest of a hopefully long life I didn't mind investing a little time and money into making the whole process a little smoother and enjoyable. Not that I expect this roaster to last that long But Who Knows??Roast On Brothers and Sisters... 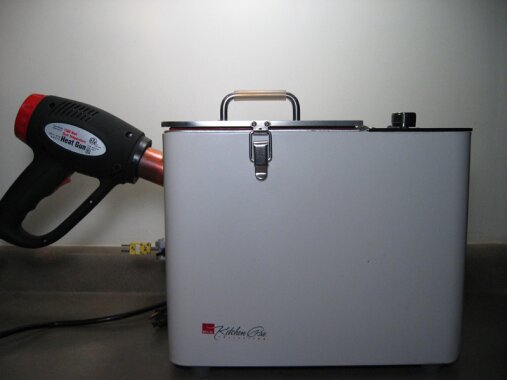 Regal Kitchen Pro off Craigslist, had to pay a little more than I wanted to for it, but the thrift stores around here are terrible for this kind of stuff and not many February yard sales in Western PA. 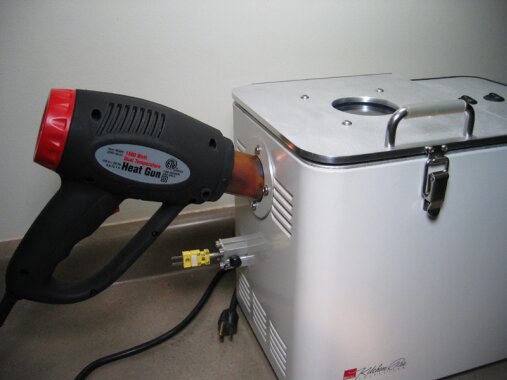 Ubiquitous $9.99 HF heat gun, 1 1/2" ID copper pipe for heat port, trim ring is scrap aluminium that just happened to be painted a close match to the BM. TC mount is a small bit of aluminium extrusion (hi-tech erector set) from the scrap box, a 1/4 turn on the knob releases the TC to pull it out. Ubiquitous $9.99 HF heat gun, 1 1/2" ID copper pipe for heat port, trim ring is scrap aluminium that just happened to be painted a close match to the BM. TC mount is a small bit of aluminium extrusion (hi-tech erector set) from the scrap box, a 1/4 turn on the knob releases the TC to pull it out.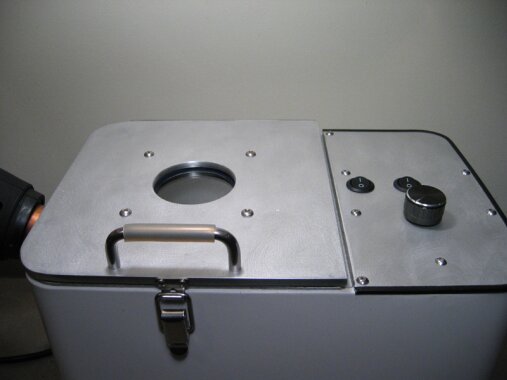 Latch and handle are from McMaster, cut about a 1/4" off the handle and added the silicone tubing which works surprisingly well, that part barely gets warm during a roast. Lid is 1/4" aluminium that I bought from a local steel yard, control panel is from my scrap box. Both sanded with an orbital sander and 180 grit to produce a pretty cool pattern that doesn't come out well in photos. The downside is it scratches easily, the upside is that a sanding block with some 220 grit "erases" everything and you can easily do it over. Still researching ways to protect it. 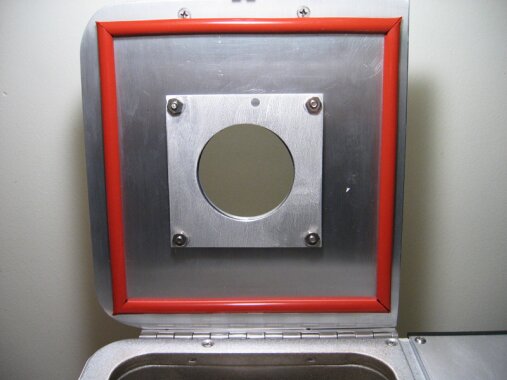 Seal is from McMaster and a little bit difficult to get nice cuts on, well for me at least. It's a durometer of 60A which ended up being a bit stiffer than I had hoped so I had to add the latch to get a good seal, the upside is that being a bit stiffer it should last longer. I believe it is rated to 500F but the adhesive on it is only rated to 250F, still stuck on there pretty good after 5 or 6 roasts so we'll see how long it lasts. If not long, I'll have to break out everybody's favorite red adhesive and glue it back on. View port is glass from the bread machine, sandwiched between two silicone gaskets cut from a cheap baking mat. The plate itself is threaded and the nuts are used as "jam" nuts to hold everything in place because I did not clamp the glass down firmly, I wanted it to float a little bit. Tight enough to seal but with a little wiggle room to allow everything to expand with the heat and hopefully not crack the glass. SS piano hinge is from the scrap box. Ive been using the term "scrap box" somewhat generically, you can easily substitute the word scrounged...  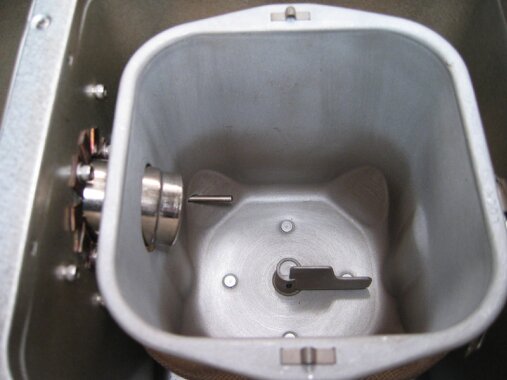 Roast chamber had the nasty bits bead blasted off by a friend. Added a set screw to the mixing paddle per SunCountry just in case. TC position is fine for 3/4 lb roasts (my usual size) and up and is a little exposed on 1/2 lb roasts so the temps might read a little higher but is still workable. I'm using the RoasterThing software and TC interface to a laptop. I use a shop vac/bucket setup for cooling so I simply suck the beans out of the roast chamber eliminating the need for it to be quickly removable I have a 3" wide piece of 1/8" aluminium bolted across the full width of the heat port side of the inner chamber for support. You're not going to do chin-ups off it, but it is more than strong enough for it's intended purpose. Bringing the HG in from the side does limit maximum roast size, but I'm reasonably certain I can do up to a pound. There is also some room to move the HG up some, this is just where it ended up for this build. I had to start somewhere... 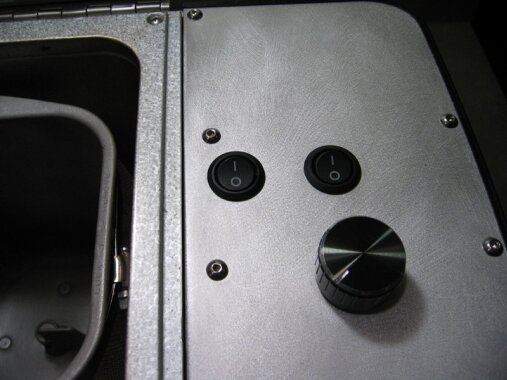 HG control is a HF router speed control that I er, um, rearranged, pretty sure the warranty is void now Just using the variable portion of it and skipped the "full on" position. Left switch controls the BM motor. I have some ceramic fiber insulation double wrapped in heavy duty foil as a barrier between the outer roast chamber and the electrical bits, still gets to about 150F on that side, I don't believe that will be a problem though.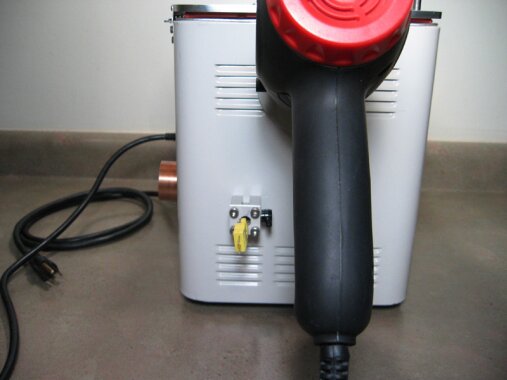 TC mount is actually bolted on from the inside, the four screws you see are simply holding the trim plate on. Can you say overkill boys and girls, sure you can. Oh Well...   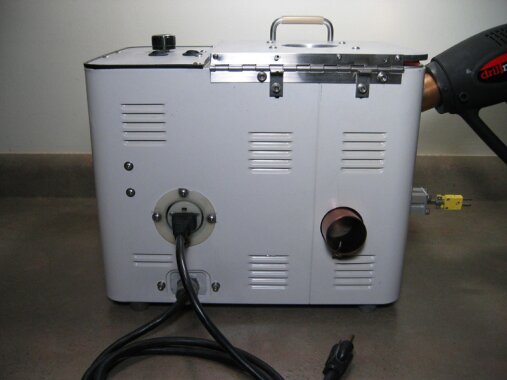 Exhaust port is a little short, just trying to salvage my failed first attempt at the heat port, doesn't pose any problems though. Most of the bigger chaff stays inside the roaster, but due to the vigorous agitation of the beans there is a "chaff dust" that exits through this port. Fortunately it's mostly confined to the counter area and wall directly behind the roaster and not all over the kitchen, deemed an "acceptable mess" in this single person household. SS corner braces hacked down a bit serve as stops for the door so I don't end up bouncing it off the back of the roaster and breaking the glass in the heat of the moment. Main power cord on the bottom. HG plugs into the round outlet controlled by the HF router speed controller. Shortened the power cable on the HG to make things a little neater. 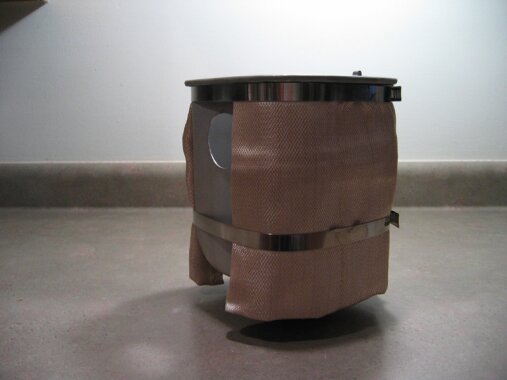 Roast chamber wrapped in a "fire blanket", from reading the CS forums it seems these things are available on every street corner in Austrailia, a little bit harder to find in the US, ordered this one from Home Depot. Held on with #104 SS hose clamps from Lowes. I still have a piece of ceramic fiber insulation that I might try to encase with the blanket, this is working well enough for now though. Well that's about it for now, just need to spend some quality time learning to roast with it, finally! and time to start work on a new brewery, I love this stuff 
Edited by MerlinWerks on 02/27/2014 1:17 PM |
|
|
|
| Lawnmowerman |
Posted on 02/27/2014 1:26 PM
|
 Pounder  Posts: 546 Joined: March 14, 2012 |
Its beautiful! How many roasts have you done? How many roasts have you done?
Bad coffee prevails when good coffee roasters stand by and do nothing.
|
|
|
|
| MerlinWerks |
Posted on 02/27/2014 1:29 PM
|
|
Newbie Posts: 42 Joined: October 10, 2013 |
Thanks! Five so far with this roaster. |
|
|
|
| ginny |
Posted on 02/27/2014 1:31 PM
|
 Founder Posts: 3476 Joined: October 24, 2005 |
Merlin: that is one fine roaster, thanks you for taking the time to post about the wrk and including the photo's... and thanks so much for the kind words about humble HRO - we appreciate it very much. I would love to see a couple of your roasts, have you done many so far? thanks in advance, ginny  |
|
|
|
| MerlinWerks |
Posted on 02/27/2014 1:39 PM
|
|
Newbie Posts: 42 Joined: October 10, 2013 |
Thanks Ginny, I'll post some roast pics later tonight... |
|
|
|
| Lawnmowerman |
Posted on 02/27/2014 2:52 PM
|
|
Pounder Posts: 546 Joined: March 14, 2012 |
Thank you very much for posting this roaster. I especially like the lid seal. Does it prevent smoke from escaping...to the point that during 1st crack no smoke pours out around the perimeter? That would be ideal and im interested in making a better seal on my next b m roaster. How much does mcmaster charge?
Bad coffee prevails when good coffee roasters stand by and do nothing.
|
|
|
|
| MerlinWerks |
Posted on 02/27/2014 3:09 PM
|
|
Newbie Posts: 42 Joined: October 10, 2013 |
It does make a pretty good seal and I don't believe you'll get any smoke out of it. I'll verify that on my next roast, probably this weekend, I can say if it is leaking from the lid it definitely is not obvious. I believe it was a little less than $2/ft. with a five ft. minimum. The minimum shipping charge to my location is around $5, but I'm only a few hours away from them. |
|
|
|
| MerlinWerks |
Posted on 02/27/2014 6:20 PM
|
|
Newbie Posts: 42 Joined: October 10, 2013 |
Here you go Ginny...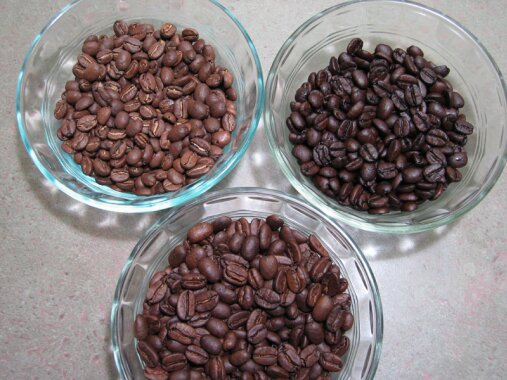 Left is Burindi Kirimiro from Sweet Marias Middle is Sumatra Lintong from Burmans Right is Brazil Fazenda from Burmans I buy most my greens from Burmans these days good service and some nice specials. And yes I was going for three different roast levels |
|
|
|
| Airhan |
Posted on 02/27/2014 6:59 PM
|
 1/2 Pounder  Posts: 228 Joined: September 29, 2013 |
How are your roasts tasting? Those beans look mighty fine, as does your roaster!
Aaron
"Grind it like it did you some great injustice!"D.L.Clark |
|
|
|
| MerlinWerks |
Posted on 02/27/2014 7:39 PM
|
|
Newbie Posts: 42 Joined: October 10, 2013 |
Thanks for the compliments. I've been very pleased with what ends up in the cup so far. The Burindi and Sumatra were just done last night so they are sleeping, to my taste at least a 3-4 day rest is required for just about any bean. The Brazil taste like a good dark roast, mostly roast flavor, I do that for my brother while occasionally slipping in some lighter roasts, trying to educate his palate along with my own I did some Indian Arabidecool and Bali Blue Moon when I did the Brazil earlier and those are what I've been drinking this week so they are almost gone. I am finding I prefer the flavors of the HG roasts more than the WhirlyPop roasts, but can't quite put my finger on it yet. I have been roasting since October, mostly with the WhirlyPop and have logged about 55 roasts and probably a dozen or so before I started logging them. I think I can honestly say that I've only had a couple that were somewhat less than pleasant to drink. For dinner parties with friends it's normally expected that I will be bringing dessert, now it's expected that I will be bringing dessert AND coffee FWIW, I've been using a #6 Melitta cone for pour over since I started drinking coffee in earnest a bit more than 30 years ago. Bought a used Technivorm about a month and a half a go and that is now my go to brewing method, really enjoying it. Also bought a used Gaggia Classic, but typically only fire it up on weekends. Baratza Preciso for a grinder. Edited by MerlinWerks on 02/27/2014 7:48 PM |
|
|
|
| allenb |
Posted on 02/27/2014 7:49 PM
|
 Administrator Posts: 3858 Joined: February 23, 2010 |
Ditto on all the positive comments above! Beautiful roaster and excellent craftsmanship! Makes me want to build one. Allen 1/2 lb and 1 lb drum, Siemens Sirocco fluidbed, presspot, chemex, cajun biggin brewer from the backwoods of Louisiana
|
|
|
|
| MerlinWerks |
Posted on 02/27/2014 9:07 PM
|
|
Newbie Posts: 42 Joined: October 10, 2013 |
Thanks Allen I was hoping this would provide at least a little inspiration. As I mentioned before IMHO the exchange of ideas and experiences are what forums like this are all about, hopefully helping to get a little more enjoyment out of the hobby. Just wanted to add my two cents... Oh no, getting a little teary eyed, Group Hug everybody
Edited by MerlinWerks on 02/27/2014 9:18 PM |
|
|
|
| icantroast |
Posted on 02/28/2014 8:19 AM
|
 1/4 Pounder  Posts: 71 Joined: January 11, 2014 |
My gosh, this thing is a work of art. It's a wonder to behold! Haha, but seriously, this is amazing, nice job! Question: how do you attach the switches (black circles) so cleanly? Are you gluing them from the underside or something?
-Jim
|
|
|
|
| MerlinWerks |
Posted on 02/28/2014 9:56 AM
|
|
Newbie Posts: 42 Joined: October 10, 2013 |
Thanks Jim, I appreciate the comments. The switches basically snap in to a 3/4" hole, to get them out you press in on clips that are an integral part of the switch and push them back out. |
|
|
|
| JETROASTER |
Posted on 02/28/2014 1:27 PM
|
 Administrator Posts: 1780 Joined: March 06, 2010 |
Very nice build. I don't need one of these, but if I did, I would copy you for sure. Here's a pic of one of those switches for anyone that is interested. They are common in the vacuum cleaner world, and will typically carry 12amps safely. Once again, very nice machine. Cheers, -Scott
JETROASTER attached the following image:

|
|
|
|
| MerlinWerks |
Posted on 02/28/2014 9:00 PM
|
|
Newbie Posts: 42 Joined: October 10, 2013 |
Thanks for the compliment Scott. Yep, that's pretty similar to the switches I used. I think I bought a bunch from a surplus house many moons ago for various electronic projects. The round ones are definitely a bit easier to work with than the rectangular ones. |
|
|
|
| Suncountry |
Posted on 03/01/2014 12:41 AM
|
|
Newbie Posts: 18 Joined: November 29, 2013 |
Hey that build looks great. I came across another BM so if I get bored I might try another build with a side port. Thanks for showing it off. |
|
|
|
| MerlinWerks |
Posted on 03/01/2014 9:51 AM
|
|
Newbie Posts: 42 Joined: October 10, 2013 |
Thanks SC. I do like the side entry for this roaster, nice and clean looking. This particular implementation does reduce the maximum roast size when compared to a top side port, but like I mentioned I'm pretty sure I could accommodate at least a pound as is. Plus there is room for the port to come in higher which would allow for larger roasts. When I started this I simply picked the middle side vent and dremeled out the louvers, but there is no reason you couldn't start as high as the sidewall will allow. Edited by MerlinWerks on 03/01/2014 9:57 AM |
|
|
|
| icantroast |
Posted on 03/01/2014 10:30 AM
|
|
1/4 Pounder Posts: 71 Joined: January 11, 2014 |
Quote MerlinWerks wrote: Thanks SC. I do like the side entry for this roaster, nice and clean looking. This particular implementation does reduce the maximum roast size when compared to a top side port, but like I mentioned I'm pretty sure I could accommodate at least a pound as is. Plus there is room for the port to come in higher which would allow for larger roasts. When I started this I simply picked the middle side vent and dremeled out the louvers, but there is no reason you couldn't start as high as the sidewall will allow. The reason this side entry is so awesome is because it allows you to have a viewing port. That was my main concern about bread machine roasting--with the top down design it's so hard to see what's going on! -Jim
|
|
|
|
| icantroast |
Posted on 03/01/2014 12:52 PM
|
|
1/4 Pounder Posts: 71 Joined: January 11, 2014 |
Mr. Merlin, can you please lend some insight on how to mount the k-type thermocouple? I just bought one but don't really know where to put it. Seems like it will be a pain to take it out whenever I'm done with a roast and then put it back in, and I just don't know how exactly to install it so it wont fall out while roasting etc. Thanks for any help! -Jim
|
|
|
|
| MerlinWerks |
Posted on 03/01/2014 1:01 PM
|
|
Newbie Posts: 42 Joined: October 10, 2013 |
I can try, over in your build thread you'll need to post a link to the thermocouple you bought and a picture of your current roasting setup. |
|
|
|
| icantroast |
Posted on 03/01/2014 1:39 PM
|
|
1/4 Pounder Posts: 71 Joined: January 11, 2014 |
I'll try to get some pictures of my setup soon (it pales in comparison to yours, lol), but this is the unit I bought: http://www.sweetm...ouple.html
-Jim
|
|
|
|
| Mad Mac |
Posted on 10/26/2014 12:04 PM
|
 1/4 Pounder Posts: 55 Joined: October 25, 2014 |
I been looking at your this setup for a long time. It's the best looking bread maker and heat gun setup I've come across. It looks very industrial. Inspired by this, I made a plywood cover for my bread maker. The heat gun nozzle hole is insulated with fiberglass cloth. I have an oval slot for exhaust. I drilled a hole on the cover for the thermocouple cable. It works for now. I plan to make a metal cover too. |
|
|
|
| MerlinWerks |
Posted on 10/28/2014 7:48 PM
|
|
Newbie Posts: 42 Joined: October 10, 2013 |
Thanks for the kind words, I do appreciate it. My roaster is still performing very well, I have a little over 100 3/4 lb. roasts on it now. I hope you get as much enjoyment and great coffee out of your roaster as I do mine. To be honest though I'm really hoping the Aillio roaster performs as well as it's designers intend. |
|
|
|
| Mad Mac |
Posted on 10/29/2014 2:40 AM
|
|
1/4 Pounder Posts: 55 Joined: October 25, 2014 |
Wow, that's some serious roaster. |
|
|
|

Page 1 of 2: 12
| Jump to Forum: |
Similar Threads
| Thread | Forum | Replies | Last Post |
|---|---|---|---|
| Finally Completed Roaster Project | Fluidbed Roaster | 10 | 05/25/2022 9:43 AM |
| Fluidbed Roaster project | Fluidbed Roaster | 145 | 03/01/2022 11:27 PM |
| Hottop Project outside the box | Dataloggers/Controllers/Rate of Rise Meters | 31 | 05/08/2021 7:13 AM |
| First drum roaster project - ideas for drums? | Drum Roasters | 7 | 08/15/2020 10:45 AM |
| MBA Capstone project survey | Roasting Coffee | 1 | 02/15/2020 5:20 PM |
Powered by PHP-Fusion Copyright © 2024 PHP-Fusion Inc
Released as free software without warranties under GNU Affero GPL v3
Designed with ♥ by NetriXHosted by skpacman