
Login

Shoutbox
You must login to post a message.
renatoa
04/17/2024 9:27 AM
 , branchu
renatoa
04/14/2024 5:56 AM
TheOtherJim and papajim,
 !
!
!allenb
04/11/2024 6:33 PM
Zemona

renatoa
04/11/2024 9:19 AM
Mrbones and sgupta,  ?
?
?renatoa
04/10/2024 1:09 AM
 , Ed K
Forum Threads
Newest Threads
War on Farmers by Su...Kaleido Roaster PID ...
Green coffee sellers
Wet beans - Estimati...
Skywalker roaster mods
Hottest Threads
| Skywalker roaster... | [292] |
| Skywalker, the AL... | [214] |
| Skywalker Roasts | [94] |
| My first popcorn ... | [47] |
| War on Farmers by... | [39] |
In Memory Of Ginny

Donations
Latest Donations
dmccallum - 10.00
JackH - 25.00
snwcmpr - 10.00
Anonymous - 2.00
Anonymous - 5.00
dmccallum - 10.00
JackH - 25.00
snwcmpr - 10.00
Anonymous - 2.00
Anonymous - 5.00
Users Online
Guests Online: 1
Members Online: 0
Total Members: 8,208
Newest Member: branchu
Members Online: 0
Total Members: 8,208
Newest Member: branchu
View Thread
Who is here? 1 guest(s)
Page 1 of 2: 12
|
 Gas Fired Drum Roaster - Lets Build It
|
|
| Lylabrown |
Posted on 06/15/2014 1:01 PM
|
 1/4 Pounder  Posts: 158 Joined: February 15, 2012 |
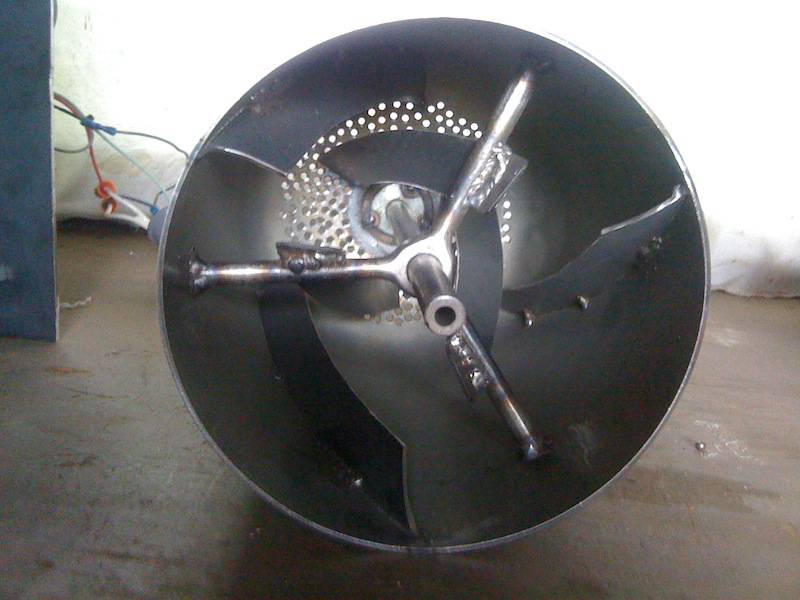
The desired features and qualities for this build are: - Solid drum. - Capacity up to 2lb. - Airflow & Propane gas controlled via Laptop/TC4C/Roastlogger. - Manual overrides for electric/gas components with the flip of a switch. - Cyclone for chaff collection. - Simple to maintain; all mechanical, gas, and electric components accessible. - Safety via PID = Fire ignitor if flame goes out, Fire cutoff solenoid if that fails. - Good view of beans and flame. - Fun to build! I've already built and tested the drum. It's a salvaged 20lb fire extinguisher (thanks AllenB) with a 7" diameter and 3/32 wall thickness, 10" long. The vanes are 1" tall, and set at 20*. Mixing from front-to-back & back-to-front is excellent. There's also a good dead-space in bean rotation on the front face which is ideal for the sight-glass and bean probe (as seen in the attached photo). Russ
Lylabrown attached the following images:


|
|
|
|
| Ringo |
Posted on 06/16/2014 4:42 AM
|
 Pounder  Posts: 474 Joined: January 14, 2010 |
That is awesome. That's a very professional design and will work great. You have the hard part done. I love seeing more and more drums getting built.
All you need in life is ignorance and confidence, and then success is sure. Mark Twain
|
|
|
|
| Lylabrown |
Posted on 06/17/2014 10:16 PM
|
|
1/4 Pounder Posts: 158 Joined: February 15, 2012 |
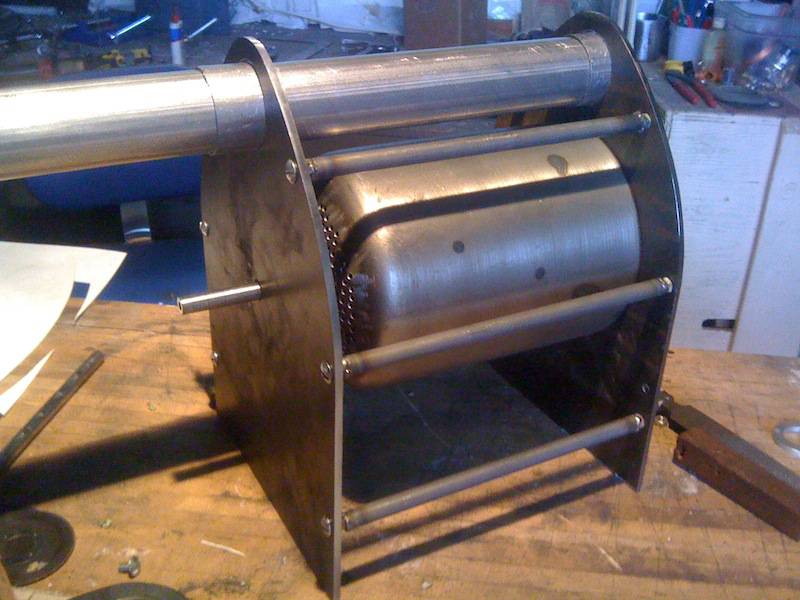
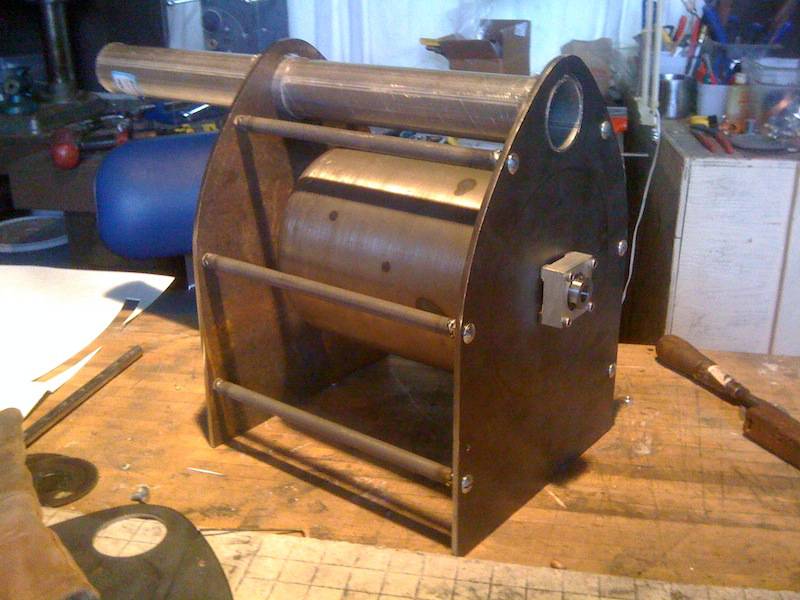
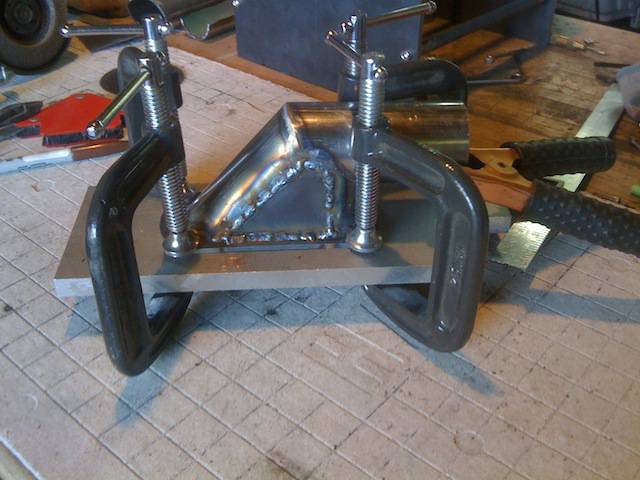
Thanks Ringo. I referenced your drum photos many times when trying to figure out the configuration of the mixing vanes and support arms. That's the beauty of posting build logs, somebody somewhere is bound to get useful information out of them. I made some progress today! The rough framing for the roast chamber is complete. The front & rear walls are 3/16" mild steel, which will be strong -- but at the same time keep the thermal mass to a minimum. The roast chamber will be double-walled on the back with 1/8"sheet, and the sidewalls & ceiling (between the drum and exhaust line) in 3/32" thick steel. I decided to go with an 2" OD exhaust line (probably overkill). Its enclosed in the framing like the probat's. It'll be removable from the rear for cleaning with minimal fuss. The pressed steel bearing block was too large for my liking (see photo), so I made one out of aluminum instead. It has the added advantage of keeping the bearing that much further away form the heat. Russ
Lylabrown attached the following images:

|
|
|
|
| allenb |
Posted on 06/18/2014 6:08 PM
|
 Administrator Posts: 3858 Joined: February 23, 2010 |
Howdy Russ, this is looking like it will be giving Probat some competition. I've always dreamed of building one that resembled the older probat L-12 shop roasters, someday... Great work! keep us posted. Allen 1/2 lb and 1 lb drum, Siemens Sirocco fluidbed, presspot, chemex, cajun biggin brewer from the backwoods of Louisiana
|
|
|
|
| Lylabrown |
Posted on 06/23/2014 7:31 PM
|
|
1/4 Pounder Posts: 158 Joined: February 15, 2012 |
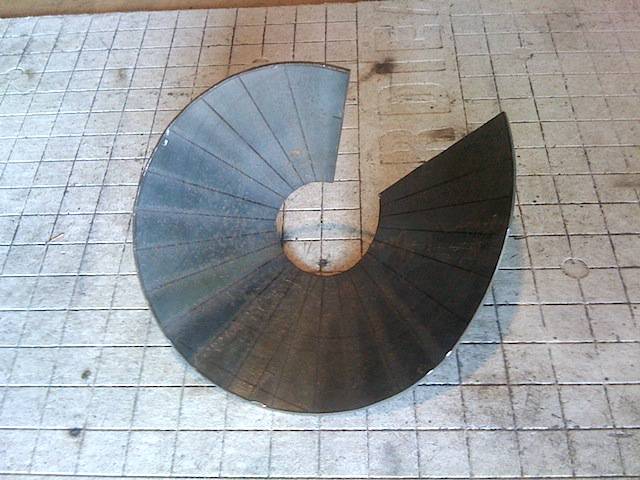
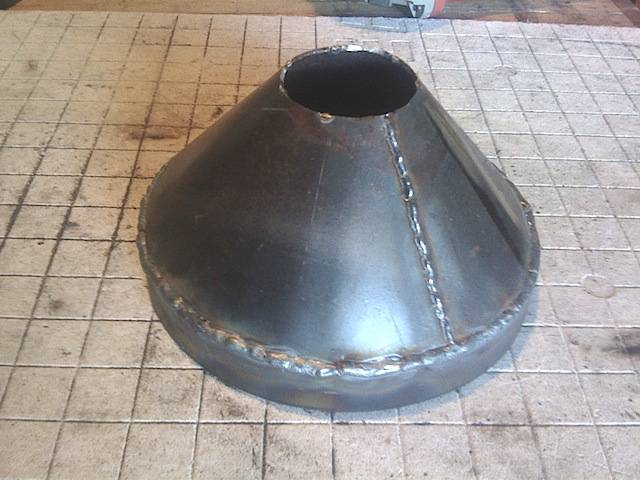
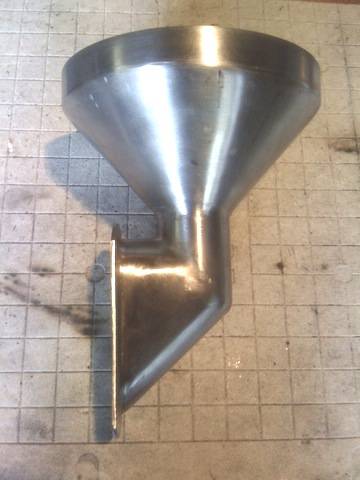
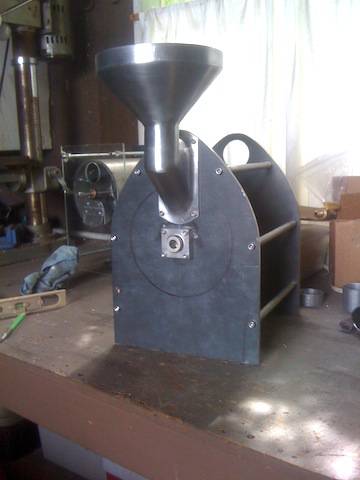
I appreciate the praise Allen. Yep, I'm blatantly stealing many of Probat's design ideas, particularly the Probatino. It's a beautiful roaster. The bean hopper/exhaust manifold is mostly done. Its constructed of 2" tubing and 3/32" sheet steel. The ring at the top of the hopper is leftover material from the drum. The fit-up and welding went relatively fast, the shaping and finishing took forever. Russ
Lylabrown attached the following images:

|
|
|
|
| Omega |
Posted on 06/23/2014 11:52 PM
|
 1/4 Pounder Posts: 132 Joined: June 13, 2014 |
Now THAT'S impressive! Someone has some incredible fabrication skills. The roaster is looking GREAT! |
|
|
|
| Ringo |
Posted on 06/24/2014 6:14 AM
|
|
Pounder Posts: 474 Joined: January 14, 2010 |
This roaster is going to be great. I love to see the quality of craftsmanship you are putting into this roaster its going to be great. On my build when welds were in the picture I had too pull back so the poor welds did not show much. I had a friend who is a welder come over and see my roaster and he said "you should have had me weld the thin stuff". Its an awesome thing when you roast the first batch and you think "I made this".
All you need in life is ignorance and confidence, and then success is sure. Mark Twain
|
|
|
|
| snwcmpr |
Posted on 06/24/2014 7:45 AM
|
 1 1/2 Pounder  Posts: 925 Joined: March 03, 2011 |
Yes, impressive. Ken in NC --------------
Backwoods Roaster "I wish I could taste as well as I wish I could roast." As Abraham Lincoln said "Do not trust everything you read on the internet". |
|
|
|
| JackH |
Posted on 06/26/2014 6:49 AM
|
 Administrator Posts: 1809 Joined: May 10, 2011 |
Russ, this looks like a great project! That gear motor looks familiar, is it the one from Surplus center? They were a great deal but I think they no longer have any. I will be following this and maybe be able to put one together myself. ---Jack
KKTO Roaster. |
|
|
|
| Lylabrown |
Posted on 06/26/2014 11:09 PM
|
|
1/4 Pounder Posts: 158 Joined: February 15, 2012 |
Wow! Thanks for all the compliments. I'm glad you guys like the progress. Ringo, Agreed, welding thin stuff is no fun. It's a fine line between too little and too much heat. The great equalizer is an angle grinder with a 60 grit flapper wheel. Jack, That's the same motor. It's been sitting in a drawer for two years waiting for the right project. It was too good of a deal to pass up! On a side note: I was prowling google images for good tear-down photos of Probat's and stumbled upon this site: http://translate..../289965659 Check out the "1 kilo CUBE" he made, found on the left sidebar. Neat stuff. Russ |
|
|
|
| allenb |
Posted on 06/27/2014 8:25 AM
|
|
Administrator Posts: 3858 Joined: February 23, 2010 |
My vote goes to the paisley cube. But, we want you to stay with classic German roaster colors so don't go getting any ideas.  Allen 1/2 lb and 1 lb drum, Siemens Sirocco fluidbed, presspot, chemex, cajun biggin brewer from the backwoods of Louisiana
|
|
|
|
| Lylabrown |
Posted on 07/15/2014 6:30 PM
|
|
1/4 Pounder Posts: 158 Joined: February 15, 2012 |
Not to worry Allen, The finished roaster will be cold and stark (black with some stainless bits), very German indeed. The pipe burner and gas controls are finished. Here's a video of the basic setup: http://vimeo.com/... The solenoid is a clippard mouse valve (http://www.clippa.../ET-2-12-H) with the low pressure/high flow orifice. It'll be controlled via TC4C & Roastlogger. One of the needle valves bypasses the solenoid to provide the low flame state, the other controls flow through the solenoid for the high flame state. It works surprisingly well. Russ |
|
|
|
| allenb |
Posted on 07/17/2014 9:13 PM
|
|
Administrator Posts: 3858 Joined: February 23, 2010 |
Looking good! It looks like you'll have plenty of control with your setup without going proportional. One benefit of this valve versus the proportional is the much lower current draw. My proportional valve runs at 2.3 watts at full open versus your Clippard ET-2 at a little over 1/2 watt. I'm assuming you can just use a simple transistor circuit switched by the Arduino to drive it? Allen 1/2 lb and 1 lb drum, Siemens Sirocco fluidbed, presspot, chemex, cajun biggin brewer from the backwoods of Louisiana
|
|
|
|
| broeker |
Posted on 07/18/2014 4:49 AM
|
 1/4 Pounder Posts: 75 Joined: June 23, 2014 |
Thats a pretty cool gas setup shown on your video....... mmmmm are those clip valves difficult to get? maybe I could control my setup with the same thing..... nice work :-) |
|
|
|
| Lylabrown |
Posted on 07/18/2014 12:37 PM
|
|
1/4 Pounder Posts: 158 Joined: February 15, 2012 |
Hey Allen, Much credit goes to you for blazing-the-trail when it comes to gas control for home roasters. I'm very happy with how the control scheme works. The trick was drilling the right size orifice (#72 drill) in relation to system psi (max. 10psi) to allow for the right btu output (max. 26k), but also to promote good air mixing by the venturi at both low and high pressure for a stable flame. Using appropriately sized needle valves really helps as well. I liked the low power consumption specs of the valve as well. It has a side benefit of allowing the valve to run very cool. I did an experiment running the valve 5 seconds on/off for an hour using a timer circuit and the valve remained at ambient temperature the whole time. I'm going to use a DC-to-DC SSR for switching the arduino's output. I want to keep the arduino/TC4C isolated from the solenoid. Pieter, The clippard valves are easily attained from the manufacturer (with shocking shipping rates). I decided to order mine from "the bay" instead, mine was under $10 with free-shipping! The hard part was finding one with the "H" designation (low pressure/high flow orifice). |
|
|
|
| allenb |
Posted on 07/18/2014 3:17 PM
|
|
Administrator Posts: 3858 Joined: February 23, 2010 |
Thanks Russ! It was fun experimenting with gas valves/controls during the design and testing phase. Much credit goes to Stan (Rustic_Roaster) who was my teacher and chief driver board designer during the conceptualization and design phase. I'm assuming the #72 drilled orifice is the burner orifice at the venturi? You can't beat a $10 dollar price tag for a solenoid that will handle billions of cycles and one that won't overheat during rapid cycling to boot! Please post details as to your whole gas burner setup and control so others can benefit from your design. I think there will be many wanting to power their roaster using your approach. If you don't mind, it would also be great to be able to post your burner and control details in our "Electric and Gas Heat Sources" forum. Keep us posted! Allen 1/2 lb and 1 lb drum, Siemens Sirocco fluidbed, presspot, chemex, cajun biggin brewer from the backwoods of Louisiana
|
|
|
|
| TheoBro |
Posted on 10/08/2015 10:22 AM
|
|
Newbie  Posts: 4 Joined: September 29, 2015 |
This is a wonderful project I wanted to copy but it seems to have stalled. I hope the OP is still around and can update. |
|
|
|
| Turingalad |
Posted on 11/06/2015 1:40 PM
|
 Newbie Posts: 30 Joined: November 18, 2014 |
Lylabrown, What's the news on your build?? I've ebjoyed following this and learned a lot, and can't wait to see more! Have you decided what to do with prob-placement/datalogging? How about airflow/chaffcollecting? Awesome build so far! |
|
|
|
| Turingalad |
Posted on 12/07/2015 7:42 PM
|
|
Newbie Posts: 30 Joined: November 18, 2014 |
Russ, or Allen, I'm interested in more of a breakdown of the burner setup. I'm pretty novice when it comes to LP and automation. I'm using propane, and Artisan (but could switch to another platform if needed), on a 1k drum roaster (very similar setup to Russ). I started out looking for a simple way to gauge gas input to accurately manually input that data in Artisan, but rediscovered this thread and am now wanting more... Thanks |
|
|
|
| allenb |
Posted on 12/08/2015 9:50 PM
|
|
Administrator Posts: 3858 Joined: February 23, 2010 |
Quote Russ, or Allen, I'm interested in more of a breakdown of the burner setup. I'm pretty novice when it comes to LP and automation. Shoot us some specifics of what areas of burner setup you're needing help with. Lots of possible areas to dive into when it comes to regs, solenoids and burners. My preference would be to go with Russ's setup with it's simple proportional on-off mode of operation. Something to consider with drum roasters is their inability to be controlled well for profile following due to the large bean temperature hysteresis. On the other hand, Tom Coxon has added features in Roastlogger that allow multiple PID settings which may allow one to fine tune it well enough to eliminate large over/undershoots during 1c to finish. I would love to hear from anyone who's been able to tame a drum roaster using Roastlogger with multiple PID settings. Allen 1/2 lb and 1 lb drum, Siemens Sirocco fluidbed, presspot, chemex, cajun biggin brewer from the backwoods of Louisiana
|
|
|
|
| Turingalad |
Posted on 12/09/2015 1:12 AM
|
|
Newbie Posts: 30 Joined: November 18, 2014 |
(Someone let me know if I'm jacking this thread... I'd be happy to post elsewhere if more appropriate.) Allen, I've got a 1k solid drum roaster, and I'm wanting to improve my propane setup from the ground up. For immediate purposes, I'm interested in having adequate BTUs/gas power, and a way to gauge BTU's/bars/PSI/water column (like I said, I'm a novice with LP). I'm also interested in what it would take to get a setup like Russ... Automated. I know my current setup is underpowered because my flames look more like a bunch of Bic lighters and less like a torch. It wasn't always like this. Perhaps my new (used) propane tank/hose are different than the ones I had before? I just don't have any gauges/controls on the line, other than a manual gas-line on/off valve (see pics) that I tweak as I roast, watching the height/color of flame, and keeping an eye on my machine temp thermometer. I purchased my roaster from a guy who made them in his garage, and have lost touch, so I don't know exact specs on everything. Pics of my setup: 1. Burner: https://drive.goo...cslist_api 2. Intake: https://drive.goo...cslist_api 3. More pics: https://drive.goo...JfRlk/edit 4. Even more pics: https://drive.goo...VKSU0/edit The burner is nearly identical to one of these Outdoor Burner/Fryers (minus the frame, of course) http://www.turkey-fryers.com/SQ14_propane_patio_stove.htm What do I need to gauge gas pressure? What's ideal gas power for a 1k setup like mine? (And how to know if what I have is adequate). Side question, while I'm thinking about it... After I work out my gas setup to gauge/adjust accurately, I'd like to figure out a good starting point for using my setup to run small samples (I've never been able to get a good batch under 1Lb...) Thanks -Devin |
|
|
|
| allenb |
Posted on 12/09/2015 10:23 AM
|
|
Administrator Posts: 3858 Joined: February 23, 2010 |
Quote (Someone let me know if I'm jacking this thread... I'd be happy to post elsewhere if more appropriate.) Actually this would be a good idea since it will end up being it's own project and for allowing others to find your build. Copy and paste your last post into a new thread and we'll delete it from Russ's thread. Allen 1/2 lb and 1 lb drum, Siemens Sirocco fluidbed, presspot, chemex, cajun biggin brewer from the backwoods of Louisiana
|
|
|
|
| Turingalad |
Posted on 12/09/2015 4:07 PM
|
|
Newbie Posts: 30 Joined: November 18, 2014 |
Got it. You can delete my post now. I found another couple threads on here including posts from Russ and Allen that are helpful. Russ, sorry for jacking your thread. I'll be following your project for sure! I like what you're doing here. |
|
|
|
| Lylabrown |
Posted on 05/14/2017 4:02 PM
|
|
1/4 Pounder Posts: 158 Joined: February 15, 2012 |
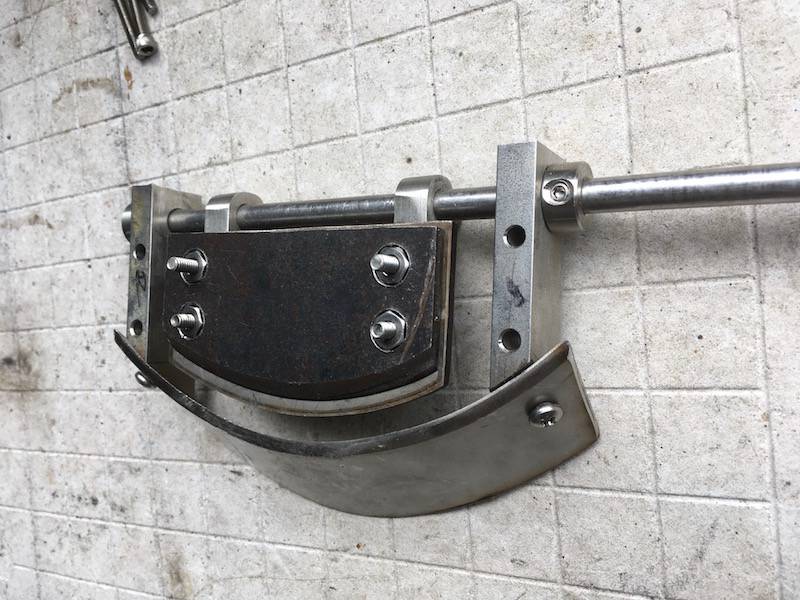
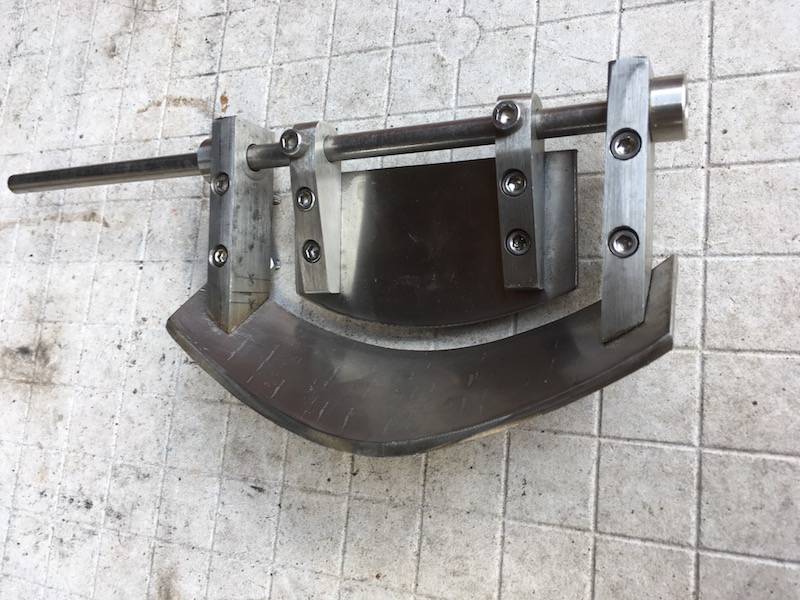
I'm finally back into working on this roaster after a long break. Two years ago I started doing contract work for a large timber company to collect data in the mountains of western oregon. My days were spent driving out to remote areas & bushwhacking through rugged terrain to collect detailed information on the flora of the forest. It was an amazing feeling working alone in a natural setting with no distractions of any kind. However, the work left me no free time or energy to tinker, which was a bummer. Anyways, the roaster should start coming together quickly now! Attached are photos of the dump door and trier assemblies I'm currently putting together.
Lylabrown attached the following images:


|
|
|
|
| allenb |
Posted on 05/15/2017 8:37 PM
|
|
Administrator Posts: 3858 Joined: February 23, 2010 |
Hey Russ, glad to see you back in the saddle! That's some very nice craftsmanship to say the least! Can't wait to see all this come together. Allen 1/2 lb and 1 lb drum, Siemens Sirocco fluidbed, presspot, chemex, cajun biggin brewer from the backwoods of Louisiana
|
|
|
|

Page 1 of 2: 12
| Jump to Forum: |
Similar Threads
| Thread | Forum | Replies | Last Post |
|---|---|---|---|
| Kaleido Roaster PID parameters | Roasting Coffee | 2 | 04/13/2024 3:07 PM |
| Skywalker roaster mods | Other Roasters | 293 | 04/07/2024 4:31 PM |
| Skywalker, the ALM chinese one pound roaster | Other Roasters | 215 | 04/02/2024 1:48 AM |
| My first popcorn mod roaster (vahegan) | Fluidbed Roaster | 48 | 03/24/2024 12:04 PM |
| Fatamorgana electric drum roaster | Other Roasters | 2 | 03/24/2024 10:03 AM |
Powered by PHP-Fusion Copyright © 2024 PHP-Fusion Inc
Released as free software without warranties under GNU Affero GPL v3
Designed with ♥ by NetriXHosted by skpacman