
Login

Shoutbox
You must login to post a message.
renatoa
04/25/2024 2:03 AM
AGZ and Intercolcoffee

allenb
04/23/2024 7:01 PM
Paul Kalb

renatoa
04/23/2024 4:34 AM
Coffee_Rabbit_Hole
and Michaelion,
and Michaelion,
renatoa
04/21/2024 2:35 AM
compactjack and GreenGenie
 ?
?
?allenb
04/19/2024 8:27 AM
eximwind
Forum Threads
Newest Threads
Skywalker roaster modsHello from Montreal ...
War on Farmers by Su...
Kaleido Roaster PID ...
Rainfrog's Roastmast...
Hottest Threads
| Skywalker roaster... | [301] |
| Skywalker, the AL... | [214] |
| Skywalker Roasts | [94] |
| Rainfrog's Roastm... | [54] |
| War on Farmers by... | [40] |
In Memory Of Ginny

Donations
Latest Donations
dmccallum - 10.00
JackH - 25.00
snwcmpr - 10.00
Anonymous - 2.00
Anonymous - 5.00
dmccallum - 10.00
JackH - 25.00
snwcmpr - 10.00
Anonymous - 2.00
Anonymous - 5.00
Users Online
Guests Online: 6
Members Online: 0
Total Members: 8,227
Newest Member: AGZ
Members Online: 0
Total Members: 8,227
Newest Member: AGZ
View Thread
Who is here? 1 guest(s)
 Hybrid Drum Roaster build
|
|
| broeker |
Posted on 06/24/2014 6:35 AM
|
 1/4 Pounder  Posts: 75 Joined: June 23, 2014 |
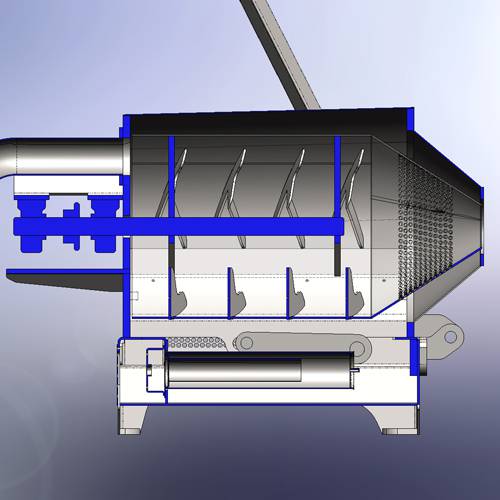
Hey Guys... So after a while checking out your fairly impressive builds, I've started to get the parts together and begun my preliminary 3d design. I have decided on a hybrid design with elements of both sample roaster (conical drum front & tipping discharge) along with a fixed back plate to allow easy hot air extraction & fitting of thermocouples etc. The vision is that the Gas burner directly heats the solid drum and the hot gasses created then enter the drum through the perforated conical section and exit through the fixed back plate to some sort of fan/cyclone system. I have plenty of design & workshop laser type equipment available to me to help the process :-) Drum 2.5mm Thick mild steel 250mm, Dia 325mm long plus cone. 25mm Dia shaft. Drive 58rpm Motovario drive with sprockets & chains to allow some playing with ratios Burner POLIDORO 41mj/h 250 long burner tube. My Gas fitter has plumbed up all the flame failure pilot light stuff and it runs from a 9kg gas bottle. What do you think? I'm trying to decide how best to extract the hot gasses....... most fans don't look like they will take any heat, and with the fabrication involved I'd sure like to buy one of the shelf and not fabricate that as well..... will one of those little metal squirrel cage fans stand the heat? What are your general exhaust temps? maybe I can get a bigger blower and dilute the exhaust stream with some ambient temp air with a choke sort of thing.. Pieter.
broeker attached the following images:


|
|
|
|
| Lylabrown |
Posted on 06/24/2014 10:33 AM
|
 1/4 Pounder Posts: 158 Joined: February 15, 2012 |
Hello and Welcome Pieter. Your design looks good. There are two areas that might need a little refining: First is the effect of thermal expansion on the drum. With the drum attached at the rear to maintain a tight gap on the rear plate, the conical front section will need to have some play to allow for expansion. I'm assuming you'll have a bearing there to support the front of the drum. A short (10mm) section of straight round tube extending from the conical section to mate with the bearing would permit movement along its axis. Second is the potential for the motor to overheat given its mounting to the "hot" parts. For a high temperature blower I'd look for ones used on wood or pellet stoves similar to this one: http://www.surplu...6-1436.axd. Keep us updated with your progress! Russ |
|
|
|
| broeker |
Posted on 06/26/2014 5:37 AM
|
|
1/4 Pounder Posts: 75 Joined: June 23, 2014 |
Hey Russ Thanks your input :-). I will look at putting a snout on it once the cone is formed...... I've made it a size that will match 50nb sch40 pipe..... I started with a nose bearing set up but am hoping things will stay pretty concentric..... I can add some bushes inside the external cone later if necessary I've got some silicone insulator things to bolt the drive on. Your pellet fire blower suggestion finically landed me a fan from one of those radiant pipe heaters things people have in warehouses.... It is made for hot gases :-) I'm stoked all the bits are arriving...... Few tweaks to the model once I've got the blower in my hands and it's all off to the laser. :-) |
|
|
|
| broeker |
Posted on 06/29/2014 2:24 AM
|
|
1/4 Pounder Posts: 75 Joined: June 23, 2014 |
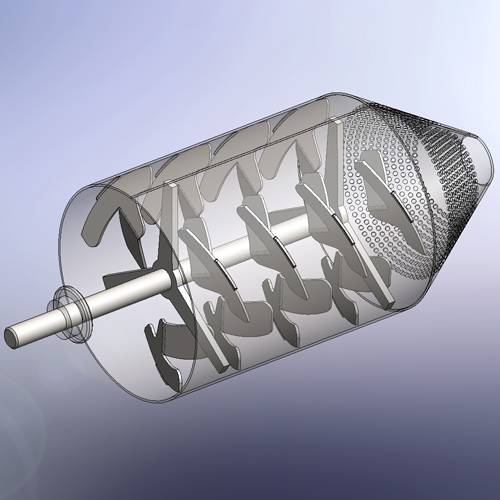
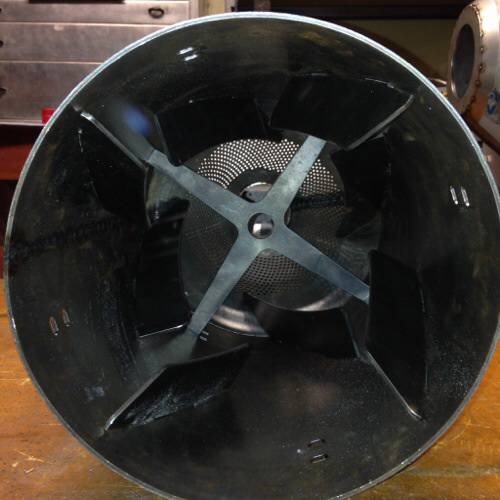
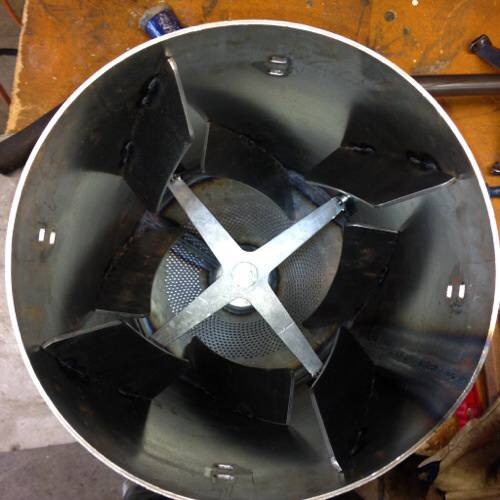
So after some very useful advice from Allen I have re-designed my drum vane's they are 40mm high set at 25 degrees. What do you guys think about the orientation & positioning of them? I've coloured the different pitch's two colours.... drum spins anticlockwise and is a sample roaster style with a cone at one end
broeker attached the following image:
|
|
|
|
| broeker |
Posted on 06/29/2014 7:03 AM
|
|
1/4 Pounder Posts: 75 Joined: June 23, 2014 |
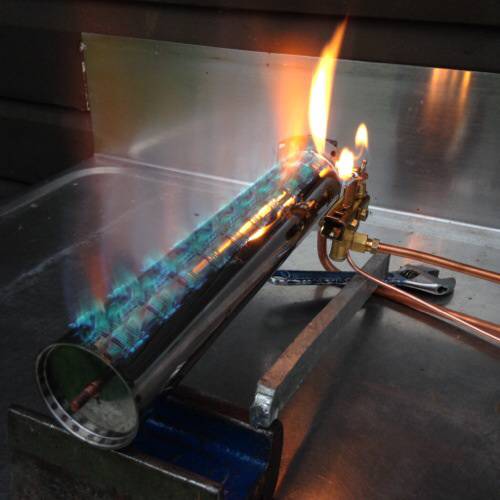
First burner test..... To determine the gap between it and the drum..... ( I've got 20mm of adjustment in both directions) It's goes better than I had expected. :-)
broeker attached the following images:

|
|
|
|
| Koffee Kosmo |
Posted on 06/29/2014 9:07 AM
|
 Administrator Posts: 1620 Joined: December 31, 2008 |
What a fantastic project Wishing you all the luck for an exceptional looking build KK I home roast and I like it. Designer of the KKTO
Roaster Build information https://homeroast...ad_id=1142 https://docs.goog...lide=id.i0 Blog - http://koffeekosm...gspot.com/ Bezzera Strega, Mazzer Robur Grinder, Pullman Tamper Convex, (KKTO) Turbo Oven Home Roaster. |
|
|
|
| Ringo |
Posted on 06/29/2014 6:40 PM
|
 Pounder  Posts: 474 Joined: January 14, 2010 |
Your veins look great to me but with your design it is a lot less important. On a standard drum the veins layout is important so the beans will dump. You have a sample roaster style so you just want to keep the beans rolling off the drum and the pile even front to back. So explaine the burner, it looks perfect. That flame layout if want you want, no hot spots. One thing to plan on your build is how to get a bean probe, this is going to be a Cadillac roaster so you will want to know where your beans are. I suspect with the design of this little Jim you have a plan.
All you need in life is ignorance and confidence, and then success is sure. Mark Twain
|
|
|
|
| broeker |
Posted on 06/30/2014 3:30 AM
|
|
1/4 Pounder Posts: 75 Joined: June 23, 2014 |
Thanks Ringo, I will be able to put any number of probes through the back wall of the roaster, it's similar to a normally configured drum roaster at the rear, just has a conical "sample" style shape at the front. I'm hoping it will be the best of both worlds :-) (Time will tell) |
|
|
|
| broeker |
Posted on 06/30/2014 4:45 AM
|
|
1/4 Pounder Posts: 75 Joined: June 23, 2014 |
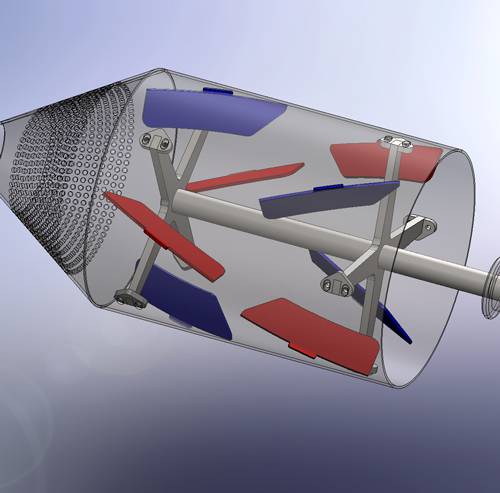
-Hopefully I've got the Vanes pitched, and in a more logical position now....... -Added a snout :-) -Both sets of vanes will pull at 25 degrees towards the mid section of the drum and the forward set also extend into the conical section to help pull any beans that might try to hangout there instead of mixing with their buddies..
broeker attached the following image:

|
|
|
|
| Ringo |
Posted on 06/30/2014 6:19 AM
|
|
Pounder Posts: 474 Joined: January 14, 2010 |
A couple years ago I took a roasting class and roasted on this machine. Its very close to your design and roasted great. We just used a spoon to reach in and pull roasting samples and had a funnel to add the beans. The one in the class pulled the air through the front opening but I think your design is great.
Ringo attached the following image:

All you need in life is ignorance and confidence, and then success is sure. Mark Twain
|
|
|
|
| broeker |
Posted on 07/04/2014 4:08 AM
|
|
1/4 Pounder Posts: 75 Joined: June 23, 2014 |
Quote Ringo wrote: A couple years ago I took a roasting class and roasted on this machine. Its very close to your design and roasted great. We just used a spoon to reach in and pull roasting samples and had a funnel to add the beans. The one in the class pulled the air through the front opening but I think your design is great. I'm looking forward to making a long spoon scoop thing to pull the beans out for a look, and a rake thing to move the hot beans around in my soon to be designed cooling bin... Are the non agitated style cooling trays any good? Or does everyone that has one wish they had one with a mixing arm? |
|
|
|
| Ringo |
Posted on 07/04/2014 6:17 AM
|
|
Pounder Posts: 474 Joined: January 14, 2010 |
None agitating is fine just stir with the spoon.
All you need in life is ignorance and confidence, and then success is sure. Mark Twain
|
|
|
|
| Lylabrown |
Posted on 07/04/2014 10:55 AM
|
|
1/4 Pounder Posts: 158 Joined: February 15, 2012 |
I think cooling agitation is only necessary if the bed of beans is really deep, or the airflow is insufficient. It seems that agitation can actually slow cooling by leaving a wake of exposed perforations as the arms sweep by. Having said that, I'd build them anyways. They look cool, and fun to engineer. |
|
|
|
| broeker |
Posted on 07/08/2014 5:20 AM
|
|
1/4 Pounder Posts: 75 Joined: June 23, 2014 |
So my front cone wil have 4.5mm holes punched in it, I want hot air to pass through it but beans etc not to get stuck in them & burn, the holes allow hot air from the burner to enter the drum, but I don't want anything falling out..... Have I gone small enough? |
|
|
|
| Ringo |
Posted on 07/08/2014 7:15 AM
|
|
Pounder Posts: 474 Joined: January 14, 2010 |
I think 4.5 would be too big, maybe use 3 mm or smaller and drill more holes. It does not take much air going through a drum when you are roasting.
All you need in life is ignorance and confidence, and then success is sure. Mark Twain
|
|
|
|
| broeker |
Posted on 07/09/2014 10:49 PM
|
|
1/4 Pounder Posts: 75 Joined: June 23, 2014 |
I reduced the holes to 3.0mm Dia and ordered all the laser cutting for the roaster........ only 6 more sleeps till its done,and I can start fabrication :-) |
|
|
|
| broeker |
Posted on 07/11/2014 6:11 AM
|
|
1/4 Pounder Posts: 75 Joined: June 23, 2014 |
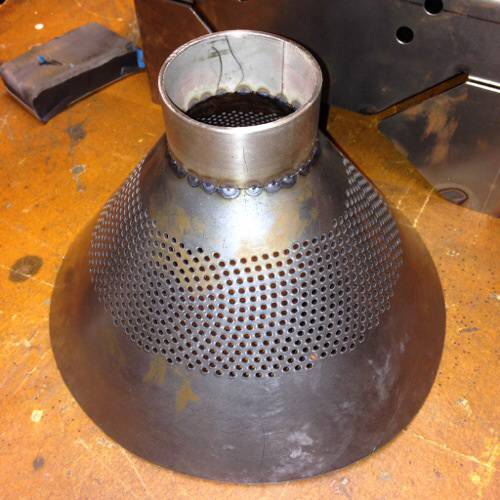
Yay the first part has arrived from the Turret punch..... its the Front Cone of my main Drum, looks like the perforations will let the hot air into the drum without any problems (and keep the beans in the drum) Bring on the Laser & CNC Pressed parts :-)
broeker attached the following images:


|
|
|
|
| broeker |
Posted on 07/15/2014 5:44 AM
|
|
1/4 Pounder Posts: 75 Joined: June 23, 2014 |
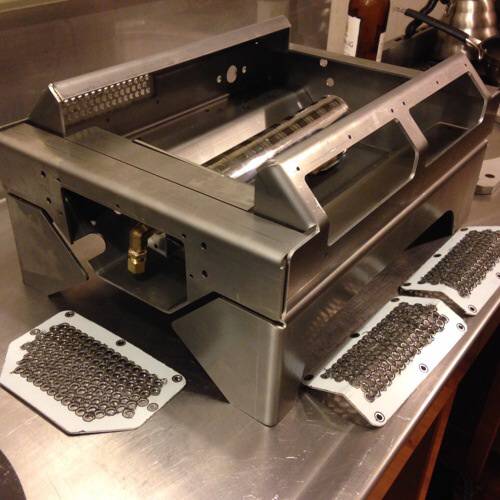
So my parts are here..... I'm so stoked!!!! All the critical things are perfect. I can already see I've probably made some things a bit heavy which might effect my dump mech but at least the project is moving forward....... Loving the solid works laser/CBC pressing combo.....
broeker attached the following images:


|
|
|
|
| Ringo |
Posted on 07/15/2014 1:12 PM
|
|
Pounder Posts: 474 Joined: January 14, 2010 |
All I can say is WOW. That is a work of art.
All you need in life is ignorance and confidence, and then success is sure. Mark Twain
|
|
|
|
| allenb |
Posted on 07/15/2014 6:04 PM
|
 Administrator Posts: 3859 Joined: February 23, 2010 |
Wow + 1! This roaster is going to be ready for business. I agree with Ringo, this will be a work of art from what I'm seeing so far. If it roasts well then even better! Allen 1/2 lb and 1 lb drum, Siemens Sirocco fluidbed, presspot, chemex, cajun biggin brewer from the backwoods of Louisiana
|
|
|
|
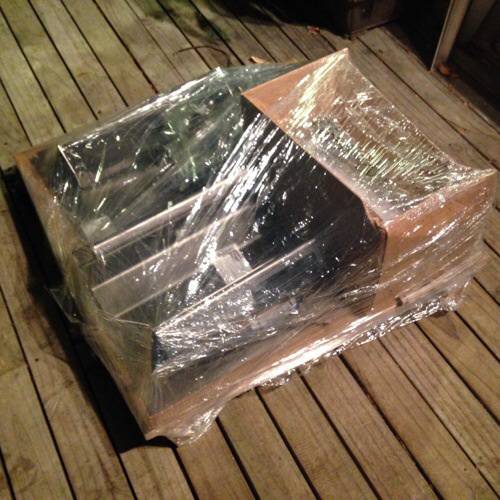
| broeker |
Posted on 07/26/2014 7:58 AM
|
|
1/4 Pounder Posts: 75 Joined: June 23, 2014 |
Things are coming together....... Sat night update... :-)
broeker attached the following images:

|
|
|
|
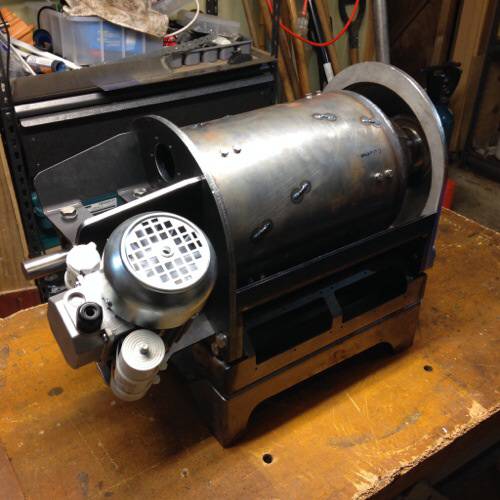
| broeker |
Posted on 07/27/2014 4:01 AM
|
|
1/4 Pounder Posts: 75 Joined: June 23, 2014 |
Sunday update..... Might have to revisit the tipping mech.... It's not done yet but it's pretty heavy...... Might have to get some hydraulics involved :-) Got the drum in... Everything is mint.... & concentric....
broeker attached the following images:


|
|
|
|
| allenb |
Posted on 07/27/2014 10:47 AM
|
|
Administrator Posts: 3859 Joined: February 23, 2010 |
Quote It's not done yet but it's pretty heavy...... Might have to get some hydraulics involved :-) Can't wait to see it roasting some beans. Fantastic workmanship!
allenb attached the following image:

1/2 lb and 1 lb drum, Siemens Sirocco fluidbed, presspot, chemex, cajun biggin brewer from the backwoods of Louisiana
|
|
|
|
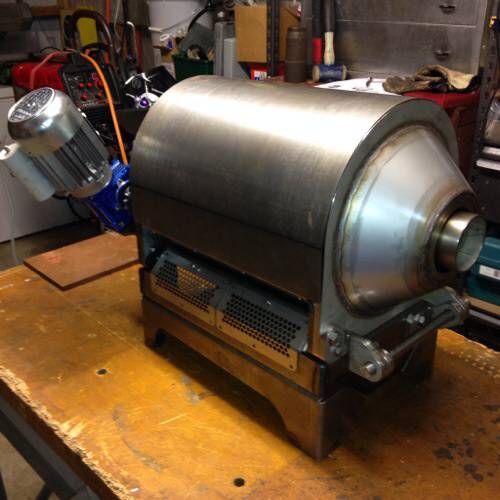
| broeker |
Posted on 08/03/2014 5:07 AM
|
|
1/4 Pounder Posts: 75 Joined: June 23, 2014 |
Sunday update.... Welded everything. Started fitting drive. Still have to fab dump handle. Lots to do still :-( Can't wait to fire things up........ What do you guys think of exhaust probes for use in the back of the roaster? I mean automotive exhaust probes.... Like the tuners use...
broeker attached the following images:

Edited by broeker on 08/03/2014 5:12 AM |
|
|
|
| MikeW |
Posted on 08/04/2014 2:15 AM
|
|
1/4 Pounder Posts: 50 Joined: April 14, 2012 |
This is another flat out amazing project. The pictures remind me of Sky Captain and the World of Tomorrow, especially the gull wing mount for the drive shaft. If it had an impeller it could be a submarine. Ca you tell us a little more about the automotive exhaust probe, I take it you have one "lying around" and want to use it? Usually probes need to be immersed 10X their diameter, and need to be sturdy enough not to break. But, you don't want too much mass so it can be responsive. People seem to use 4mm-6mm diameter. It can also be tricky to put the probe into the coffee for small batches while dodging vanes etc. For measuring air temperature, such as the "environment" inside the drum almost anything will do if it is accurate. |
|
|
|

| Jump to Forum: |
Similar Threads
| Thread | Forum | Replies | Last Post |
|---|---|---|---|
| Skywalker roaster mods | Other Roasters | 302 | 04/25/2024 9:09 AM |
| Kaleido Roaster PID parameters | Roasting Coffee | 2 | 04/22/2024 1:40 AM |
| Skywalker, the ALM chinese one pound roaster | Other Roasters | 215 | 04/02/2024 1:48 AM |
| My first popcorn mod roaster (vahegan) | Fluidbed Roaster | 48 | 03/24/2024 12:04 PM |
| Fatamorgana electric drum roaster | Other Roasters | 2 | 03/24/2024 10:03 AM |
Powered by PHP-Fusion Copyright © 2024 PHP-Fusion Inc
Released as free software without warranties under GNU Affero GPL v3
Designed with ♥ by NetriXHosted by skpacman