
Login

Shoutbox
You must login to post a message.
renatoa
04/25/2024 2:03 AM
AGZ and Intercolcoffee

allenb
04/23/2024 7:01 PM
Paul Kalb

renatoa
04/23/2024 4:34 AM
Coffee_Rabbit_Hole
and Michaelion,
and Michaelion,
renatoa
04/21/2024 2:35 AM
compactjack and GreenGenie
 ?
?
?allenb
04/19/2024 8:27 AM
eximwind
Forum Threads
Newest Threads
Skywalker roaster modsHello from Montreal ...
War on Farmers by Su...
Kaleido Roaster PID ...
Rainfrog's Roastmast...
Hottest Threads
| Skywalker roaster... | [301] |
| Skywalker, the AL... | [214] |
| Skywalker Roasts | [94] |
| Rainfrog's Roastm... | [54] |
| War on Farmers by... | [40] |
In Memory Of Ginny

Donations
Latest Donations
dmccallum - 10.00
JackH - 25.00
snwcmpr - 10.00
Anonymous - 2.00
Anonymous - 5.00
dmccallum - 10.00
JackH - 25.00
snwcmpr - 10.00
Anonymous - 2.00
Anonymous - 5.00
Users Online
Guests Online: 2
Members Online: 0
Total Members: 8,226
Newest Member: AGZ
Members Online: 0
Total Members: 8,226
Newest Member: AGZ
View Thread
Who is here? 1 guest(s)
Page 1 of 2: 12
|
 Another Propane Gas Control Method
|
|
| Lylabrown |
Posted on 08/24/2014 5:56 PM
|
 1/4 Pounder  Posts: 158 Joined: February 15, 2012 |
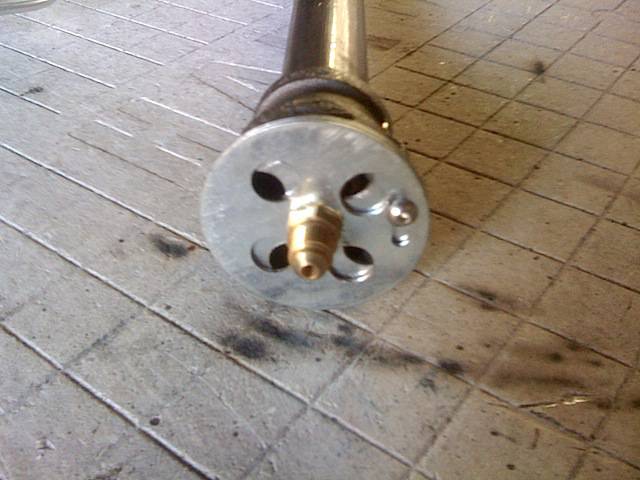
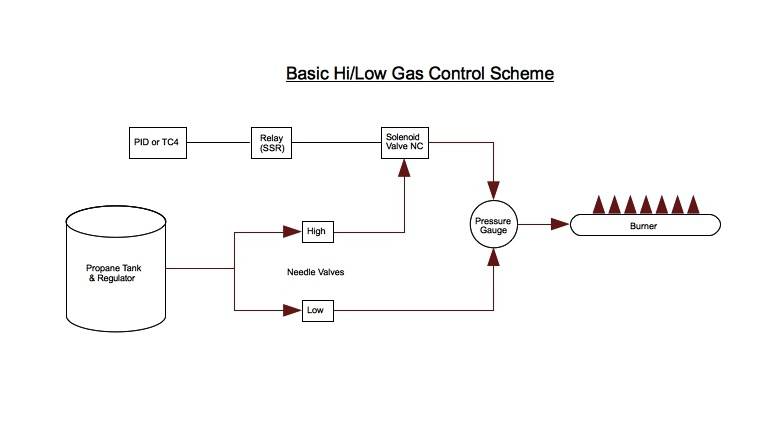
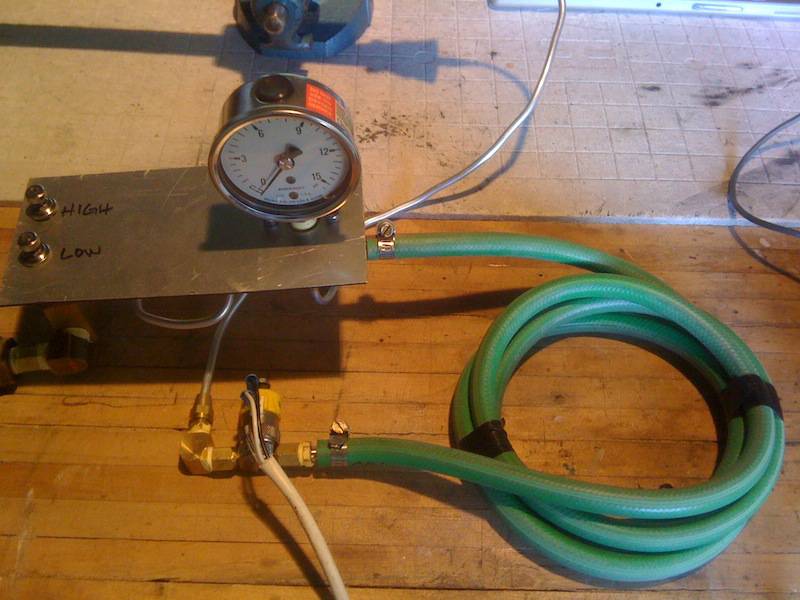
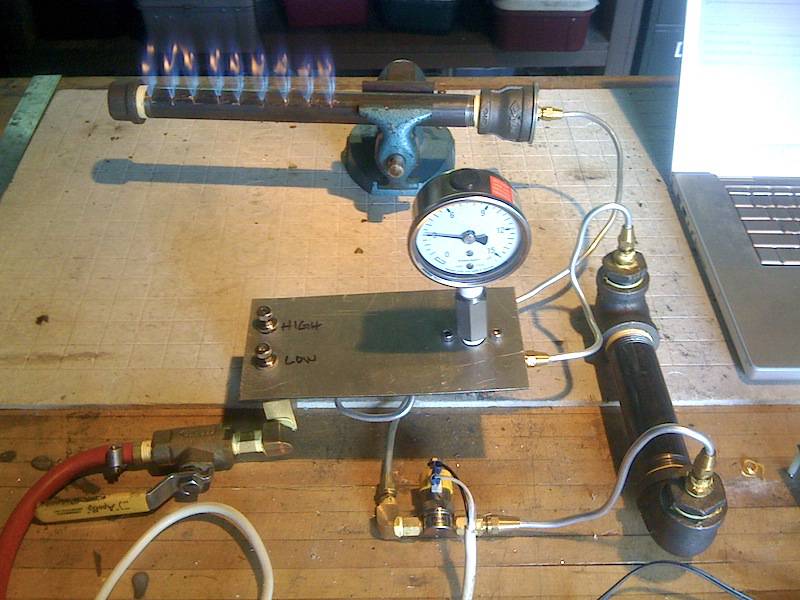
Per request, here are the details of the burner setup being used on my drum roaster build. Which can be found here: http://forum.home...ad_id=4083 This gas control scheme was proposed by allenb a couple of years back (http://forum.home...ad_id=2127) which utilizes a solenoid valve along with needle valves in order to create a high fire/low fire burner setup. With this arrangement he low flame is always on, and the high flame kicks in when the solenoid valve is energized/opened. A PID controller or Arduino TC4 can energize a SSR which in turn energizes/opens the valve. In practice, it works the same as powering/controlling an electric heating element. The two needle valves allow for independently fine tuning the high/low flame states (BTU outputs), and will behave as pre-sets without the need for adjusting once they're dialed in to the roasters BTU requirements. For my setup I'm using propane torch regulator that mounts to a standard 20lb propane tank. Downstream from regulator is a manifold for the emergency shutoff & needle valves, another for the pressure gauge junction, and a clippard solenoid valve. The tubing runs are made using 3/16OD aluminum "pilot" tubing with SAE flare fittings. Refer to the attached photos & diagram for a better understanding of the layout of the various components. To determine the ideal burner BTU output I fiddled around with the BTU calculator found here: http://ronreil.ab...ign2.shtml. I settled on a system pressure of 10psi, with an orifice diameter of 0.025" which gives a maximum of 26k BTU output. Thats more heat than I'll possibly need, but the control scheme allows it to be turned down to the desired output. I'm using this solenoid valve made by Clippard: http://www.clippa.../ET-2-12-H. To make the burner orifice I drilled a hole in the center of a 1/8"fnpt cap fitting with a #72 bit. Which connects to a 1/8" npt to 3/16" flare fitting. Sandwiched between the two are washers drilled with holes for the adjustable air intake/venturi. The burner is made from 3/4" x 12" black iron nipple with a 1 1/4" to 3/4" reducing fitting on one end, and cap on the other. The venturi is attached to the reducing fitting with screws threaded into the end of the fitting. A set screw allows the venturi to be locked in place once the optimal air fuel mix is found. To my surprise, it worked on the first try with a stable (blue with small yellow tip) flame at both high & low pressure. The flame holes are slots cut 1/4 of the way into the pipe diameter with a hacksaw. Here's a video of the setup: http://vimeo.com/... The toggle switch is used in place of the Arduino TC4/PID & SSR in the test video, but you get the general idea. I'll make another video once things are installed in the roaster. Not mentioned are the safety features of this setup. I'll update this thread with the details once they are implemented. Russ
Lylabrown attached the following images:


|
|
|
|
| Omega |
Posted on 08/26/2014 9:32 PM
|
 1/4 Pounder Posts: 132 Joined: June 13, 2014 |
Interesting concept. It will be good to hear how this setup works with the roaster. Barry |
|
|
|
| Ringo |
Posted on 08/27/2014 6:12 AM
|
 Pounder  Posts: 474 Joined: January 14, 2010 |
I like this set up, should work on my pipe burner. It would be nice to automate the roasting process.
All you need in life is ignorance and confidence, and then success is sure. Mark Twain
|
|
|
|
| JimG |
Posted on 08/27/2014 4:22 PM
|
|
1 1/2 Pounder  Posts: 834 Joined: October 23, 2008 |
I, too, like this concept. Does anyone have a feel for how frequently the solenoid can be "pulsed" before a problem is caused? The PWM16 library for the TC4 system presently supports a PWM time base only as slow as 4 seconds. Is that going to be too many cycles for the solenoid? Jim |
|
|
|
| Lylabrown |
Posted on 08/28/2014 3:09 PM
|
|
1/4 Pounder Posts: 158 Joined: February 15, 2012 |
Hey Jim, I was wondering the same thing. The spec sheet says it's rated for continuous duty with a cycle life of over a billion. There was no recommended pulse or cycle intervals, as is the case for most solenoids. I emailed clippard with that question this morning, here's their response: Quote The EV line is rated continuous use, you can cycle it as fast at 10ms 24 hours a day. That's encouraging. I guess it makes sense when considering how low the power draw of the solenoid is (0.67 watts). Russ |
|
|
|
| Lylabrown |
Posted on 08/28/2014 7:19 PM
|
|
1/4 Pounder Posts: 158 Joined: February 15, 2012 |
Here's a neat thought: If the valve can do 100Hz (50Hz full on/off cycle) at max, running it at 4Hz would be no problem. If that's the case, 4Hz switching in tandem with the inherent system hysteresis (lag from pressurized gas in the tubing between the valve & burner orifice) would create virtual proportional control. Could that be right? Russ |
|
|
|
| JimG |
Posted on 08/28/2014 8:36 PM
|
|
1 1/2 Pounder Posts: 834 Joined: October 23, 2008 |
It would be easier to just do digital proportional control, or PI, or PID control, wouldn't it? My guess is that PWM with a 1 Hz time base would be plenty fast for pretty good temperature control of a roaster. Of course, I know absolutely nothing about the lag or hysteresis associated with propane valves and piping  Jim |
|
|
|
| Lylabrown |
Posted on 08/30/2014 7:29 PM
|
|
1/4 Pounder Posts: 158 Joined: February 15, 2012 |
You're exactly right Jim. Here are a few test videos of different cycle rates. 1Hz - http://vimeo.com/... 2Hz - http://vimeo.com/... 4Hz - http://vimeo.com/... I don't think the beans will care either way. Russ |
|
|
|
| allenb |
Posted on 08/31/2014 11:15 AM
|
 Administrator Posts: 3859 Joined: February 23, 2010 |
Hey Russ, very nice setup. This should give you excellent control of your roaster. I think what you've accomplished will not only give your roaster perfect control but will show others a way to easily control their gas fired fluidbed with little to no noticeable ET swing. One thing I noticed when taking a look at my burner setup again is because of the small 1/8" OD tubing I used and the length of it, I have a greater hysteresis lag when the valve switches back and forth between hi and lo states. I'm wondering if one were to experiment with various size orifices or a needle valve located at the outlet of the solenoid so you could dial in an optimum amount of hysteresis. With just the right amount of hysteresis there would be a smoothly varying heat output which would produce the proportional effect you're looking for with using on/off PID. Allen Edited by allenb on 08/31/2014 11:23 AM 1/2 lb and 1 lb drum, Siemens Sirocco fluidbed, presspot, chemex, cajun biggin brewer from the backwoods of Louisiana
|
|
|
|
| Lylabrown |
Posted on 08/31/2014 3:00 PM
|
|
1/4 Pounder Posts: 158 Joined: February 15, 2012 |
Thanks Allen, I was about to start tinkering with the pressure & orifice sizes when another idea came to mind: You can dampen pressure spikes by increasing volume. To test the idea - I added about 6' of 1/4' ID "type T" tubing to the system between the solenoid and the pressure gauge manifold (see photo). Here are the videos of before & after adding the tubing: 2Hz Before - http://vimeo.com/... 2Hz After - http://vimeo.com/... I'm blown away by the improvement the extra tubing has made. The pressure spikes are now just ripples and the flame is much more stable. Russ
Lylabrown attached the following image:
|
|
|
|
| allenb |
Posted on 08/31/2014 3:59 PM
|
|
Administrator Posts: 3859 Joined: February 23, 2010 |
That's another way to go about it and seems to work well. I had given some thought during my build to incorporate some sort of snubber using a small cylinder with tubing connections on each end similar to a refrigeration system suction line dryer (somewhere around 2" long by 2" dia) and from the looks of how your extra length of tubing worked, it would have most likely done the trick. I would like to see if a restriction, post-solenoid, would work as well. After pondering it more, I'm not certain it would result in increasing the hysteresis but would be worth a try as it would be a cleaner solution. Allen 1/2 lb and 1 lb drum, Siemens Sirocco fluidbed, presspot, chemex, cajun biggin brewer from the backwoods of Louisiana
|
|
|
|
| allenb |
Posted on 08/31/2014 4:16 PM
|
|
Administrator Posts: 3859 Joined: February 23, 2010 |
Something to consider on choosing your pwm time base is the faster you cycle it, even though the valve will handle it, it will have a drastic affect on how long your pressure gauge lasts. But, if there's a large hysteresis they can handle much faster cycling than when there's abrupt pulsing. FWIW, I've found with my drum roaster that cycling every 2 seconds is more than adequate and the drum surface and inlet air to the rear of the drum don't see any temperature swings during the hi-low pulsing. Faster pulsing would be advantageous for a fluidbed though. Allen 1/2 lb and 1 lb drum, Siemens Sirocco fluidbed, presspot, chemex, cajun biggin brewer from the backwoods of Louisiana
|
|
|
|
| JimG |
Posted on 08/31/2014 9:16 PM
|
|
1 1/2 Pounder Posts: 834 Joined: October 23, 2008 |
Russ - Very neat stuff! After watching your videos, I might be inclined to speed things up. A faster PWM time base, together with the extra hose length, might smooth out the response to the point where it behaves like a proportional valve. Maybe going all the way to 60Hz is feasible? I don't want to take this thread into the weeds, but the ICC control used in aCatauiQ and aArtisanQ_PID might work for you. Jim |
|
|
|
| Lylabrown |
Posted on 09/01/2014 1:48 PM
|
|
1/4 Pounder Posts: 158 Joined: February 15, 2012 |
Hey Allen, Agreed, the added tubing proves the concept, but isn't the most elegant solution. I like the idea of using a pulse dampener of some sort. The purpose built devices are very expensive, I can hack one together using some 1" black iron pipe and fittings. It would behave like a water hammer arrestor used in household plumbing. As long as it's the low point of the system and purged of all air -- it should be safe in the rare, but possible, event of flash-back behind the burner orifice. Also agreed, cycling the solenoid 1Hz or slower would be more than adequate for good roaster control. It's fun to experiment with the various options though. Russ |
|
|
|
| Lylabrown |
Posted on 09/01/2014 2:18 PM
|
|
1/4 Pounder Posts: 158 Joined: February 15, 2012 |
Quote JimG wrote: After watching your videos, I might be inclined to speed things up. A faster PWM time base, together with the extra hose length, might smooth out the response to the point where it behaves like a proportional valve. Maybe going all the way to 60Hz is feasible? Hey Jim, That sounds familiar  . . Here's a test using the 60Hz "Fast PWM" intended for the fan in roastlogger: [video]http://vimeo.com/104946641[/video] Video link: http://vimeo.com/... 60Hz is slightly faster than the solenoids response time for a full cycle (50Hz). As a result, it sticks "off" below 15% and "on" above 85%. Other than that, it worked fine. The valve didn't even get warm after 20 minutes of testing. Impressive. Russ |
|
|
|
| allenb |
Posted on 09/01/2014 2:36 PM
|
|
Administrator Posts: 3859 Joined: February 23, 2010 |
I wonder how it would respond with 20 and 30 hz? You guys may have come up with a means of tricking an on/off valve into becoming a proportional valve. Very interesting experiment! Allen 1/2 lb and 1 lb drum, Siemens Sirocco fluidbed, presspot, chemex, cajun biggin brewer from the backwoods of Louisiana
|
|
|
|
| allenb |
Posted on 09/01/2014 2:46 PM
|
|
Administrator Posts: 3859 Joined: February 23, 2010 |
I thought more on the issue of gauges not liking rapid pulsing. Something that is commonly done in refrigeration and hvac is to install an orifice fitting just behind the gauge that effectively cancels rapid needle fluctuations but allows it to react fast enough. Not sure what size orifice would be needed but would probably need to be quite small. Allen 1/2 lb and 1 lb drum, Siemens Sirocco fluidbed, presspot, chemex, cajun biggin brewer from the backwoods of Louisiana
|
|
|
|
| Lylabrown |
Posted on 09/01/2014 3:09 PM
|
|
1/4 Pounder Posts: 158 Joined: February 15, 2012 |
Hey Allen, It looks like I can get an Ashcroft "pulsation dampener" (http://www.dfs-ga...s/50+1106B) on theBay for under 20 bucks shipped. It uses a little pin that acts like a piston to help cancel out the pulses. Also, I'm currently running the gauge "dry", I'll fill it with some propylene glycol soon. That should help smooth the pulses as well. Russ |
|
|
|
| JimG |
Posted on 09/01/2014 4:20 PM
|
|
1 1/2 Pounder Posts: 834 Joined: October 23, 2008 |
Quote Lylabrown wrote: 60Hz is slightly faster than the solenoids response time for a full cycle (50Hz). As a result, it sticks "off" below 15% and "on" above 85%. Oops. I lost track of your mains frequency ;-) Try adding a few lines of code to user.h in RoastLoggerTC4. This will give you several more options to try. I would expect the 49.92Hz setting to work well. I would also try the 25.00Hz setting. The crystal on the TC4C is normally quite accurate, so these will track mains frequency well. I think tracking the mains frequency more closely will reduce the blocking at low and high output settings. Code Download source
If this continues to show promise, it might be worth doing a little coding to shorten the firing pulses down to 1 ms or so. I think a shorter firing pulse for the SSR would also help with the blocking. EDIT: Upon further review, the above will probably not help while using the present PWM code in RoastLoggerTC4. What is really needed is to change the control method to "integral cycle control" (ICC) or "burst mode" where short pulses are timed to coincide with the AC sine wave. Sorry for confusing the issue. Jim PS - thanks goes to Bhante for doing the math on several of these values. Edited by JimG on 09/02/2014 11:32 AM |
|
|
|
| Lylabrown |
Posted on 09/07/2014 6:37 PM
|
|
1/4 Pounder Posts: 158 Joined: February 15, 2012 |
Hey Jim, The additional pwm options for the heater are most welcome. I gave the 50 & 25Hz options a try. On 25Hz there was partial blocking at 5% & 95% but good everywhere between. At 5% the plunger doesn't make a full on/off stroke with the normal 'click' sound. You can hear it in the beginning of this video: [video]http://vimeo.com/105507107[/video] Link: http://vimeo.com/... At 50Hz it behaves in the same manner as 25Hz, with the partial blocking at 10% & 90%, and normal in between. Not that any of this matters for my purposes, I'm perfectly happy to have proportional control in 10% increments. But i thought you'd like to know how this system is behaving at the different settings. Also, I added my hacked together pressure dampener made with black pipe and fittings. By my calculations it doubles the airspace that the extra hose provided. It further smoothed the pressure spikes at the expense of response time. The pulsation dampener for the pressure gauge also arrived, and it works perfectly. The pressure gauge needle is absolutely steady & free of vibration now. A big thanks to you and Bhante for the additional pwm frequency options & backend math. Russ
Lylabrown attached the following image:
|
|
|
|
| allenb |
Posted on 09/08/2014 9:07 AM
|
|
Administrator Posts: 3859 Joined: February 23, 2010 |
It looks like this may be a way to control this valve. OTOH, is the noise I'm hearing coming from the valve and is it very loud? If yes, I think I would go back to 1/sec with the pulse dampening you've got now and see if it's less abrupt on pulsing. It would be a lot easier on the valve. Allen 1/2 lb and 1 lb drum, Siemens Sirocco fluidbed, presspot, chemex, cajun biggin brewer from the backwoods of Louisiana
|
|
|
|
| klix |
Posted on 12/13/2014 12:20 PM
|
|
Newbie  Posts: 10 Joined: December 10, 2014 |
Hi Russ, I'm thinking about designs for a new drum roaster build. My current drum roaster is all manual and for the new build, I want to add various levels of automation. I really like to concept that you have demonstrated here! Have you had a chance to actually test this gas setup with a roast? I'm curious to see how well it works in practice (eg. Are you able to closely follow a defined roast profile). |
|
|
|
| Lylabrown |
Posted on 12/15/2014 1:25 PM
|
|
1/4 Pounder Posts: 158 Joined: February 15, 2012 |
Thanks Klix! Unfortunately, I've been buried under a contract job for the last few months and haven't had time to work on the roaster. In theory, the automated gas control scheme I'm testing should offer good control once the variables (combustion air intake flow, flame stability at different exhaust air / fan speeds, etc.) are accounted for. But I can't say for sure until it's actually browning beans 'on profile'. My hope is that you, or anybody else can take some of these ideas and improve upon them for your own control setups. Russ |
|
|
|
| klix |
Posted on 12/22/2014 10:46 AM
|
|
Newbie Posts: 10 Joined: December 10, 2014 |
Hi Russ, Hopefully you get some time to continue work on your roaster! This thread amongst others has certainly inspired me and has given me some good ideas. I am currently trying to source some parts and I'm having a hard time finding the clippard valve that you used in your setup (ET-2-12-H). I cannot find anyone on eBay with the -H version and the clippard site says out of stock. Can anyone recommend an alternative? I have been looking online and many of the similar valves that I have found are either costly or just not right. Any help to either source the same valve or something similar would be appreciated. Thanks! |
|
|
|
| Lylabrown |
Posted on 12/24/2014 11:13 AM
|
|
1/4 Pounder Posts: 158 Joined: February 15, 2012 |
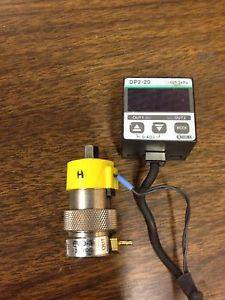
Hey Klix, I got lucky when searching eBay for mine. The "H" designation never turned up in search titles or descriptions, I had to look for it in the product photos. I did find one in a eBay search this morning that includes a digital pressure gauge. Here's the listing: http://www.ebay.c...26_rdc%3D1 Russ
Lylabrown attached the following image:
|
|
|
|

Page 1 of 2: 12
| Jump to Forum: |
Similar Threads
| Thread | Forum | Replies | Last Post |
|---|---|---|---|
| Renatoa can you walk us through a roast based on Heat power control vs PID? | Roasting Coffee | 32 | 08/21/2023 12:41 AM |
| Unable to get Artisan Scope's PID to control heating | Dataloggers/Controllers/Rate of Rise Meters | 4 | 08/01/2023 9:11 AM |
| Problem with electric control Quest M6 Coffee Roaster | Quest M3 Roaster | 27 | 06/20/2023 3:39 AM |
| Gas control for bullet de aillio | R1 Bullet Roaster | 10 | 03/10/2023 11:13 PM |
| Help! Blower motor control | Fluidbed Roaster | 6 | 12/09/2022 11:42 AM |
Powered by PHP-Fusion Copyright © 2024 PHP-Fusion Inc
Released as free software without warranties under GNU Affero GPL v3
Designed with ♥ by NetriXHosted by skpacman