
Login

Shoutbox
You must login to post a message.
renatoa
04/17/2024 9:27 AM
 , branchu
renatoa
04/14/2024 5:56 AM
TheOtherJim and papajim,
 !
!
!allenb
04/11/2024 6:33 PM
Zemona

renatoa
04/11/2024 9:19 AM
Mrbones and sgupta,  ?
?
?renatoa
04/10/2024 1:09 AM
 , Ed K
Forum Threads
Newest Threads
War on Farmers by Su...Kaleido Roaster PID ...
Green coffee sellers
Wet beans - Estimati...
Skywalker roaster mods
Hottest Threads
| Skywalker roaster... | [292] |
| Skywalker, the AL... | [214] |
| Skywalker Roasts | [94] |
| My first popcorn ... | [47] |
| War on Farmers by... | [39] |
In Memory Of Ginny

Donations
Latest Donations
dmccallum - 10.00
JackH - 25.00
snwcmpr - 10.00
Anonymous - 2.00
Anonymous - 5.00
dmccallum - 10.00
JackH - 25.00
snwcmpr - 10.00
Anonymous - 2.00
Anonymous - 5.00
Users Online
Guests Online: 2
Members Online: 0
Total Members: 8,208
Newest Member: branchu
Members Online: 0
Total Members: 8,208
Newest Member: branchu
View Thread
Who is here? 1 guest(s)
Page 1 of 2: 12
|
 First Build - 5kg Roaster - Here we go!!
|
|
| bpeak |
Posted on 12/02/2014 10:36 AM
|
 Newbie  Posts: 21 Joined: December 02, 2014 |
Hi everybody. Before I jump into questions that I have, I'll give you some background. My brother in-law has asked me to assist him in designing, detailing, and building a roaster. He has been roasting for a while now using very small batch air systems and is looking to go much bigger. Here are the project goals: A) 5kg typical capacity (with hopeful ability to roast as little as 1kg batch for specialties or sampling) B) Full unit with detached cooling tray, full cyclone exhaust, etc. Solid drum with perforated back wall and all the goodies. C) Gas fired via propane D) Mostly manual and analog controls to start. May upgrade to digital controls in the future. E) Fully insulated housing. Likely to be a "light bulb" shaped housing similar to the Diedrich IR5. This will be my first dive into the realm of coffee roasters. However, I work in an architectural firm by day (with lots of CAD abilities for planning) and have done a fair share of custom design and fabrication for motorcycles. So we're going to give it a go. I have done quite a bit of research, on this website and others, as well as studying commercial roasters (as much as you can online... without actually seeing one in person... yet). But before I show you the drawings I have and get too deep - I have a few questions that I would LOVE you guys' help with. Please feel free to reply with answers to any/all of the following: 1) Based on Dan's calc, for 5kg batch size, a closed drum design would required a drum volume of 1,763.70 cubic inches minimum. We are looking at two optional drum dimensions --- either a 12" diameter x 16" long (which would net 2.6% surplus volume) --- or a 13" diameter x 14" long (with 5.4% surplus volume). Question is, which do you think would be better, not only for the 5kg batches but also to have the greatest chances for a good 1kg batch? 2) I have some questions on the clearances within the housing... between the housing and the drum itself. Given a drum of the sizes above, how much clearance is recommended on the tops/sides between drum and housing? How much clearance is recommended at the rear of the drum (between the perforated back wall of the drum and the back wall of the housing itself)? 3) Also regarding clearances, below the drum, I'm also looking for input on distances from drum to burner tubes and burner tubes to bottom of housing. I assume this is contingent a bit on the type of burner... btu output... etc. But are there general rules of thumb? If not - I'll cover this detail in a later post. That's all for now. BY THE WAY - I want to make it clear that my intention in this project is to fully document the build in terms of working fabrication drawings - fully dimensioned and spec'd. So any info you provide as we go along will hopefully help future builders with maybe a simpler path to building one of their own. So... thanks in advance for all of your help. |
|
|
|
| allenb |
Posted on 12/02/2014 8:21 PM
|
 Administrator Posts: 3858 Joined: February 23, 2010 |
Welcome to HRO bpeak! Be sure to post a brief bio about yourself in the member introductions forum. I'll take a stab at a couple of your questions. On drum volume, I'd go with the larger of the two since there isn't a huge difference between them and I'm always partial to a 1 to 1 dia-length ratio which most of the more well known manufacturers usually settled on. If it were my build I would go no less than 1/8" and no thicker than 1/4 drum wall. Between inner wall and drum distance (top and sides), anywhere between 1 and 2" should be fine and this is not real critical but it's good to leave some fiddling room for maneuvering things. Between rear of drum and first back panel, 2"should be fine and will allow unimpeded airflow into drum. Include 2" between first back panel and rear of roaster and you can insulate to ensure little heat radiates to drive components. On burner tubes to bottom of drum. Place the burners away from center to give more clearance. I'd go 4 or 5" from the top surface of the burner pipe to drum when measuring in a straight vertical line. If your design won't allow this much distance then add a curved deflector an inch from the drum surface to spread the flame out. On distance from burner tube and bottom of roaster. This isn't real critical but you need to ensure you've allowed plenty of secondary air to easily flow to the burner area for good combustion. I would recommend replicating Probat's layout on their L-12 with makeup air path and baffling which ensures thorough makeup air and combustion gas mixing prior to coming in contact with the drum. Allen
allenb attached the following image:

1/2 lb and 1 lb drum, Siemens Sirocco fluidbed, presspot, chemex, cajun biggin brewer from the backwoods of Louisiana
|
|
|
|
| bpeak |
Posted on 12/02/2014 8:43 PM
|
|
Newbie Posts: 21 Joined: December 02, 2014 |
Awesome! Ok - I'll hit the new members area. Wasn't sure if there was one. I'll take a look. On the drum, I was definitely leaning towards the 13" diameter x 14" long. Your thoughts confirm it. I've mocked up a cardboard drum tonight and am going to play around with vane design over the next few days. Will post a pic. On the inner clearances, that sounds good. I was planning on 2" sides and top to allow for air and horizontal rods that will connect the front and back plates structurally. So that should do then. I guess I can just go 2" in the back too to keep everything uniform. Thanks for that info. I have plenty of space to be able to work at the bottom side at this point. I'm still doing homework on the burners so I think that element will have to remain on the drawing board for now. I'm looking at sources for cannibalizing a burner setup from a complete system rather than trying to engineer and piece together a gas kit. ((When it comes to things that can go boom... I tend to seek out a tried and true off-the-shelf method)) Anyhoo - thanks again. More to come... including preliminary drawings once I get them updated for the more 1:1-ish drum. :) |
|
|
|
| bpeak |
Posted on 12/03/2014 9:20 AM
|
|
Newbie Posts: 21 Joined: December 02, 2014 |
Figured I'd share some screen shots. First is the last round... Generation 2. Chatted with my brother in-law over the holiday and determined we were going to change some things so this edition is going into the archive folder. 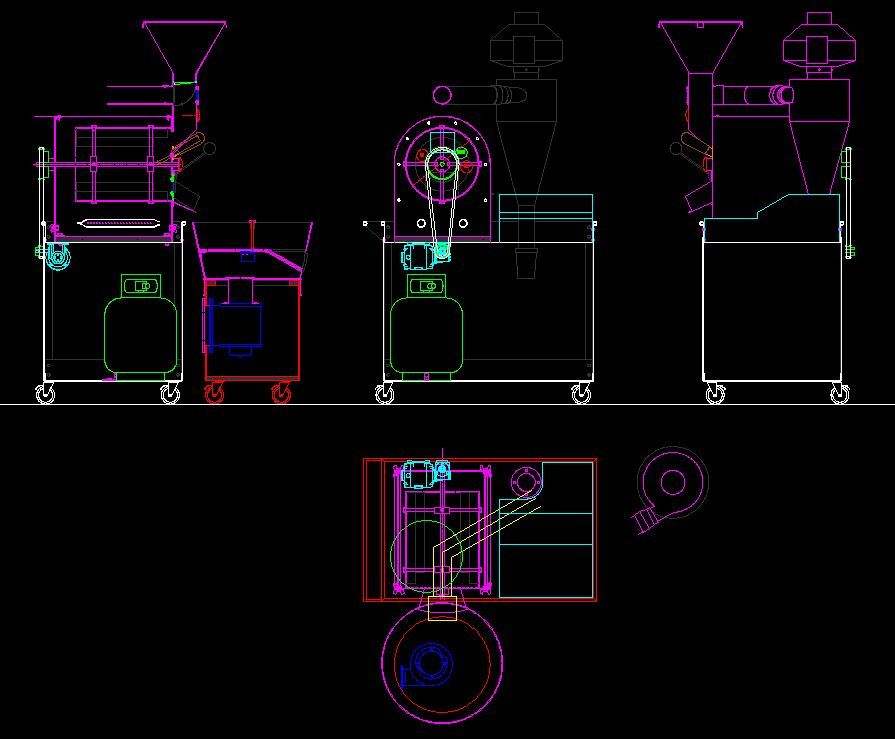 |
|
|
|
| bpeak |
Posted on 12/03/2014 9:22 AM
|
|
Newbie Posts: 21 Joined: December 02, 2014 |
Here is the start of Generation 3. Going with a better drum shape and better housing. This time fully insulated. 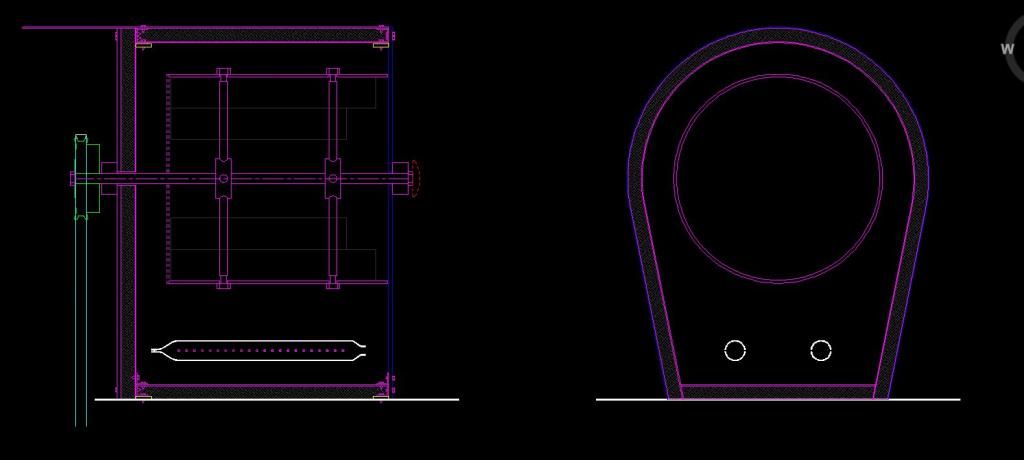 |
|
|
|
| bpeak |
Posted on 12/03/2014 9:29 AM
|
|
Newbie Posts: 21 Joined: December 02, 2014 |
Also started mocking up the drum, both physically and on the computer. We will be going for a typical vane setup. Four outer vanes pushing toward the face plate. Four inner vanes pushing toward the rear plate. The direction slope of the vanes (forward or backward pushing) will be determined once we nail down what motor and drive system (whether clockwise or counter clockwise). As a reminder, this is shooting for a 5kg capacity... 13" diameter... 14" long. Planning on having the inner vanes welded and supported also by the hub/spokes. More on that to come.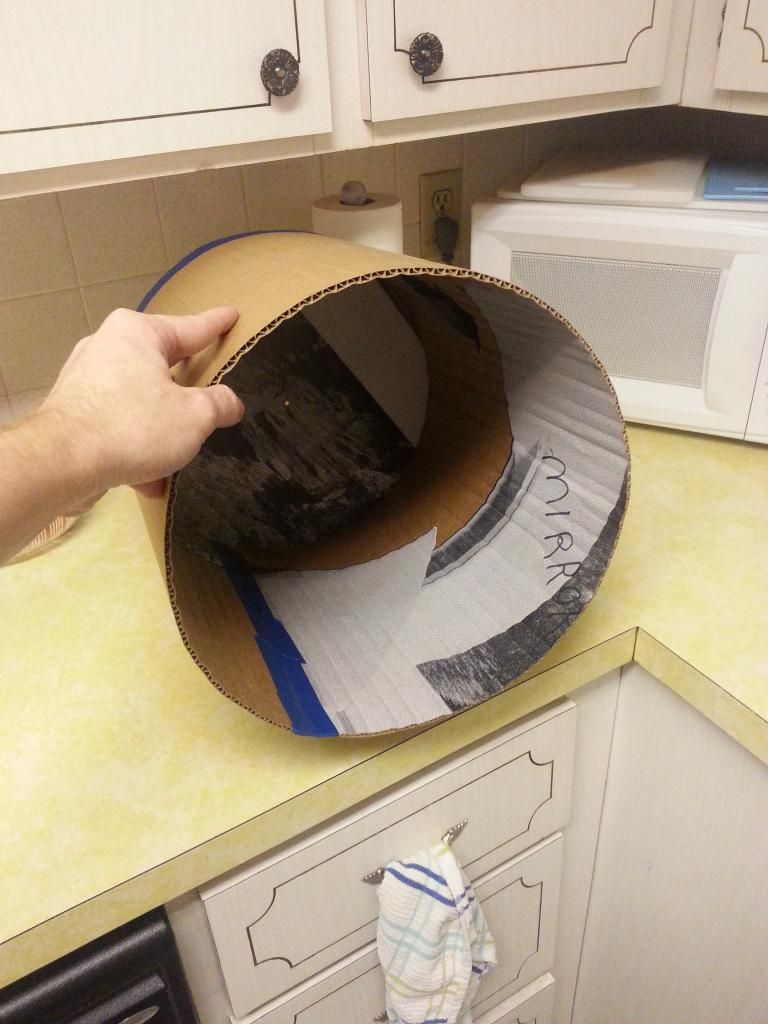  |
|
|
|
| bpeak |
Posted on 12/03/2014 3:02 PM
|
|
Newbie Posts: 21 Joined: December 02, 2014 |
One last update for today. The revised Gen 3... this time in black and white rather than the CAD colors. The carts for each unit will be fully enclosed with access doors to get to the goodies within. Probably going to design in a raised control panel area to the right of the roaster on that blank spot of the cart... that's where he'll be standing. Very much liking the direction at this point. I know the image is a bit hard to view but if anyone sees anything that jumps out as a red-flag... please let me know. Would love your feedback and input. Thanks all!!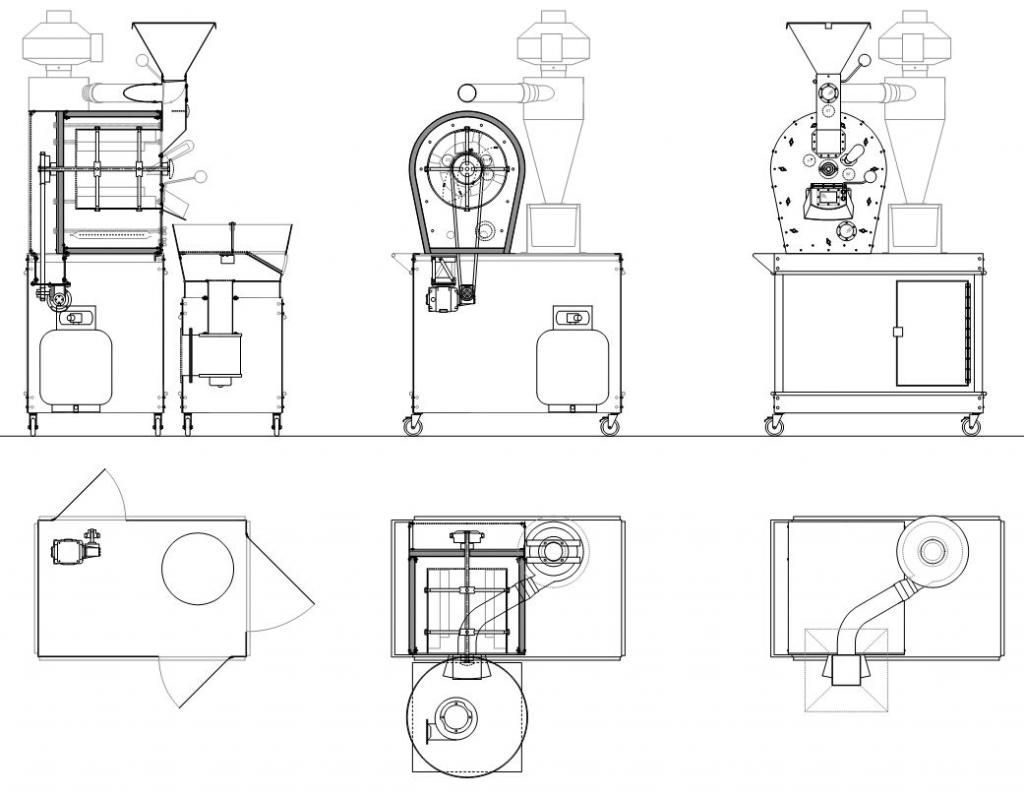 |
|
|
|
| allenb |
Posted on 12/03/2014 8:52 PM
|
|
Administrator Posts: 3858 Joined: February 23, 2010 |
Wow, you are well on your way! Must be nice having a mastery of Autocad. A couple of tips that might help prevent unwanted heartburn near the final stages of the build. One thing that seems to plague many a roaster designer/builder including your's truly is the means of attaching the inner sheet metal skin and outer layer to the front and rear plates. There's a tendency to avoid fully thinking this out until most of the roaster is already together then we stand back and go Hmmm, how am I gonna pull this off? There's a couple of options that typically come to mind, tack weld angle brackets every few inches around the perimeter of the front and back plates and drill pilot holes to allow using sheet metal screws and the other is to fabricate washers with an extension tab that can be bent at a right angle. You then place the washer/tabs between the main frame all-thread nuts and the front and rear plates. The problem with either method is trying to accurately locate where to drill the holes in the inner and outer skins. Anyway, not a huge deal but if this can be worked out prior to the last stretch it will save some pain and suffering. Don't skimp on vane height and it's good to make the reverse vanes taller than the forward vanes for good agitation as there's less bean mass density where those vanes are located. Obviously, there's a limit as to how tall you can make the vanes and not crowd the real estate where you need to place trier. Keep us posted, Allen Edited by allenb on 12/03/2014 10:39 PM 1/2 lb and 1 lb drum, Siemens Sirocco fluidbed, presspot, chemex, cajun biggin brewer from the backwoods of Louisiana
|
|
|
|
| bpeak |
Posted on 12/04/2014 6:22 AM
|
|
Newbie Posts: 21 Joined: December 02, 2014 |
Thanks Allen. I appreciate the heads-up. Yea, as I look at other home builds and professional jobs, that connection seems to be a tough one to figure out. Since my brother in-law and I don't have a welder (or welding skills) we are trying to keep as many connections bolted/screwed as possible to keep costs down. Below is a close-up of that connection that you were talking about... what do you think? 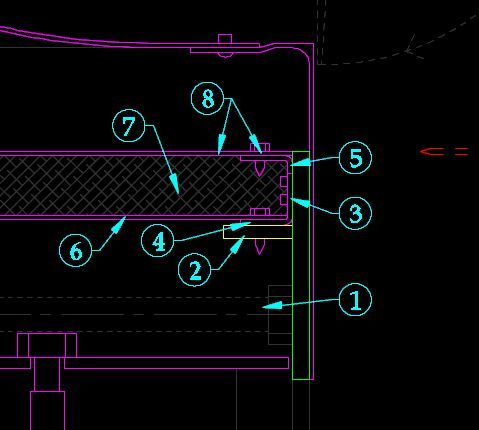 FYI - the purple represents cold or mild steel sheet metal and fasteners. The yellow represents steel bar (3/16" hoop that makes the shape of the light bulb). And the green represents stainless steel (planning on a 1/4" complete front plate in stainless). STEPS: 1) Connecting the front and back face plates with 1/2" rods (can be seen as the wing nut spots in the front view from the previous post). This will nail down the length and final resting place as well as the alignment of the plates front and rear. 2) Setting in the steel hoops. I want to have steel hoops that follow the full shape of the housing including the flat bottom. This will be the primary anchorage for the shell to faceplate as well as the primary anchorage for the entire roaster down to the cart. 3) Fasten steel angle brackets to the faceplate. These little bolts can also be seen on the front view... in a staggered pattern with the bolts of step 5. 4) With the angles solid... fasten them down into the steel hoop. All of these connections will likely be found, marked, and drilled based on the test fit so that we know everything will line up. (rather than trying to pre-drill everything and hope for the best) 5) Mount another row of angles to the faceplate aiming up which will hold the top shell. 6) Finally install the inner shell. This should work well because those lower angle brackets are staggered from the upper angle brackets so we should always be able to get tools in there to actually get to the screw/bolt heads. 7) Add the ceramic wool insulation. Planning on 1" thick blankets. 8) Finally add the outer shell. It seems like a LOT of steps and work but this basic approach is what we're planning for all sides front and back. Even the bottom of the roaster will have a similar insulated double wall shell... and all of it will be able to mount to the reinforced cart via the steel hoop. Plus... there isn't on weld that will be needed. Lots of bolts to run in. Lots of elbow grease. But hey... elbow grease is free and fasteners are cheap, right? Thoughts? |
|
|
|
| bpeak |
Posted on 12/04/2014 6:31 AM
|
|
Newbie Posts: 21 Joined: December 02, 2014 |
And on the vanes, right now I have drawn the outer ones at 2" and the inner ones at 1.5". 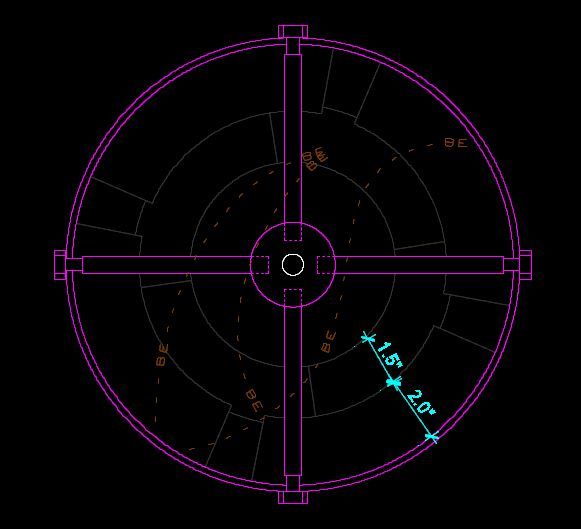 There's still more room at the center of the drum. Would you recommend maybe 2"Outer/2"Inner? PS - I confirmed that we will be running the drum counter clockwise when looking at the front. The drawings are set up this way for the controls and tester. So... the 3D model of the drum/vanes is incorrect. That model is set up for clockwise rotation. ((I think... right?)) |
|
|
|
| allenb |
Posted on 12/04/2014 8:31 PM
|
|
Administrator Posts: 3858 Joined: February 23, 2010 |
It looks like you've given the issue of sheet metal attachment plenty of thought and what you're proposing should work great. By staggering the brackets you'll have good access as well. For insulation I'd use 1" mineral wool item # 93315K34 here: http://www.mcmast...on/=uvu819 You had asked about off the shelf burner options in a previous post. There's quite a few companies out there that sell burners but most of them aren't cost effective unless buying quantity. On the other hand, this outfit http://www.tejass...urners.htm will do a custom length burner (PBM125) with venturi/jet combo ready to install at a much more reasonable price from what I've heard. It's just a pipe burner but they're tried and true and don't break the bank. I would use two for allowing good turn-down to low firing rates. If you decide to use this setup you'll need to allow space in the rear for the cast venturi fixtures. On vane height, I would go 1.5" outer and 2" inner. The 1.5" will grab and mix the dense perimeter layer very effectively and the taller inner ones will more easily grab the less dense layer of beans to kick them to the rear for great circulation. If you haven't already locked into your vane scheme you should know that there's no rule where you must make the vanes a continuous length from front to rear in a serpentine fashion but you can stagger shorter, half length sections with equal or better mixing. This has the added benefit of not having to form the longer vane into a spiral shape to keep it at a right angle to the drum wall. I've seen many examples of pre-1950's Probats using this arrangement. Allen Edited by allenb on 12/04/2014 8:43 PM 1/2 lb and 1 lb drum, Siemens Sirocco fluidbed, presspot, chemex, cajun biggin brewer from the backwoods of Louisiana
|
|
|
|
| Ringo |
Posted on 12/05/2014 5:06 AM
|
 Pounder  Posts: 474 Joined: January 14, 2010 |
On my drum ii welded 1 inch angle iron on my end panels. I laid my inside steel on that angle and let it float. I laid the insulation over that, I used hard duct board. Then I laid the top over that. I cut 1/2 flat bar to go around the outside edge. I drilled through the flat bar drilled and tapped the angle iron under the insulation and bolted the skin on. I did this so things could float with expansion from fash heat changes. I have stated in other post that I think I may have added too much insulation. That 3/4 inch duct board has a lot of mass and holds a lot of heat, if I were to build another I would use loose laid ceramic insulation. I am no expert so take what I say here with a grain of salt. I believe your slant to the front on your stirring veins may be too steep. I am worried on a small load most of your beans will stay too the front edge. On the smallest load you will run you want the beans to make a small pile up front to put your bean temp but also spread out over the leanth of the drum. I believe the most important function of the veins is to kick the beans side ways to get them off the drum. You want different beans hitting the drum all the time. I "think" you want the beans to fly through the air as far as possible. I covered the front of my drum with prexy glass put some navy beans inside and watched them run.
All you need in life is ignorance and confidence, and then success is sure. Mark Twain
|
|
|
|
| bpeak |
Posted on 12/05/2014 7:47 AM
|
|
Newbie Posts: 21 Joined: December 02, 2014 |
On the insulation... for those who have amazon prime and free shipping... http://www.amazon...ramic+wool Ends up being a bit cheaper per sqft. Comes in 31"x24" small roll. I think that's one of those things where we'll be keeping our eyes out (even shopping local at the mom-n-pop shops) and just buy the lowest price roll we can find. |
|
|
|
| bpeak |
Posted on 12/05/2014 8:23 AM
|
|
Newbie Posts: 21 Joined: December 02, 2014 |
Quote bpeak wrote: On the insulation... for those who have amazon prime and free shipping... http://www.amazon...ramic+wool Ends up being a bit cheaper per sqft. Comes in 31"x24" small roll. I think that's one of those things where we'll be keeping our eyes out (even shopping local at the mom-n-pop shops) and just buy the lowest price roll we can find. NEVERMIND. MY BAD. Just realized that your McMaster Carr item is 25 FEET long... not 25". WOW! That's an awesome price! ((was up late last night at the Lightning game... still clearing out the cobwebs this morning)) Thanks!! |
|
|
|
| bpeak |
Posted on 12/05/2014 8:34 AM
|
|
Newbie Posts: 21 Joined: December 02, 2014 |
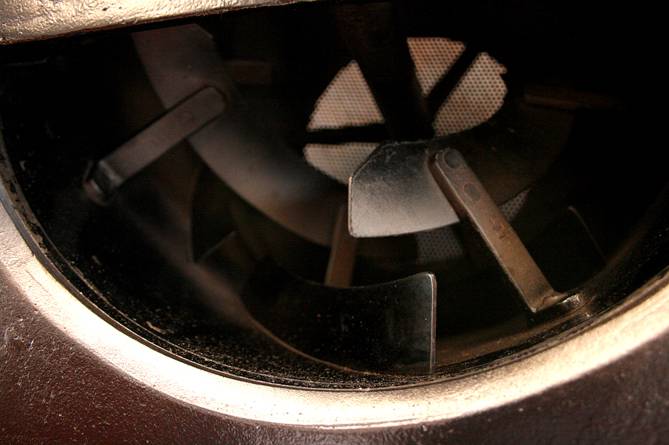
Ringo... thanks for the tip. I've been seeing more and more pics of vanes set up like Allen was saying too... where the outer vanes are not one long vane front-to-back but a series of 3 or 4 vanes in a row... and that group done at each of the four quadrants of the circle. So if 4 in a row, there'd be 16 total outer mini vanes. Easier to fab I bet too. I found a pic on this forum from back in '09 that was said to be of an actual commercial drum roaster (evidenced by the fact that it is on a rack with other drums too). Do you think this approach would be better considering the 13" diameter drum? 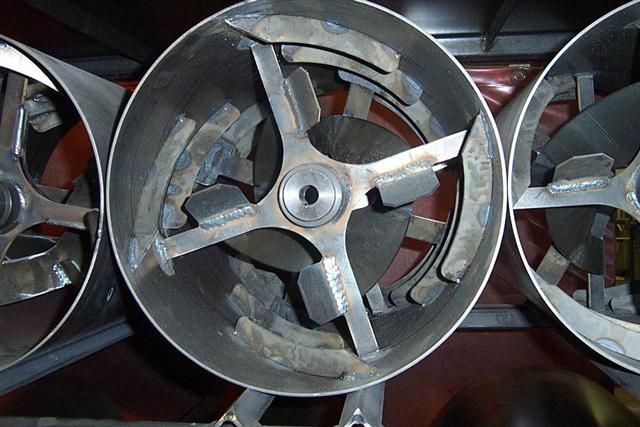 If I match that image and do rows... the outers appear to be pretty steep (maybe 30 degrees or more - hard to tell) but that wouldn't have the same problems as what I drew because the individual vanes are separated, right? This shouldn't get that bean trap spot. It also looks like those rows' vanes "overlap" so that the beans cant just roll on the drum between vanes. They're always going to get tossed onto the larger rear facing inner vanes. Prolly a good tip. Also on the outer vanes --- they are really short. If I just look at height based on proportion, they appear to be about 8% of the diameter of the drum. (Dx0.08) Based on that math, with a 13" diameter drum, a similar proportioned outer vane for me would be 1.04". Likewise, those inner vanes are about 16% of the diameter (or twice the size of the outers) so for me 2.08". The inners also look like they corkscrew a full 90 degrees (due North at the rear to due East at the front). Another interesting point. They're also separated by the same 8% as a gap to make sure nothing gets jammed? Or just so that the inner vanes are closer to the axle to better toss things around? It's also cool that the inners are welded to the hubspokes rather than to the outer vanes. Fascinating. Anyhoo --- We will be doing most of the metal prep, cuts, test fits, etc. to keep outsourced costs down and then hitting up a local welder just to lay welds. So any savings in fab time will be that much more saved in our grease-o-the-elbow. I'm taking it all in. Thanks again guys. |
|
|
|
| Ringo |
Posted on 12/05/2014 10:21 AM
|
|
Pounder Posts: 474 Joined: January 14, 2010 |
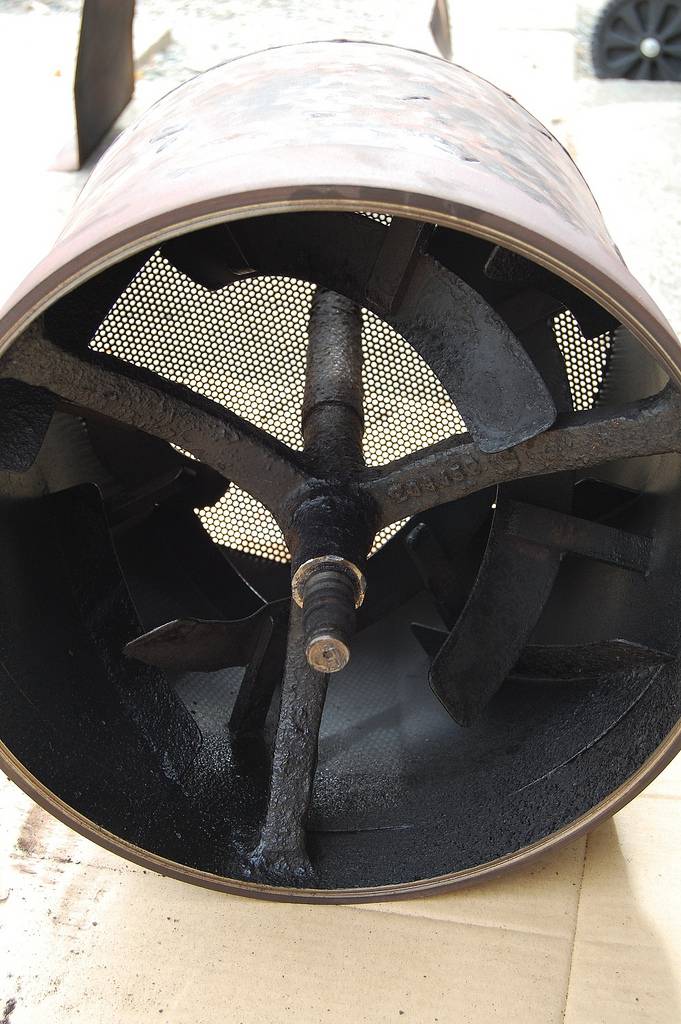
You are right they do seem very steep. I guess I just do not undertand why this works but they are commercial drums so they have to. It seems to me the beans would slide along the drum one vein to the next and never roll off. I have pic of 3 or 4 more commercial drums they all seem to have steep pitches on the veins. I will try to post these pics. Not good pictures I know but maybe they will help. Number 1 and 4 are old roaster being rebuilt number 2 is a modern 2k roaster, 3 is a rebuild but do not remember what. Roaster pictures are hard to find.
Ringo attached the following images:


Edited by Ringo on 12/05/2014 10:27 AM All you need in life is ignorance and confidence, and then success is sure. Mark Twain
|
|
|
|
| Ringo |
Posted on 12/05/2014 10:39 AM
|
|
Pounder Posts: 474 Joined: January 14, 2010 |
One more Probate 2k I think
Ringo attached the following image:

All you need in life is ignorance and confidence, and then success is sure. Mark Twain
|
|
|
|
| bpeak |
Posted on 12/05/2014 1:57 PM
|
|
Newbie Posts: 21 Joined: December 02, 2014 |
The product of my lunch break today. Added a revised control panel area which will be at about 37" from floor to buttons, well within reach. The housing for the controls will also act as a cover for the chaff bin. Planning on a clear 64oz container for chaff at the bottom of the cyclone. The backside of the control box will be open. The lid to the chaff bin will be permanently fixed to the control box. When the bin gets full... twist it off and dump it out. Also updated these views for the new drum vanes and added a right side end view. Oh... and also added our design for the cooling tray arms/fins. Yep... was a good lunch. PS - nevermind the bum. It's one of the few people that are built into CAD. It's set to my brother in-law's height. I doubt he'll suit up like that when he's roasting... but who knows. 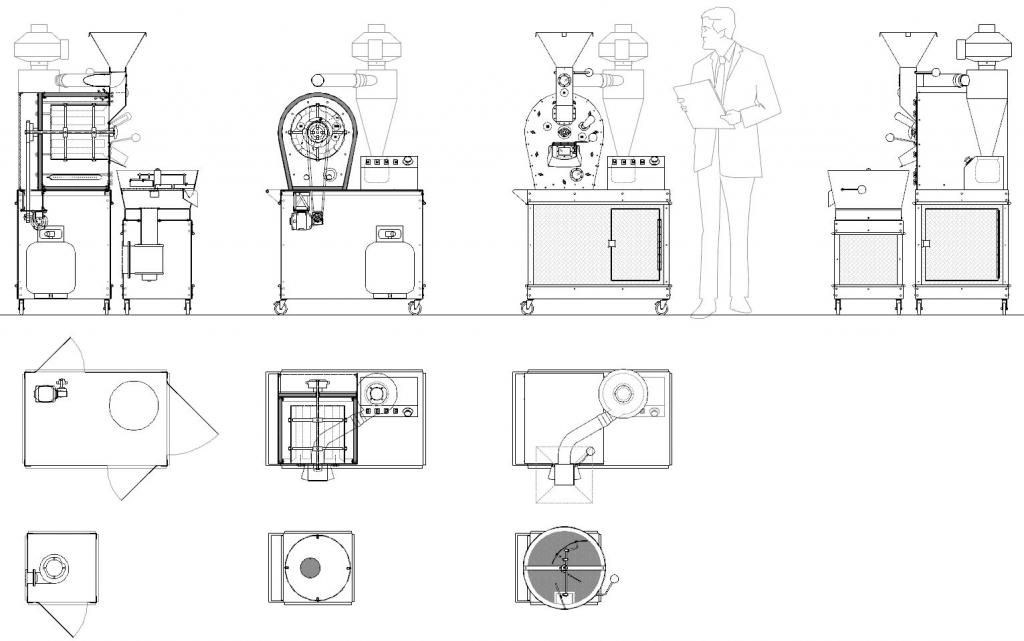 |
|
|
|
| allenb |
Posted on 12/06/2014 12:58 AM
|
|
Administrator Posts: 3858 Joined: February 23, 2010 |
I've played around with drum vane angles from 20 to 45 degrees off axis and I've found anything steeper than 30 degrees does have a tendency to stack too much coffee at the front of the drum which reduces the available heat transfer surface area of your drum which increases the drum temperature needed for a given rate of rise. My preference is anywhere between 25 and 30 degrees. As far as proximity of inner and outer vanes to each other, if using a 1.5" for outer vanes you should be fine stacking them with no gap between them. Due to the large crossing angles between them, there's no chance of beans getting caught where they cross. Allen 1/2 lb and 1 lb drum, Siemens Sirocco fluidbed, presspot, chemex, cajun biggin brewer from the backwoods of Louisiana
|
|
|
|
| allenb |
Posted on 12/06/2014 11:00 AM
|
|
Administrator Posts: 3858 Joined: February 23, 2010 |
Me stated that anything steeper than 30 degrees stacked too much coffee at the front of the drum. I need to qualify my statement in that my observations were with inner vanes equal to outer vane height and at the same pitch. It may be that by using a taller inner vane than outer that the stacking tendency may be negligible. It would be interesting to see tests with taller inner vanes and various angles in an acrylic drum. Allen 1/2 lb and 1 lb drum, Siemens Sirocco fluidbed, presspot, chemex, cajun biggin brewer from the backwoods of Louisiana
|
|
|
|
| Ringo |
Posted on 12/06/2014 9:59 PM
|
|
Pounder Posts: 474 Joined: January 14, 2010 |
I agree Allen, I can not understand how a steep angle will let the beans spread over the drum. I only ever build 1drum in my life so I do not have much background to pull from. I think the reason for the forward slant is to unload the beans and a small mixing of beans front to back. I know on my roaster I can roast 6 pounds down to 1 pound with good results I do not think most commercial roasters have that range. When I was testing on a large load some beans would spill over the top of both veins. Is this good or bad? This short forward vein is why I can run a small batch. If it was 2 inches high I believe a small charge would pile up too much on the front. So maybe this is how commercial drum get by with the steep angle, maybe most of the beans roll over the top and spread out. Also maybe commercial roasters do not need a big charge size variation. It would be hard to make money running 16 percent smaller than max roast like I do.
All you need in life is ignorance and confidence, and then success is sure. Mark Twain
|
|
|
|
| allenb |
Posted on 12/07/2014 11:22 AM
|
|
Administrator Posts: 3858 Joined: February 23, 2010 |
I think you nailed it on commercial roasters not needing to handle small loads. I'm sure they're optimizing the design for full batches. On if beans spill over the vanes is good/bad? In my 1 lbr the beans are definitely cascading over the vanes which is also the case with commercial roasters. I haven't done the math on % of vane height to drum diameter on a typical 12 kilo shop roaster but I seem to remember the vanes to be around 2 to 2 1/2" tall in a 2' diameter drum or somewhere around 2' which would make them fairly short compared to most of our small home-builts. Allen 1/2 lb and 1 lb drum, Siemens Sirocco fluidbed, presspot, chemex, cajun biggin brewer from the backwoods of Louisiana
|
|
|
|
| bpeak |
Posted on 12/08/2014 9:40 AM
|
|
Newbie Posts: 21 Joined: December 02, 2014 |
Upate - I modeled the outer vanes based on the 4-in-a-row staggered approach for a total of 16 outer vanes. Ran at 30 degrees. The overlap on everything looks really good for solid kick of beans forward without getting stuck. Best of all is that using this method I was able to generate a flat template for the out vane cuts. Will be super easy to fab out of flat bar for a welder to just lay a bead. No helical bending on these. No crazy setup. Really simple. The inner vanes... well... more on those later. |
|
|
|
| bpeak |
Posted on 12/08/2014 9:48 AM
|
|
Newbie Posts: 21 Joined: December 02, 2014 |
Separate topic... on the cooling tray... I'm very much liking this little motor for the stir arms assembly. Would be mounted just below the mesh where the beans are. Has a decent 12rpm. But it only has 2.6 in-lbs torque. Do you guys think that will be enough? http://www.mcmast...18/=uxo0e3 As a reminder, our cooling stir arm design is below and would spin clockwise. The overall diameter of the bean cooling area is about 19" (for reference in how deep the beans might be). The two straight paddles are the actual sweeps that are down on the mesh pushing out to the trap door. the curved one is held off the mesh and would pull the beans back to the center for a constant turn-over till the trap door is pulled. 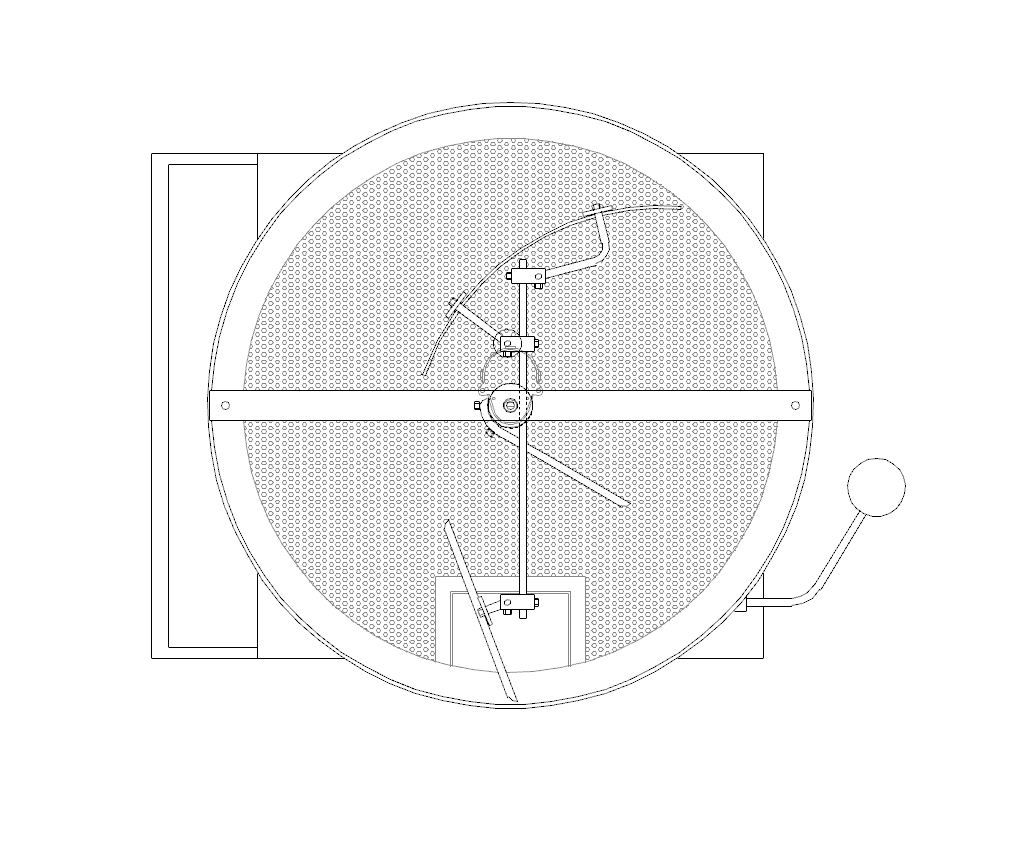 Thoughts? Motor ok for the purpose? |
|
|
|
| Ringo |
Posted on 12/08/2014 5:06 PM
|
|
Pounder Posts: 474 Joined: January 14, 2010 |
2.5 inch pound is very light, I would look for something bigger. There is a place people buy gear motor from it's like surplus supply. Some one will come on here and give you the name.
All you need in life is ignorance and confidence, and then success is sure. Mark Twain
|
|
|
|

Page 1 of 2: 12
| Jump to Forum: |
Similar Threads
| Thread | Forum | Replies | Last Post |
|---|---|---|---|
| Kaleido Roaster PID parameters | Roasting Coffee | 2 | 04/13/2024 3:07 PM |
| Skywalker roaster mods | Other Roasters | 293 | 04/07/2024 4:31 PM |
| Skywalker, the ALM chinese one pound roaster | Other Roasters | 215 | 04/02/2024 1:48 AM |
| My first popcorn mod roaster (vahegan) | Fluidbed Roaster | 48 | 03/24/2024 12:04 PM |
| Fatamorgana electric drum roaster | Other Roasters | 2 | 03/24/2024 10:03 AM |
Powered by PHP-Fusion Copyright © 2024 PHP-Fusion Inc
Released as free software without warranties under GNU Affero GPL v3
Designed with ♥ by NetriXHosted by skpacman