
Login

Shoutbox
You must login to post a message.
renatoa
04/18/2024 12:36 AM
greyberry2, N C, 
renatoa
04/17/2024 9:27 AM
 , branchu
renatoa
04/14/2024 5:56 AM
TheOtherJim and papajim,
 !
!
!allenb
04/11/2024 6:33 PM
Zemona

renatoa
04/11/2024 9:19 AM
Mrbones and sgupta,  ?
?
?Forum Threads
Newest Threads
Rainfrog's Roastmast...War on Farmers by Su...
Kaleido Roaster PID ...
Green coffee sellers
Wet beans - Estimati...
Hottest Threads
| Skywalker roaster... | [292] |
| Skywalker, the AL... | [214] |
| Skywalker Roasts | [94] |
| Rainfrog's Roastm... | [53] |
| My first popcorn ... | [47] |
In Memory Of Ginny

Donations
Latest Donations
dmccallum - 10.00
JackH - 25.00
snwcmpr - 10.00
Anonymous - 2.00
Anonymous - 5.00
dmccallum - 10.00
JackH - 25.00
snwcmpr - 10.00
Anonymous - 2.00
Anonymous - 5.00
Users Online
Guests Online: 3
Members Online: 1
Dennie_S
Total Members: 8,210
Newest Member: N C
Members Online: 1
Dennie_S
Total Members: 8,210
Newest Member: N C
View Thread
Who is here? 1 guest(s)
 Excel and Arduino Control of Modified Popcorn Roaster
|
|
| ChicagoJohn |
Posted on 10/15/2016 2:32 PM
|
 Pounder  Posts: 513 Joined: June 15, 2015 |
About a year ago I posted a series of modifications for the Presto PopLite for coffee roasting. A few weeks ago I undertook a project to interface it with Excel using an Arduino microcontroller. I found some free to use software, PLX-DAQ, from Parallax, Inc., and selmaware that allowed this to exchange and used it to connect my PopLite modification to a MAX6675 temperature module for k-thermocouple input and to a stepper motor for control of the PWM to the heating coil. I am using Windows XP and Excel 2003 and it is my understanding the approach I took should work up to Win 10, but that there are serial transfer issues with Win 10 that have not been resolved in connection with PLX-DAQ. Excel workbooks for ?F and ?C, Arduino sketches, and an Adobe PDF with annotated photos is now available in a zip file for member download, thanks to JackH, to anyone interested, via the blue Downloads selection on the upper left menu bar. I put a video on YouTube showing how this roasting system presently works. https://youtu.be/... The Excel spreadsheets allow generation of profile curves through changing two equation parameters so as to change final roast temperature, development times first crack to end of roast relative to total roast interval, etc. The profile generated then automatically transfers to the target profile that the PWM adjustment strategy attempts to match via the stepper motor. If you're interested in learning more and have any questions, suggestions, or see corrections that need to be made, please post them in this tread and I'll try to respond. Edited by JackH on 10/15/2016 3:30 PM So many beans; so little time.... |
|
|
|
| JackH |
Posted on 10/15/2016 3:34 PM
|
 Administrator Posts: 1809 Joined: May 10, 2011 |
Nice work John! I may try it to replace my old hand crank Variac method. I added a direct link to your download. (Just click the blue Download). ---Jack
KKTO Roaster. |
|
|
|
| greencardigan |
Posted on 10/19/2016 5:26 AM
|
 1 1/2 Pounder  Posts: 1185 Joined: November 21, 2010 |
Thanks for this. I might download it and give it a try sometime. I'm assuming I can customise the serial commands it's sending to the arduino? It would likely be easy to get it working with the TC4 and various associated sketches. Brad |
|
|
|
| ChicagoJohn |
Posted on 10/19/2016 6:05 AM
|
|
Pounder Posts: 513 Joined: June 15, 2015 |
Quote I'm assuming I can customise the serial commands it's sending to the arduino? Brad Yes you can. When you unpack the zip file, there are two files in the PLX-DAQ folder; one of the files is a help file which provides a complete list of directives that the front end by selmaware recognizes and the rules you will need to follow in sending them. In summary, these directives will allow you to write to and read from any cells in the first spreadsheet in an workbook. You might also be interested in looking at a separate product written by selmaware called MakerPlot that is a stand-alone, fully configurable, serial-directed system for use with microcontrollers capable of sending and receiving serial data. I plan to pursue use of this next, but since I have some previous experience with Excel, I decided to use that as a starting point. So many beans; so little time.... |
|
|
|
| ChicagoJohn |
Posted on 10/20/2016 8:48 AM
|
|
Pounder Posts: 513 Joined: June 15, 2015 |
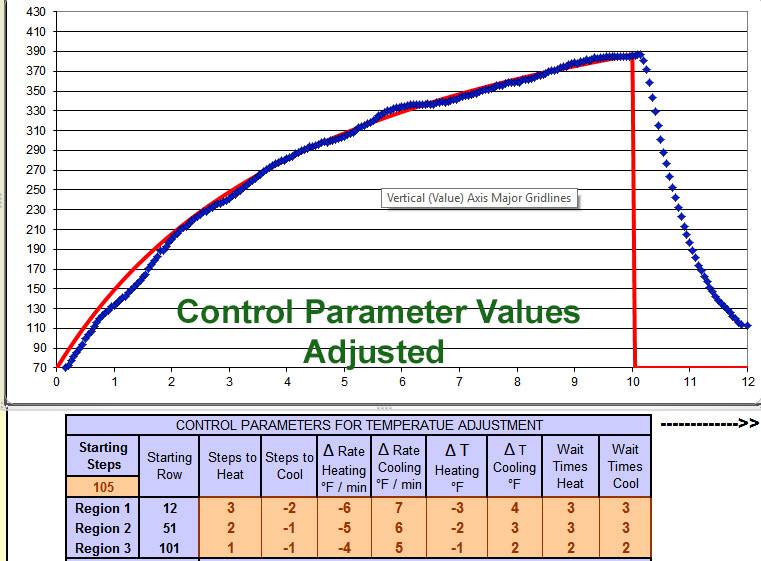
I tried a few changes to the table of control parameters this morning. Ambient conditions were very similar to when I did the video, and I think the changes today helped. I've attached a couple of images which show the difference in correspondence to the target curve and the associated control parameter values. These were both first batch roasts without any warm up. Ambient temperature on both occasions was around 47?F. By clicking on them, you can flip back and forth to make the changes evident. First crack was around 355?F (180?C) and 7.75 minutes for 22.5% of total roast time after 1C. I've been drinking the product from this automated process now for several days and it's what I'm looking for; now hopefully highly repeatable. 
ChicagoJohn attached the following images:

Edited by ChicagoJohn on 10/20/2016 9:03 AM So many beans; so little time.... |
|
|
|
| ChicagoJohn |
Posted on 10/25/2016 10:02 AM
|
|
Pounder Posts: 513 Joined: June 15, 2015 |
Another update -- System seems to be working well and is especially nice to use on cold mornings before sunrise allowing me to watch things from the warm side of the patio door.
ChicagoJohn attached the following images:


So many beans; so little time.... |
|
|
|
| ChicagoJohn |
Posted on 12/04/2016 8:59 AM
|
|
Pounder Posts: 513 Joined: June 15, 2015 |
I decided to add a slider for manual increase or decrease of heating steps and to record the net effect of this manual input together with the preset step profile and the corrections made by the spreadsheet automatically upon the PWM stepper motor control setting at each three second interval during the roast. This stepper profile can then be used as the starting preset for the subsequent roast, "learning" from the past one, to produce continuous improvement in correspondence with the target. In the screen shot example from this morning's roast, I made three manual changes as indicated. In the first two, I added a step of heating and in the last one I subtracted a step. I've also indicated where 1C onset occurs for the particular configuration and type of thermocouple I'm using. If anyone is interested in a copy of this latest spreadsheet, let me know as JackH told me he'd be willing to put it in the download area.
ChicagoJohn attached the following image:

So many beans; so little time.... |
|
|
|
| btreichel |
Posted on 12/04/2016 10:52 AM
|
 1/4 Pounder  Posts: 185 Joined: May 07, 2007 |
Nice bit of work, are you seeing changes in the cup? |
|
|
|
| ChicagoJohn |
Posted on 12/04/2016 12:22 PM
|
|
Pounder Posts: 513 Joined: June 15, 2015 |
Quote Thanks for your comment. Results seem to more consistent now that profile logging and heating control are automated, but I've also switched from the Aeropress to a more repeatable brewing method, so it's hard to say which is responsible. So many beans; so little time.... |
|
|
|
| btreichel |
Posted on 12/04/2016 1:02 PM
|
|
1/4 Pounder Posts: 185 Joined: May 07, 2007 |
Interesting, I find my areopress repeatable. But then I may be doing mine a bit different. Grind around table salt, next finest is espresso, pour 203 water into the press till the crust hits the top, crunch that down, water to 300 gr. Stir about 6 to 8 times, then rest my hands on the top. Oh, 17 gr, basically 1 flat areo scoop. |
|
|
|
| ChicagoJohn |
Posted on 12/04/2016 2:24 PM
|
|
Pounder Posts: 513 Joined: June 15, 2015 |
Quote btreichel wrote: Interesting, I find my areopress repeatable. But then I may be doing mine a bit different. Grind around table salt, next finest is espresso, pour 203 water into the press till the crust hits the top, crunch that down, water to 300 gr. Stir about 6 to 8 times, then rest my hands on the top. Oh, 17 gr, basically 1 flat areo scoop. Thanks for sharing your AP method. I thought my AP was the most repeatable method I'd used up to that point, and I used it for around 18 months. I found temperature made a big difference and heated 450 ml water to 175-180?F and used 34 gm of hand burr mill grind probably a bit coarser than yours. I filled the cylinder after bloom before pressing, stirred 10 times the and diluted in the cup with the remaining water to about 400 ml product. For the past month or so I've been hand grinding 45 gm to maybe French press level -- pretty coarse -- heating 500 ml water to 180?F, pouring 300 ml of that in my mug, dumping the grounds into the remaining 200 gm and stirring for 30 seconds, then pouring that slurry all at once into a stainless, paperless, pour-over cone over the mug with the 300 gm of water in it and letting it drain until it stops continuous flow to single drips when I remove it. (Actually, I've been doing this twice in succession every morning for the past 2-3 weeks having started a with 17 gm a day. Now I'm up to <cough> 90 gm.  ) )I don't know if it's the automation in the roasting process or the change in brewing, but, to your question, I'm not able to discern any meaningful differences day-to-day now. I doubt I'll go back to the Aeropress since I find the new method quicker, easier, less messy, and easier to clean up and it just seems intuitively like there is less potential for variation in it. So many beans; so little time.... |
|
|
|
| Dann-Oh |
Posted on 04/24/2017 6:05 PM
|
|
Newbie  Posts: 23 Joined: May 11, 2016 |
Hey John, So I am looking into modding my popcorn roaster. To be honest I'm going to be coping your design pretty closely. I have a question for you. 1) Can you please provide a list of the hardware devices you used for you automation project. Thanks for posting all your mods to the forum. |
|
|
|
| jkoll42 |
Posted on 04/24/2017 8:27 PM
|
 1 1/2 Pounder Posts: 860 Joined: February 14, 2011 |
Sorry Dann-Oh. John is a jerk and is not going to help you. Kidding. This forum has lost some humor since G left us and this is a poor attempt at bringing something back. Jon -Jon
Honey badger 1k, Bunn LPG-2E, Technivorm, Cimbali Max Hybrid, Vibiemme Double Domo V3 |
|
|
|
| Dann-Oh |
Posted on 04/25/2017 9:44 AM
|
|
Newbie Posts: 23 Joined: May 11, 2016 |
Good try JKoll ;-). We all know John is a sharing man. |
|
|
|

| Jump to Forum: |
Similar Threads
| Thread | Forum | Replies | Last Post |
|---|---|---|---|
| Kaleido Roaster PID parameters | Roasting Coffee | 2 | 04/13/2024 3:07 PM |
| Skywalker roaster mods | Other Roasters | 293 | 04/07/2024 4:31 PM |
| Skywalker, the ALM chinese one pound roaster | Other Roasters | 215 | 04/02/2024 1:48 AM |
| My first popcorn mod roaster (vahegan) | Fluidbed Roaster | 48 | 03/24/2024 12:04 PM |
| Fatamorgana electric drum roaster | Other Roasters | 2 | 03/24/2024 10:03 AM |
Powered by PHP-Fusion Copyright © 2024 PHP-Fusion Inc
Released as free software without warranties under GNU Affero GPL v3
Designed with ♥ by NetriXHosted by skpacman