
Login

Shoutbox
You must login to post a message.
renatoa
04/18/2024 12:36 AM
bijurexim, greyberry2, N C, 
renatoa
04/17/2024 9:27 AM
 , branchu
renatoa
04/14/2024 5:56 AM
TheOtherJim and papajim,
 !
!
!allenb
04/11/2024 6:33 PM
Zemona

renatoa
04/11/2024 9:19 AM
Mrbones and sgupta,  ?
?
?Forum Threads
Newest Threads
Rainfrog's Roastmast...War on Farmers by Su...
Kaleido Roaster PID ...
Green coffee sellers
Wet beans - Estimati...
Hottest Threads
| Skywalker roaster... | [292] |
| Skywalker, the AL... | [214] |
| Skywalker Roasts | [94] |
| Rainfrog's Roastm... | [53] |
| My first popcorn ... | [47] |
In Memory Of Ginny

Donations
Latest Donations
dmccallum - 10.00
JackH - 25.00
snwcmpr - 10.00
Anonymous - 2.00
Anonymous - 5.00
dmccallum - 10.00
JackH - 25.00
snwcmpr - 10.00
Anonymous - 2.00
Anonymous - 5.00
Users Online
Guests Online: 4
Members Online: 0
Total Members: 8,211
Newest Member: bijurexim
Members Online: 0
Total Members: 8,211
Newest Member: bijurexim
View Thread
Who is here? 1 guest(s)
 Roaster Rob Clone - 1-5lb Gas Fired
|
|
| KramE |
Posted on 12/07/2016 4:04 PM
|
|
1/4 Pounder  Posts: 53 Joined: March 29, 2015 |
Hello, I wanted to move up from the trusty bake-a-round to a larger batch system, so here is my take on Roaster Rob's design. I purchased the Sievert 2941 torch head, and due to the odd M20x1 threads, I had a custom M20x1 to 3/8 NPT adapter machined at a local shop. I then reduced the 3/8 npt down to 1/4" npt for no particular reason other than ease of converting to and from propane fittings. All of the piping and fittings were ordered from McMaster Carr. 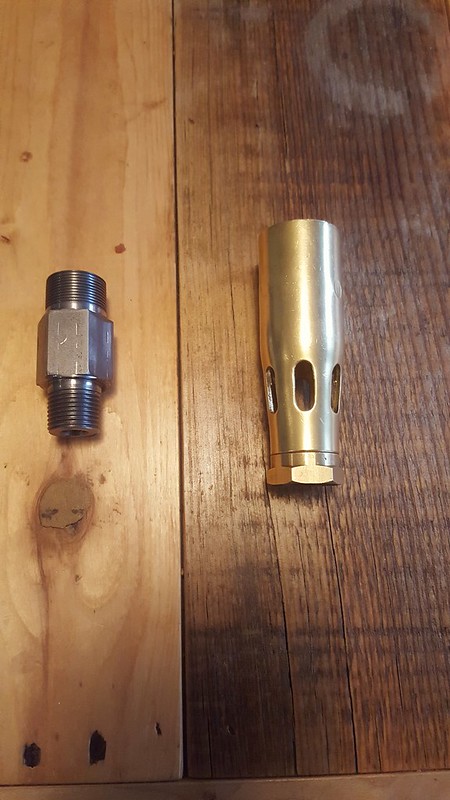 2016-11-12_10-00-28 2016-11-12_10-00-28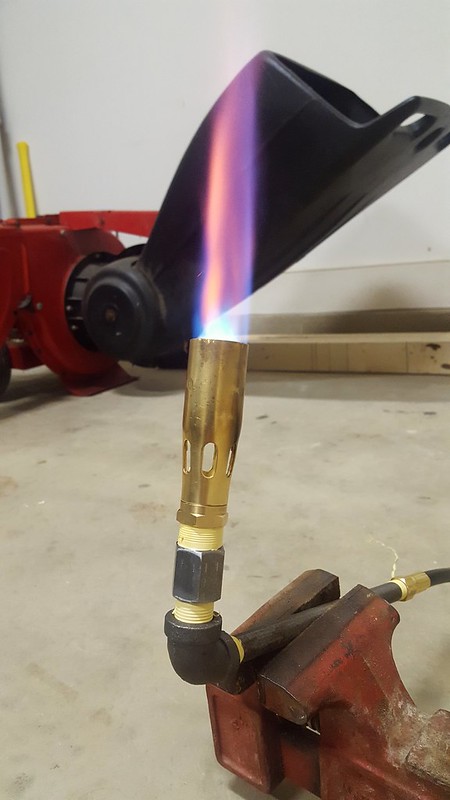 2016-11-26_07-29-27 by 2016-11-26_07-29-27 by I the bought a 2' and a 3' section of 6" x "6" x 1/4" aluminum square tubing from a local metal supply store for $78 plus $12 for two cuts. I also picked some scrap aluminum sheeting for the perforated plate for around $12 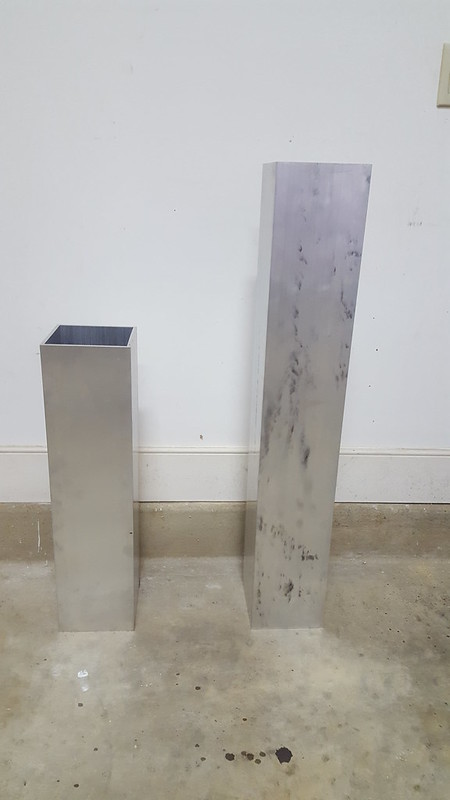 20161207_134437 20161207_134437I am attempting to re-purpose the same vacuum from my bake a round build, so I had to build it tall enough to line up with the blower port. The result is a roughly 12" x 12" x 12" box made of melamine shelving that I had laying around. I drilled a hole for the 1 1/4" PVC under sink slip tip extension that just happened to fit the blower port of the vacuum. I taped the seals with duct tape because quite a bit of air was leaking out. 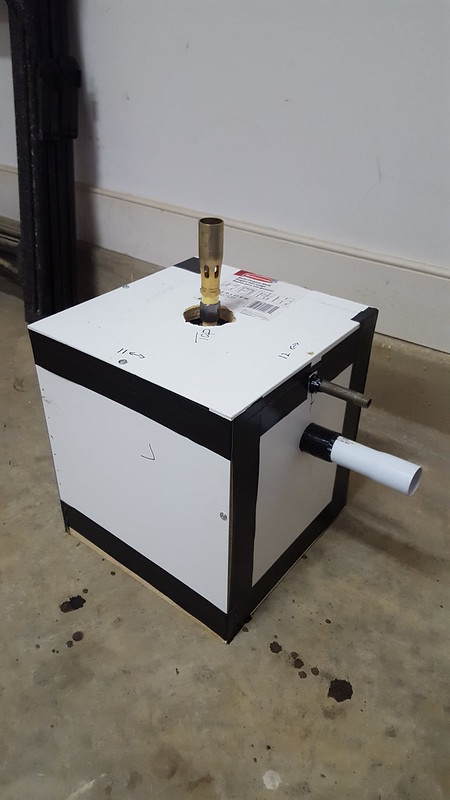 20161207_134322 20161207_134322I forgot to order pipe brackets/clamps to mount the pipe from McMaster, and neither HD or Lowe's had 1/4" clamps, so I bought a gang box. 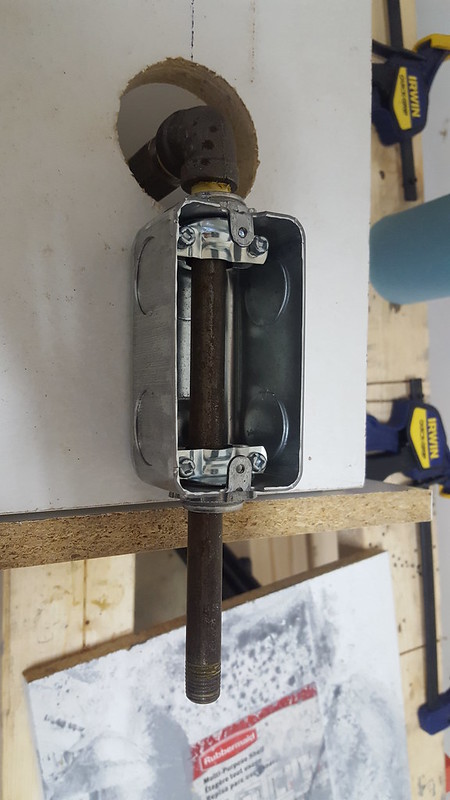 20161202_151813 by Mark E 20161202_151813 by Mark EFor the perforated plate, I tried to follow AllenB/Roaster Rob's recommendations on post #53 in Roaster Rob's stickied post found here - http://forum.home...owstart=40. I cut aluminum sheeting with a jigsaw and bent it at a 45 degree angle 1.375" from the edge so roughly 25% of the volume will be part with the perforations. I then mounted the bent section of aluminum to a flat sheet with screws and drilled 1/8" holes through both plates at the same time about 8mm apart in rows, not in a diamond pattern (more on that later). In hind sight, I would have done the hole layout and drilling on one sheet first, then mount it to the second sheet drill again, and THEN do the bend. The result: 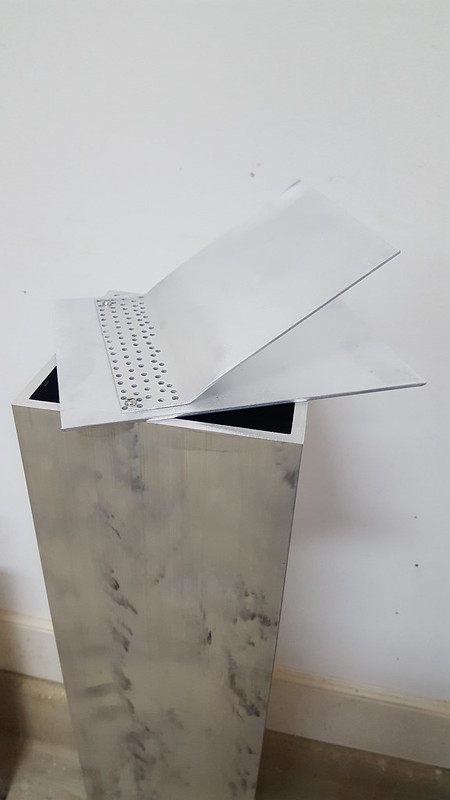 20161207_134541 20161207_134541Bottom: 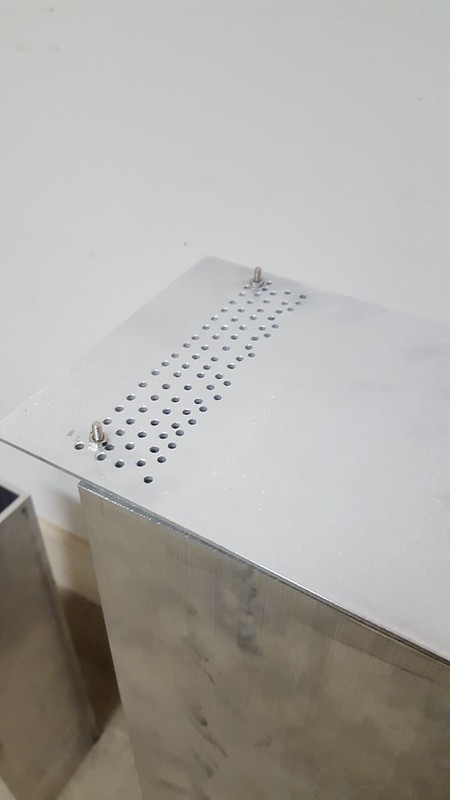 20161207_134607 20161207_134607An unintended benefit to the screws are that they align the plate to the furnace section of the roaster. So the 2' section of aluminum square sits on top of the box and the per plate on top of that. 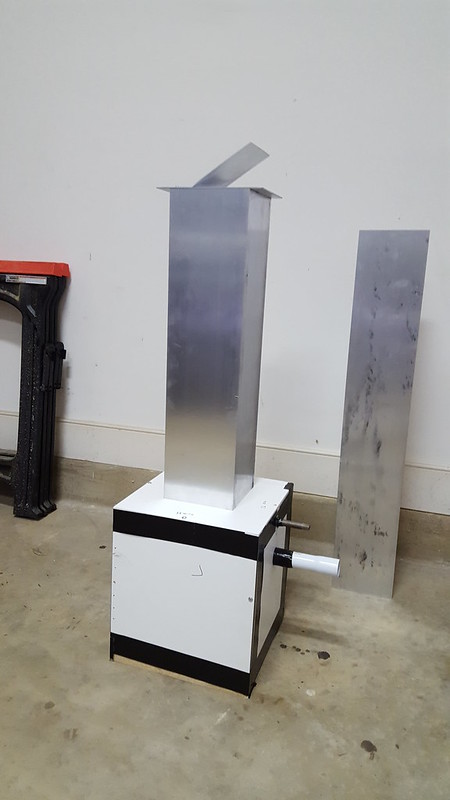 20161207_134652 20161207_134652I can then slide the roasting chamber on top, and voila! Roaster. 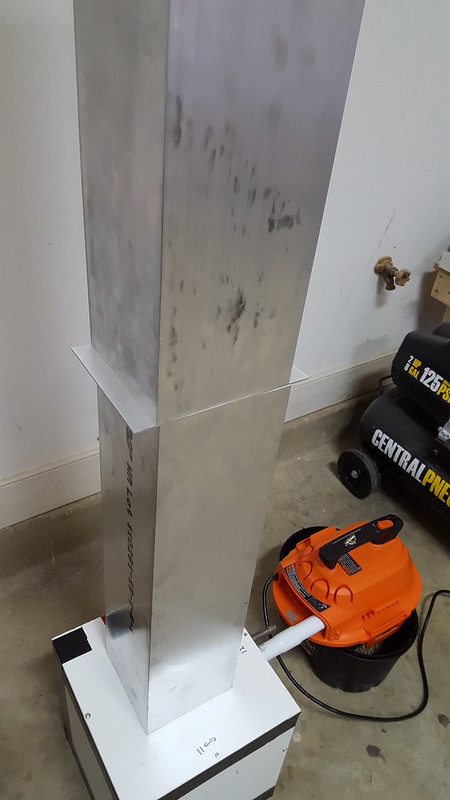 20161207_134815 20161207_134815---------------------------------------------------------------------------------------------- I hooked up the blower last night, and as it turns out, I can only move 1lb of beans. The exact same as the old system I'm trying to upgrade. So my question....where did I go wrong? 1. The vacuum is under powered (2.5 peak HP, 6A) 2. Too many perforations 2A. Perforations not in a diamond pattern 3. The hole in the box with the torch head is too small 4. Too much dead space in the box 5. Something I'm not seeing I'll eventually figure out bean dumping, temp probes, and viewing window after I solve this little conundrum. Any thoughts? |
|
|
|
| greencardigan |
Posted on 12/07/2016 8:21 PM
|
 1 1/2 Pounder  Posts: 1185 Joined: November 21, 2010 |
Try a steeper angle on the ramp? You say it's 45 degrees but it looks less? |
|
|
|
| KramE |
Posted on 12/07/2016 9:35 PM
|
|
1/4 Pounder Posts: 53 Joined: March 29, 2015 |
You know, now that you mention it, when I made the plate it wasn't long enough at 45 degrees and I had to bend it back a bit to close the gap between the plate and the chamber wall. I'm going to remake the plate and do a better job with the perforations and I'll make sure to get the measurements correct this time. I also noticed improvement after I went back and pushed all the tape down again. I plan on sealing all the joints with caulk except the ones that I need to maintain access to the torch head plumbing. |
|
|
|
| allenb |
Posted on 12/08/2016 6:29 PM
|
 Administrator Posts: 3858 Joined: February 23, 2010 |
Quote I hooked up the blower last night, and as it turns out, I can only move 1lb of beans. The exact same as the old system I'm trying to upgrade. When you say you can only move 1 lb of beans, what happens when you add more? Does the spout become erratic? (starts and stops) or stops altogether? If it stops completely after adding more than a lb then it's either an under powered vacuum or leakage at the joints assuming you drilled the prescribed number of holes per unit area as prescribed in RoasterRob's post. An angle steeper than 45 degrees will require more blower power to spout the same cross section and column height but a shallower angle as you're showing will require somewhat less power but can sometimes suffer from an irregular spout caused by an insufficient return of the beans to the perf plate. Allen 1/2 lb and 1 lb drum, Siemens Sirocco fluidbed, presspot, chemex, cajun biggin brewer from the backwoods of Louisiana
|
|
|
|
| KramE |
Posted on 12/08/2016 8:20 PM
|
|
1/4 Pounder Posts: 53 Joined: March 29, 2015 |
Quote allenb wrote: When you say you can only move 1 lb of beans, what happens when you add more? Does the spout become erratic? (starts and stops)... Allen Yes. When I added more beans it became more irratic. When I made the first perf plate I just kinda eyeballed the holes, so I didn't really follow Roster Robs's/your formula closely. I also miscalculated the length of the plate needed to make a 45 degree angle by 18mm. I just stepped on the plate to bend it back down so it would fit. This resulted in a more gentle slope than an actual angle. I was sloppy and in a hurry. I didn't realize the degree of accuracy required. That being said, after I sealed all the box leaks, the bed movement improved significantly enough to move 2 pounds well enough to roast (I think) I am going to remove the tape and caulk all the seams except those that I need to keep free to access the torch plumbing. I'm also rebuilding the perf plate and will take the time to lay down the pattern before drilling. I'm actually really happy with how things are coming along. Yes, I have some hurdles, but nothing that feels insurmountable. Edited by KramE on 12/08/2016 8:35 PM |
|
|
|
| allenb |
Posted on 12/09/2016 8:29 PM
|
|
Administrator Posts: 3858 Joined: February 23, 2010 |
Quote That being said, after I sealed all the box leaks, the bed movement improved significantly enough to move 2 pounds well enough to roast (I think) That's good to hear! It's unfortunate that even small amounts of leakage from enough locations with a vacuum motor powered system can substantially reduce static pressure to a point where lifting a fluidbed's column of beans is impossible. Good to hear you've gotten improved results. If you want to gain some headroom and get proper lift even with some small leaks, get yourself a typical vacuum motor/blower and you'll be able to lift a few lbs with ease. Allen 1/2 lb and 1 lb drum, Siemens Sirocco fluidbed, presspot, chemex, cajun biggin brewer from the backwoods of Louisiana
|
|
|
|
| KramE |
Posted on 12/09/2016 11:14 PM
|
|
1/4 Pounder Posts: 53 Joined: March 29, 2015 |
Quote If you want to gain some headroom and get proper lift even with some small leaks, get yourself a typical vacuum motor/blower and you'll be able to lift a few lbs with ease. Allen What do you mean by typical? Like an upright vacuum? Shop vac? Do you have any suggestions? |
|
|
|
| allenb |
Posted on 12/10/2016 7:06 AM
|
|
Administrator Posts: 3858 Joined: February 23, 2010 |
I guess the word typical was not the best choice to describe my point. Most of the vacuum motor/blowers I've seen used in fluidbed builds have typically had an amperage draw of 10+ amps or at least 1200 watts as with this one for an example: https://www.zoro....50569451e5 The vacuum cleaner you're using has a max amp rating of 6 amps or around 700 watts which equates to much less static pressure potential at the air flows you'll be needing. It can probably work but it will not allow any headroom. Allen 1/2 lb and 1 lb drum, Siemens Sirocco fluidbed, presspot, chemex, cajun biggin brewer from the backwoods of Louisiana
|
|
|
|
| KramE |
Posted on 12/10/2016 8:04 AM
|
|
1/4 Pounder Posts: 53 Joined: March 29, 2015 |
Perfect, thank you! I definitely want to upgrade the blower. I don't see an inlet or outlet... Does that mean I have to build a box with the base to the outside and the rest inside? Similar to a subwoofer and enclosure? |
|
|
|
| allenb |
Posted on 12/10/2016 8:26 AM
|
|
Administrator Posts: 3858 Joined: February 23, 2010 |
The blower in the box method (mount it motor side into a hole in your box) is my preference but some have been able to use the tangential discharge type vacuum motor in their design: http://www.steam-...-5084.html But, use the method that's easiest to incorporate into your build. Allen 1/2 lb and 1 lb drum, Siemens Sirocco fluidbed, presspot, chemex, cajun biggin brewer from the backwoods of Louisiana
|
|
|
|
| KramE |
Posted on 12/10/2016 8:44 AM
|
|
1/4 Pounder Posts: 53 Joined: March 29, 2015 |
I saved this in my previous searches http://www.airsup...olioID=383 It's similar, if not the same as what oldgearhead uses in his system. The 2hp model has a couple more cfm than the tangential, but 10 cfm less than your first linked blower. Do you think the 10cfm is significant? Is the spa blower functionality different in motor design such that it's rated performance would suffer? I'm not opposed to the first type of motor, but the spa blower appears to be easier to integrate, at least on paper. |
|
|
|
| oldgearhead |
Posted on 12/10/2016 9:39 AM
|
 1 1/2 Pounder Posts: 1128 Joined: February 10, 2011 |
Spa blowers and vac blowers are basically the same. The housing makes them 'blow' instead of 'suck'. Mine is simple two-stage, flow-through vac with 100/100 capability. The housing is from an old spa. I need 60 CFM at the start of a 500 gram roast, and 40 CFM at the end. However, mine is 'ported' in order to keep the blower cooler. . Edited by oldgearhead on 12/10/2016 9:54 AM No oil on my beans...
|
|
|
|
| KramE |
Posted on 12/10/2016 12:21 PM
|
|
1/4 Pounder Posts: 53 Joined: March 29, 2015 |
Quote oldgearhead wrote: I need 60 CFM at the start of a 500 gram roast, and 40 CFM at the end. However, mine is 'ported' in order to keep the blower cooler. Do you think it maintains that scale? 120 cfm - 1kg? Do you have the 1hp blower? |
|
|
|
| oldgearhead |
Posted on 12/10/2016 1:20 PM
|
|
1 1/2 Pounder Posts: 1128 Joined: February 10, 2011 |
The blower draws 2 amps on a variable auto-transformer and almost 3 amps on a router speed controller. It's advertised as 1.5HP. Get some Navy beans and check things out. The baffle hole pattern, the restriction above the RC, the height of the column, and the phase of the moon are all factors.. No oil on my beans...
|
|
|
|
| allenb |
Posted on 12/10/2016 3:04 PM
|
|
Administrator Posts: 3858 Joined: February 23, 2010 |
Quote KramE wrote: Quote oldgearhead wrote: I need 60 CFM at the start of a 500 gram roast, and 40 CFM at the end. However, mine is 'ported' in order to keep the blower cooler. Do you think it maintains that scale? 120 cfm - 1kg? Do you have the 1hp blower? Here's a basic formula for figuring kilowatts per cfm at X temperature rise in Fahrenheit KW = (CFM X temperature rise) / 3193 My first fluidbed which was able to roast 1/4 lb flowed around 10 cfm and could hit 500F leaving the heating element with a 75 degree inlet temp (425 degree delta). This roaster had a 1.2 kw element. The formula proves this to be very close: 1.3 = (10 x 425) / 3193 For a recirculating roaster, lets say it's sending 150 F back to be reheated to 500 F near the end of the roast. That's a delta T of 350 degrees F. If we're flowing 40 cfm through the element at a delta T of 350 F then we have the following: (40 x 350) / 3193 = 4.38 KW To be able to flow 120 cfm with everything else being equal we would have: (120 x 350) / 3193 = 13.15 KW Allen 1/2 lb and 1 lb drum, Siemens Sirocco fluidbed, presspot, chemex, cajun biggin brewer from the backwoods of Louisiana
|
|
|
|
| KramE |
Posted on 12/10/2016 9:15 PM
|
|
1/4 Pounder Posts: 53 Joined: March 29, 2015 |
Thank you so much for your time and help. Stepping back a minute from all of this, I can't express just how amazing it is to have so much expertise in a niche interest so freely available in a public forum. |
|
|
|
| KramE |
Posted on 12/10/2016 9:46 PM
|
|
1/4 Pounder Posts: 53 Joined: March 29, 2015 |
As it turns out, the first perf plate I made had another design flaw [url=https://flic.kr/p/Q4ZVeV] [url=https://flic.kr/p/Q4ZVeV]That gap rendered at least 50% of the holes useless probably more. The second perf plate wasn't nearly as bad, but still wasn't completely flat against the bottom portion. To solve this, I used High Temp RTV gasket silicone rated to 650 degrees between the two pieces. After a brief test run, a new leak popped up where the top and bottom of the two chambers meet. I assume it's because of the increased pressure due to the perf plate no longer leaking around/through the aforementioned gap. I threw some duct tape on it at this point just to keep moving. With everything sealed to the best of my ability, 2 lbs really moves around. I'm not sure how exactly I'm going to solve the leak between the two chambers. I'll either use something easy like kapton tape, or since I have the gasket silicone laying around and open, use that to seal the gap. At this point, I'm going to move ahead and try and figure out a way to fit a baffle on the torch head to protect the flame. When I look to upgrade the blower, is there a reason to not go with the highest CFM available? Such as https://www.zoro....378033/?q= It's has almost 25 CFM more than the example given in post #8. Is there any other specification that I should be looking at? Edited by KramE on 12/10/2016 9:56 PM |
|
|
|
| allenb |
Posted on 12/11/2016 7:33 AM
|
|
Administrator Posts: 3858 Joined: February 23, 2010 |
Quote When I look to upgrade the blower, is there a reason to not go with the highest CFM available? Such as https://www.zoro....378033/?q= It's has almost 25 CFM more than the example given in post #8. Is there any other specification that I should be looking at? It's unnecessary to go for the highest cfm rating. Roasting a 1 kg batch of coffee will not require anywhere near that flow rate. Pretty much any vacuum blower that has a max amp draw of close to 10 amps and regardless of how many stages should work fine for you. As oldgearhead mentioned, trying to nail down cfm, velocity, static pressure etc is usually not worth the effort with the size fluidbed you're building. If you do the math with the formula I posted, you will see that the actual cfm that fluidbed roasters use is much less than most people believe to be the case. For an example, a 1 lb fluidbed I built a while back required around 8500 btu/hr which is equivalent to around 2500 watts. To achieve a temperature rise of 425 F (500 minus 75 degree ambient temp) with a heat source rated at 2500 watts, you cannot flow more than 20 cfm. There isn't a linear relationship between charge weight increase and increase in required cfm. In my case it went from 10 cfm for a 1/4 lb charge to 20 cfm for a 1 lb charge. I'm guessing your 1 kg design will not end up using more than 25 cfm for proper spouting and looking over the math, that is probably on the high side. Allen 1/2 lb and 1 lb drum, Siemens Sirocco fluidbed, presspot, chemex, cajun biggin brewer from the backwoods of Louisiana
|
|
|
|
| KramE |
Posted on 12/11/2016 8:52 AM
|
|
1/4 Pounder Posts: 53 Joined: March 29, 2015 |
Thanks again for your time and help! |
|
|
|
| KramE |
Posted on 12/28/2016 1:08 PM
|
|
1/4 Pounder Posts: 53 Joined: March 29, 2015 |
Just an update. I remade the perf plate and taped the seams between the two square sections. The roaster works great. I have a temp probe in the furnace and the bean bed. I'm really surprised at how well I can control the temperature and bean movement. The vacuum has more than enough oomph to loft 2 pounds of green. 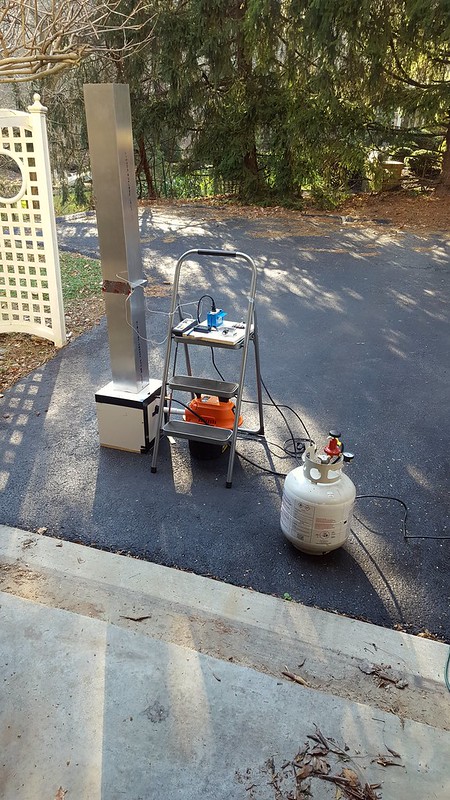 2016-12-28_02-07-12 2016-12-28_02-07-12 |
|
|
|
| CoffeeInterest |
Posted on 12/04/2018 3:52 PM
|
 Newbie  Posts: 16 Joined: November 23, 2018 |
Incredible build with Aluminum! How do you dump the beans from this? Did you figure out what the max capacity was on the roaster? |
|
|
|

| Jump to Forum: |
Similar Threads
| Thread | Forum | Replies | Last Post |
|---|---|---|---|
| Kaleido Roaster PID parameters | Roasting Coffee | 2 | 04/13/2024 3:07 PM |
| Skywalker roaster mods | Other Roasters | 293 | 04/07/2024 4:31 PM |
| Skywalker, the ALM chinese one pound roaster | Other Roasters | 215 | 04/02/2024 1:48 AM |
| My first popcorn mod roaster (vahegan) | Fluidbed Roaster | 48 | 03/24/2024 12:04 PM |
| Fatamorgana electric drum roaster | Other Roasters | 2 | 03/24/2024 10:03 AM |
Powered by PHP-Fusion Copyright © 2024 PHP-Fusion Inc
Released as free software without warranties under GNU Affero GPL v3
Designed with ♥ by NetriXHosted by skpacman