
Login

Shoutbox
You must login to post a message.
renatoa
04/18/2024 12:36 AM
bijurexim, greyberry2, N C, 
renatoa
04/17/2024 9:27 AM
 , branchu
renatoa
04/14/2024 5:56 AM
TheOtherJim and papajim,
 !
!
!allenb
04/11/2024 6:33 PM
Zemona

renatoa
04/11/2024 9:19 AM
Mrbones and sgupta,  ?
?
?Forum Threads
Newest Threads
Rainfrog's Roastmast...War on Farmers by Su...
Kaleido Roaster PID ...
Green coffee sellers
Wet beans - Estimati...
Hottest Threads
| Skywalker roaster... | [292] |
| Skywalker, the AL... | [214] |
| Skywalker Roasts | [94] |
| Rainfrog's Roastm... | [53] |
| My first popcorn ... | [47] |
In Memory Of Ginny

Donations
Latest Donations
dmccallum - 10.00
JackH - 25.00
snwcmpr - 10.00
Anonymous - 2.00
Anonymous - 5.00
dmccallum - 10.00
JackH - 25.00
snwcmpr - 10.00
Anonymous - 2.00
Anonymous - 5.00
Users Online
Guests Online: 3
Members Online: 0
Total Members: 8,211
Newest Member: bijurexim
Members Online: 0
Total Members: 8,211
Newest Member: bijurexim
View Thread
Who is here? 1 guest(s)
 Baby George Foreman Roaster
|
|
| Kinder |
Posted on 03/07/2017 2:34 PM
|
|
Newbie  Posts: 21 Joined: March 07, 2017 |
I purchased a george foreman rotisserie on CL for $40. I have since modified the roaster quite a bit. Just wanted to get some feed back and thoughts to possibly improve. I have only been roasting for a couple of months.
Kinder attached the following images:


|
|
|
|
| Kinder |
Posted on 03/07/2017 3:08 PM
|
|
Newbie Posts: 21 Joined: March 07, 2017 |
Also wanted to add that I have been roasting anywhere from 16 oz to 20 oz in 15:00 - 18:00 with a preheat of 400-450 Deg. |
|
|
|
| renatoa |
Posted on 03/08/2017 1:49 AM
|
|
Administrator Posts: 3005 Joined: September 30, 2016 |
Wish I could buy such machine locally... phenomenal idea ! At first read, looking at first picture only, I thought you fit a real TO in one of the side walls, this would have been really striking 
Roasters: DIY: TO based IR 200-640g
Moded commercial: Skywalker, Dieckmann RoestMeister, Nesco, popper(s). Electrics: TC4ESP, MS6514, USB/Artisan/Apps, PID controllers Grinders: Arco, Xeoleo ghost burrs, Krinder, vintage PeDe Dienes, MBK Feldgrind Brew/presso: ALM pour over, Arin lever, Staresso Mirage, Hario Cafeor dripper, Flair, Kompresso, Rota Aeropress, Gaggia Mini |
|
|
|
| renatoa |
Posted on 03/08/2017 2:28 AM
|
|
Administrator Posts: 3005 Joined: September 30, 2016 |
Actually... I found some on US eBay cheaper than you get yours... but the shipping cost to EU is a fortune, $100 :( What is the basket size ? Roasters: DIY: TO based IR 200-640g
Moded commercial: Skywalker, Dieckmann RoestMeister, Nesco, popper(s). Electrics: TC4ESP, MS6514, USB/Artisan/Apps, PID controllers Grinders: Arco, Xeoleo ghost burrs, Krinder, vintage PeDe Dienes, MBK Feldgrind Brew/presso: ALM pour over, Arin lever, Staresso Mirage, Hario Cafeor dripper, Flair, Kompresso, Rota Aeropress, Gaggia Mini |
|
|
|
| Kinder |
Posted on 03/08/2017 8:04 AM
|
|
Newbie Posts: 21 Joined: March 07, 2017 |
Yeah, I did not see that I had turbo oven selected for the topic on this thread even though I did build one of those as well for a back up roaster. The drum is one I purchased on ebay for 15 bucks, its made for the Jr. GF so I had to modify it to fit the Baby GF. I think the size is 7" in diameter by 8.5" in length. I can double check though. |
|
|
|
| renatoa |
Posted on 03/08/2017 8:15 AM
|
|
Administrator Posts: 3005 Joined: September 30, 2016 |
No worries, this machine is difficult to place in an existing category anyway, borrowing a bit of all others: hot gun, but no machine bread, nor dog bowl, a touch of behmor... truly frankenroaster :)
Roasters: DIY: TO based IR 200-640g
Moded commercial: Skywalker, Dieckmann RoestMeister, Nesco, popper(s). Electrics: TC4ESP, MS6514, USB/Artisan/Apps, PID controllers Grinders: Arco, Xeoleo ghost burrs, Krinder, vintage PeDe Dienes, MBK Feldgrind Brew/presso: ALM pour over, Arin lever, Staresso Mirage, Hario Cafeor dripper, Flair, Kompresso, Rota Aeropress, Gaggia Mini |
|
|
|
| renatoa |
Posted on 03/17/2017 4:15 AM
|
|
Administrator Posts: 3005 Joined: September 30, 2016 |
I have the opportunity to get one at a good price, $72 delivered from US to EU, please help me decide... - what is the inner space available for the biggest drum can fit ? - why isn't the internal heater appropriate for roasting and a hot gun mod is needed ? Thank you ! Roasters: DIY: TO based IR 200-640g
Moded commercial: Skywalker, Dieckmann RoestMeister, Nesco, popper(s). Electrics: TC4ESP, MS6514, USB/Artisan/Apps, PID controllers Grinders: Arco, Xeoleo ghost burrs, Krinder, vintage PeDe Dienes, MBK Feldgrind Brew/presso: ALM pour over, Arin lever, Staresso Mirage, Hario Cafeor dripper, Flair, Kompresso, Rota Aeropress, Gaggia Mini |
|
|
|
| JackH |
Posted on 03/17/2017 10:27 AM
|
 Administrator Posts: 1809 Joined: May 10, 2011 |
Len at CoffeeRoastersClub is a member here and here is a link to his George Foreman drum. Maybe you can get some ideas for your build. http://www.coffee...eman-drum/ I have heard that these units are 950W. I think if it was insulated better and had more power, it would make a nice roaster. ---Jack
KKTO Roaster. |
|
|
|
| Kinder |
Posted on 03/22/2017 2:23 PM
|
|
Newbie Posts: 21 Joined: March 07, 2017 |
Yes, that is correct. The Baby GF is 950W but the Big GF is 1500W I beleive. Also they a Jr. model but not sure on the wattage. It takes way to long to roast with unmodified Baby GF. If your are willing to do a few mods you can convert it into a pretty solid roaster. Good luck! |
|
|
|
| renatoa |
Posted on 03/22/2017 2:34 PM
|
|
Administrator Posts: 3005 Joined: September 30, 2016 |
Already on the (transatlantic) way to me :) Please, can you measure inner space to figure what is the biggest drum I can fit ? More exactly, if my existing 14x23 cm (5.5x9") would fit. Thank you ! Roasters: DIY: TO based IR 200-640g
Moded commercial: Skywalker, Dieckmann RoestMeister, Nesco, popper(s). Electrics: TC4ESP, MS6514, USB/Artisan/Apps, PID controllers Grinders: Arco, Xeoleo ghost burrs, Krinder, vintage PeDe Dienes, MBK Feldgrind Brew/presso: ALM pour over, Arin lever, Staresso Mirage, Hario Cafeor dripper, Flair, Kompresso, Rota Aeropress, Gaggia Mini |
|
|
|
| Kinder |
Posted on 03/22/2017 3:37 PM
|
|
Newbie Posts: 21 Joined: March 07, 2017 |
Yeah will do. If you ordered the Baby GF model I would stick with the size drum that I have because anything bigger would more than likely not fit. I will measure it up when I get home from work. |
|
|
|
| Kinder |
Posted on 03/22/2017 3:38 PM
|
|
Newbie Posts: 21 Joined: March 07, 2017 |
Also, you want a little space in between the drum and heating element. |
|
|
|
| Kinder |
Posted on 03/22/2017 7:04 PM
|
|
Newbie Posts: 21 Joined: March 07, 2017 |
Ok, the drum I have is 8-3/4" in length by 7" in diameter. I also measured the inside length from the face of the gear to the other wall and its about 10". So the drum you have should work. You will have to combine your drum with the rotisserie parts that come with the baby GF. Let me know If you have any trouble. |
|
|
|
| renatoa |
Posted on 03/23/2017 2:48 AM
|
|
Administrator Posts: 3005 Joined: September 30, 2016 |
You can see what I got, is eBay item 152446326971. The last picture shows what parts will come included, no round basket, but already having one, as I wrote. Still two weeks wait :) Roasters: DIY: TO based IR 200-640g
Moded commercial: Skywalker, Dieckmann RoestMeister, Nesco, popper(s). Electrics: TC4ESP, MS6514, USB/Artisan/Apps, PID controllers Grinders: Arco, Xeoleo ghost burrs, Krinder, vintage PeDe Dienes, MBK Feldgrind Brew/presso: ALM pour over, Arin lever, Staresso Mirage, Hario Cafeor dripper, Flair, Kompresso, Rota Aeropress, Gaggia Mini |
|
|
|
| coffeeismagick |
Posted on 09/15/2017 7:58 PM
|
|
Newbie Posts: 34 Joined: September 14, 2017 |
hi Kinder, thanks for sharing. have a couple of Qs: 1. did you mod the rotation speed? if not, is 3 RPM rotation speed resulted in even roasts? 2. did you add a PID? I will be receiving a GF JR tomorrow, will add a popcorn popper instead of a heat gun, hot air would get into the roaster via a small piece of 3" flex duct through the drip-tray opening at the bottom, therefore I would avoid cutting a hole in the roaster. the drip-tray opening will allow chaff to be falling out/off, or I would add a mesh net at drip-tray opening to collect the chaff. will update the actual outcome, hope it would be as expected as stated above. |
|
|
|
| renatoa |
Posted on 09/16/2017 1:18 AM
|
|
Administrator Posts: 3005 Joined: September 30, 2016 |
The lower the rotation speed, the lower the quantity you can roast in a given time. Also, if not a proper agitation, i.e. just layers sliding, instead rolling/jumping beans, as is under 5 RMP, the heat penetrate inner beans very late, thus you have a big delta between out of drum temperature and inner drum temperature (I don't mean BT, just air inside drum) The later is a very serious issue, because if you raise too much the external drum temperature, in an attempt to force the inner air raise, you risk to go over 250C in drum metal, and in this case scorching of beans in direct contact with will occur. Based on experiments I did with a drum of the GF size, but in other oven, I concluded that 10 RPM is the minimum you can use, only if you also build inside the drum the most complicate, and effective, vane system you can imagine. The best example I can give you is Gene roaster glass drum, it is 10 RPM, and that uber sized paddle inside literally paddles through the beans. Without decent vane(s) you can't hope to have proper agitation under 20 RPM. Also, I would encourage you to use IR (radiant) heat together with convection, instead hot air only. With a mesh drum, as you plan to use, there are chances enough IR find the way inside drum, and the radiant heat is much better. In this moment I switched for some time to IR to bean method, no drum, and is a completely new universe... very low ET, no scorching, far less smoke, no burnt chaff, it is golden instead brown, and incredible even penetration inside beans. |
|
|
|
| coffeeismagick |
Posted on 09/16/2017 6:06 AM
|
|
Newbie Posts: 34 Joined: September 14, 2017 |
thank you renatoa for your advice. Quote renatoa wrote: Also, I would encourage you to use IR (radiant) heat together with convection, instead hot air only. I will be using the radiant heat from the GF oven's original heating elements as the main heat source, and adding the hot air from a pop corn popper for convection and to control the roasting speed, as we already know that the original heating elements alone would not be sufficient for GF to roast the coffee beans in under 15 minutes time. are you suggesting that I ought to add additional heating elements to the oven? I would be interested in hearing your experience with using and modding the GF that you had purchased in March, are you happy with it? I guess I would research for a replacement ac/dc motor that is capable to drive the GF drum to rotate at 10 to 20 RPM per your findings about the drum rotation speed for GF. any advice on that? thanks so much again for your help. |
|
|
|
| renatoa |
Posted on 09/16/2017 10:10 AM
|
|
Administrator Posts: 3005 Joined: September 30, 2016 |
The march GF was lost in transit over the pond and Paypal refunded me. No answer from seller. :( I am using a 30 RPM motor that can be found on ebay searching for 50KTYZ and 30 rpm. Available multiple models in the 2.5-50 RPM range. Shaft is 7mm, no idea how is the GF motor coupled, maybe it works... |
|
|
|
| coffeeismagick |
Posted on 09/16/2017 11:33 AM
|
|
Newbie Posts: 34 Joined: September 14, 2017 |
Quote renatoa wrote: I am using a 30 RPM motor that can be found on ebay searching for 50KTYZ and 30 rpm. Available multiple models in the 2.5-50 RPM range. Shaft is 7mm, no idea how is the GF motor coupled, maybe it works... GF uses TYJ-50 motor, which I believe has the same size as TYC-50. The latter has wide range of RPM selections and are available on ebay, but the GF motor has a longer shaft, and I don't think I can just swap out the shaft because the shaft is part of the motor gear system. I might be able to cut out the GF shaft and attach it to the TYC-50 shaft using a coupler, since there are holes on the shafts of both motors, it is possible, but it may be difficult to actually make that happen. I may had to live with the 3 RPM rotation speed, other people had reported that the result of the roasts with 3 RPM had been even, but they may or may not be the true connoisseurs who can tell the difference. |
|
|
|
| coffeeismagick |
Posted on 09/16/2017 2:49 PM
|
|
Newbie Posts: 34 Joined: September 14, 2017 |
just received the GF JR, it actually uses different motor with an external gear box, not the same as with GF Baby which uses a straight TYJ-50 motor with a long shaft. it would be very difficult to replace this motor LD-5801, as it is not one of the common interchangeable gear motors like TYC. TYJ. and KTYZ motors, I guess I had to live with the 3 RPM rotation speed with this roaster. I could replace the motor and gear box with a large fan motor, but I am trying to keep things as simple as possible, so I will see how the roast would do with 3 rpm drum rotation, before attempting a big mod for this. on the plus side, the drum basket that come with GF JR seem "perfect", it has the similar fins configuration as the Behmor 1600 drum, so other than the slow rotation speed, this roaster is just like a Behmor 1600, I am building my own controller to interface artisan anyway, none of the Behmor control panel and program mode is relevant to me. I got this GF JR roaster in new condition with all parts still in original plastic bags, from ebay, for$53 and change which includes shipping, can't beat the price really. I am going to start my first batch of roast now, will start with 250g first. |
|
|
|
| coffeeismagick |
Posted on 09/16/2017 8:08 PM
|
|
Newbie Posts: 34 Joined: September 14, 2017 |
my first batch of roast was a failure, it took 40 minutes to finish, and this was with added hot air from a 1450 W pop corn popper that provided both additional heat and convection action. I have identified the flaws of this oven and my setup, and hope that by correcting these flaws, my next batch should get the expected result. the flaws were: 1. the heating element is inherently too weak 2. the location of the heating element is inefficient 3. there is zero insulation and the glass door is a big cause for heat loss and poor heat efficiency 4. the drum was rotating only in one direction and it was the wrong direction: away from the heat element 5. the flex duct for hot air was not insulated, the heat may had been severely lost before reached the oven planned corrective measures: 1. I could add one additional heat element, if all else failed, but for the time being, leave this alone 2. leave the heat element location alone for now, if the below measurements don`t work, I would relocate the heat element to the bottom of the oven 3. add aluminium foil to the upper half of the glass door to reflect the heat/IR 4. figure out how to change drum rotation direction 5. thermal insulate the flex duct for hot air. if the 3-4 failed, I will move the heat element to the bottom, if that too failed to solve my problem, I will add one additional heat element (900+W), thus I will have heat element at the rear and the bottom of the oven, the heat power would be doubled. the second heat element will have its own power cord, connect to a SSR controlled power outlet, so that I can utilize PID control powered by artisan. I hope that measures 3-5 would rectify this problem, but am prepared to implement measurement 2 & 1, if I need to. measurement 1 is my last resort, since it would double the heat, in theory that would half the roasting time. |
|
|
|
| renatoa |
Posted on 09/17/2017 7:50 AM
|
|
Administrator Posts: 3005 Joined: September 30, 2016 |
before everything change rotation direction, should be easy, the motor is three wires usually, with a capacitor connected between two leads. One mains lead comes to motor lead A, and the other mains leas comes to either B or C, which are the capacitor terminals. Move mains wire from to the other capacitor terminal, to change the rotation. If rotation change succeed, many good thing will happen... the beans will be pushed inside oven, closer to heater, far from colder door. Use less beans next test, at most 250 grams. If no hay smell in 5 minutes and no sign of yellowing, no more continue and sacrifice beans, stop test and evaluate what can be done in next step. The beans with dry phase not finished can still be used for a further test. |
|
|
|
| coffeeismagick |
Posted on 09/17/2017 12:15 PM
|
|
Newbie Posts: 34 Joined: September 14, 2017 |
I have decided to abandon the idea of adding hot air as means to add more heat to the roaster, instead, I will proceed with the adding one additional heating element mod. The reason for that is mainly for easy operation and simplicity, to make this a self-contained single-piece roaster. I ordered the heating element for Baby GF from ebay, the mod will be simple: just drill two holes in the side wall that is made with cheap sheet metal that is not thick and not hard, should be easy to drill the holes through with a electrical drill, connect 2 wires of a new power cord to each of the heating element terminal, and I should get enough heat to roast 500g of beans in under 13 -15 minutes, when I also make the drum to rotate in the right direction and add aluminium foil to the glass door to reflect the heat. I am inclined to place the new heating element at the bottom of the oven, as it would be most efficient since the beans would spend more time closed to the bottom than in any other position inside the slowly rotating drum, but I have observed from roasting my first batch that the majority of the chaff had fallen to the bottom of the oven, if I place the hating element at the bottom, the fallen chaff would be burnt off when in contact with the heating element, this would produce even more smokes, any thoughts and advice about the placement of the new heating element? |
|
|
|
| renatoa |
Posted on 09/17/2017 1:25 PM
|
|
Administrator Posts: 3005 Joined: September 30, 2016 |
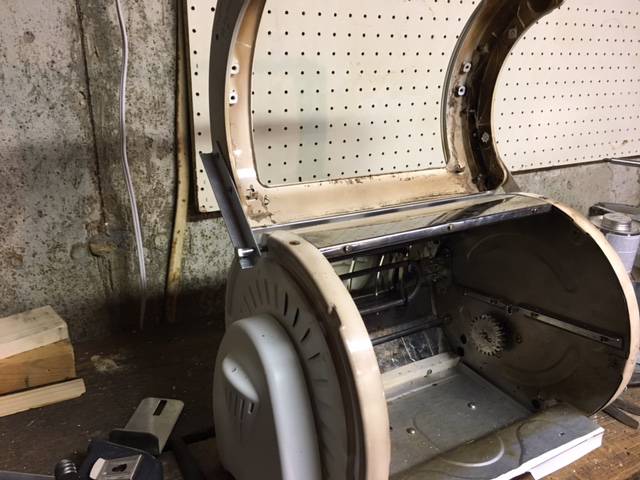
Any picture with placement of actual element ? Would be awesome if the new element would be predominant IR radiant, and less convection based. |
|
|
|
| coffeeismagick |
Posted on 09/17/2017 1:54 PM
|
|
Newbie Posts: 34 Joined: September 14, 2017 |
Quote do you mean the existing heating element placement? that is at the back wall of the oven interior:  I have only two options for the location of the new heating element that I want to add: either the bottom wall of the top wall of the oven interior. Placing it at the bottom wall would provide the most efficient heating configuration, my concern for that is the issue of fallen chaff that would contact the bottom heating element and create fire and smoke, which may or may not be a problem, since I will only use the roaster oven outdoors, even in the coldest winter days. Placing it at the top wall would allow the bottom dripping tray opening to remain accessible for heat gun or flex duct to provide additional hot air heat source and convection action. I really don't know which option is more practical and rational. |
|
|
|

| Jump to Forum: |
Similar Threads
| Thread | Forum | Replies | Last Post |
|---|---|---|---|
| Kaleido Roaster PID parameters | Roasting Coffee | 2 | 04/13/2024 3:07 PM |
| Skywalker roaster mods | Other Roasters | 293 | 04/07/2024 4:31 PM |
| Skywalker, the ALM chinese one pound roaster | Other Roasters | 215 | 04/02/2024 1:48 AM |
| My first popcorn mod roaster (vahegan) | Fluidbed Roaster | 48 | 03/24/2024 12:04 PM |
| Fatamorgana electric drum roaster | Other Roasters | 2 | 03/24/2024 10:03 AM |
Powered by PHP-Fusion Copyright © 2024 PHP-Fusion Inc
Released as free software without warranties under GNU Affero GPL v3
Designed with ♥ by NetriXHosted by skpacman