
Login

Shoutbox
You must login to post a message.
renatoa
04/18/2024 12:36 AM
bijurexim, greyberry2, N C, 
renatoa
04/17/2024 9:27 AM
 , branchu
renatoa
04/14/2024 5:56 AM
TheOtherJim and papajim,
 !
!
!allenb
04/11/2024 6:33 PM
Zemona

renatoa
04/11/2024 9:19 AM
Mrbones and sgupta,  ?
?
?Forum Threads
Newest Threads
Rainfrog's Roastmast...War on Farmers by Su...
Kaleido Roaster PID ...
Green coffee sellers
Wet beans - Estimati...
Hottest Threads
| Skywalker roaster... | [292] |
| Skywalker, the AL... | [214] |
| Skywalker Roasts | [94] |
| Rainfrog's Roastm... | [53] |
| My first popcorn ... | [47] |
In Memory Of Ginny

Donations
Latest Donations
dmccallum - 10.00
JackH - 25.00
snwcmpr - 10.00
Anonymous - 2.00
Anonymous - 5.00
dmccallum - 10.00
JackH - 25.00
snwcmpr - 10.00
Anonymous - 2.00
Anonymous - 5.00
Users Online
Guests Online: 2
Members Online: 0
Total Members: 8,211
Newest Member: bijurexim
Members Online: 0
Total Members: 8,211
Newest Member: bijurexim
View Thread
Who is here? 1 guest(s)
Page 1 of 2: 12
|
 Modifications to flour sifter for roasting?
|
|
| AMRoberts |
Posted on 06/06/2018 2:51 PM
|
|
Newbie  Posts: 30 Joined: March 24, 2018 |
Hi, So I'm feeling the need to move on from my modified popcorn popper ... Larger batch size is my primary goal, not having to wear ear protection while roasting is a secondary goal (my popper with the fan at high speed to get the beans moving at start of roast is loud). For my next DIY I'm planning on using a large flour sifter for mechanical stirring of the beans, with my Camp Chef SB30 providing the heat. For those of you who have constructed a flour sifter-based roaster, do you modify the shape of the sifter bails? If so is it to achieve better stirring/mixing of the beans? It seems like the "stock" shape has to be about making contact with the bottom screen (to force flour/sugar/etc. through), but beans don't benefit from this close contact especially at the (possible) cost of lack of stirring/mixing closer to the rotation axis for the bails. If this is previously-explored territory, could somebody point me to any posts/threads that talk about it? While the actual flour sifter is probably the least costly part of my planned build, I don't want to waste time and risk possible part breakage doing experiments if there is already a good answer. Thanks, Alan |
|
|
|
| ruddhess |
Posted on 06/07/2018 9:37 AM
|
 Newbie Posts: 29 Joined: May 31, 2018 |
I modified my sifter last night and it worked really well. Before this modification, the beans kept getting stuck between the screen and the beater wires. It wasn't easy and took a few tries to get it right, but in the end it worked well. I will try to describe what I did: I grabbed the wire at the apex of the arc with my left hand and pulled toward my body, while pushing down/away hard with my right thumb against the right side of the wire down in the sifter between the axle and where my left hand (really just two fingers or so) was. I did this for all four beaters. Then I rotated the sifter 180? and repeat. I did this whole operation a couple of times (the wires/beaters are really stiff). What I ended up with was a sort of spiral affair. But it works great and the beans don't jam up the works. The sifter tends to push the beans left and rearward, though, leaving part of the screen bare to the fore and right of the screen. Hope this will help you some. Rodney |
|
|
|
| ruddhess |
Posted on 06/07/2018 8:56 PM
|
|
Newbie Posts: 29 Joined: May 31, 2018 |
This is what it looks like.
ruddhess attached the following image:

|
|
|
|
| AMRoberts |
Posted on 06/08/2018 1:27 PM
|
|
Newbie Posts: 30 Joined: March 24, 2018 |
Hi Rodney, Thanks, the description and picture are helpful. I hadn't thought about beans getting stuck between the beaters and the screen. I've got to figure out how to take the axle out of my sifter, since there are some plastic bushings between the axle and the sifter sidewalls ... I'm assuming these need to come out before roasting heat gets applied! So perhaps I'll be able to make use of some pliers or something to help with bending, while the beater assembly is out of the sifter. Thanks, Alan |
|
|
|
| ruddhess |
Posted on 06/08/2018 5:44 PM
|
|
Newbie Posts: 29 Joined: May 31, 2018 |
Very welcome! Hope to see some pics of your modifications and your roaster set-up. I am in the process of setting up a different roaster myself. I roasted last Wednesday using the 5" diameter sifter just held with my hands as steadily as I could against the top of my popcorn popper (in an effort to slow the roast down - well it surely did slow it down a tad too much - 12 minutes to yellow) so I ended up dumping the beans in the popper hopper at that point and in 4 more minutes (after 1st crack had simmered down quite a bit) the roast was done. So I am going to build a wooden stand like I have seen others do. At least I have my sifter dialed in. Good luck on your mod Alan. Rodney |
|
|
|
| ruddhess |
Posted on 06/08/2018 5:45 PM
|
|
Newbie Posts: 29 Joined: May 31, 2018 |
Alan, Can you get away with just cutting the plastic bushings out with a utility knife? Rodney |
|
|
|
| ruddhess |
Posted on 06/08/2018 5:51 PM
|
|
Newbie Posts: 29 Joined: May 31, 2018 |
I have been tossing around in my head the idea of building a "mega" duty sifter out of 1/16" stainless steel with teeny tiny little bearings for the axle, and beefy super duty "french curve" bails/beaters. Might get around to it one of these days. Flour sifters seem kinda cheesy/cheap/flimsy for what we want to do with them. I can understand companies not building the Rolls Royce of flour sifters if all people are going to do is sift a bunch of flour through it once in a while. But coffee roasters really put the cranks to some of their sifters, LOL. Cheers, Rodney |
|
|
|
| renatoa |
Posted on 06/09/2018 2:59 AM
|
|
Administrator Posts: 3005 Joined: September 30, 2016 |
You can borrow ideas from a design that I am envisioning and gathering parts for a future roaster, described below. Made from an ice bucket and a stainless strainer, check the picture. Both parts are under $10 each, strainer diameter is 22 cm, and intended capacity 500 grams. Heat source will be up, not bottom, consisting of a TO central part, without glass, mounted on a custom cut stainless steel lid. There will be a window in the lid, with double purpose: beans charge opening and beans monitoring through a glass, after charge. Beans drop done by tumbling the sifter around the beater shaft. Still thinking how to integrate a cooler stage at the bottom of the ice bucket. And chaff management... ...
renatoa attached the following image:
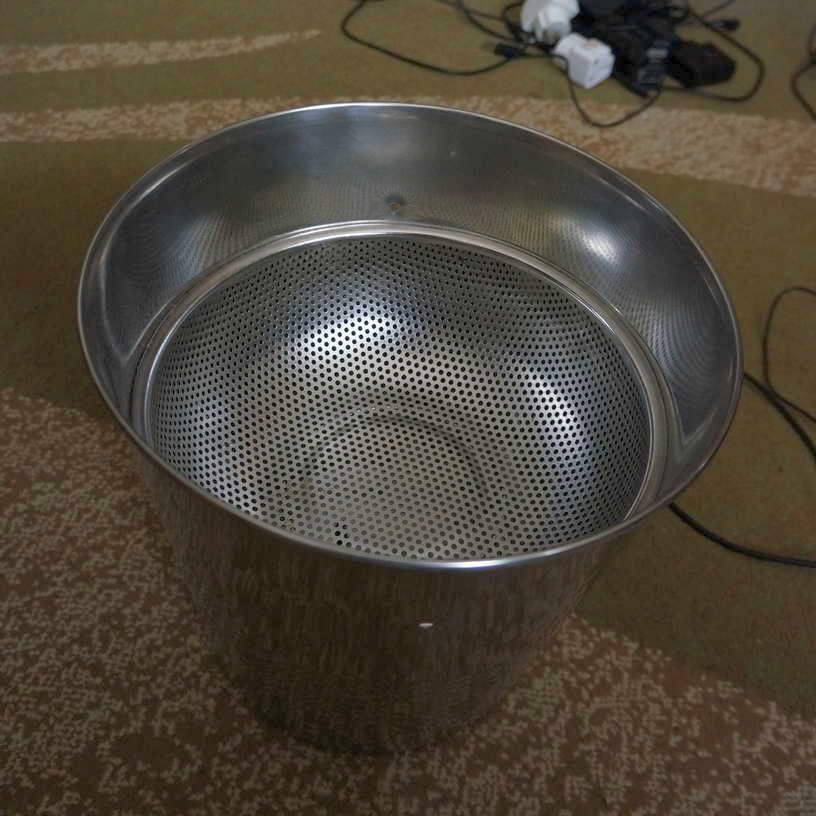
Roasters: DIY: TO based IR 200-640g
Moded commercial: Skywalker, Dieckmann RoestMeister, Nesco, popper(s). Electrics: TC4ESP, MS6514, USB/Artisan/Apps, PID controllers Grinders: Arco, Xeoleo ghost burrs, Krinder, vintage PeDe Dienes, MBK Feldgrind Brew/presso: ALM pour over, Arin lever, Staresso Mirage, Hario Cafeor dripper, Flair, Kompresso, Rota Aeropress, Gaggia Mini |
|
|
|
| AMRoberts |
Posted on 06/11/2018 10:48 AM
|
|
Newbie Posts: 30 Joined: March 24, 2018 |
Quote ruddhess wrote: Alan, Can you get away with just cutting the plastic bushings out with a utility knife? Rodney When I next get the sifter I've purchased out of the box I'll take a look and see if I think I can get a knife in there. One reason I was thinking of pulling the axle (assuming that is how it was assembled and that I can disassemble/reassemble) would be to replace the plastic bushings with something like: http://catalog.bu...d-bearings if the axle diameter matches up with the I.D. of an off-the-shelf sleeve bearing. A super-quick Amazon check suggested $3-4 for a pack of several bearings, so I wouldn't feel bad about adding that much more cost to the $15 I spent for the sifter. Quote ... Flour sifters seem kinda cheesy/cheap/flimsy for what we want to do with them. ... I take the point; have you had a sifter break or wear-out while roasting? My DIY roaster approach is it either should be durable or it should be inexpensive/replaceable. So I'm thinking of the sifter as replaceable part, but I am interested in whether anyone who has been using one knows how long they hold up as a roaster. Cheers, Alan |
|
|
|
| AMRoberts |
Posted on 06/11/2018 10:53 AM
|
|
Newbie Posts: 30 Joined: March 24, 2018 |
Quote renatoa wrote: You can borrow ideas from a design that I am envisioning and gathering parts for a future roaster, described below. Made from an ice bucket and a stainless strainer, check the picture. ... Beans drop done by tumbling the sifter around the beater shaft. ... Renatoa, let me make sure I understand where you are going with this ... Are you planning a horizontal axle across the sifter with some sort of beater/stirrers attached, instead of the vertically-oriented motor turning stirring arm(s) that I've seen in most of the "KKTO" pictures on other threads? Cheers, Alan |
|
|
|
| renatoa |
Posted on 06/11/2018 11:30 AM
|
|
Administrator Posts: 3005 Joined: September 30, 2016 |
Yes, you got it right. Using a TO lid as heating source is better than a hotgun imo, and their usage are not limited to KKTO designs. |
|
|
|
| ruddhess |
Posted on 06/11/2018 2:53 PM
|
|
Newbie Posts: 29 Joined: May 31, 2018 |
Alan, RE: Bushings: those bushings look like JUST the thing! I "googled" bushings the other day and saw some "oil impregnated" ones that look similar (supposedly Home Depot has them), but I don't know if they would be food safe, so it looks like you have found just the very item for the job! RE: Flour Sifter Durability: I haven't been roasting with my flour sifter that long to be able to say whether it will last very long under the heat conditions. I do though appreciate the simplicity of them and that they are cheap. The big 8 and 5 cup stainless steel ones with the black turn knob look fairly robust too. I just found my 5 cup sifter at the Goodwill for $3-4. It has flowers painted on the side, lol. I was a little worried about the paint, but it seems to be unaffected by the temps subjected to it so far. BTW, the roast from last Wednesday that took 12 minutes to go from green to yellow and then only 4 minutes from yellow/tan to 1st crack or just a bit beyond was SO much better than the roasts that I had been doing with jus the air popper alone (4 minutes or less? Just now starting to use my phone/stop watch to try and keep tabs on my roasts). I'm a "newbie" roaster who likes the tinkering with gadgets as much as I like to drink the coffee. Rodney |
|
|
|
| ruddhess |
Posted on 06/11/2018 3:08 PM
|
|
Newbie Posts: 29 Joined: May 31, 2018 |
I like using the flour sifter for a mechanical agitation without having to rely solely on the air for agitation. To me, air is a WONDERFUL conveyor of heat, but a much poorer agitator (much less air "pressure" is needed to merely convey the heat efficiently; and trying to achieve that "balance" between enough air to agitate the beans, and not too much air that sufficient heat from the element is maintained to control temp, just seems to me to be a less than ideal solution). I know it can be done - lots of people are doing it, but . . . I've been messing with three or four air poppers and fiddling with moving the sifter up and down and just now beginning to fashion some transition pieces between the poppers and the bottom of the sifter in an attempt to slow down my roasts (opposed to becoming an electronic wizard, lol - though I did go to HF this weekend and get one of the router speed controls to play with - but only after I put the main coil heating element on it's own circuit - doesn't make sense to slow the fan down and the heat down at the same time - in fact, I can't really see any reason to slow the fan down at all). I have a heat gun, but haven't fooled around with it yet, just with the poppers. Sorry to ramble, just some thoughts. Cheers, Rodney |
|
|
|
| ruddhess |
Posted on 06/11/2018 3:17 PM
|
|
Newbie Posts: 29 Joined: May 31, 2018 |
renatoa, I like your idea. Please keep us posted on your progress with your build. :) Rodney |
|
|
|
| ruddhess |
Posted on 06/11/2018 3:43 PM
|
|
Newbie Posts: 29 Joined: May 31, 2018 |
Alan, I just now took a look at that Camp Chef SB30 inline - and it reminded me of something I saw at Home Depot this weekend: https://www.homedepot.com/p/STOK-Tourist-104-sq-in-Single-Burner-Portable-Propane-Gas-Grill-in-Black-with-Insert-Compatibility-STG1000HD/206467954 Of course my mind went to COFFEE ROASTER! LOL Rodney |
|
|
|
| AMRoberts |
Posted on 06/11/2018 3:47 PM
|
|
Newbie Posts: 30 Joined: March 24, 2018 |
Quote Assuming you have the part in-hand, how do you rate the TO's noise compared to typical heat guns and air popcorn poppers? Just curious, so far I've run across one used TO at a Goodwill store, an older "Galloping Gourmet" model. Since they had a test outlet at the store I cranked it up. Unit ran, but the noise level seemed in the same ballpark as my hot-rodded air popper (the current roaster) and my heat gun. I was wondering if the noise level was nominal for all such TOs or if I was listening to an older and/or badly worn unit. Cheers, Alan |
|
|
|
| AMRoberts |
Posted on 06/11/2018 5:18 PM
|
|
Newbie Posts: 30 Joined: March 24, 2018 |
Quote ruddhess wrote: Alan, RE: Bushings: those bushings look like JUST the thing! I "googled" bushings the other day and saw some "oil impregnated" ones that look similar (supposedly Home Depot has them), but I don't know if they would be food safe, so it looks like you have found just the very item for the job! Time will tell, assuming I can get the axle/beater unit disassembled and the axle diameter is a reasonable fit for a bushing. I'm assuming it can't be any worse than the axle working against the stainless steel edge formed by the thru-hole in the sifter, but there is the old saying about the dangers of assuming :-). The same company has a standard line of oil impregnated bushings where they recommend a maximum working temp of 220F, and a oil/PTFE lubricated series that is rated to 460F. That is actually what the web site recommends for slow-speed applications, but I have to believe that temp above 460F is going to be possible as you near the end of a roast. Also note that the conforming spec for even the Dri-Plane bushing reads: "... when impregnated with MIL L-17331 oil." I haven't gone hunting for that (yet), but I'll speculate it is something like a high-temp turbine/air-compressor oil. I think you can find high-temp oils repackaged into small containers; it gets sold for maintenance on small electric motors, blowers for wood-stoves and BBQ/smokers, etc. A small bottle ought to be a lifetime, multiple-project supply for DIYers. Intuitively I wouldn't want to use an bushing impregnated with a low temperature oil for a roaster part. After all, when you season your cast iron skillet or grill grates, the typical procedure is a thin coat of oil and into a 500F oven for a hour. What emerges is a polymerized layer; not what you want to happen between the axle and the bushings. Cheers, Alan |
|
|
|
| ruddhess |
Posted on 06/11/2018 6:28 PM
|
|
Newbie Posts: 29 Joined: May 31, 2018 |
"Time will tell, assuming I can get the axle/beater unit disassembled and the axle diameter is a reasonable fit for a bushing. I'm assuming it can't be any worse than the axle working against the stainless steel edge formed by the thru-hole in the sifter, but there is the old saying about the dangers of assuming :-)." LOL! I have wondered as well whether the axle/beaters can be removed easily. I did see in one place that someone had used the brass acorn nut in conjunction with a hex driver of the same size and a battery powered drill of some sort to power the beaters. And I wondered why put the acorn nut on there if the axle couldn't be taken out. So hopefully it is. The beaters on the 6" diameter 8 cup sifter look mighty beefy - and (here's where I get to assume, lol) therefore, difficult to bend into a new configuration. But perhaps the clearance is better on that type of sifter and the beaters might not need to be modified? "The same company has a standard line of oil impregnated bushings where they recommend a maximum working temp of 220F, and a oil/PTFE lubricated series that is rated to 460F. That is actually what the web site recommends for slow-speed applications, but I have to believe that temp above 460F is going to be possible as you near the end of a roast." I have been taking temperature "measurements" (albeit with a used turkey fryer mechanical/coil spring dial thermometer from Goodwill) down inside the bottom of the roasting chambers of my popcorn poppers. FWIW, the 1440W Presto (Mod. No. 0482107 - center screen) measured 440?F; the 1240W Presto (Mod. No. 0484602 - center screen) measured 350?F; the 1200W West Bend "Hot Air" (No model number that I could find - side vents) measured 375??F; and the 1040W West Bend Air Crazy (Mod. No. 82418? - discontinued; didn't write it down - side vent model) was (as I recall - again, didn't write this one down) 375?F (which surprised me because it is only 1040W. But all this is mute if you use a propane burner to power your roast with the sifter. You could easily go over 460?F in the roast. In fact, I have to wear a welding glove to hold onto the handle of my sifter with my popcorn poppers. If I can dig out/find my single burner propane camp stove from inside my garage, then I think that I'll modify my sifter with a DIY handle that stands well off to the side out of the path of the rising heat current. "Also note that the conforming spec for even the Dri-Plane bushing reads: "... when impregnated with MIL L-17331 oil." I haven't gone hunting for that (yet), but I'll speculate it is something like a high-temp turbine/air-compressor oil. I think you can find high-temp oils repackaged into small containers; it gets sold for maintenance on small electric motors, blowers for wood-stoves and BBQ/smokers, etc. A small bottle ought to be a lifetime, multiple-project supply for DIYers." I have wondered what kind of oil would be the best if I used the tiny "skate" style bearings on my super-duper DIY sifter. I think the oil/grease that I found for food safe application was WAY expensive. If the bearings are cheap enough, I'd try leaving them dry and replacing if they seize up. "Intuitively I wouldn't want to use an bushing impregnated with a low temperature oil for a roaster part. After all, when you season your cast iron skillet or grill grates, the typical procedure is a thin coat of oil and into a 500F oven for a hour. What emerges is a polymerized layer; not what you want to happen between the axle and the bushings." Yes, I was leery of the oil in the impregnated bearings as well. But I didn't think about the possibility of it turning to polymer. It might not have too much of an effect if the bearing area was really small (similar to the thin metal of the sifter sides against the small diameter axle), but then again it would suck if it seized up during a roast because of it. If I recall correctly the bearings you linked were good to 700?F? That should work fine - better "over engineered" than under. So the ones you referred to are probably an excellent fit. Thanks for the link. :) Plenty of powdered metal flange bushings/bearings on Amazon, so good for Amazon Prime people (just got it recently). Rodney |
|
|
|
| AMRoberts |
Posted on 06/11/2018 10:56 PM
|
|
Newbie Posts: 30 Joined: March 24, 2018 |
Quote ruddhess wrote: LOL! ... I did see in one place that someone had used the brass acorn nut in conjunction with a hex driver of the same size and a battery powered drill of some sort to power the beaters. ... I plan to use a 24VDC, 60RPM motor to turn the beater on my sifter. I hadn't made up my mind yet whether to use a hex driver on that nut, or attach a disc to the motor shaft with a cut-out to match the crank handle. Quote The beaters on the 6" diameter 8 cup sifter look mighty beefy - and (here's where I get to assume, lol) therefore, difficult to bend into a new configuration. But perhaps the clearance is better on that type of sifter and the beaters might not need to be modified? They are beefy, and out-of-the-box they are in rubbing contact with the screen (makes sense given the purpose it was built for), so changing them to avoid jams, have better stirring action, and maybe reduce noise still seems like a good idea. Quote I have been taking temperature "measurements" (albeit with a used turkey fryer mechanical/coil spring dial thermometer from Goodwill) down inside the bottom of the roasting chambers of my popcorn poppers. ... Have you browsed the Popcorn Popper roasting forum, https://forum.hom...rum_id=121? Most poppers have a thermostat built in somewhere (roasting chamber side wall or in the heater/fan assembly). If you haven't bypassed that yet, I suspect the temperatures you have been measuring are a function of their respective thermostats. Any of the wattages you listed are capable of producing 500F+ inlet air, for some amount of air flow. My Nostalgia APH200 has the melted plastic to prove it :-)! Lots of detail in that forum. Cheers, Alan |
|
|
|
| renatoa |
Posted on 06/12/2018 1:25 AM
|
|
Administrator Posts: 3005 Joined: September 30, 2016 |
Nope, that unit you tests should have bearings/bushings/motor busted. The noise of TO unit itself is a LOT less than the noise made by 500 grams of beans turned at 60 rpm by two paddle. You can hear FC without any effort. Quote AMRoberts wrote: Quote Assuming you have the part in-hand, how do you rate the TO's noise compared to typical heat guns and air popcorn poppers? Just curious, so far I've run across one used TO at a Goodwill store, an older "Galloping Gourmet" model. Since they had a test outlet at the store I cranked it up. Unit ran, but the noise level seemed in the same ballpark as my hot-rodded air popper (the current roaster) and my heat gun. I was wondering if the noise level was nominal for all such TOs or if I was listening to an older and/or badly worn unit. Cheers, Alan |
|
|
|
| ruddhess |
Posted on 06/12/2018 8:15 AM
|
|
Newbie Posts: 29 Joined: May 31, 2018 |
"Most poppers have a thermostat built in somewhere (roasting chamber side wall or in the heater/fan assembly). If you haven't bypassed that yet, I suspect the temperatures you have been measuring are a function of their respective thermostats. Any of the wattages you listed are capable of producing 500F+ inlet air, for some amount of air flow. My Nostalgia APH200 has the melted plastic to prove it :-)! Lots of detail in that forum." I did move the thermostat on my Air Crazy this weekend and last night I measured the temps down in the chamber (remembering that the first time I did so, it was plugged in to a power strip at the end of a 25 foot extension cord - the measurements on the other poppers were sans the power strip) and got a reading of 400?F in 60 seconds and 420?F in 90 seconds (now it makes sense because this 1040W popper is the only one that I've altered the thermostat. I know those NiChrome coils will get to about 2000?F? or a little more on their own without any air flowing through them (I keep reading about 1400?F max "operating" temperature for NiChrome?). I rewired my little pottery kiln recently (ordered 13 gauge A1 Kanthal wire from Euclid's Elements & Pottery Tools and wound the coils myself - the calcs on resistance is easy with the chart they provide). Now I find myself mulling over how to make a coil that isn't as "powerful" as the ones in the popcorn poppers - they are designed to heat up "immediately" - people want their popcorn RIGHT NOW, dang it! LOL. The calculations that include heat loss and the amount of heat energy that can "come out" of various coil configurations, though, is much more complicated than just determining the length of a given gauge of element wire (all I did was approximately match the resistance of the existing elements and ensure that I could jam that length of coiled elements into the kiln effectively). Anyway, thanks for the tip on the popper forum. I need to check that out. :) |
|
|
|
| AMRoberts |
Posted on 06/12/2018 10:24 AM
|
|
Newbie Posts: 30 Joined: March 24, 2018 |
Quote ruddhess wrote: ... I did move the thermostat on my Air Crazy this weekend and last night I measured the temps ... and got a reading of 400?F in 60 seconds and 420?F in 90 seconds ... I know those NiChrome coils will get to about 2000?F? or a little more on their own without any air flowing through them ... (bold text emphasis by me) ... Obligatory safety comment: The coil(s) in your air popper may tolerate operating without air flow, but the surrounding materials (connections and wiring to the coil(s), support structure for the coil(s), fan rotor and body, motor, and the popper shell) probably won't. My modded popper will not supply power to the coils without power also being supplied to the separate DC supply that runs the fan; and I still consider it a tool for use only by an informed and competent adult, since the operator (me) is responsible for fault detection. You'll find some discussion of operational safety issues/strategies and tales of burned-out poppers in the popper forum. Quote Now I find myself mulling over how to make a coil that isn't as "powerful" as the ones in the popcorn poppers - they are designed to heat up "immediately" - people want their popcorn RIGHT NOW, dang it! LOL. Your other option is to control the average power running through the coil(s). You can do this with purchased manual controls (the HF router control is one example), purchased digital controls (when you see discussion of a "PID controller," I imagine that every variant people are buying and using these days is internally microprocessor-based), or DIY it (there is another HRO forum https://forum.hom...rum_id=133 that has lots of fun reading). Note that control DIY doesn't mean "designed from scratch", you can follow the trails blazed by others, there is lots of good work out there. The bad news is that you can spend more on control and instrumentation than an air popper costs. The good news (or rationalization?) is that with some thought you can expect some/all of your controls and instrumentation to migrate to the next roaster (although I guess this assumes you are moving on to a new roaster, not accumulating an ever-growing fleet of roasters :-) Cheers, Alan |
|
|
|
| ruddhess |
Posted on 06/12/2018 3:56 PM
|
|
Newbie Posts: 29 Joined: May 31, 2018 |
"(bold text emphasis by me) ... Obligatory safety comment: The coil(s) in your air popper may tolerate operating without air flow, but the surrounding materials (connections and wiring to the coil(s), support structure for the coil(s), fan rotor and body, motor, and the popper shell) probably won't. My modded popper will not supply power to the coils without power also being supplied to the separate DC supply that runs the fan; and I still consider it a tool for use only by an informed and competent adult, since the operator (me) is responsible for fault detection. You'll find some discussion of operational safety issues/strategies and tales of burned-out poppers in the popper forum." I have heard about people forgetting to turn off the heating elements first and letting the fan blow to cool them down a bit or trying to run the popper without turning on the fan (all of this after separating the two circuits). Which is something I tried last night with my Orville. Except that I couldn't see that the tiny (almost human hair thickness - or thinness, if you will) secondary coil was connected to the same high temp rivet/eyelet (I can actually put a safety pin through the center of the "rivet" that goes through the mica card) as the main heating coil. Ended up with a completely dead end circuit for the fan (after hacking the thermostat out with a dremel), then got to looking much closer and spied the dual connection at the hot lead from the cord. I like the modification that separates the main coil and then uses the HF router controller to limit voltage to the main coil and thus slow down the roast a bit. (I have no desire to slow the fan down at all. The main coil is PLENTY powerful even with full fan power blowing through it all the time.) I still have to get over to those popper forums and check all of that out soon. "Your other option is to control the average power running through the coil(s). You can do this with purchased manual controls (the HF router control is one example), purchased digital controls (when you see discussion of a "PID controller," I imagine that every variant people are buying and using these days is internally microprocessor-based), or DIY it (there is another HRO forum https://forum.hom...rum_id=133 that has lots of fun reading). Note that control DIY doesn't mean "designed from scratch", you can follow the trails blazed by others, there is lots of good work out there. The bad news is that you can spend more on control and instrumentation than an air popper costs. The good news (or rationalization?) is that with some thought you can expect some/all of your controls and instrumentation to migrate to the next roaster (although I guess this assumes you are moving on to a new roaster, not accumulating an ever-growing fleet of roasters :-)" LOL!! I gotta watch myself and prevent that! (I have a garage full of old vintage sewing machines) I only have four poppers so far - proud of myself - passed up one yesterday at GW (it was just like one I already had). HF router controller is more my level. PID?? What, lol? I had to look that up on Wikipedia the other day, lol. I'd heard of them before, but filed that away in the "electronic wizardry" folder inside my brain. And I had heard that the computer controlled stuff can get pricey. Then there's this: there is just something inside me that goes "yuck!" when I see all that electronic stuff attached to the roaster/popper. I'd rather "engineer" (I am an architectural & engineering drafting tech - and GIS mapping tech by day) something more mechanical than to endeavor to learn (at the tender young age of 61) an ever advancing field of "electronic wizardry", lol. Being lazy for sure, I'll admit. Lots of available electronic components on second hand stuff at the thrifts (like the DC motors and controllers off of old tread mills, etc), that can be had for a reasonable amount. But there is something about "keeping it simple" that appeals to me too. And I am on the verge moving to the "next level"of cheap DIY roasting by using my cheap two stage HF heat gun to try a roast with my sifter. I even have the 'end caps' for a wooden stand - I found two giant baluster caps (each one only a dollar) the other day at a local thrift that I am going to use. I'm also keeping an eye out for one of the red (really fancy) metal housing multi-step heat guns - they seem like an ideal heat source for roasting with the sifter. I've seen a couple really nice/cool ones that use those fancy red heat guns. Finding (or building) the proper transition from nozzle to bottom of sifter seems like a key element too. Cheers, Rodney |
|
|
|
| AMRoberts |
Posted on 06/15/2018 7:53 AM
|
|
Newbie Posts: 30 Joined: March 24, 2018 |
Hi Rodney, Quote ruddhess wrote: ... (all of this after separating the two circuits). Which is something I tried last night with my Orville. Except that I couldn't see that the tiny (almost human hair thickness - or thinness, if you will) secondary coil was connected to the same high temp rivet/eyelet (I can actually put a safety pin through the center of the "rivet" that goes through the mica card) as the main heating coil. ... From what I've read its a nearly-standard pattern for poppers. The secondary coil's purpose is to drop mains voltage to match the fan motor's requirements. If your popper's fan motor is a DC motor, you'll also see a rectifier of some flavor. On my popper that was four individual diodes soldered directly to the motor terminals. Rivets, crimps, or other such connectors get used on coil ends because you are operating well above the typical electrical solder's melting point of course. Quote ... (I have no desire to slow the fan down at all. The main coil is PLENTY powerful even with full fan power blowing through it all the time.) ... Simplifies things for you, on my popper I have to drop airflow to reach the higher temperatures needed to keep the roast going near end of roast. I believe you'll find fluid bed roaster users in the forums who prefer to set a power level for the heater and control speed of roast by varying airflow. Quote ... Finding (or building) the proper transition from nozzle to bottom of sifter seems like a key element too. Something like a canning funnel: https://www.amazo...less+steel might be an off-the-shelf place to start, if you can find one with an upper diameter that matches your sifter, and a lower diameter close enough to your heat gun's outlet. Cheers, Alan |
|
|
|
| ruddhess |
Posted on 06/15/2018 1:44 PM
|
|
Newbie Posts: 29 Joined: May 31, 2018 |
Hello Alan, Thanks for the reply. (I can't seem to figure out the "quotes" feature on this forum, so I will keep doing it "my way" as I have been.) "From what I've read its a nearly-standard pattern for poppers. The secondary coil's purpose is to drop mains voltage to match the fan motor's requirements. If your popper's fan motor is a DC motor, you'll also see a rectifier of some flavor. On my popper that was four individual diodes soldered directly to the motor terminals." I had read about that (the secondary coil acting as voltage reducing component) along with lots of comments about "poor design". I don't understand the electrical aspect to know for sure whether it is a poor design, but I have seen photos of the very first/early popcorn poppers (and I think I actually had one of them in the very late 70s or very early 80s) and the 120VAC fan/blower motors (and they seem infinitely more robust than the dinky little DC brushless motors - but brushless is cool). I have been collecting a few small vacuums at the thrift stores for $5 and $6 in hopes that the motors can be used in a DIY roaster that I am contemplating. My popper does indeed have the four diodes wired in at the base like you mention. "Rivets, crimps, or other such connectors get used on coil ends because you are operating well above the typical electrical solder's melting point of course." And rivets and crimps are cheap (a manufacturing plus as seen from their end of things). I am accustomed to seeing the REALLY "robust" electrical connections on the elements in my electric pottery kilns. Now THOSE are sturdy!! LOL "Simplifies things for you, on my popper I have to drop airflow to reach the higher temperatures needed to keep the roast going near end of roast." Hmmm, I may have to rethink this aspect then - possibly add the oft suggested dimmer switch to my fan circuit, just in case it is needed. I've passed up a dozen or more up at thrifts thinking that I'd never have a need - doh!! I have actually noticed that my main popper has been "struggling" to reach temp (this is the one that I haven't modified the thermostat on yet). I did take voltage readings on my plugs and cords: 122.3V and 122.4V - which surprised me a little considering it is summer and everybody is running their A/C units full blast. Maybe the power company boosts the volts during the summer because of this? I measured my volts at the outlet on my balcony (coffee roasting takes place in the garage, so different building, etc.) last winter and it was only reading 117V. Close enough to 120V either way. "I believe you'll find fluid bed roaster users in the forums who prefer to set a power level for the heater and control speed of roast by varying airflow." That makes a lot of sense. Especially if a true 120VAC blower motor were in use - I suspect they could really throw the beans!! I have a lot of tinkering/toying around to do. I'm not one to merely follow the step-by-step. I rewired my little Cress pottery kiln to be ON/OFF (using the kiln sitter switch only - a bit inconvenient, but it works and it's simple and no more delicate electrical relays and timers, etc. to go bust on me - and they want an arm and a leg to replace some of that stuff - I'm not cool with proprietary parts - sewing machine parts and cord connections is one of those areas that gives me a burr under the saddle). I'm a geezer. "Something like a canning funnel: https://www.amazo...less+steel might be an off-the-shelf place to start, if you can find one with an upper diameter that matches your sifter, and a lower diameter close enough to your heat gun's outlet." Precisely!! I actually have been looking with a keen eye when perusing my local thrifts for canning funnels. I found a little aluminum one - not a good fit, but bought it anyway. Might be able to use it down the road. Those stainless steel ones look like a good fit. Thanks for the link. I actually found a stainless steel Cory style vacuum coffee pot part that looks like a funnel at one of my local GW stores yesterday - a little over $1!!!!! I didn't know what it was until I got up to the counter to pay and a nice lady asked me about it and told me what it was. I guess they came with a kind of glass rod with bumps or channels on/in them that went down into the skinny tube and that glass rod allowed the liquid from the bottom part (I don't have that part or the rubber gasket that goes between - apparently they are available though by contemporary "third party" suppliers) to siphon up the tube without letting too much or any of the coffee grounds to come up with the liquid. I'm fascinated with all the old coffee related 'accoutrement'. I ended up dremeling the two rivets that hold the mica pieces together (I plan to replace the rivets with tiny nuts/bolts - there are porcelain "guard" tubes inside the mica sheets to protect the rivets/bolts from heat) and getting in there to break the tiny secondary filament off from it's post/rivet (leaving the main coil attached). That separated the two circuits. (Sorry, no pictures. It's always 94-98 degrees out there even after 8PM and I haven't thought to take pics yet.) I was able to stretch the end of the secondary element enough (concurrently ensuring that no two coils of the element were touching) to run the end under the vertical mica support and up through the rivet that connects to the return (ground) wire for the fan. I fussed with it until I could just barely grab it with my needle nose pliers and fish it up a little more to begin putting a coiled "knot" in it so it wouldn't slip back down through the rivet. It now has a little "ball" of coiled wire element in contact with the rivet and metal bar that attaches to the wire leading to the fan motor. I tested the fan and it runs. I have been contemplating leaving it as-is or attempting to silver solder it. I will probably test the fan some more by letting it run to ensure that the "ball end" retainer (as I'll call it) doesn't uncoil. (That's the cool thing about NiCr wire opposed to Kanthal A-1; the NiCr wire still bends after repeated heating and cooling - that Kanthal wire gets mighty brittle after a few cycles in a pottery kiln.) I don't expect this little fan to last forever, but one never knows with this stuff. Sometimes the things you expect to fail keep plugging along for quite a while. I will just have to be ready to turn the main coil off if the fan quits working. I don't plan to put the guts back into the plastic housing anyway. If anything, I'll but it inside a custom made metal vent/flue pipe or something similar that won't melt or burn. I'll try to take a pic or two to post in case you're interested in seeing my mess, LOL. Cheers, Rodney |
|
|
|

Page 1 of 2: 12
| Jump to Forum: |
Similar Threads
| Thread | Forum | Replies | Last Post |
|---|---|---|---|
| New to roasting. Could you help me with roasting advice? | Roasting Coffee | 24 | 02/18/2024 10:45 PM |
| Hottop KN-8828P-2K - Roasting Profiles | HotTop Roaster | 7 | 02/09/2024 7:05 AM |
| New to roasting and could use helpful advice w/SR800 roasting. | Roasting Profiles | 8 | 01/29/2024 9:36 AM |
| Heat gun flour sifter roaster | Heat Gun Roasting | 1 | 01/06/2024 8:42 AM |
| Re roasting underdeveloped coffee beans | Roasting Coffee | 5 | 01/02/2024 11:17 PM |
Powered by PHP-Fusion Copyright © 2024 PHP-Fusion Inc
Released as free software without warranties under GNU Affero GPL v3
Designed with ♥ by NetriXHosted by skpacman