
Login

Shoutbox
You must login to post a message.
renatoa
04/25/2024 2:03 AM
AGZ and Intercolcoffee

allenb
04/23/2024 7:01 PM
Paul Kalb

renatoa
04/23/2024 4:34 AM
Coffee_Rabbit_Hole
and Michaelion,
and Michaelion,
renatoa
04/21/2024 2:35 AM
compactjack and GreenGenie
 ?
?
?allenb
04/19/2024 8:27 AM
eximwind
Forum Threads
Newest Threads
Skywalker roaster modsHello from Montreal ...
War on Farmers by Su...
Kaleido Roaster PID ...
Rainfrog's Roastmast...
Hottest Threads
| Skywalker roaster... | [301] |
| Skywalker, the AL... | [214] |
| Skywalker Roasts | [94] |
| Rainfrog's Roastm... | [54] |
| War on Farmers by... | [40] |
In Memory Of Ginny

Donations
Latest Donations
dmccallum - 10.00
JackH - 25.00
snwcmpr - 10.00
Anonymous - 2.00
Anonymous - 5.00
dmccallum - 10.00
JackH - 25.00
snwcmpr - 10.00
Anonymous - 2.00
Anonymous - 5.00
Users Online
Guests Online: 3
Members Online: 0
Total Members: 8,227
Newest Member: AGZ
Members Online: 0
Total Members: 8,227
Newest Member: AGZ
View Thread
Who is here? 1 guest(s)
 Transparent Fluid Bed Design
|
|
| pixelsmithy |
Posted on 03/14/2019 10:58 AM
|
|
Newbie  Posts: 28 Joined: October 14, 2016 |
Nice build CK. I just wanted to mention that this thread and your YouTube video have been shared in the Facebook Group: "Fluid Bed Coffee Roasters".  |
|
|
|
| CK |
Posted on 03/14/2019 12:28 PM
|
|
1/2 Pounder  Posts: 250 Joined: December 07, 2018 |
Thanks pixelsmithy. I've just finished version2 (gutted V1 and put new internals in) and will start posting some of the information soon. The roaster is now automated using Arduino/TC4 and Artisan. |
|
|
|
| homeroaster |
Posted on 03/14/2019 1:23 PM
|
 Newbie Posts: 28 Joined: November 02, 2007 |
An awesome elegant and functional design. Well executed.
*********************
Ed Needham "to absurdity and beyond!" http://www.homero... http://www.facebo...EdNeedham1 ********************* |
|
|
|
| Graeme Lindsay |
Posted on 03/14/2019 4:39 PM
|
|
Newbie Posts: 7 Joined: April 13, 2017 |
Hi CK, What an amazing, well thought-out build...very impressed. I've got a several questions if you don't mind, particularly around PID as dialling in PID for a machine is a frustrating experience for many people. BATCH SIZE I was looking at the power input and roast times that you posted. It looks as though you could have some spare power to potentially push the green bean weight even higher and still roast in a less than 12 minutes. Have you tried larger batch sizes yet or have you found the roast chamber not quite big enough, beans flow not ideal or they shoot out the exhaust? PID SETTINGS AND APPROACH Re the TC4 and Artisan automation I would be really grateful if you could share your PID settings. I know they won't be the exact settings I need as each machine is different, but it would be a good starting point as I'm (along with many others!) finding dialling in Artisan PID settings very frustrating. Been trying standard PID on error as well as the newer PID on input (measurement) feature in Artisan. I'm using an Artisan 6M spouted fluid bed, batches 500 grams to 1.8 kg usually, TC4 hooked up to a Macbook running Artisan (swapped out the heater Fotek VA SSRs for Fotek DA SSRs to enable Artisan control via TC4), still controlling fan manually. What version of Artisan are you using (1.4, 1.5. 1.6.1?) Are you using PID firmware on the TC4 or Artisan software PID? Are you using "PID on error" or "PID on input" (measurement)? What are the P, I and D settings? Are you using the PID mode to follow a "background" or "ramp/soak"? Lookahead period is something I'm still playing around with...been using anywhere from 5-20 seconds...what period have you settled on? Sampling interval? Also, very curious as to your approach to PID tuning...lots of discussion/frustration in these forums and others on tuning approaches. e.g. did you try first changing amounts of P to get a certain result, then worked on the next variable (e.g. I or D) to obtain a desired result, then moved on to the third variable (if using). How well is the PID working...any crashes or flicks or temperature or is it following the desired temperatures well? Many thanks. Graeme |
|
|
|
| CK |
Posted on 03/14/2019 11:00 PM
|
|
1/2 Pounder Posts: 250 Joined: December 07, 2018 |
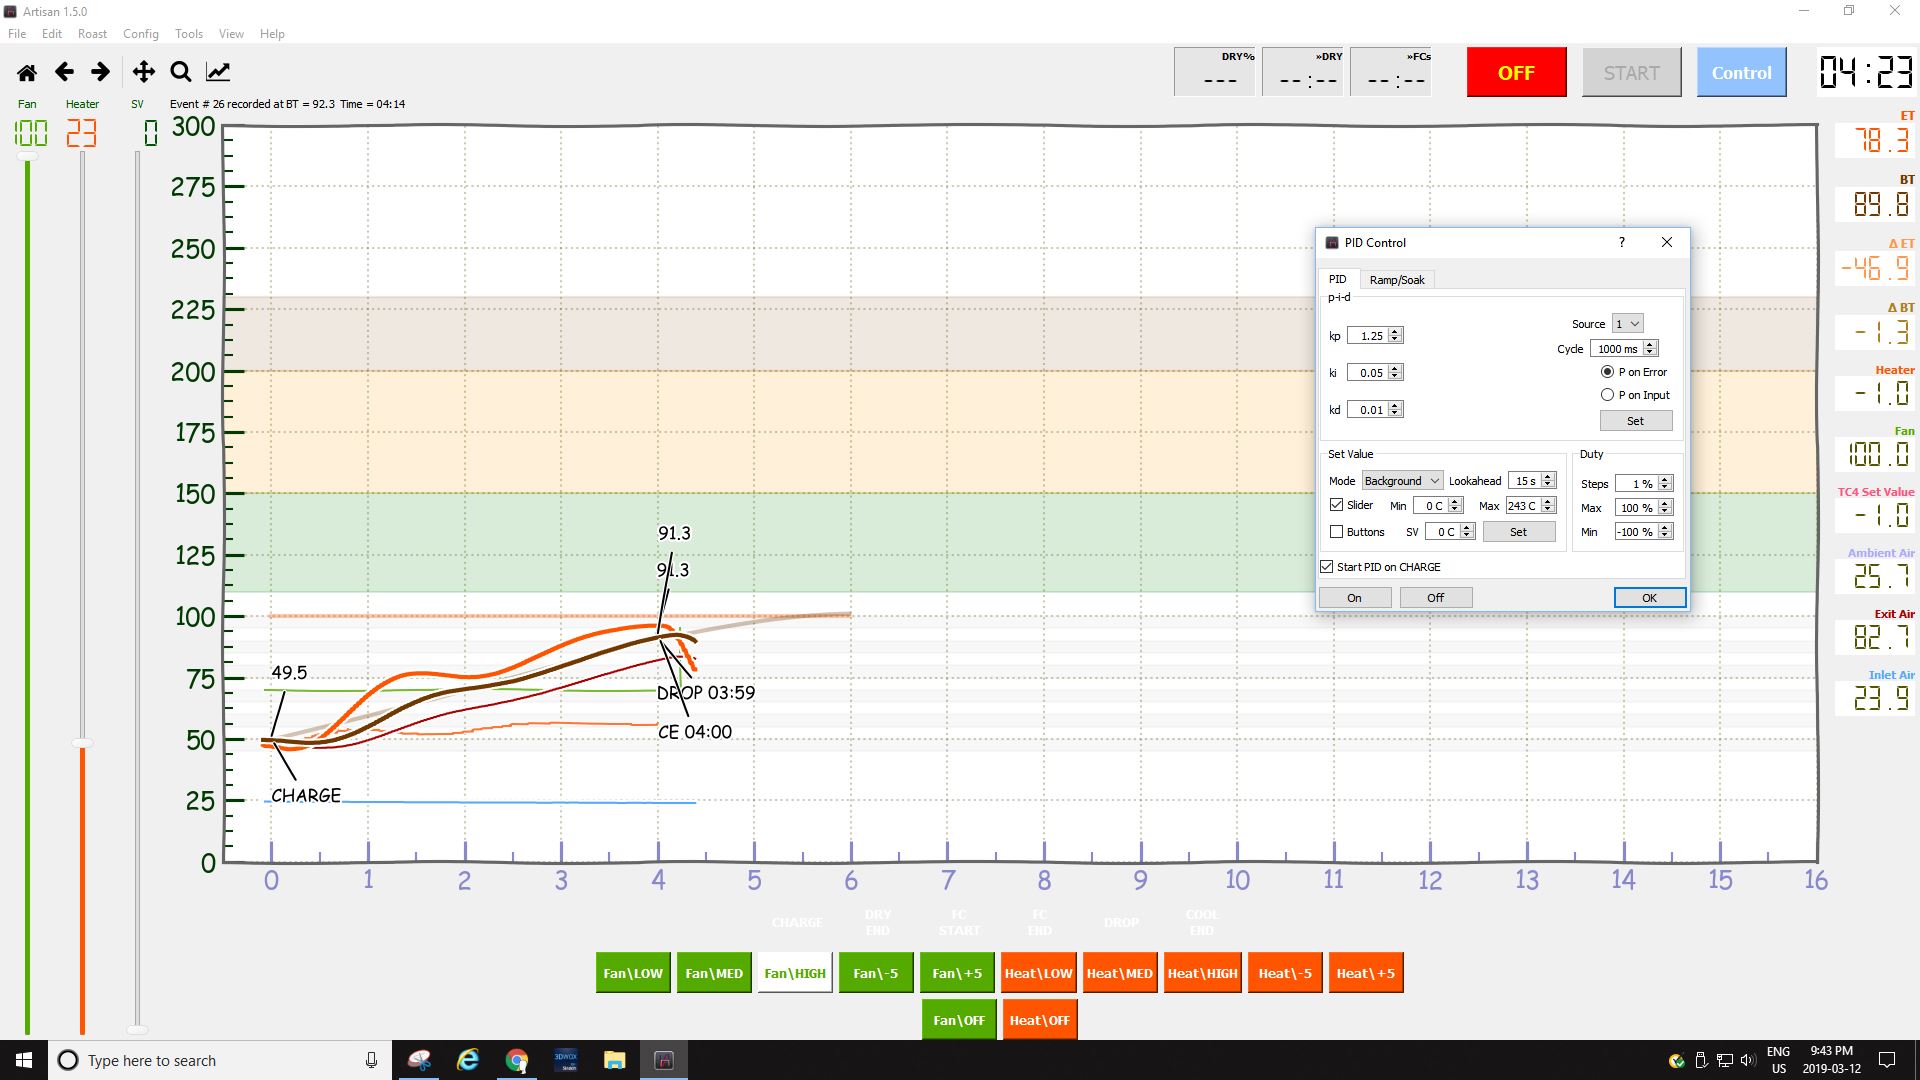
Graeme, thank you. I'm totally new at PID and the whole automation process. At first, without a visual aid, I was entering higher than necessary numbers in P and I and D inputs. My machine was all over the map... high spike, low spike, terrible. After many hours of trial runs on old greens and finally red beans (the chili type), I gave up. I did a lot of reading and YT still nothing. Then I read this page https://en.wikipe...controller and found the animated GIF about the middle of the page on the right side to be most helpful. Starting with the PID values all at 0 I did as shown, starting with a small P number... the rest comes easily following this method. The image I'm attaching is what worked for my machine. I may tweak it some, but it works quite good already.
CK attached the following image:
|
|
|
|
| JitterzZ |
Posted on 03/15/2019 12:04 AM
|
 1/4 Pounder  Posts: 151 Joined: October 08, 2018 |
Effects of varying PID parameters (Kp,Ki,Kd) on the step response of a system.
JitterzZ attached the following image:

|
|
|
|
| renatoa |
Posted on 03/15/2019 2:26 AM
|
|
Administrator Posts: 3010 Joined: September 30, 2016 |
Sincerely, this graph don't inspire me much confidence. PID values depends a lot of the process, and the conclusions of this animations are wrong for 99% of the processes I know. Actually, I think to a single case where these values could be appropriate, and even this is not a common situation we experience in the whole life: making a drift with a car  P and D simultaneously at same big value means nothing else than acceleration (P) and brake (D) pressed together, as I seen in a drift tutorial. Never experienced... As I wrote many times in the past, I am done with PID and profile following for coffee roasting, it's simply not the right control method for such process, period. Especially recovering after a TP is the nightmare of a PID, and a disaster when not tuned. A PID can't predict approaching the profile and TP event, to start increasing power, so usually ends into a profile undershot, followed by oscillations. Manually adjusting in this moment negates the automatic profile following idea. Check here some posts yesterday about an alternative approach of profiling a roast without PID. https://forum.hom...post_68211 Edited by renatoa on 03/15/2019 2:57 AM |
|
|
|
| CK |
Posted on 03/15/2019 3:29 PM
|
|
1/2 Pounder Posts: 250 Joined: December 07, 2018 |
Quote Graeme Lindsay wrote: BATCH SIZE I was looking at the power input and roast times that you posted. It looks as though you could have some spare power to potentially push the green bean weight even higher and still roast in a less than 12 minutes. Have you tried larger batch sizes yet or have you found the roast chamber not quite big enough, beans flow not ideal or they shoot out the exhaust? This machine has plenty of spare power but it is currently limited by the slim RC. The glass only has an 85mm inner diameter and about 210mm inner height. The most roasted so far was 350g... easily, in under 12 minutes. The problem comes with cooling the beans at the end. A higher fan output during cooling ejects some beans to the chaff cyclone. So the best balance is 300g. With 500g greens in the RC, the beans still loft well even without heat applied. I never roasted them because of the small RC... there's no room for expanding bean mass at 500g. The height of the green beans in the RC is about 150mm deep over the screen inlet, and I'm quite surprised the little fan works so well. I'm thinking of making a larger RC that can be modular to this roaster to up the batch sizes. |
|
|
|
| CK |
Posted on 03/19/2019 9:49 PM
|
|
1/2 Pounder Posts: 250 Joined: December 07, 2018 |
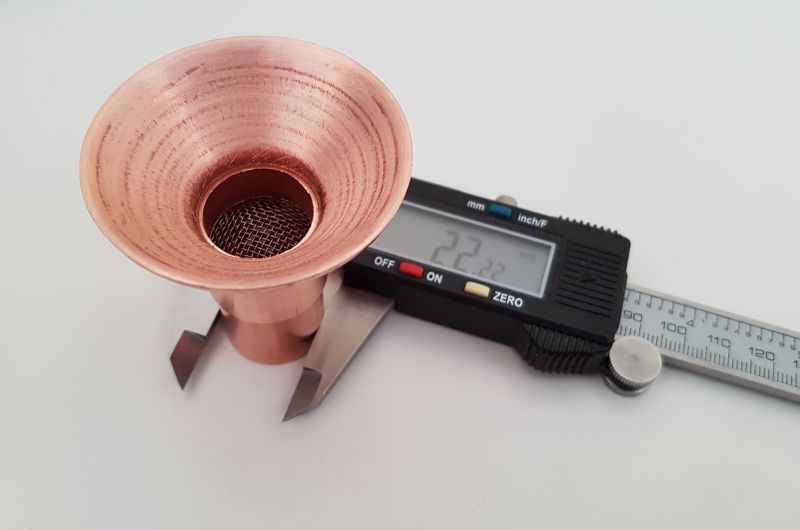
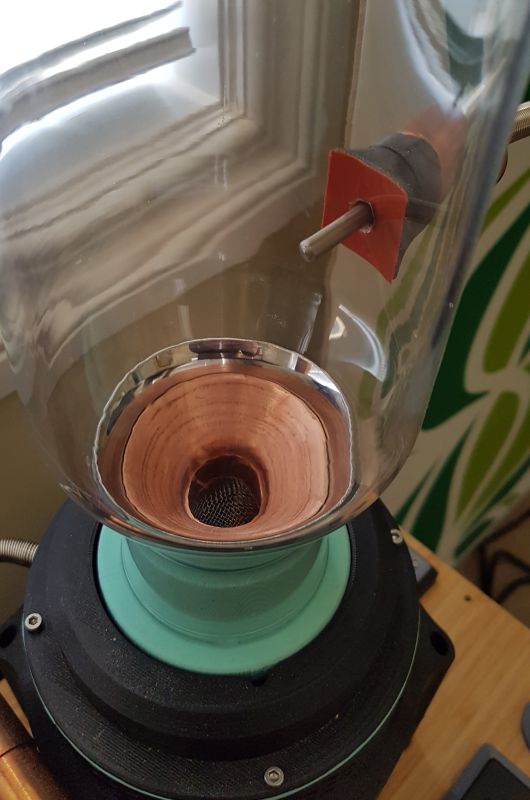
I've replaced the old silicone bean cone for a more resilient high-temperature copper and stainless steel bean cone. Works great. This allows the roaster to go to hotter drop temperatures.
CK attached the following images:

|
|
|
|
| MaKoMo |
Posted on 03/20/2019 12:25 PM
|
|
1/4 Pounder Posts: 123 Joined: April 06, 2011 |
Quote renatoa wrote: Especially recovering after a TP is the nightmare of a PID, and a disaster when not tuned. A PID can't predict approaching the profile and TP event, to start increasing power, so usually ends into a profile undershot, followed by oscillations. Manually adjusting in this moment negates the automatic profile following idea. Check here some posts yesterday about an alternative approach of profiling a roast without PID. https://forum.hom...post_68211 I agree that a PID will always struggle with the TP "effect" in a drum roaster profile, mostly because it is totally artificial. I haven't looked at your alternating approach, but what to say against an hybrid approach, where you use some event replay by time/temp or an alarm program up to DRY and the let a PID do the rest? You can even adjust p-i-d parameters over the second half of the roast, like using a different tuning from FCs on then before using a simple rule in Artisan. |
|
|
|
| revive |
Posted on 03/21/2019 10:06 AM
|
|
Newbie Posts: 2 Joined: July 11, 2011 |
Beautiful design. I actually came across your youtube vid before seeing your full breakdown of the build here.. excellent work! Out of curiosity, where did you source the cyclone from? And did you custom make the new copper copper and SS bean cone or are those off the shelf? Great work! |
|
|
|
| CK |
Posted on 03/21/2019 10:16 AM
|
|
1/2 Pounder Posts: 250 Joined: December 07, 2018 |
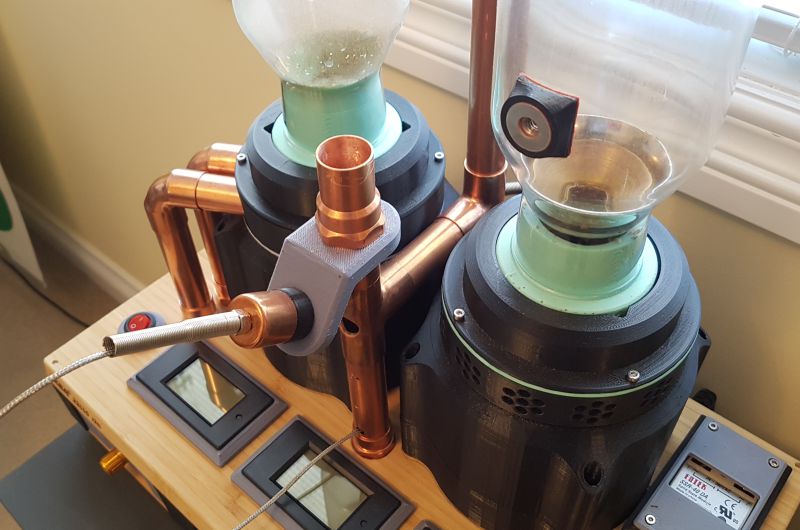
An upgrade for the roaster to quiet the machine down. These copper intake pipes bring air from inside the machine through holes in the bottom plate of the body. With the solid intake spacer ring, it now has a lower operating sound of 65 DB at 50% fan... quite comfortable to be around while roasting. (Before this modification, it was a loud 73-75 DB.)
CK attached the following image:

|
|
|
|
| CK |
Posted on 03/21/2019 11:02 AM
|
|
1/2 Pounder Posts: 250 Joined: December 07, 2018 |
Quote revive wrote: Out of curiosity, where did you source the cyclone from? And did you custom make the new copper cone and SS bean cone or are those off the shelf? The cyclone was bought here; https://www.amazo...&psc=1 The copper cone is an off the shelf 2" to 3/4" pipe reducer fitting bought here; https://www.amazo...&psc=1 It was cut, filed and then bonded to the SS cone. The SS cone was left over from another project. It too was cut and filed to custom specs for this RC. It was bought here; https://www.amazo...&psc=1 |
|
|
|
| revive |
Posted on 03/21/2019 2:26 PM
|
|
Newbie Posts: 2 Joined: July 11, 2011 |
Quote CK wrote: Quote revive wrote: Out of curiosity, where did you source the cyclone from? And did you custom make the new copper cone and SS bean cone or are those off the shelf? The cyclone was bought here; https://www.amazo...&psc=1 The copper cone is an off the shelf 2" to 3/4" pipe reducer fitting bought here; https://www.amazo...&psc=1 It was cut, filed and then bonded to the SS cone. The SS cone was left over from another project. It too was cut and filed to custom specs for this RC. It was bought here; https://www.amazo...&psc=1 Very nice, and very resourceful indeed!! I just noticed them, but your chambers are tapered...what did you use for them?? |
|
|
|
| CK |
Posted on 03/21/2019 4:10 PM
|
|
1/2 Pounder Posts: 250 Joined: December 07, 2018 |
Quote I just noticed them, but your chambers are tapered...what did you use for them?? https://www.ikea..../90279719/ |
|
|
|
| renatoa |
Posted on 03/21/2019 4:34 PM
|
|
Administrator Posts: 3010 Joined: September 30, 2016 |
hmmm... 1 l at 27 cm height give 7 cm diameter, are they really so slim ? You complained about not enough capacity/column height... what about rebuild with bake-a-round glass ? |
|
|
|
| CK |
Posted on 03/21/2019 6:23 PM
|
|
1/2 Pounder Posts: 250 Joined: December 07, 2018 |
Quote The RC has an inner diameter of about 8.5 cm (9 cm outer diameter). It's perfect for 250-300g bean charge, as long as the blower isn't set too high for cooling. Good enough for my home use. However, in the interest of inventing something, I am working on another RC idea for this build... something modular that will integrate with the base unit. |
|
|
|
| CK |
Posted on 03/21/2019 11:38 PM
|
|
1/2 Pounder Posts: 250 Joined: December 07, 2018 |
Here is the new location for the BT probe. This location yields more accurate results for BT. In the previous build, it was in the exhaust area, but that reading was skewed by about + or - 10C depending on what part of the roast was being read (beginning or end). It has NIB magnets in the handle to fix it securely to the RC or the holster.
CK attached the following images:

|
|
|
|
| RobS |
Posted on 03/25/2019 12:48 PM
|
|
Newbie Posts: 10 Joined: March 23, 2019 |
Quote CK wrote: This is a CAD bottom and top section view of the heater and how it was made. These show the intake and exhaust air flow pattern through the custom heat coils. if you don't mind me asking what did you use for the springs to keep the heating elements apart as well as what was used to keep the bottom element in the housing so it would not touch the wood. thank you Rob |
|
|
|
| CK |
Posted on 03/26/2019 4:31 PM
|
|
1/2 Pounder Posts: 250 Joined: December 07, 2018 |
The springs were from a Meccano set I had laying around. Any light duty spring/springs would work... They are held in place by friction fitting over the end of the screws and nuts that hold the upper and lower mica plates together. The origninal rivets joining the mica plates were removed to customize the heater coils for this build. The heater housing is from the Twobiu air popper, and is designed from the factory to raise the heater (heater 1) off the machine. |
|
|
|
| RobS |
Posted on 03/26/2019 8:12 PM
|
|
Newbie Posts: 10 Joined: March 23, 2019 |
I have a housing very similar but there doesn't seem to be anything to hold the coil up might be I just wasn't paying enough attention when I took it apart. Do you happen to have a picture of how you mounted the motor. I am thinking of mounting it in between two plywood plates with 4" PVC as the body and the intake in a friction fit hole out the top and plumb it to the heat chamber from the PVC body. Any advice is greatly appreciated Thanks |
|
|
|
| RobS |
Posted on 03/26/2019 8:15 PM
|
|
Newbie Posts: 10 Joined: March 23, 2019 |
Do you think a filet of rtv would be ok to hold it in place The heater # 1 |
|
|
|
| CK |
Posted on 03/27/2019 7:55 AM
|
|
1/2 Pounder Posts: 250 Joined: December 07, 2018 |
Page 2 of this post shows the motor location... it was mounted using custom 3D printed housings for the top and bottom engagements. |
|
|
|
| CK |
Posted on 03/27/2019 8:09 AM
|
|
1/2 Pounder Posts: 250 Joined: December 07, 2018 |
RTV will hold anything but it's permanent. I used Silco 6500 high temp. It's great for making an air tight air supply from the blower to the heater. A caution though, once you use it, it's a one way ticket... messy stuff. I tested my machine for many hours before using the silicone to finalize designs. |
|
|
|
| RobS |
Posted on 03/27/2019 9:38 AM
|
|
Newbie Posts: 10 Joined: March 23, 2019 |
perfect thanks. I did see your 3d printed housing but I do not have access to a 3d printer I do however have a cnc router but to make a deep housing I would have to slice it and then laminate it together but PVC housing would make it more DIY friendly. did you mount the motor like it was in the vacuum front ring and the rubber rectangle on the back? |
|
|
|

| Jump to Forum: |
Similar Threads
| Thread | Forum | Replies | Last Post |
|---|---|---|---|
| Coffee Crafters Fluid Bed Coffee Roasters | JAVA TRADING COMPANY | 4 | 03/29/2024 9:41 AM |
| Square tube fluid bed | Fluidbed Roaster | 5 | 02/26/2024 9:32 AM |
| First Fluid bed test..Some success, many questions | MY FIRST ROASTER | 14 | 12/23/2023 11:13 AM |
| Drum or Fluid Bed | Building a Coffee Roaster | 6 | 12/04/2023 1:06 PM |
| Bubblebed roaster based on Nepro wave design | Fluidbed Roaster | 27 | 09/27/2023 3:09 PM |
Powered by PHP-Fusion Copyright © 2024 PHP-Fusion Inc
Released as free software without warranties under GNU Affero GPL v3
Designed with ♥ by NetriXHosted by skpacman