
Login

Shoutbox
You must login to post a message.
allenb
04/23/2024 7:01 PM
Paul Kalb

renatoa
04/23/2024 4:34 AM
Coffee_Rabbit_Hole
and Michaelion,
and Michaelion,
renatoa
04/21/2024 2:35 AM
compactjack and GreenGenie
 ?
?
?allenb
04/19/2024 8:27 AM
eximwind
renatoa
04/18/2024 12:36 AM
bijurexim, greyberry2, N C, 
Forum Threads
Newest Threads
Skywalker roaster modsHello from Montreal ...
War on Farmers by Su...
Kaleido Roaster PID ...
Rainfrog's Roastmast...
Hottest Threads
| Skywalker roaster... | [297] |
| Skywalker, the AL... | [214] |
| Skywalker Roasts | [94] |
| Rainfrog's Roastm... | [54] |
| War on Farmers by... | [40] |
In Memory Of Ginny

Donations
Latest Donations
dmccallum - 10.00
JackH - 25.00
snwcmpr - 10.00
Anonymous - 2.00
Anonymous - 5.00
dmccallum - 10.00
JackH - 25.00
snwcmpr - 10.00
Anonymous - 2.00
Anonymous - 5.00
Users Online
Guests Online: 2
Members Online: 0
Total Members: 8,223
Newest Member: Paul Kalb
Members Online: 0
Total Members: 8,223
Newest Member: Paul Kalb
View Thread
Who is here? 1 guest(s)
 Cyclops - my 1kg drum build
|
|
| directtraderoasting |
Posted on 07/14/2020 8:00 PM
|
|
Newbie  Posts: 13 Joined: July 06, 2020 |
Quote pjvdl wrote: Quote directtraderoasting wrote: My 10" diameter x 12" drum is around 3mm thick (a little over) and it's pretty responsive, but you still have to be ahead of what the bean is going to do when profiling. You have to do a few roasts to know how the bean responds then tweak your adjustments based on that bean and how is going to act in certain stages of the roast. I run 2 temp probes. One in the bean mass and one near the opposite side up by the bean loading chute (hot air in the drum). I also have an analog thermometer in my bean loading chute and chaff collector (mainly to keep an eye on things/backup). Edit: if I ever build another 2kg/2.5kg, I may go a little thicker on the drum wall. The next standard option I can easily order is a .250" wall pipe, which is 6mm. I think that may be better overall. I do like that the 3mm drum is quick to heat up and cool down though and it's responsive. I think the slightly thicker wall might be easier though, just make the adjustments earlier Interesting figures. I am a little concerned that a 1.6mm drum will not have enough heat inertia. When I get my new elements, I'm keen to test the responsiveness of mine. If it really doesn't have enough, you could maybe go the double walled route adding another later of steel around e drum with a 1,/4" gap. That could be done without completely redoing the drum. Not sure how well the double walled route in eureka with electric though? Either way it should hold enough I would think. |
|
|
|
| danst |
Posted on 07/15/2020 3:31 AM
|
 1/4 Pounder  Posts: 65 Joined: April 18, 2013 |
Quote allenb wrote: Nichrome can be used but .... Controlling a tubular element with their high thermal inertia is fortunately easy to control and only needs simple on-off duty cycling by your controller of choice and yes, slow pwm is fine... This is what I mean, nichrome is not easy (mechanic, electric safeness) and It must be done for more power with almost no airflow. I had one 300W preheating nichrome wire element in Ugly I , 100% overlarge and it keeped. (why? - 2.4 kW heating for 700g beans and 1.6mm drum was not optimal - rather low) Excuse my English - now I know , "heating rods" are tubular elements. This is good way, considerably more expensive. The best is large element(s) with low power on sq.inch. 8 W/sq.inch is a good value, 13 W/sq.inch is the maximum, with shorter lifetime. (the airflow in drum roaster = no airflow in term of cooling elements and calculation of max. load) Now I have 3mm drum, insulated body, tubular elements 3.8 kW ans switchable passive preheating of incoming air. It is definitly not overpowered. Although in summer I can make longer roasts with 1200g beans. Ugly II is my third drum roaster, all features sit overall well, but when the elements are gone I take new with 4.5kW. In your case - with low mains I?l consider gas heating. Edited by danst on 07/15/2020 4:31 AM 1000g Ugly roaster, QM Alexia EVO, Bezzera BZ09, Niche Zero, Fiorenzato Doge 63, Mazzer Jolly(Mestre), Handground, T. Moccamaster, Aeropress.
|
|
|
|
| renatoa |
Posted on 07/15/2020 6:13 AM
|
|
Administrator Posts: 3008 Joined: September 30, 2016 |
For low airflow I would consider a cluster of IR ceramic radiant elements, like this: https://www.ebay....3134263085 or, why not... induction, like bullet R1 roaster... maybe sounds a bit fiction, but not so difficult as it seems. All you have to do is to get a kitchen 2000W plate, keep the electronics for power control, extract the coil, bend it on the drum curvature, and find a way to mount, using some spacers. Here is a page where you can see the Bullet coil assembly maintenance: https://docs.goog...EIfdcY/pub ... and here is a kitchen induction plate coil: https://5.imimg.c...00x500.jpg Extracting from that plastic support and mould it with hot air on the drum curvature is the most difficult part of the conversion job. |
|
|
|
| allenb |
Posted on 07/15/2020 1:44 PM
|
 Administrator Posts: 3859 Joined: February 23, 2010 |
Quote I'll look up the company that made me a few sets of tubulars and post the contact info. I would go with shape FT2, 4 or 6 (second link) to get length up where you need it to get watts per square inch as low as possible. I think I went up to 15 watts/sq in in free air with a ".430 diameter and didn't have a problem but I would run this by them when ordering. They can attach a rectangular mounting plate with screw holes near the termination end for mounting and you can use threaded termination ends or 1/4" spade connectors. To obtain 4 KW you'll most likely need 4 elements to keep watt density low enough and they can be stacked on top of each other with a certain minimum space required between them. You'll want to ensure the area where these will be mounted have a couple of layers of sheet metal baffles separating them from the outside shell and bottom of the roaster to minimize losses to the outside. Be sure to allow intake air to pass across the elements up and across the bottom of the drum on the way to the rear of the drum where the drum air entry point is to maximize heat transfer. Tempco: https://www.tempc...act-Us.htm https://www.tempc...ormtns.pdf 1/2 lb and 1 lb drum, Siemens Sirocco fluidbed, presspot, chemex, cajun biggin brewer from the backwoods of Louisiana
|
|
|
|
| allenb |
Posted on 07/15/2020 1:57 PM
|
|
Administrator Posts: 3859 Joined: February 23, 2010 |
Quote This is what I mean, nichrome is not easy (mechanic, electric safeness) and It must be done for more power with almost no airflow. Quote Excuse my English - now I know , "heating rods" are tubular elements. This is good way, considerably more expensive. The best is large element(s) with low power on sq.inch. 8 W/sq.inch is a good value, 13 W/sq.inch is the maximum, You're right, nichrome can be a challenge unless one is good at fabricating mica board frames and can do the crimping for terminations. Also one has to be well versed in designing for a specific watt density etc... You're also right on more expensive. I asked one company for a ballpark $ for one hairpin 1000 watt tubular and it was around $70.00. If you need 4 to get the total KW you want, you're looking at almost $300.00 for the elements plus shipping. Gas looks better all the time but not sure how much cheaper it would be once you get the regulators, needle valves or proportional valves etc. and might be even more unless you're a good scavenger. 1/2 lb and 1 lb drum, Siemens Sirocco fluidbed, presspot, chemex, cajun biggin brewer from the backwoods of Louisiana
|
|
|
|
| pjvdl |
Posted on 07/15/2020 10:08 PM
|
 Newbie Posts: 38 Joined: April 05, 2020 |
Quote allenb wrote: Quote This is what I mean, nichrome is not easy (mechanic, electric safeness) and It must be done for more power with almost no airflow. Quote Excuse my English - now I know , "heating rods" are tubular elements. This is good way, considerably more expensive. The best is large element(s) with low power on sq.inch. 8 W/sq.inch is a good value, 13 W/sq.inch is the maximum, You're right, nichrome can be a challenge unless one is good at fabricating mica board frames and can do the crimping for terminations. Also one has to be well versed in designing for a specific watt density etc... You're also right on more expensive. I asked one company for a ballpark $ for one hairpin 1000 watt tubular and it was around $70.00. If you need 4 to get the total KW you want, you're looking at almost $300.00 for the elements plus shipping. Gas looks better all the time but not sure how much cheaper it would be once you get the regulators, needle valves or proportional valves etc. and might be even more unless you're a good scavenger. Wow, this is all getting much more complex than I anticiapted when I started! I have a bunch of new nichrome 1600W elements on order that I am expecting to arrive this week. My current plan is to play around with oversizing the number that I install in the roaster and then running each at a maximum of 50%. This way I think if I install 4 x 1600W, I have a total of 6.4kw at 100% or 3.2kw at 50%. This will help keep the watt density down and if I configure the control to alternate pairs of the elements on/off, I should still be able to keep within my available current envelope. If this doesn't work, then I will need to consider alternatives as you have suggested. Plan B at this point is an alternative, lower power density, more stable electric element. There have been a few suggested in this thread. From what I can gather these each have their pros and cons. If I attempt to summarise the suggestions made so far, for consideration:
Plan C. I also have mains gas (natural gas) piped to the location where I am planning to install the roaster, so this might end up being a better solution. Plan D. I do have 3-phase 240V to my property, but I would need to get an electrician in to run 3-phase to a location where I can run the roaster. Trades are expensive in australia, so this could easily exceed $600 - $800 on its own. And I would still need to solve the problem of which element to use. Too many options! Anyway, thanks again to all for your suggestions and input. I am taking this one step at a time. I will let you know how I go with my nichrome tests. Edited by pjvdl on 07/15/2020 10:16 PM -- Paul
ECM Rocket espresso Eureka Mignon grinder 500g BBQ rotisserie roaster 1kg drum roaster |
|
|
|
| renatoa |
Posted on 07/16/2020 2:31 AM
|
|
Administrator Posts: 3008 Joined: September 30, 2016 |
For induction you don't need so much power Compared with a drum with an external heater, where the heat goes in all directions, and only a good insulation drive it back to the drum, for induction the losses are much much lower, all the power goes into the drum metal, and from there directly to beans. Insulation role for induction is less critical as for a heater outside the drum, it is there just to keep the heat inside drum, a simple heat reflective foil can do this job maybe better than a ceramic blanket. Plan E: ceramic radiant plate with gas burner: small and focused heat: https://www.ebay....3386665809 |
|
|
|
| allenb |
Posted on 07/16/2020 6:11 AM
|
|
Administrator Posts: 3859 Joined: February 23, 2010 |
I very much like the idea of the efficient nature of induction heating and renatoa is right that insulation would be much less of an issue. In addition to the induction heater, one will need to design and install a convection heater for preheating intake air as a result of needed exhausting of chaff and smoke. Unfortunately, power requirements for enough air throughput to remove chaff and smoke for a 1kg drum will be at least 1.5 kw for a 10-15 cfm flow. Obviously, with enough heat to the drum, one could omit heating the air but wonder if heating and cooling at the same time might have a negative effect on roast quality?
1/2 lb and 1 lb drum, Siemens Sirocco fluidbed, presspot, chemex, cajun biggin brewer from the backwoods of Louisiana
|
|
|
|
| pjvdl |
Posted on 07/16/2020 6:58 AM
|
|
Newbie Posts: 38 Joined: April 05, 2020 |
Quote renatoa wrote: For induction you don't need so much power Compared with a drum with an external heater, where the heat goes in all directions, and only a good insulation drive it back to the drum, for induction the losses are much much lower, all the power goes into the drum metal, and from there directly to beans. Insulation role for induction is less critical as for a heater outside the drum, it is there just to keep the heat inside drum, a simple heat reflective foil can do this job maybe better than a ceramic blanket. Plan E: ceramic radiant plate with gas burner: small and focused heat: https://www.ebay....3386665809 Your point regarding the necessary power is an interesting one. For this to work, are you suggesting that the induction coil be mounted directly to the drum then? I had imagined that the coil would be mounted to a stationary buffle that sits just under the drum. This baffle would be ferrite and act as the heater. So while this would still be much more efficient than a heater that is heating the air, there might still be some losses. Have I got this wrong? If I go down the gas route, then I like the idea of an IR ceramic plate. Quote allenb wrote: I very much like the idea of the efficient nature of induction heating and renatoa is right that insulation would be much less of an issue. In addition to the induction heater, one will need to design and install a convection heater for preheating intake air as a result of needed exhausting of chaff and smoke. Unfortunately, power requirements for enough air throughput to remove chaff and smoke for a 1kg drum will be at least 1.5 kw for a 10-15 cfm flow. Obviously, with enough heat to the drum, one could omit heating the air but wonder if heating and cooling at the same time might have a negative effect on roast quality? Combining induction with a lower power nichrome pre-heater is an interesting idea! If I can't get nichrome going on its own, this might be my new preferred alternative if I can work out how to control the induction power and mount it -- Paul
ECM Rocket espresso Eureka Mignon grinder 500g BBQ rotisserie roaster 1kg drum roaster |
|
|
|
| renatoa |
Posted on 07/16/2020 7:59 AM
|
|
Administrator Posts: 3008 Joined: September 30, 2016 |
Induction coil should be mounted as close to the drum, without touching it. No baffle, the drum itself will heat by induction, as a stainless steel pot placed on the induction plate. The only difference versus a kitchen usage is that you don't heat the bottom, but the side of the "pot". Regarding control... yeah, this is a hot potato... I would start with manual control, using the heater power panel, to discover the power % - ET temperature relationship. Interfacing with Arduino is not a simple task, because there are no low voltage inside such devices, even the buttons are line operated, i.e. there is line voltage on all the buttons... so at first sight you should use relays, or optocouplers for interface... doable for an Arduino insider, not so simple for the average Joe. Allenb point is great, cold intake air wouldn't be a good idea... so let's address this with the following approach: what if the exhaust will be the air between the drum and the outer oven wall? This way, the power apparently wasted as radiation outside the drum will be used to heat the air for exhaust, thus a save... |
|
|
|
| allenb |
Posted on 07/16/2020 8:15 AM
|
|
Administrator Posts: 3859 Joined: February 23, 2010 |
Quote Extracting from that plastic support and mould it with hot air on the drum curvature is the most difficult part of the conversion job. This might be a fun project for someone with a 3D printer if there is a printable plastic with high enough working temperature. 1/2 lb and 1 lb drum, Siemens Sirocco fluidbed, presspot, chemex, cajun biggin brewer from the backwoods of Louisiana
|
|
|
|
| pjvdl |
Posted on 07/29/2020 7:41 AM
|
|
Newbie Posts: 38 Joined: April 05, 2020 |
My Aliexpress order of nichrome elements finally arrived on the weekend, allowing me to run some more tests; both inside the roasting chamber and independently. I have configured the heater assembly with 2 x 1600W nichrome heater coils mounted in 40mm diameter tubes, connected to my centrifugal fan via a baffle to ensure an even split of airflow between the two coils (see photos - you will note that I have removed the drum from the roasting chamber for one of the tests). I have also played around with different methods for ensuring adequate, even airflow around the elements in the tube. Although the elements were all supplied with mica paper wrapping, I have discarded this in favour of spacers at either end of the tube to ensure the element is well centred in the tube. This seems to work better than the mica paper, as the paper seems to restrict airflow too much. With this configuration, if I link the maximum duty cycle of the heaters to the fan duty cycle, I have found that I can reliably run the heater coils at 90% of fan power. ie. with fan at 90%, max heat is 81%. This means that my max power is 90% or 2 x 1600W => 2880W. From my reading on this forum, 2.9kW should be enough for a 700g - 800g roast or so, however in my testing (below), I have found that is can barely cope with 500g. This is in a double skinned stainlless steel roaster (albeit with no insulation). In addition, this heater configuration is not really what I originally planned, as it does not really provide any radiant heat directly to the drum. So although I have been able to show that I can use nichrome heaters, I am struggling to deliver the power in the way I want. I am contemplating installing a 3rd 1600w under the drum to provide a level of radiant heat, which would be possible, but is another whole design exercise. Sadly, I think my conclusion is that it is going to be difficult to use nichrome to deliver a radiant/convention combination of heat sufficient to roast anything like the 1kg that I had originally designed this roaster for. In fact, except for induction, I wonder if it is even possible to roast 1kg with only 4kw of electric heat. I am keen on renatoa's recommendations around induction, and based on this suggestion I have explored this option, but the lack of control may mean this is a non-starter, as I had hoped to be able to do at least some profiling using Artisan/Arduino/TC4Plus. When I get some more time, I may just buy a cheap Ikea benchtop induction cooktop to tear apart and test. In the meantime I htink I am going to tweek my existing setup to see how far I can push it. Test results This can pre-heat the roasting chamber to 250C in around 6 minutes. My initial tests with some old green beans are: 500g roast: it can roast 500g of beans in around 13 minutes, if I drop heat power to 60% on initial charge, gradually raising heat power to 90% through the roast to 1st crack and dropping back to around 30% power. 1000g roast: around 18 minutes, even at higher heat percentage
pjvdl attached the following images:
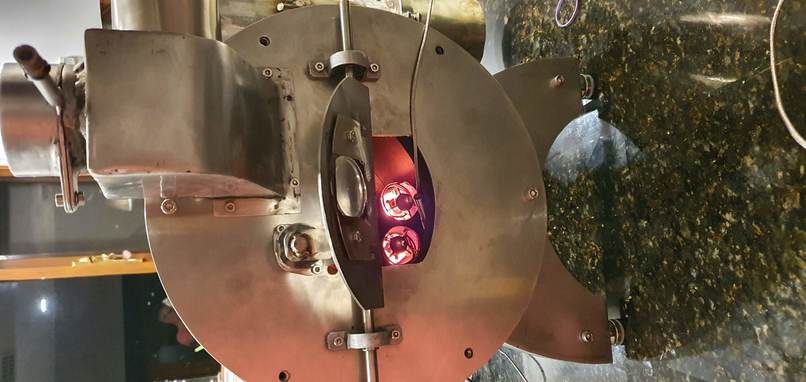

-- Paul
ECM Rocket espresso Eureka Mignon grinder 500g BBQ rotisserie roaster 1kg drum roaster |
|
|
|
| allenb |
Posted on 07/29/2020 8:00 AM
|
|
Administrator Posts: 3859 Joined: February 23, 2010 |
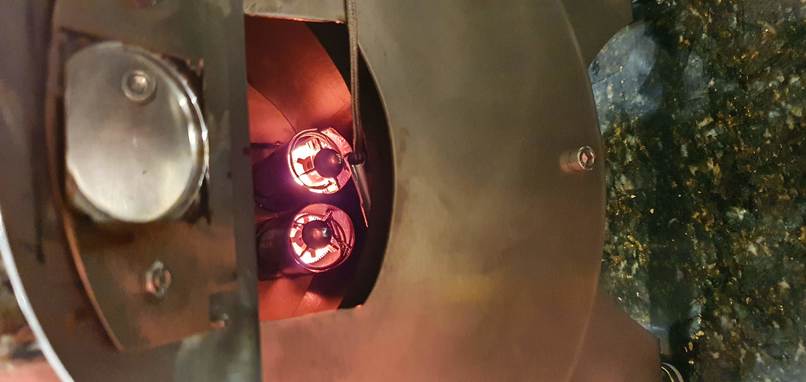
Shoot us some additional data: Amps and voltage at 90% power (if you have an ammeter) Air temp leaving the elements (at least 1" past the end of the tube) Color of nichrome (pure yellow or closer to dull orange?) 1/2 lb and 1 lb drum, Siemens Sirocco fluidbed, presspot, chemex, cajun biggin brewer from the backwoods of Louisiana
|
|
|
|
| pjvdl |
Posted on 07/29/2020 8:20 AM
|
|
Newbie Posts: 38 Joined: April 05, 2020 |
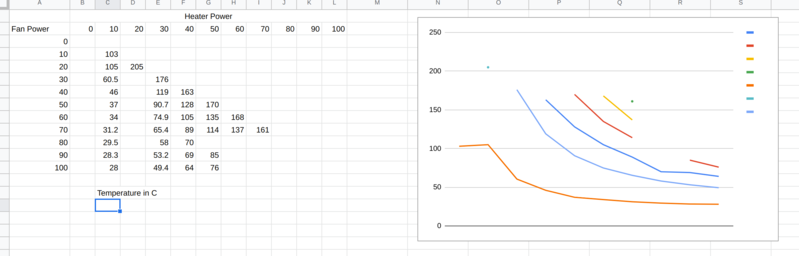
Quote allenb wrote: Shoot us some additional data: Amps and voltage at 90% power (if you have an ammeter) Air temp leaving the elements (at least 1" past the end of the tube) Color of nichrome (pure yellow or closer to dull orange?) I'm glad you asked :) I use 240V power. My ammeter is showing around 15Amps at 100% power (which I can operate for a few minutes before burning out an elements). This is across both elements in parallel. My setup uses a slow (8Hz) PWM signal to control power to the heater (eg. 50% is 500ms on alternating with 500ms on), I believe that the percentage value is rounded down to the nearest 125ms (8Hz), so 90% means that it is using 100% power for 7/8 of a second. This switching of power causes my ammeter reading to fluxtuate, so difficult to confirm reading, but based on my understanding, it should still be pulling the full 15Amps for 7/8 of each second. I have run a number of tests with different combinations of fan power and heater power. I have attached the results of these tests below. The temperature readings in these tests were taken at the exit of the heating element tube (within 2mm). I find colour to be somewhat subjective, but the photos I posted in the previous show the elements at the maximum colour I can consistently run without blowing one. Bright orange?
pjvdl attached the following image:
-- Paul
ECM Rocket espresso Eureka Mignon grinder 500g BBQ rotisserie roaster 1kg drum roaster |
|
|
|
| renatoa |
Posted on 07/29/2020 8:54 AM
|
|
Administrator Posts: 3008 Joined: September 30, 2016 |
You should use 1 Hz PWM for at least 2% (1.67% on 60Hz) control resolution... 8Hz will degrade significantly your control precision. Are you using TC4 ? why not going with ICC ? |
|
|
|
| allenb |
Posted on 07/29/2020 4:08 PM
|
|
Administrator Posts: 3859 Joined: February 23, 2010 |
The chart doesn't convey what I'm looking for. What is the temperature leaving the elements at a fan power level you expect to use to allow removal of chaff and smoke and at 90% or somewhere around there power level to the element. The chart is showing a maximum of 161C (321F) discharge temperature which will not get you where you want to go. Or, am I missing something?
1/2 lb and 1 lb drum, Siemens Sirocco fluidbed, presspot, chemex, cajun biggin brewer from the backwoods of Louisiana
|
|
|
|
| pjvdl |
Posted on 07/29/2020 6:45 PM
|
|
Newbie Posts: 38 Joined: April 05, 2020 |
Quote allenb wrote: The chart doesn't convey what I'm looking for. What is the temperature leaving the elements at a fan power level you expect to use to allow removal of chaff and smoke and at 90% or somewhere around there power level to the element. The chart is showing a maximum of 161C (321F) discharge temperature which will not get you where you want to go. Or, am I missing something? No. You are not missing anything. I agree that it doesn't show what I would expect either. The temperatures at the exit are definitely lower than what I would expect. It is unclear why this is the case. As an aside, this is why the table is incomplete, as I realised that I was not getting the results that I would expect (and I blew an element at 100%/100%). I have a couple of theories as to why this may be. Either there is an issue with the responsiveness of the K-type thermocouple that I am using to take the measurements. Or, the airflow is too high at high fan %, causing significant variations in the temperature. I did notice if II moved location of the probe, the temerature reading did vary significantly, supporting this theory. I am not an expert in fluid dynamics, but I think the data also supports this, as you will notice the measured temperature at 80%/80% and 90%/90% is lower than 60%/60%, even though the colour indicates it should be hotter. I would be interested in other's thoughts on this. Because I didn't trust the absolute temperature readings, I was guided more by the temperatures relative to each other, building up a picture of how the temperature curves develop as a factor of heat and fan. I was also guided by the colour of the elements at their hottest point, which I did also record, although I neglected to include these in the table that I attached. I have now updated the table with the colour, so this might give a better indication (attached below). You will see that the colour at 100% fan / 100% heat is yellow. This is when I blew an element, ending my test :( On this basis, I am assuming that my "Orange/Yellow" is as high as I can go. I did also run a couple of tests the next day with the tip of the thermocouple inserted into the end of the pipe as close as I could get to the live element without actually touching it - probably 5mm from the end of the live element coil. At this point I was measuring around 540C at 90% when the element was orange/yellow, which is more in line with what I would expect. Chaff and smoke are removed when the fan is at least 50%, so I have some room to move in this regard. As I mentioned, this settup is heating my roasting chamber to 250C in around 6 minutes, so clearly the temperature readings that I have recorded are incorrect for some reason.
pjvdl attached the following image:

Edited by pjvdl on 07/29/2020 6:58 PM -- Paul
ECM Rocket espresso Eureka Mignon grinder 500g BBQ rotisserie roaster 1kg drum roaster |
|
|
|
| pjvdl |
Posted on 07/29/2020 7:05 PM
|
|
Newbie Posts: 38 Joined: April 05, 2020 |
Quote renatoa wrote: You should use 1 Hz PWM for at least 2% (1.67% on 60Hz) control resolution... 8Hz will degrade significantly your control precision. I think I understand why you would get a 1.67% control resolution at 60Hz, but are you sure you would get a 2% resolution at 1Hz? To be fair, I struggle to get my head around the ATMega bit control theory of PWM, but from my testing, 1Hz PWM on a Arduino/TC4 setup switches the power on/off at a maximum frequency of 1Hz. To achieve a 2% control resolution you would need to include 50 cycles in your control cycle, which at 1Hz is 50 seconds for one cycle through. Or am I missing something here? From user.h file in the aArtisanQ_PID arduino shield (you will see that I have 8Hz uncommented): //////////////////// // Time Base for slow PWM on OT1, OT2 // When NOT using PHASE_ANGLE_CONTROL option // choose one of the following for the PWM time base for heater output on OT1 or OT2 //#define TIME_BASE pwmN4sec // recommended for Hottop D which has mechanical relay //#define TIME_BASE pwmN2sec //#define TIME_BASE pwmN1Hz // recommended for most electric heaters controlled by standard SSR //#define TIME_BASE pwmN2Hz // #define TIME_BASE pwmN4Hz #define TIME_BASE pwmN8Hz // The faster frequencies below are for advanced users only, and will require changes to the PWM16 Library //#define TIME_BASE 15 // approx. 977 Hz //#define TIME_BASE 7 // approx. 1.95kHz //#define TIME_BASE 6 // approx. 2.2kHz //#define TIME_BASE 3 // approx. 3.9kHz Quote renatoa wrote: Are you using TC4 ? why not going with ICC ? TBH, I started using PWM because I was initially learning how to work with an Arduino/TC4 and that is the default. I have been meaning to look at the alternative control mechanism, but haven't had the time. I think ICC is also dependent on the presence of a zero cross detector, which I have had a quick look for, but have not managed to source yet. This is definitely something that I want to try. Edited by pjvdl on 07/29/2020 7:28 PM -- Paul
ECM Rocket espresso Eureka Mignon grinder 500g BBQ rotisserie roaster 1kg drum roaster |
|
|
|
| renatoa |
Posted on 07/30/2020 2:09 AM
|
|
Administrator Posts: 3008 Joined: September 30, 2016 |
When using PWM, the SSR command that comes from TC4 could be of an infinite degree of precision, but this not matter because is not sync'ed with the mains frequency, so you can chop (or miss) a random part of the sine. As a result, when you dial for example 50% heater, and using 1 Hz cycle, the output could be anywhere in the 49-51 sine waves passed through the SSR. From here, the 2% precision (for 50 Hz), and 1.67% = 1/60, for US mains. I found this fact following this intriguing statement that you can read in any PID leaflet "...set the control period for SSR outputs to 2 seconds...". After some digging, the explanation was been clear: this cycle time is required if you want 1% precision of control... elementary... if you see on screen 1...100%, then you want to feel on heater the difference down to 1% step. For 8Hz PWM, for each PWM pulse you have practically only 50/8 = 6 sines available to control. So you have only 7 levels of power control: 0, 1/6 = 16.7%, 33%, 50%, 67%, 83% and 100% This is dramatic decimation of control choices, that could led unusable my roaster for example... where 80% of roast time I play with figures between 72 and 77%, sometimes 1% in a minute change making a difference in final roast ! 1% of power is 3 C degrees in hot air temperature, how much this matters depend on your specific machine inertia, quite critical for FB, acceptable for heavy drums. With ICC the power modulation is done by passing or blocking the entire half-sine, (thus the need for a zero cross detection, as you well guessed) So if you you have 100 half pulses for 50 Hz mains, then you can have 1% resolution/precision, and this is true instantly, in any moment. Another advantages of using ICC: - don't exhibits transients, because the switching is always near zero of the sine, so less or no perturbations in the sensible house equipment. - the heater is less stressed with temperature swing, as for on-off - for halogen heaters, less annoying pulsing light |
|
|
|
| danst |
Posted on 07/30/2020 3:36 AM
|
|
1/4 Pounder Posts: 65 Joined: April 18, 2013 |
I see no problem with precision degree of 1 Hz with SSR and it is well suited for resistance heaters and their longevity. For heating control of electric drum roaster is 5% or even 10% scale of power enough. The nichrome heater is usable (for classic drum roaster) only when it holds all the power without airflow. It must be so designed, not as these airflow-heatings from heatguns etc. (this means several power units in series and parallel or one with thick wire, but long for reducing power- amperage and load, all this results in bigger space requirments) In a classic roaster, it must be possible to go on max even without forced airflow, above all in drying phase. With common kind of nichrome (what you are using) is the airflow too high for good power usage. The idea with inductive heating is for me a bit risky. Not easy for DIY. Proved solution are tubular elements. It must be space for it, just like for gas heating. I believe, it is a good idea to copy professional roasters. 1000g Ugly roaster, QM Alexia EVO, Bezzera BZ09, Niche Zero, Fiorenzato Doge 63, Mazzer Jolly(Mestre), Handground, T. Moccamaster, Aeropress.
|
|
|
|
| allenb |
Posted on 07/30/2020 12:47 PM
|
|
Administrator Posts: 3859 Joined: February 23, 2010 |
Something to consider with resistive wire forced air convection heaters as you are using. If engineered correctly and established heater watt density is not exceeded, you will be able to increase cfm to a point where the element will show little to no visible glow in a normally lit room at design full power. If you are not exceeding the design voltage then you're air flow is insufficient at full power. I can take any 1500 watt nichrome forced air convection heater and flow slightly more than optimum designed cfm and end up with no visible color. Danst brings up a good point about being able to operate during the drying phase with little to no non-recirculating air flow which allows a humid environment during the drying phase. Studies have been done, but don't ask me by whom, that show a more even and beneficial heat transfer during the first few minutes when steam is allowed to surround the beans while being driven from them. This obviously only applies to mechanically agitated roasters and recirculating fluidbeds. 1/2 lb and 1 lb drum, Siemens Sirocco fluidbed, presspot, chemex, cajun biggin brewer from the backwoods of Louisiana
|
|
|
|
| pjvdl |
Posted on 10/25/2020 7:20 AM
|
|
Newbie Posts: 38 Joined: April 05, 2020 |
After a bit of a hiatus due to other commitments, I have had some time to revisit the heater in my 1kg drum build. My preference based on the input of members of this group was a tubular element, but the manufactures that I contacted in Australia were not able to build one to the specs I require in the space available (approx 70mm high x 200mm wide x 250mm deep). Without this as an option, I decided to design an open-coil resistive wire heater. My calculations showed I needed a gauge of around 15 AWG. I have not been able to source Nichrome 80 in any gauge approaching this, but I could get Kanthal A1, which isn't ideal, but I figured I'd give it a try. Design parameters: Material: Kanthal A1 Gauge: 15 AWG Max Voltage: 156V (65% of 240V) Resistance: 15ohms Power density: 2.09 W/cm2 (13.5W/inch2) Winding my own open coil elements, I have mounted two of these in parallel on a S/S and mica frame. The fabrication is a little rough, but it does for a test while I wait for ceramics to fabricate a permenant solution. My tests showthat I can operate this element at full power with no air flow. Using it, I have roasted 1kg of beans to first crack in around 7 minutes as a first test, so plenty of power. This needs some more testing, but looks like it should be a good solution.
pjvdl attached the following images:


Edited by pjvdl on 10/25/2020 7:41 AM -- Paul
ECM Rocket espresso Eureka Mignon grinder 500g BBQ rotisserie roaster 1kg drum roaster |
|
|
|
| allenb |
Posted on 10/25/2020 11:16 AM
|
|
Administrator Posts: 3859 Joined: February 23, 2010 |
Wow, I can see you spent more than a couple of hours designing mica standoff plates and path of all the connections! That had to be some major work but looks good. A couple of questions. Will there be mica sheet beneath the Kanthal in case of melt down and element dropping? would be a good safety measure. What is the air flow path now? Is it able to access most of the coils before entering the rear of the drum? Great choice going with the Kanthal as it is reported to be very robust. 1/2 lb and 1 lb drum, Siemens Sirocco fluidbed, presspot, chemex, cajun biggin brewer from the backwoods of Louisiana
|
|
|
|
| pjvdl |
Posted on 10/25/2020 6:19 PM
|
|
Newbie Posts: 38 Joined: April 05, 2020 |
Quote allenb wrote: Wow, I can see you spent more than a couple of hours designing mica standoff plates and path of all the connections! That had to be some major work but looks good. A couple of questions. Will there be mica sheet beneath the Kanthal in case of melt down and element dropping? would be a good safety measure. What is the air flow path now? Is it able to access most of the coils before entering the rear of the drum? Great choice going with the Kanthal as it is reported to be very robust. Thanks Allen. I agree that mica beneath the element would be a good idea. I have not done this at this stage, because I have limited mica supply and want to reserve it for my final element build (using ceramic insulators), and I can only get mica sheets from aliexpress - which takes around 2 months to get to Australia! My testing has also shown that with the 80mm spaced supports, my 15 AWG element doesn't droop more than a few mm and I have a 10mm gap beneath it. I am still working on airflow. I previously had a baffle between the top of the element and the underside of the drum to force air across the element. With the current element design I have very little space though, so have removed it for the moment. This doesn't seem to be causing a problem though, as I am running my fan (max 160 cfm - overpowered I know!) at around 10 - 20% for the majority of the roast. For those that are interested, I have included a link to the spreadsheet that I used from my heater element calculations below: Resistive heater element design spreadsheet for Nichrome 80 and Kanthal A1 wire https://docs.goog...sp=sharing Edited by pjvdl on 10/25/2020 6:31 PM -- Paul
ECM Rocket espresso Eureka Mignon grinder 500g BBQ rotisserie roaster 1kg drum roaster |
|
|
|
| allenb |
Posted on 10/25/2020 7:45 PM
|
|
Administrator Posts: 3859 Joined: February 23, 2010 |
Thanks for sharing the link for calcs for the resistive element. One nice outcome of your current design is the heavy gauge of the wire which would be quite a feat to melt it and cause an issue where it could drop against the roaster body. With proper grounding, it would pop the circuit breaker immediately. So, does the air path go from an opening at the rear and blow across the coils towards the front of the roaster and then work it's obvious path around and back to the drum openings? This would be optimum. 1/2 lb and 1 lb drum, Siemens Sirocco fluidbed, presspot, chemex, cajun biggin brewer from the backwoods of Louisiana
|
|
|
|

| Jump to Forum: |
Similar Threads
| Thread | Forum | Replies | Last Post |
|---|---|---|---|
| Fatamorgana electric drum roaster | Other Roasters | 2 | 03/24/2024 10:03 AM |
| Dereks 1-2Kg drum roaster build | Drum Roasters | 116 | 03/14/2024 7:16 AM |
| Jborks 2kg drum roaster build | Drum Roasters | 6 | 01/20/2024 12:15 PM |
| Potential LOT of Build Supplies | JAVA TRADING COMPANY | 9 | 12/18/2023 10:21 AM |
| Advice needed for type roaster to build. | WHAT SHOULD I BUY OR MAKE | 4 | 12/04/2023 1:22 PM |
Powered by PHP-Fusion Copyright © 2024 PHP-Fusion Inc
Released as free software without warranties under GNU Affero GPL v3
Designed with ♥ by NetriXHosted by skpacman