
Login

Shoutbox
You must login to post a message.
renatoa
04/18/2024 12:36 AM
bijurexim, greyberry2, N C, 
renatoa
04/17/2024 9:27 AM
 , branchu
renatoa
04/14/2024 5:56 AM
TheOtherJim and papajim,
 !
!
!allenb
04/11/2024 6:33 PM
Zemona

renatoa
04/11/2024 9:19 AM
Mrbones and sgupta,  ?
?
?Forum Threads
Newest Threads
Rainfrog's Roastmast...War on Farmers by Su...
Kaleido Roaster PID ...
Green coffee sellers
Wet beans - Estimati...
Hottest Threads
| Skywalker roaster... | [292] |
| Skywalker, the AL... | [214] |
| Skywalker Roasts | [94] |
| Rainfrog's Roastm... | [53] |
| My first popcorn ... | [47] |
In Memory Of Ginny

Donations
Latest Donations
dmccallum - 10.00
JackH - 25.00
snwcmpr - 10.00
Anonymous - 2.00
Anonymous - 5.00
dmccallum - 10.00
JackH - 25.00
snwcmpr - 10.00
Anonymous - 2.00
Anonymous - 5.00
Users Online
Guests Online: 2
Members Online: 0
Total Members: 8,211
Newest Member: bijurexim
Members Online: 0
Total Members: 8,211
Newest Member: bijurexim
View Thread
Who is here? 1 guest(s)
Page 1 of 2: 12
|
 Centrifugal TO Roaster build
|
|
| allenb |
Posted on 11/19/2021 4:49 PM
|
 Administrator Posts: 3858 Joined: February 23, 2010 |
In the middle of building a TO roaster using a centrifugal type agitation instead of paddle. Still needs to have the TO top modified to fit the smaller diameter of the pot I used. The drive base is from a standard bread maker. Had to replace the drive shaft with a longer one. RPM is unchanged. 1/2 lb and 1 lb drum, Siemens Sirocco fluidbed, presspot, chemex, cajun biggin brewer from the backwoods of Louisiana
|
|
|
|
| allenb |
Posted on 11/19/2021 4:56 PM
|
|
Administrator Posts: 3858 Joined: February 23, 2010 |
Forgot to mention, load in video is 1 lb but should be able to handle much more as far as sufficient bean agitation. Not sure how much coffee the 1500 watt TO top will handle.
1/2 lb and 1 lb drum, Siemens Sirocco fluidbed, presspot, chemex, cajun biggin brewer from the backwoods of Louisiana
|
|
|
|
| Koffee Kosmo |
Posted on 11/19/2021 6:09 PM
|
 Administrator Posts: 1620 Joined: December 31, 2008 |
I like the idea and would like to see roasting results when they are available When I did my initial research on coffee roasting principles The common theme was that the bean mass should remain intact during the agitation process, so the heat transfer should be from both the TO heat source, and stored heat transfer from the beans themselves Then I chose the appropriate speed and best agitation method that gently pushed, tumbled and worked the beans from the center to the outside continuously while still having occasional pause sections So I will be watching to see the upcoming roasting test results KK I home roast and I like it. Designer of the KKTO
Roaster Build information https://homeroast...ad_id=1142 https://docs.goog...lide=id.i0 Blog - http://koffeekosm...gspot.com/ Bezzera Strega, Mazzer Robur Grinder, Pullman Tamper Convex, (KKTO) Turbo Oven Home Roaster. |
|
|
|
| renatoa |
Posted on 11/20/2021 2:01 AM
|
|
Administrator Posts: 3005 Joined: September 30, 2016 |
Quote allenb wrote: Forgot to mention, load in video is 1 lb but should be able to handle much more as far as sufficient bean agitation. Not sure how much coffee the 1500 watt TO top will handle. Wow, wow... One pound surely does. I did 640 grams with 1300 W. But shorter distance from beans to TO, about 8 cm. Great agitation there, with the cost of increased noise though... eagerly waiting the first roast to hear how FC can be distinguished from that high pitched background ambient. Also, where goes the chaff ? Not the last... do you plan to add a dump door in the bottom? The machine seems big enough to dump beans by tilting. Edited by renatoa on 11/20/2021 4:30 AM |
|
|
|
| allenb |
Posted on 11/20/2021 6:56 AM
|
|
Administrator Posts: 3858 Joined: February 23, 2010 |
Quote Koffee Kosmo wrote: I like the idea and would like to see roasting results when they are available When I did my initial research on coffee roasting principles The common theme was that the bean mass should remain intact during the agitation process, so the heat transfer should be from both the TO heat source, and stored heat transfer from the beans themselves Then I chose the appropriate speed and best agitation method that gently pushed, tumbled and worked the beans from the center to the outside continuously while still having occasional pause sections So I will be watching to see the upcoming roasting test results KK Hi KK and great observations. Yes, I've read the same regarding heat transfer being optimized by keeping bean to bean contact happening as much as possible while allowing adequate heat access at the same time. With that said, the roaster can be slowed down by going with a variable speed motor drive instead of using the bread maker motor allowing roasting different load sizes. The current setup would probably do better at 2 lbs. 1/2 lb and 1 lb drum, Siemens Sirocco fluidbed, presspot, chemex, cajun biggin brewer from the backwoods of Louisiana
|
|
|
|
| allenb |
Posted on 11/20/2021 7:11 AM
|
|
Administrator Posts: 3858 Joined: February 23, 2010 |
Quote renatoa wrote: Wow, wow... One pound surely does. I did 640 grams with 1300 W. But shorter distance from beans to TO, about 8 cm. Great agitation there, with the cost of increased noise though... eagerly waiting the first roast to hear how FC can be distinguished from that high pitched background ambient. Also, where goes the chaff ? Not the last... do you plan to add a dump door in the bottom? The machine seems big enough to dump beans by tilting. Good questions Renatoa! Here goes: Noise: Bigger bean mass is quieter but will need the exterior of the pot insulated with some sound absorbing material to hear 1C. Chaff exit: Will be incorporating a slit in the pot shell near the bean travel with catch cup hanging on the exterior as Farmroast used with his Dreamroaster. Dump door will be a hinged flap in the side with angled chute attached to the outside as with a drum roaster. Will just tilt the works upside down for now until concept proves to give acceptable roast results. I will not be measuring bean temp on this one but only ET. Pot height will be shortened eventually to only as tall as necessary maximize heat transfer and lessen heat loss through metal skin. Edited by allenb on 11/20/2021 8:43 AM 1/2 lb and 1 lb drum, Siemens Sirocco fluidbed, presspot, chemex, cajun biggin brewer from the backwoods of Louisiana
|
|
|
|
| renatoa |
Posted on 11/20/2021 7:26 AM
|
|
Administrator Posts: 3005 Joined: September 30, 2016 |
You can use for insulating such tapes, used in motor tuning jobs: https://www.heats...haust-wrap or, for fireplaces: https://www.amazo...01DDKEC02/ |
|
|
|
| allenb |
Posted on 11/20/2021 9:11 AM
|
|
Administrator Posts: 3858 Joined: February 23, 2010 |
Those are some possibilities for noise reduction. Another option would be to use a ceramic pot instead of metal which would not ring/resonate like metal but drilling holes would require carbide tools. Some history behind this design Years ago I built a smaller version of the centrifugal bowl roaster. The bowl was basically a small dog food bowl made from carbon steel and had several 1/8" tall vanes placed around the sloped wall to give the beans traction to be slung up and into the stationary turning vanes. I had assumed the sloped walls were necessary in order to effectively move the beans up and into the turning vanes but the current design proved we don't need a bowl and a flat disc is sufficient as the beans will walk up the sides of the pot and easily hit the return vanes. I had used 3 vanes instead of 2 which created less intense velocity and kept beans in closer contact with each other. A few notes on the current design: Pot diameter = 10" Disc is 3/32" thick. (thinner may deflect downward at edges due to bean force near vanes) Disc vanes (4) are 1/8" tall x 2" long. If using slower rpm, you might need to increase vane height by a small margin. Some chaff will travel down below disc via gap between disc and pot so leave a cleanout door to vacuum chaff.; Link to farmroast's dreamroaster with chaff removal slot and cup: https://homeroast...#post_4485 See posts #7 and 13 for chaff exit slot and cup 1/2 lb and 1 lb drum, Siemens Sirocco fluidbed, presspot, chemex, cajun biggin brewer from the backwoods of Louisiana
|
|
|
|
| renatoa |
Posted on 11/20/2021 9:37 AM
|
|
Administrator Posts: 3005 Joined: September 30, 2016 |
One more design detail that I think deserves a bit of reflection is how the airflow path could interfere with those deflectors. The airflow coming from the lid is not vertical, but spiraling along the walls, counter clockwise for my lid, as looking from above, no idea if this is an universal standard. The chaff flying in the oven shows very clear evidence of this descending path, a complete circle spiral is about one inch tall. Now the question is how this airflow will interfere with the deflectors, and which of two turbulence patterns that will be created in the bottom of the pot would be best for the roasting. For my roaster I have two different pots, for small and large roasts. The smaller, for under 250 grams roasts, can be seen in the video below, is partially centrifugal for the push outside action, combined with gravitational return path to center, due to the curved bottom of the pot. 9" outer pan diameter, 60 rpm and half pound greens there. Need a faster turning motor to experiment some true centrifugal setup. |
|
|
|
| tem3000 |
Posted on 01/16/2022 12:41 PM
|
|
Newbie  Posts: 2 Joined: January 13, 2022 |
Any progress on your TO? It looks really promising! I'm interested in seeing its progress... |
|
|
|
| allenb |
Posted on 01/16/2022 5:10 PM
|
|
Administrator Posts: 3858 Joined: February 23, 2010 |
Actual physical changes no but have been finalizing dump door design and control strategies along with probe placement so hopefully will be cutting and bolting in the next two weeks and will post video of it in action if all goes well. Like many others, lots of other stuff getting in the way! 
1/2 lb and 1 lb drum, Siemens Sirocco fluidbed, presspot, chemex, cajun biggin brewer from the backwoods of Louisiana
|
|
|
|
| tem3000 |
Posted on 01/16/2022 5:18 PM
|
|
Newbie Posts: 2 Joined: January 13, 2022 |
Thanks, that's great! Looking forward to pics as you life's busyness allows. :-) |
|
|
|
| allenb |
Posted on 02/04/2022 12:22 PM
|
|
Administrator Posts: 3858 Joined: February 23, 2010 |
Design work almost complete on a few fronts. Question on placement of temp sensor for sensing hot air discharge from TO. Place within a short distance down from fan screen? Also, I'm assuming it needs to be closer to the perimeter to not sense returning air coming back up from beans traveling back up the center where is re-enters the fan suction. Please advise, thanks 1/2 lb and 1 lb drum, Siemens Sirocco fluidbed, presspot, chemex, cajun biggin brewer from the backwoods of Louisiana
|
|
|
|
| renatoa |
Posted on 02/04/2022 1:48 PM
|
|
Administrator Posts: 3005 Joined: September 30, 2016 |
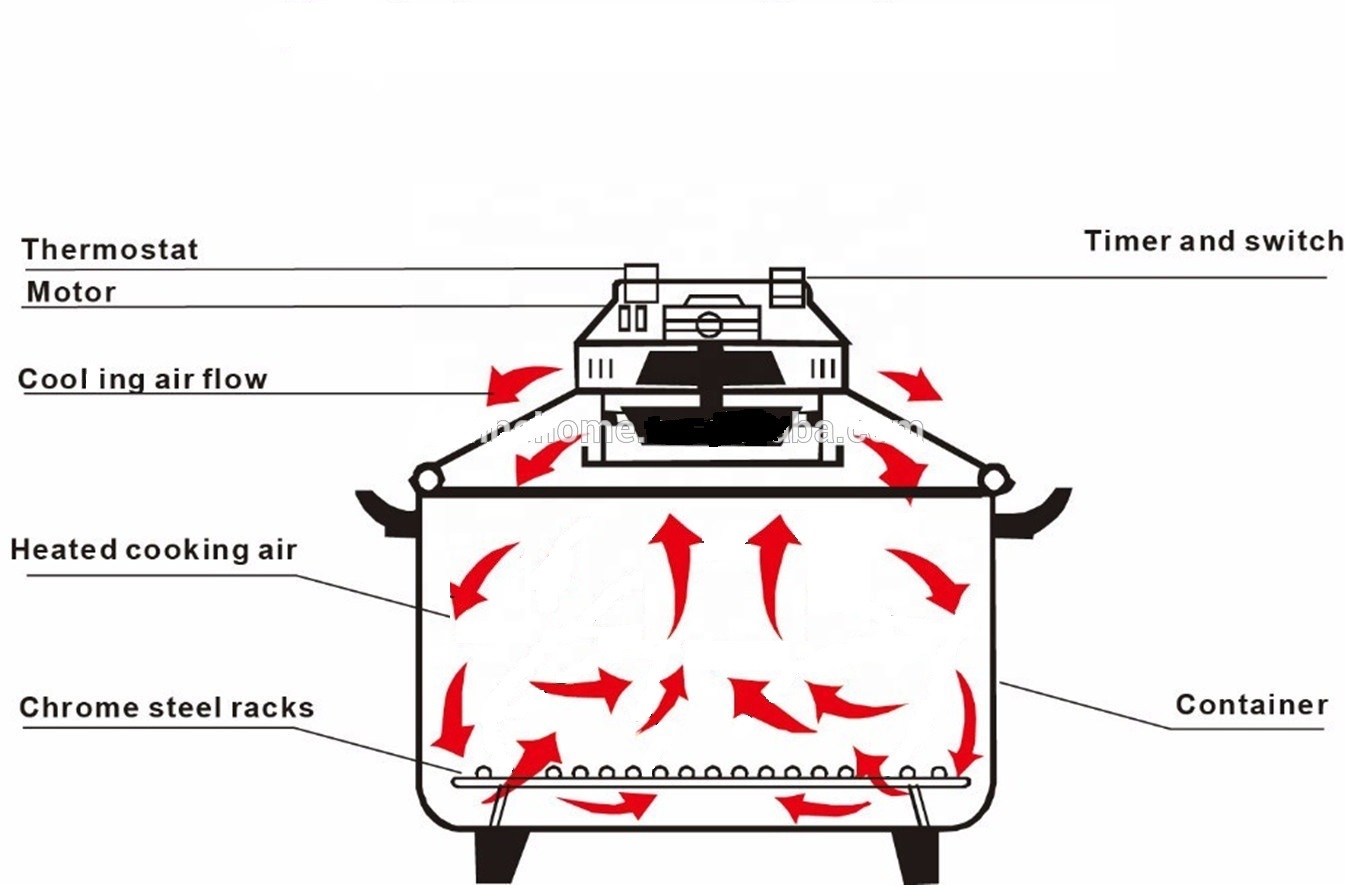
Attached diagram probably already known, but worth posting one more time for those new to TO. Probe placement depends what you want to sense: temperature of air entering or leaving the coffee bed. Also, not clear yet the effect of the new added centrifugal airflow to the lid generated vortex. Are they in the same directions, or opposite ? On mine the probe is above the coffee, about 5 cm from the center, in the middle of the radius of beans circle. FC flick is very noticeable in that location, you see the effect on display some couple of seconds before the first audible cracks. ~~~
renatoa attached the following image:
|
|
|
|
| allenb |
Posted on 02/04/2022 3:03 PM
|
|
Administrator Posts: 3858 Joined: February 23, 2010 |
I need to read the temperature of the hot air the beans are being exposed to which from what I see, will not be as simple as reading the air lifting the beans in a fluidbed. In a TO, you have the air leaving the TO head at X temperature but by the time it actually travels to the location of the bean bed, it has most likely done some mixing with returning air. Due to this, It sounds like it will take some trial and error to find the hottest spot? If FC flick is noticeable on your setup then that must mean that the beans vapor release just before and during the first few seconds of FC must cause the surrounding roasting air to also be affected. I still haven't taken the time to check rotation of the fan wheel of my TO. Will get that tomorrow. 1/2 lb and 1 lb drum, Siemens Sirocco fluidbed, presspot, chemex, cajun biggin brewer from the backwoods of Louisiana
|
|
|
|
| allenb |
Posted on 02/05/2022 12:59 PM
|
|
Administrator Posts: 3858 Joined: February 23, 2010 |
Quote renatoa wrote: Attached diagram probably already known, but worth posting one more time for those new to TO. Also, not clear yet the effect of the new added centrifugal airflow to the lid generated vortex. Are they in the same directions, or opposite ? ~~~ In your attached TO drawing, it depicts hot air leaving the hot air blower wheel somewhat horizontally and slightly angling down. This is not the case with mine as it has a stainless vertical shroud ring encircling the halogen tube which only allows the leaving air to discharge downward. I'm sure since it's a spinning vortex, it quickly spreads out to the outer wall of the roasting chamber so same effect. Measured the blower wheel rotation today and it luckily spins in the same direction as the rotating plate. 1/2 lb and 1 lb drum, Siemens Sirocco fluidbed, presspot, chemex, cajun biggin brewer from the backwoods of Louisiana
|
|
|
|
| renatoa |
Posted on 02/06/2022 2:41 AM
|
|
Administrator Posts: 3005 Joined: September 30, 2016 |
Quote allenb wrote: In a TO, you have the air leaving the TO head at X temperature but by the time it actually travels to the location of the bean bed, it has most likely done some mixing with returning air. Due to this, It sounds like it will take some trial and error to find the hottest spot? Nope, the two airflows are very well separated, found this in my early TO days experiments, when I built inside my oven something equivalent with aerodynamic tunnel. Model planes is my other hobby from the childhood. Basically, placed in various points of the oven and roasting pan strings like in this video: https://youtu.be/...1NP60?t=24 ... allowing me to see the airflow, as is in the diagram above. In the center is the strongest airflow, the suction of the turbine of the lid. And is almost straight vertical. On the walls the descending airflow is not vertical as in the diagram, but a spinning vortex, in a very sharp angle, almost horizontal, as the air is ejected from the turbine. Surely I don't see significant mixing between the two airflows, there is no strings tilting suggesting this. The center column is very well defined by the turbine entrance diameter, the strings outside this area are tilted to the center, there is not turbulence at the roasting pan peripheral making them tilt outside, to the walls. Similarly, the outer airflow is very well defined by the walls, the centrifugal forge effect is visible at least 10 cm deep from the lid. My oven being 12 cm high, I suspect that the only factor that change the direction is the bottom corner, as in the diagram. The hot air enters under the perforated roasting pan, and pass through the coffee bed, sucked by the central column. Quote allenb wrote: If FC flick is noticeable on your setup then that must mean that the beans vapor release just before and during the first few seconds of FC must cause the surrounding roasting air to also be affected. Because vapor is sucked up vertically in the central column, and the ET probe is placed immediately above the bean bed, it should follow very accurate the evolution of hot air leaving beans. Edited by renatoa on 02/07/2022 7:59 AM |
|
|
|
| renatoa |
Posted on 02/06/2022 2:58 AM
|
|
Administrator Posts: 3005 Joined: September 30, 2016 |
Quote allenb wrote: In your attached TO drawing, it depicts hot air leaving the hot air blower wheel somewhat horizontally and slightly angling down. This is not the case with mine as it has a stainless vertical shroud ring encircling the halogen tube which only allows the leaving air to discharge downward. I'm sure since it's a spinning vortex, it quickly spreads out to the outer wall of the roasting chamber so same effect. Sincerely, without doing any test, my aerodynamic background cries it would not happen, if that ring is about 2 cm high, as I seen in some pictures of such lids. The EU models does not have that ring. The vortex will go to the walls immediately how it escapes from the ring, as you well guessed. To avoid all this uncertainty, I suggest you to make some measurements of the empty machine inside temperature, in the bottom center, as approximate you can define the position "above the beans", and build a temperature-power level table. Then do the first roasts based on that table, without any measurement. This was one of the stages I went through during my experiments, before TC4ESP project. |
|
|
|
| allenb |
Posted on 02/06/2022 9:02 AM
|
|
Administrator Posts: 3858 Joined: February 23, 2010 |
The shroud is easily removed and isn't needed to support the protective screen. This would bring it in line with EU TO designs? I can't see this causing any heat transfer problems in regards to sufficient heat removal from the halogen ring as the blower wheel radial face is exactly in line with the halogen ring and air would flow directly across the ring and out to the pot walls.
1/2 lb and 1 lb drum, Siemens Sirocco fluidbed, presspot, chemex, cajun biggin brewer from the backwoods of Louisiana
|
|
|
|
| renatoa |
Posted on 02/06/2022 10:37 AM
|
|
Administrator Posts: 3005 Joined: September 30, 2016 |
How high is your pot ? This will decide the balance of IR versus convection. The addition of IR changes things significantly... I can give you numbers from my setup only, as a guideline. For a lamp to beans distance of 8 cm. The same roast that needed 72-75% power levels for 10-11 minutes with screen plate mounted, take 8-9 minute with 65% power with screen removed at all. Also, different power management cases: with IR you should reduce power as FC approaches, as for a conventional roaster, with convection you can keep power flat from DE to the end. Edited by renatoa on 02/07/2022 2:12 AM |
|
|
|
| Koffee Kosmo |
Posted on 02/06/2022 4:53 PM
|
|
Administrator Posts: 1620 Joined: December 31, 2008 |
The amount of heat available from the TO is closely related to the overall volume of the roast chamber for best roast results Greater volume will result in baking not roasting To small a volume and the roast will burn So look at my thread for all the details regarding ideal volume KK I home roast and I like it. Designer of the KKTO
Roaster Build information https://homeroast...ad_id=1142 https://docs.goog...lide=id.i0 Blog - http://koffeekosm...gspot.com/ Bezzera Strega, Mazzer Robur Grinder, Pullman Tamper Convex, (KKTO) Turbo Oven Home Roaster. |
|
|
|
| renatoa |
Posted on 02/07/2022 2:10 AM
|
|
Administrator Posts: 3005 Joined: September 30, 2016 |
Indeed, volume is a key factor, especially for a majoritar convective roasting, where heat losses are significant, and walls are mandatory to be insulated. And also the agitation is critical, I got uneven roasts easily until the paddle was been finely tuned for the available RPM. For IR roasting, because energy hits the beans directly, insulation is less critical, and roast is much more uniform, if the coffee bed is not higher than 3-4 layers, which equates to one pound greens in a 23 cm dia roasting area. When roasting using IR mainly convection role is more to ensure an uniform ambient, hot air is a lot less hotter than in case of convection roasting, at least 10 C degrees lower, that can be seen on chaff color, honey gold, instead dark brown. |
|
|
|
| allenb |
Posted on 02/07/2022 7:08 AM
|
|
Administrator Posts: 3858 Joined: February 23, 2010 |
Quote renatoa wrote: How high is your pot ? This will decide the balance of IR versus convection. The addition of IR changes things significantly... I can give you numbers from my setup only, as a guideline. For a lamp to beans distance of 8 cm. The same roast that needed 72-75% power levels for 10-11 minutes with screen plate mounted, take 8-9 minute with 65% power with screen removed at all. Also, different power management cases: with IR you should reduce power as FC approaches, as for a conventional roaster, with convection you can keep power flat from DE to the end. Lamp to beans is 12.7 cm. The screen is 90+ % open design with a very thin wire and openings around 4.76mm wide. There will be no appreciable loss of IR pass through with this screen. I've removed the stainless shroud. I'm not sure if I mentioned this but I have a radiant heater below the bean disk so if needed, I can also add some under-bean heat if the roaster lacks sufficient heating power. Interesting observations you've made with aerodynamics of vortex in a cylinder produced by a turbine. 1/2 lb and 1 lb drum, Siemens Sirocco fluidbed, presspot, chemex, cajun biggin brewer from the backwoods of Louisiana
|
|
|
|
| renatoa |
Posted on 02/07/2022 7:58 AM
|
|
Administrator Posts: 3005 Joined: September 30, 2016 |
So you will have "contact" transfer too  I'm envious ...  |
|
|
|
| allenb |
Posted on 02/07/2022 9:58 AM
|
|
Administrator Posts: 3858 Joined: February 23, 2010 |
Quote Koffee Kosmo wrote: The amount of heat available from the TO is closely related to the overall volume of the roast chamber for best roast results Greater volume will result in baking not roasting To small a volume and the roast will burn So look at my thread for all the details regarding ideal volume KK Ok, diameter of pot is 10". Depth from top rim to bean disk is 7.5". Comes out to 8.013 liters. in reading one of your earlier threads on TO design, ideal volume is 7-9 liters. 1/2 lb and 1 lb drum, Siemens Sirocco fluidbed, presspot, chemex, cajun biggin brewer from the backwoods of Louisiana
|
|
|
|

Page 1 of 2: 12
| Jump to Forum: |
Similar Threads
| Thread | Forum | Replies | Last Post |
|---|---|---|---|
| Kaleido Roaster PID parameters | Roasting Coffee | 2 | 04/13/2024 3:07 PM |
| Skywalker roaster mods | Other Roasters | 293 | 04/07/2024 4:31 PM |
| Skywalker, the ALM chinese one pound roaster | Other Roasters | 215 | 04/02/2024 1:48 AM |
| My first popcorn mod roaster (vahegan) | Fluidbed Roaster | 48 | 03/24/2024 12:04 PM |
| Fatamorgana electric drum roaster | Other Roasters | 2 | 03/24/2024 10:03 AM |
Powered by PHP-Fusion Copyright © 2024 PHP-Fusion Inc
Released as free software without warranties under GNU Affero GPL v3
Designed with ♥ by NetriXHosted by skpacman