
Login

Shoutbox
You must login to post a message.
renatoa
04/18/2024 12:36 AM
bijurexim, greyberry2, N C, 
renatoa
04/17/2024 9:27 AM
 , branchu
renatoa
04/14/2024 5:56 AM
TheOtherJim and papajim,
 !
!
!allenb
04/11/2024 6:33 PM
Zemona

renatoa
04/11/2024 9:19 AM
Mrbones and sgupta,  ?
?
?Forum Threads
Newest Threads
Rainfrog's Roastmast...War on Farmers by Su...
Kaleido Roaster PID ...
Green coffee sellers
Wet beans - Estimati...
Hottest Threads
| Skywalker roaster... | [292] |
| Skywalker, the AL... | [214] |
| Skywalker Roasts | [94] |
| Rainfrog's Roastm... | [53] |
| My first popcorn ... | [47] |
In Memory Of Ginny

Donations
Latest Donations
dmccallum - 10.00
JackH - 25.00
snwcmpr - 10.00
Anonymous - 2.00
Anonymous - 5.00
dmccallum - 10.00
JackH - 25.00
snwcmpr - 10.00
Anonymous - 2.00
Anonymous - 5.00
Users Online
Guests Online: 1
Members Online: 0
Total Members: 8,211
Newest Member: bijurexim
Members Online: 0
Total Members: 8,211
Newest Member: bijurexim
View Thread
Who is here? 1 guest(s)
 SR540 - Ideal profile (time and temperature)
|
|
| Salemme12 |
Posted on 01/24/2022 7:42 PM
|
|
Newbie  Posts: 9 Joined: January 24, 2022 |
Hi, I bought an sr540 in 2021 and have been experimenting with many different roast profiles for the last 6 months or so. I've learned a lot on this site, however, I don't think anyone has really nailed down a good standard profile to use on the sr540. I've roasted about 50 batches at this point and there has been a lot of trial and error, but also trial and success. I thought it would be helpful to share my successful batches here so others could use this as a starting point. I am also hoping for comments on how I can further improve cupping or any ideas on how to further tweak my current target profile. I recorded and saved my 4 best batches in an excel file that I can hopefully attach here as a picture for others to see. A few things to point out first. My preferred roast is light to medium and I tend to enjoy Ethiopian coffees that have a lot of berry and citrus flavor bursting out. I find dry process to be my go to, though I like a lot of washed process as well. In regards to green bean, I get mine from Sweet Maria's. I pretty much always start with 130g of green bean and the fan on 9, with the power on 1. Different outlets in your home will provide different heating levels, but my typical goal is to spend about 4 minutes in the drying phase, then start to slowly ramp up the power at an even rate or rise (RoR), with a targeted first crack (FC) at around 9 minutes. I accomplish this by lowering the fan speed or increasing the power every 30 seconds. I usually won't bring the fan down below 7 because I want to keep enough movement in order to avoid an uneven roast. After adjusting the fan and power every 30 seconds, I usually end at Fan 7, Power 9 or Fan 8, Power 9, depending on temperature and FC. FC usually happens at around 405-415 degrees on my machine. Once FC is reached, I tend to allow for 1 minute of development, but I really just watch closely and pay attention. Sometimes I develop for 45 seconds, sometimes 90 seconds, so it just depends on the bean really. I have made several really good batches with this method. It is very easy to mess up a batch though - a few extra tips: if you try to go too hot right out of the gate and don't allow for a long enough drying phase, you will end up with a very grassy tasting coffee. I made this mistake for a solid month since most sites recommend starting the sr540 with very high power. That hardly ever works, maybe is okay for a dark roast but certainly not for a light/medium. Where I tend to mess up now is when I get to FC, sometimes I don't get the temperature to keep increasing enough and I've had coffees come out more flat or bland due to a misstep at the very end. It has certainly been hit or miss but I've really enjoyed the process and have learned a lot and also had some delicious unique coffees along the way. I know this is a very long post but I hope it is helpful for any beginners starting out with an sr540 or other fluid bed roaster. I would love to hear any feedback from professionals who may be able to help me tweak this even further and strengthen my ideal profile. Thanks for all the help to everyone on this site!
Salemme12 attached the following images:


|
|
|
|
| renatoa |
Posted on 01/25/2022 1:19 AM
|
|
Administrator Posts: 3005 Joined: September 30, 2016 |
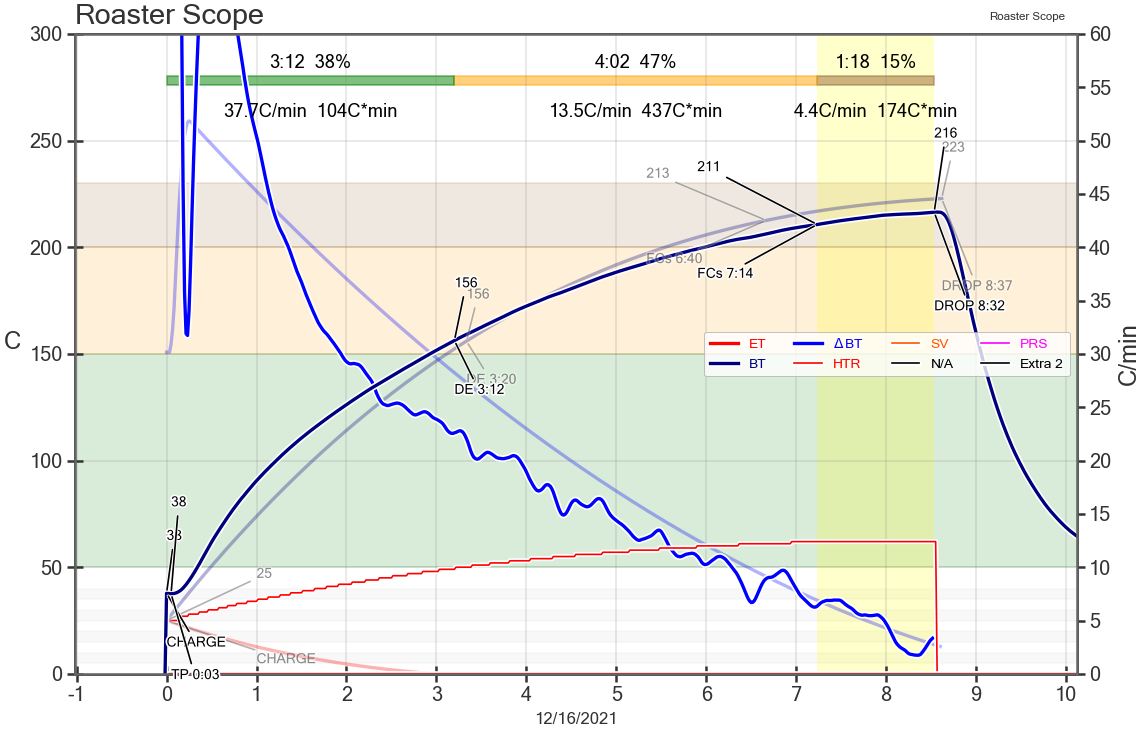
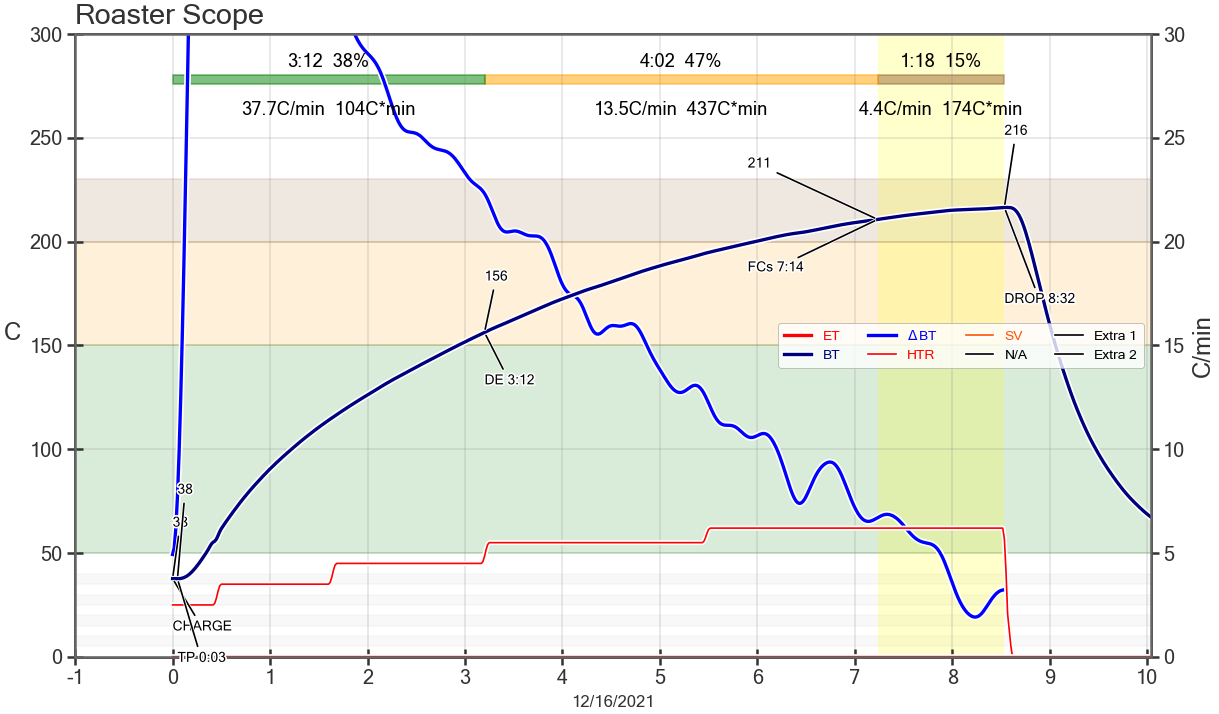
Welcome ! For such commercial machine, where the roasting details aren't very well technical documented, and I don't want to open or mod, I would buy a wattmeter adapter fitted mains plug, like this: www.amazon.com/Me...ref=sr_1_8 ... and build a table with the heater levels-power equivalents. Next thing you should know is that in a FB machine the power profile is very close to the roasting profile you want to achieve... IF !!! ... the airflow in constant ! Having this info in hand you can make power level changes to approximate as best possible, the roasting profile you want. You should be aware that the resulting roasting profile will be stepped though, and not continuous. An example of such approach is in the attached image. The lower graph, with red line is power level, starts from 25% and ramp to 61%, almost in the same shape as the profile. The machine power is 2000W and load is 100 grams. Related to your thread subject, there is no ideal, one profile roast them all. Without knowing the power for level 1, at first read a bell sound for me: he stays too much in dry phase.  And the whole is too long (for a hot air machine). I would adjust power dose to bring FC under minute 8. ~~~
renatoa attached the following image:
|
|
|
|
| Salemme12 |
Posted on 01/25/2022 10:40 AM
|
|
Newbie Posts: 9 Joined: January 24, 2022 |
Thanks, renatoa. So are you saying it is more important to monitor the kWh produced by the machine? And by constant airflow, are you suggesting that I keep the fan speed the same the entire roast? Also, how long should my target drying phase be? FC at 7-8 minutes is better? I will look into that power adapter, however, can't I just monitor air temperature and also have a target RoR to reach FC by the desired time? Is there a good target for RoR during the roasting phase - does 15-20 degrees Fahrenheit RoR per minute make sense? |
|
|
|
| renatoa |
Posted on 01/25/2022 11:03 AM
|
|
Administrator Posts: 3005 Joined: September 30, 2016 |
Quote So are you saying it is more important to monitor the kWh Not exactly to monitor each roast the kW, but to have an idea what power is every level, and change them according to desired profile, not blind try and error. As an example, if you check the same roast graph attached, where I changed a bit the power levels, from a continuous evolution, to a stepped evolution, as a SR machine levels. The power start from level 2 and step up to level 6, assuming each step is 10% power. Such technique allows you to find precise moments of power changes for an intended profile, instead whole minutes, as in the roast log excerpts below: Code Download source 00:28 55.01 25 0 Quote ... by constant airflow, are you suggesting that I keep the fan speed the same the entire roast? Yes, constant airflow is same fan for the whole roast, is how I did the roast from the graph. Quote how long should my target drying phase be? Plan for 3:30-3:45 for each phase, dry and brown, to have FC in the 7-7:30 ballpark, and see how it taste. Quote ...can't I just monitor air temperature... If you have any means to measure something, sure, will be useful, but how accurate and reliable it is ? How much temperature is from air and how much from beans ? You can see in the graph that Dry End is at 156 C and Fc at 211 C, which are both very unusual levels... too much air in the measurement point, that is... I found that power levels measurement give me more accurate info than measured temperatures. Quote Is there a good target for RoR during the roasting phase - does 15-20 degrees Fahrenheit RoR per minute make sense? RoR value change for each phase of roast... during dry we have an average of about 60-70F per minute, during brown phase about 30F/minute, and during development about 10-15F, even 20. The lower figures that are frequently quoted from the internet, i.e. 40-20-10, are for drum roasters, with longer times. Fluid bed machines being faster have higher RoR figures.
renatoa attached the following image:
Edited by renatoa on 01/25/2022 11:39 AM |
|
|
|
| Salemme12 |
Posted on 01/25/2022 1:53 PM
|
|
Newbie Posts: 9 Joined: January 24, 2022 |
Thank you very much for this additional feedback, renatoa. I have purchased the wattmeter adapter you recommended and plan to try to achieve a roast profile closer to what you are describing. I just have a few more clarifying questions. How do you tell when the drying phase ends aside from just by looking at the color of the beans? On the profile you attached, it shows DE @ 3:12 with a temperature of 313F and FC @ 7:14 with a temp of 411F. What is unusual about that? I hit FC around 410F every time I roast. Also, that would be ~25F RoR per minute during brown phase. Additionally, as others with the SR540 will attest, it is difficult to keep the temperatures low and so I usually start with the fan on maximum speed and power on the lowest setting. However, in order to increase temp and hit FC, I ultimately need to lower the fan speed. So it is difficult to keep airflow constant throughout on the SR540. I do think it will be helpful to monitor both power output and temp going forward though. Thanks! |
|
|
|
| renatoa |
Posted on 01/26/2022 2:18 AM
|
|
Administrator Posts: 3005 Joined: September 30, 2016 |
Noooope !!! not copy my profile, because machines are different as power and airflow ! Please, first build the power-level table, then let's analyse a bit, focusing on your existing roasts. Quote How do you tell when the drying phase ends aside from just by looking at the color of the beans? I don't, it is stamped automatically by Artisan on the graph, after the fact. The roast is done with a custom controller, without a computer. Quote ...FC @ 7:14 with a temp of 411F. What is unusual about that? I hit FC around 410F every time I roast. Yep, because both are high airflow machine. On a classic setup, like a drum, the "standard FC" happens under and close to 200C/400F. Quote it is difficult to keep the temperatures low and so I usually start with the fan on maximum speed and power on the lowest setting. This means the level 1 of heater on SR540 is set too high by the factory... it should be under 600W for 100 grams, your measurements will confirm this... or not... On my machine where the heater levels are under my total control, the start power level is 500W, this is 25% of 2000W. There is nothing bad to start with a higher level of power, if the air temperature for this level don't exceed 200C/300F. It's an usual load temperature in a commercial roaster. Maybe your need to increase the power so much on the final is because you keep beans so much on level 1, and they don't accumulate enough heat. Is exactly the reverse of a typical roast strategy, where heat is pumped in excess at the beginning of roast, and lowered a bit at the end. You can see from the stepped graph that it was already to level 4 (45%) in the second minute, not after 4-5 minutes... Edited by renatoa on 01/26/2022 4:38 AM |
|
|
|
| renatoa |
Posted on 01/26/2022 2:28 AM
|
|
Administrator Posts: 3005 Joined: September 30, 2016 |
"Kids do crazy things... when home alone" Look at this guy roasts, 5-6 minutes the whole cycle, with power set at NINE !!! from the beginning, and not changed at all... he plays with the fan only |
|
|
|
| Salemme12 |
Posted on 01/26/2022 9:57 AM
|
|
Newbie Posts: 9 Joined: January 24, 2022 |
I roasted 3 batches last night (130g per batch) with an attempt to lower the drying phase to roughly 3:30 and hit FC by 7:00. First batch hit FC at around 6:45, 2nd batch around 7:55, and 3rd around 7:00. I then allowed around 1:00-1:15 of development time based on color and smell. I achieved this by starting with fan on 9 and power 1 as I usually do and then at 3:30 I lowered the fan and increased the power gradually every 30s. I will see how cupping is after at least 5 days of rest. In regards to the video above and starting at fan 9, power 9, that is a terrible method that is what most sites recommend. This is my reason for originally posting here because most recommendations for the sr540 are not helpful. I tried that type of method for my first 20+ roasts and it almost always results in a grassy taste and poor quality unless you roast dark, which I don't prefer. Doing that essentially skips the drying phase completely and the beans are roasted well on the outside but not thoroughly cooked. My method of high fan and low power for the first several minutes and then ramping up has yielded very good results. One I get my wattmeter adapter I will roast a few more batches and revert back with my results and stats. Thanks! |
|
|
|
| Salemme12 |
Posted on 01/26/2022 10:09 AM
|
|
Newbie Posts: 9 Joined: January 24, 2022 |
Also, as noted in that video you shared, every machine is different. He mentions at the end that when they compared temperatures they were only getting up to like 380 something. My machine has shown temps up to 440 and I'm sure I could get it higher too. So maybe they go max power entire roast because they can't get it hot enough whereas I don't have that problem. |
|
|
|
| renatoa |
Posted on 01/26/2022 11:02 AM
|
|
Administrator Posts: 3005 Joined: September 30, 2016 |
I have no more comments until I see your machine power value for level 1. |
|
|
|
| Salemme12 |
Posted on 01/27/2022 7:26 PM
|
|
Newbie Posts: 9 Joined: January 24, 2022 |
So I hooked up my roaster to the wattmeter adapter and here are the power outputs based on various settings. Please note that I tested the machine watts without any beans in the chamber. Fan 9 Power 1 = 1400W F8P1 = 1388W F7P1 = 1365W F7P2 = 1417W F7P3 = 1464W F7P4 = 1502W F7P5 = 1539W F7P6 = 1585W F7P7 = 1610W F7P8 = 1657W F7P9 = 1700W F8P9 = 1710W F9P9 = 1730W |
|
|
|
| Salemme12 |
Posted on 01/29/2022 11:14 AM
|
|
Newbie Posts: 9 Joined: January 24, 2022 |
Following up here, I roasted a batch of Sumatra Dry process Gunung Tujah this morning, using the wattmeter and taking some of the advice above. I had originally roasted a batch of this last week hitting FC at 9:20 and initiating the cool-down at 10:10. This was a shorter development time, however, it came out delicious. Still, I decided to try roasting with a shorter drying phase and higher RoR. I ended up hitting FC just before 8:00 and allowing 1:15 of development. The roast appears excellent with a very even looking roast at a city+ to full city roast level. Here is the information during the roast: 0:00 Fan 9 Power 1 1390W 3:30 dropped to Fan 7 Power 2, 1400W, 328F 4:30 F7P4, 1490W, 359F 5:30 F7P6, 1560W, 378F 6:30 F7P8, 1640W, 392F 7:30 F7P9, 1665W, 410F 8:00 F6P9, 1660W, 417F 8:30 F6P9, 1660W, 430F 9:00 F6P9, 1660W, 435F Upon FC, I ultimately decided to lower the fan once more to level 6 in order to avoid a crash in RoR. I shall see how this one tastes compared to my other successful batch in a few days. In the meantime, I would love to hear any thoughts on these power levels and how I can manipulate them. |
|
|
|
| Salemme12 |
Posted on 02/01/2022 10:57 AM
|
|
Newbie Posts: 9 Joined: January 24, 2022 |
Quote Any further thoughts here?? |
|
|
|
| CafficitoeTim |
Posted on 06/05/2022 1:17 PM
|
|
Newbie Posts: 1 Joined: May 12, 2022 |
Hi, I stumbled upon this thread that you posted while searching online for sr540 roast profiles. I really appreciate you putting this out there. I feel like I can relate to a lot of what you talked about. You're a bit ahead of me - so I thought I'd reach out and ask for some advice. I'm new to roasting and have a new sr540. I've had my sr540 for about 2 months and have roasted about 15 times so far. These first several batches have been mostly just experimental (just getting the hang of how the machine works). The results of these roasts have been very hit or miss (mostly miss). But, that's ok. Just part of the learning process. I've tried and worked with your profiles that you posted for my last 5 roasts. Starting at high fan/low power. Leaving the top open. Trying to dry process for the first several minutes. Then adding power every 30 seconds. Results have been better. But, so far just "ok" overall. Leaving me with a slightly over-roasted aftertaste. I want to learn the best way to roast light with this machine from those who have spent a lot of time exploring their sr540's. Of course I understand that there is no ideal, one roast profile. But, a light roast profile that works consistently is what I'd like to explore. I also mostly like light roasts. And tend to (like you) enjoy Ethiopians "coffees that have a lot of berry and citrus flavor bursting out". I'm really going for big floral and fruity flavors that leave me with a pleasant aftertaste to walk around with. And I understand that there is not simply just one profile to follow. And that every roast is different. But, a light roast strategy with this machine I feel is really important for me to follow (especially for me just starting out). I have questions and I'd love to hear and learn about which profiles have worked for you. Where you are now, and where roasting with this machine has taken you? |
|
|
|
| MarcBerm |
Posted on 03/02/2023 10:52 AM
|
|
Newbie Posts: 2 Joined: March 02, 2023 |
Attached are my results from testing the SR540 for temperature and power draw at each combination of fan speed and power level. I performed this test when other electrical loads in the house were minimal, periodically checking to make sure that voltage and frequency remained relatively constant. It's worth noting that "every roast is unique" is true, having as much to do with variability in the power supply as it does variability in the beans. It's not just different outlets and extension cords, because power can vary throughout the day and year within any given home due to influences both inside and outside the home. Even with sufficient power at the panel, other high-demand electrical appliances running at the same time as an electric roaster will affect the apparent power draw, because the voltage and sometimes frequency available to the roaster will be reduced. Just as the temperatures at each power level are highest at the lowest fan speeds, I'm sure the temperatures here would be significantly higher if there were 130 grams of beans acting to further obstruct airflow through the roaster. I thought about trying to use some kind of dried legumes that would be resistant to burning as a stand-in for coffee beans, but decided against it in the end. Maybe for a future test though. I am new to roasting and have only done a couple of roasts so far. The high variability in opinions on roast profiles and settings highlighted the need for me to start with the best objective test data I could gather from the machine itself, and so I present it here for the benefit of anyone else who may find it useful.
MarcBerm attached the following image:

|
|
|
|
| renatoa |
Posted on 03/02/2023 1:40 PM
|
|
Administrator Posts: 3005 Joined: September 30, 2016 |
It's strange to see you don't reach 400F on any combination... Probably empty chamber factor plays a role in this A way to simulate beans resistance to airflow, without effective roasting, could be to use clay granules as a load. |
|
|
|
| allenb |
Posted on 03/02/2023 2:35 PM
|
 Administrator Posts: 3858 Joined: February 23, 2010 |
Welcome Marc to HRO! Glad to have you on board. I'm not sure how many Freshroast users we have these days but hopefully some will chime in to give you tips for best way to handle the SR540. Are you able to control the roaster well enough to allow slowing it down to hit at least a 7 or 8 minute roast? renatoa, in looking over a few reviews of the roaster, the temperature displayed does not equate to the actual temperature hitting the beans. It seems to read low by at least 50 degrees F and as much as 100 degrees. Due to this, it is really only valuable as a reference tool, and not to be taken as an actual real measured temperature. 1/2 lb and 1 lb drum, Siemens Sirocco fluidbed, presspot, chemex, cajun biggin brewer from the backwoods of Louisiana
|
|
|
|
| MarcBerm |
Posted on 03/03/2023 8:57 AM
|
|
Newbie Posts: 2 Joined: March 02, 2023 |
Quote renatoa wrote: It's strange to see you don't reach 400F on any combination... Probably empty chamber factor plays a role in this A way to simulate beans resistance to airflow, without effective roasting, could be to use clay granules as a load. I was thinking the same thing. I suspect a combination of empty chamber and underreporting of temperature by the machine itself, which apparently it's known to do. Quote allenb wrote: Are you able to control the roaster well enough to allow slowing it down to hit at least a 7 or 8 minute roast? Yes, but I don't feel like I have a very consistent experience trying to control it, and so I set out to make this chart as a jumping off point for reference. Quote allenb wrote: It seems to read low by at least 50 degrees F and as much as 100 degrees. Due to this, it is really only valuable as a reference tool, and not to be taken as an actual real measured temperature. This tells me it's probably worthwhile to do another round of testing with a full chamber and maybe even a separate temperature probe. For now, I'm happy to have just a general idea of the temperature spread across the various settings, though I might do some spot checks with a full chamber just to see if there's a pattern to empty vs. full temps that can be applied across the board (though I doubt it'll be that simple). |
|
|
|
| allenb |
Posted on 03/03/2023 9:14 AM
|
|
Administrator Posts: 3858 Joined: February 23, 2010 |
Quote This tells me it's probably worthwhile to do another round of testing with a full chamber and maybe even a separate temperature probe. For now, I'm happy to have just a general idea of the temperature spread across the various settings, though I might do some spot checks with a full chamber just to see if there's a pattern to empty vs. full temps that can be applied across the board (though I doubt it'll be that simple). Something to really drill down on is to determine if the displayed temperature is consistent when using the same batch size and heat setting (tested with similar ambient air temps). If this proves to be good, then you really don't need to know the actual hot air temperature although it would be nice. The usefulness of the reading is to be able to repeat hot air profiles accurately from roast to roast so you remove as many variables as possible. Then you can alter the air temp as needed to experiment with slower or faster roasting curves to find the best cupping results. On that note, with most small fluidbed roasters including all of the ones I've built over the years, getting an actual, real roast chamber inlet temperature is very difficult due to severe stratification of the air stream. Move the sensor by 1/8" one way or the other and you can read a totally different number. I've seen a 100 F difference by moving my thermocouple tip 1/4" and I finally just left it there and used it for all future settings. 1/2 lb and 1 lb drum, Siemens Sirocco fluidbed, presspot, chemex, cajun biggin brewer from the backwoods of Louisiana
|
|
|
|
| Salemme12 |
Posted on 05/23/2023 7:28 PM
|
|
Newbie Posts: 9 Joined: January 24, 2022 |
Just to come full circle on this thread, I wanted to share my findings and success and what I have ultimately determined to be ideal. First, understanding the wattage that your electrical outlet is producing when you turn on your roaster is crucial for consistency. My family and I moved to a new home and I found that I had to adjust the settings on my machine to accommodate the change in power. The simple solution is to hook your machine up to a watt meter that you can get for like $15-20 online. Ultimately, I have deemed around ~1350-1400W of output to be the best starting point on the SR540 (assuming fan starts at highest setting - 9 - which is what you should start at). For my machine this is usually fan 9, power 2 or 3 - it actually depends on the day because the power output isn't always the same where I live. Again, it is very simple to turn on my machine when there is no coffee in the chamber and see what the watt meter says to make sure it is in that 1350-1400W range before starting my roast. You may have to test various outlets throughout your home to find the best one. Once that is nailed down as the starting point, here is my recommendation for roast profile: - 130g beans. - Start with fan 9, power depends on watt meter reading as mentioned above. - Monitor the Environmental Temperature (ET) throughout roast and aim to get up to 350* F no sooner than 1:00 but no later than 1:30. - After the first 1-1:30, you will either increase power or reduce fan speed in order to increase ET. Do this in steady increments - 1-2 notches of inc. power or 1 notch of dec. fan every minute or so. - Target is First Crack (FC) at ~6:00, though I have had very good results anywhere from 5-7:00 FC, but 6:00 seems to be the sweet spot across most coffees. - On my machine (it of course depends on the bean), most beans hit FC at an ET of 410-420* (this is extremely consistent for me for African & South American beans). - Once you know your machine you can figure out how to inc. power/dec. fan to hit FC in ~6:00. - It is important that as you are nearing FC, you reduce fan one notch as your final temp increase to make sure you have a good FC (I typically like to have fan around 8 and end around 7 but it depends on outlet wattage again). - For a City+ roast (between light & medium), which is where I usually start out, I typically will allow for 40-50s of development time, with my max ET hitting somewhere between 430-440*. -Once you finish the development time, hit the cool-down button and increase fan back to 9. A few final thoughts: Each bean is different and there is still some experimentation to determine the ideals for every bean. What I have outlined above is what I have found to be excellent across just about everything I roast. The only time I may alter this would be with certain Kenyan beans that need extreme delicacy on how fast you let your temperature rise in the early stages (not hitting 350* until 2:00 or later). I will also say that I am not a fan of dark roast coffee and never roast past full city (medium), but for anyone looking to get that jammy berry citrus-packed vibrant & complex cup that I so earnestly pursue, this is the way to achieve that. Edited by Salemme12 on 05/25/2023 2:44 PM |
|
|
|
| renatoa |
Posted on 05/24/2023 1:40 AM
|
|
Administrator Posts: 3005 Joined: September 30, 2016 |
Good post ! using effective power measurement instead % of a supposedly known and stable power is a bright idea ! Quote Salemme12 wrote: - Monitor the Environmental Temperature (ET) throughout roast and aim to get up to 350* F no sooner than 1:00 but no later than This is probably the equivalent of the "try to hit 100C BT at quarter of FC time" rule in drums world. For example 100C at minute 2 if target FC is minute 8. This is an indicator of the dry approach, if right or need power adjustment. Very rarely mentioned in roasting tutorials, even Rao removed from his course after debates with guy using machines with turning point around 100C during first minute. |
|
|
|

| Jump to Forum: |
Similar Threads
| Thread | Forum | Replies | Last Post |
|---|---|---|---|
| SR800/SR540 Fan Current TC4+ | Fresh Roast 8 and NEW SR 500 | 83 | 03/04/2024 8:15 PM |
| Roast Profile | Roasting Profiles | 11 | 12/27/2023 5:31 AM |
| Using a Fixed Profile Bob Books | Roasting Coffee | 8 | 11/12/2023 4:51 PM |
| Curious profile | Roasting Coffee | 5 | 07/25/2023 8:13 AM |
| Electric pourover scaa temperature | Preparing Coffee | 7 | 06/26/2023 10:43 AM |
Powered by PHP-Fusion Copyright © 2024 PHP-Fusion Inc
Released as free software without warranties under GNU Affero GPL v3
Designed with ♥ by NetriXHosted by skpacman