
Login

Shoutbox
You must login to post a message.
renatoa
05/04/2024 10:15 AM
ETaylor101,  ?
?
?renatoa
04/29/2024 1:50 AM
 , OptomAvad
allenb
04/26/2024 11:19 AM
Mongke

renatoa
04/26/2024 7:26 AM
 , bmartin1000
renatoa
04/25/2024 2:03 AM
AGZ and Intercolcoffee

Forum Threads
Newest Threads
My first roaster eve...Understanding the Curve
Skywalker, the ALM c...
War on Farmers by Su...
Lift blower
Hottest Threads
| Skywalker roaster... | [306] |
| Skywalker, the AL... | [215] |
| Rainfrog's Roastm... | [54] |
| War on Farmers by... | [41] |
| Understanding the... | [29] |
In Memory Of Ginny

Donations
Latest Donations
dmccallum - 10.00
JackH - 25.00
snwcmpr - 10.00
Anonymous - 2.00
Anonymous - 5.00
dmccallum - 10.00
JackH - 25.00
snwcmpr - 10.00
Anonymous - 2.00
Anonymous - 5.00
Users Online
Guests Online: 2
Members Online: 0
Total Members: 8,242
Newest Member: ETaylor101
Members Online: 0
Total Members: 8,242
Newest Member: ETaylor101
View Thread
Who is here? 1 guest(s)
 1 lb drum build
|
|
| JackH |
Posted on 02/09/2020 4:35 PM
|
 Administrator Posts: 1809 Joined: May 10, 2011 |
It is probably better to use a hosting site so you can place your photos where you want them in the text.
---Jack
KKTO Roaster. |
|
|
|
| Scooter75 |
Posted on 02/09/2020 4:50 PM
|
|
Newbie  Posts: 27 Joined: November 24, 2019 |
Well, I was able to post 2 of the 3 pics I wanted to. The 3rd just wouldn't load. I tried to post all 3 in the same post and wouldn't do it. That is why I had one post per picture. Tried the last pic and no dice, which was post #23. It showed up without the picture I attached. It followed the same format as the first 2. Also, if I had no text in the post it wouldn't post a picture by itself. Tried multiple times on my second and third posts. |
|
|
|
| JackH |
Posted on 02/09/2020 5:49 PM
|
|
Administrator Posts: 1809 Joined: May 10, 2011 |
It is strange. I have members that have trouble with photos and then I have this post with lots of photos posted: https://forum.hom...ad_id=5866 I sent you a PM. You can email me the photos and I will try to get them on the site. Sorry for the trouble. Edited by JackH on 02/09/2020 5:57 PM ---Jack
KKTO Roaster. |
|
|
|
| Scooter75 |
Posted on 02/28/2020 8:36 PM
|
|
Newbie Posts: 27 Joined: November 24, 2019 |
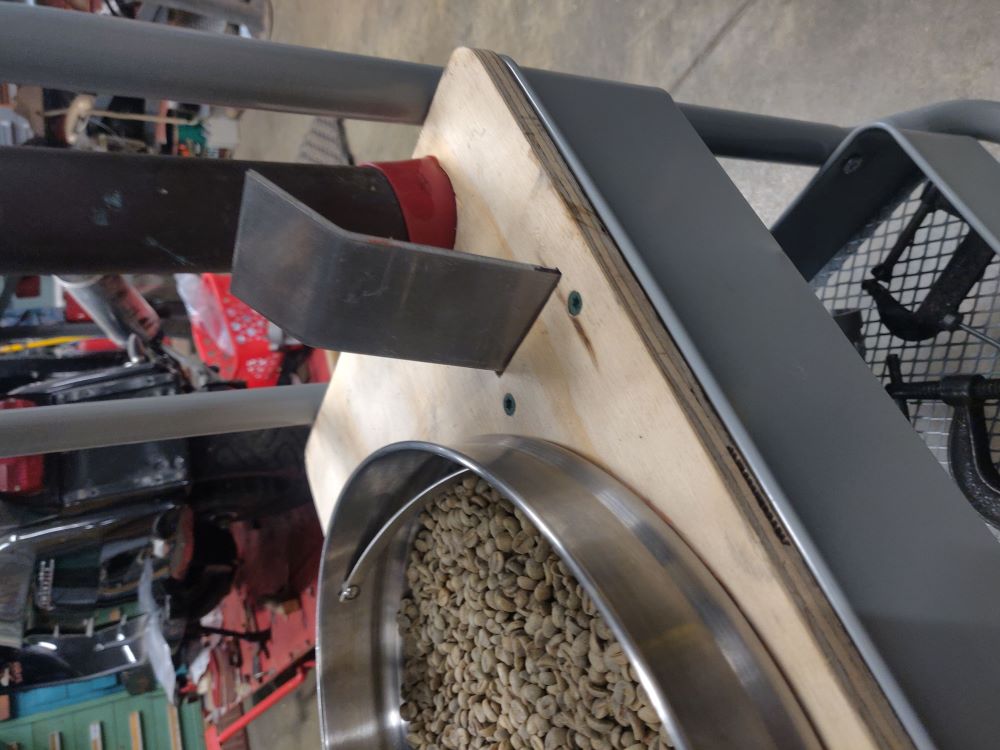
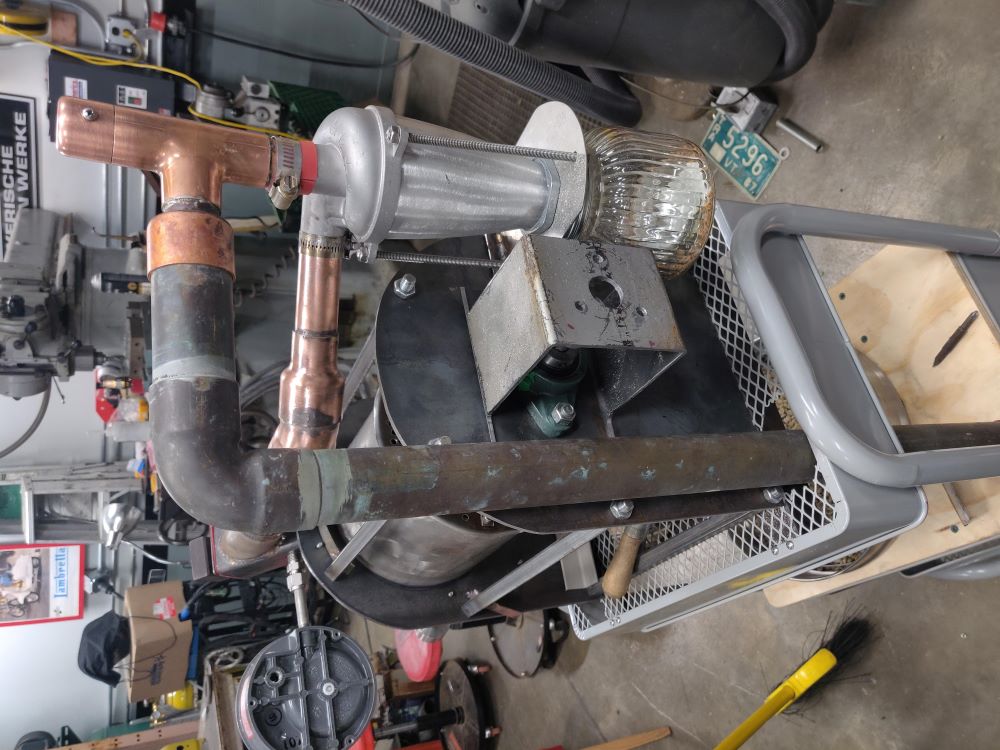
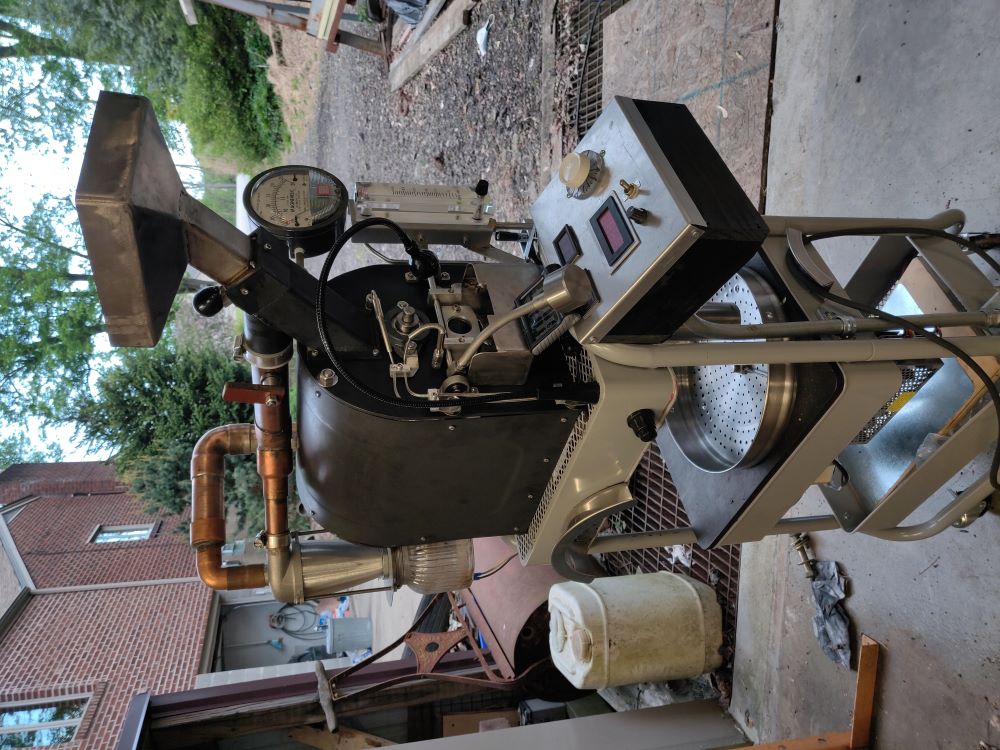
Been a little bit since i posted any updates so here it goes. pics goes from right to left, first pic is on the right last is on left to follow my description. I didn't realize that the pics would post last to first. Sorry, but i did figure out how to resize them and get them up! first pic is the funnel and drop door. Got the sightglass in and the funnel fabbed and fit. Going to mount this roaster on a cart, kinda like the 3 tier from Ikea. Top is the roaster, middle is going to be the cooling tray and fan, bottom is the catch all. second pic it the discharge chute to cooling tray. 2" ss tube. Found one of the aluminium dust separators on Amazon and using it for a chaff separator. last pics of it installed. It is coming along. next it to get the burner installed. The hole under the drop door is going to be the sightglass for it.
Scooter75 attached the following images:
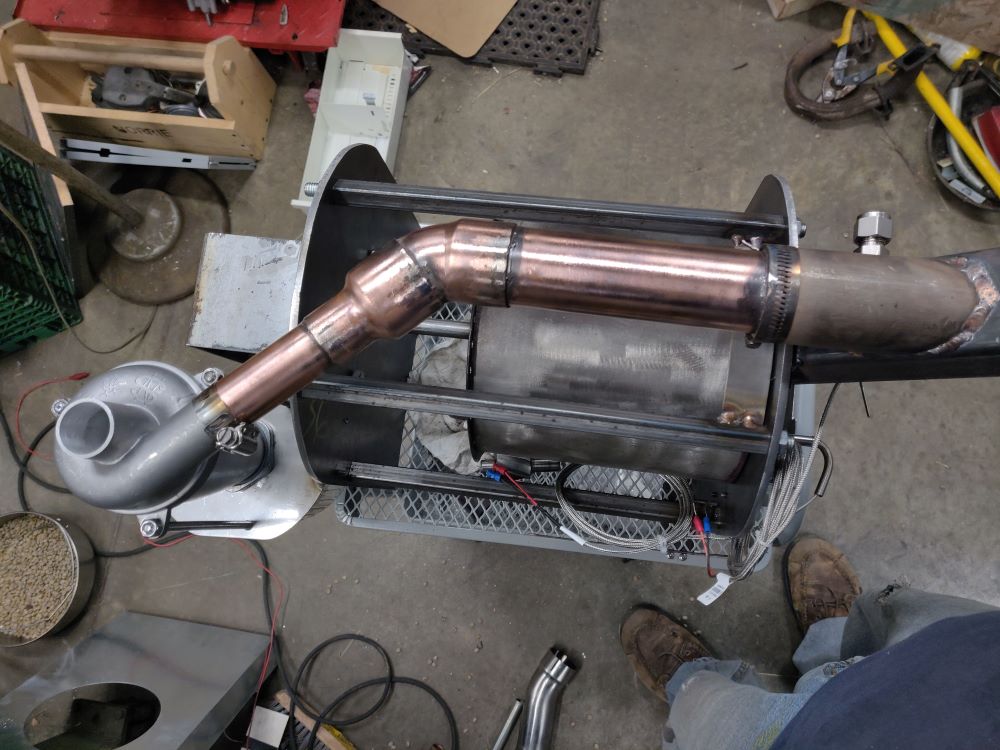

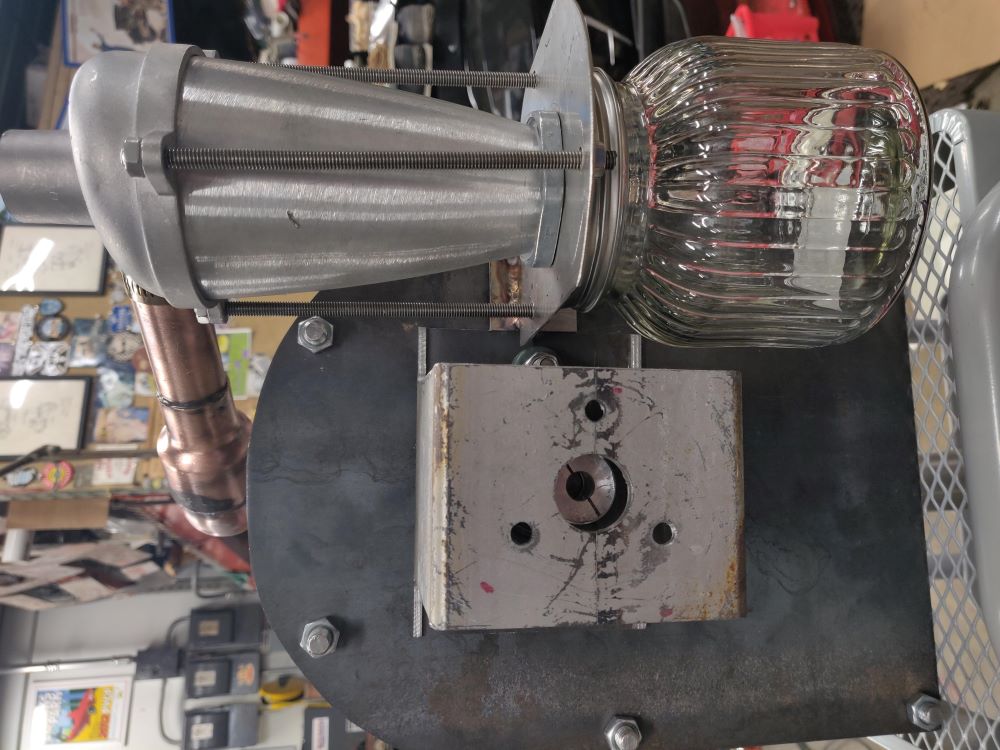
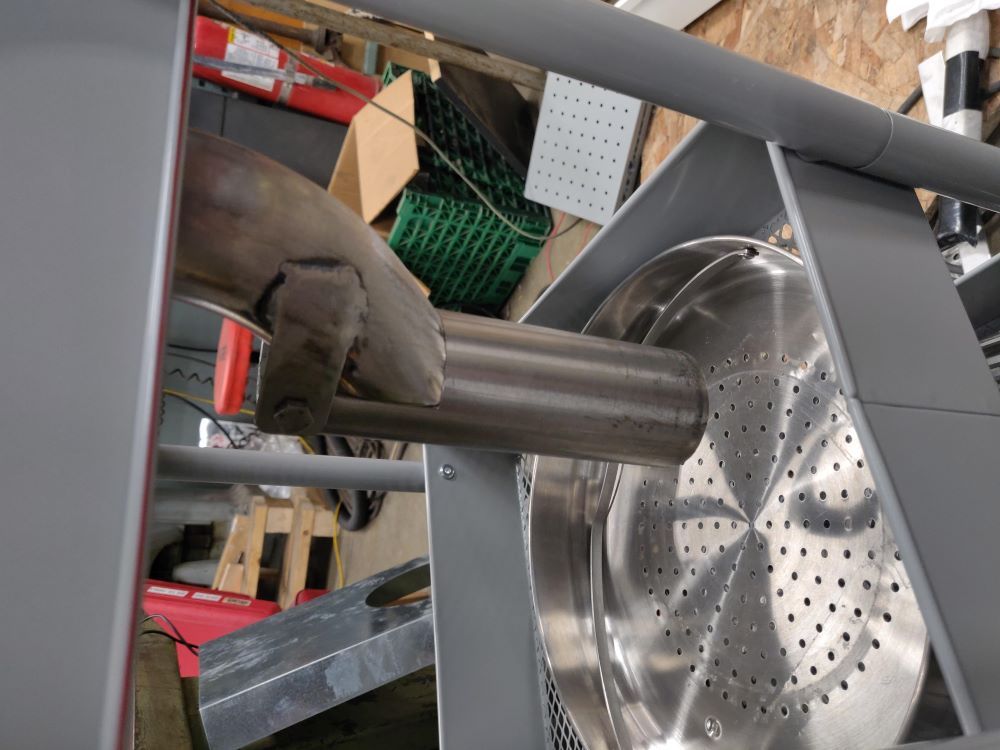
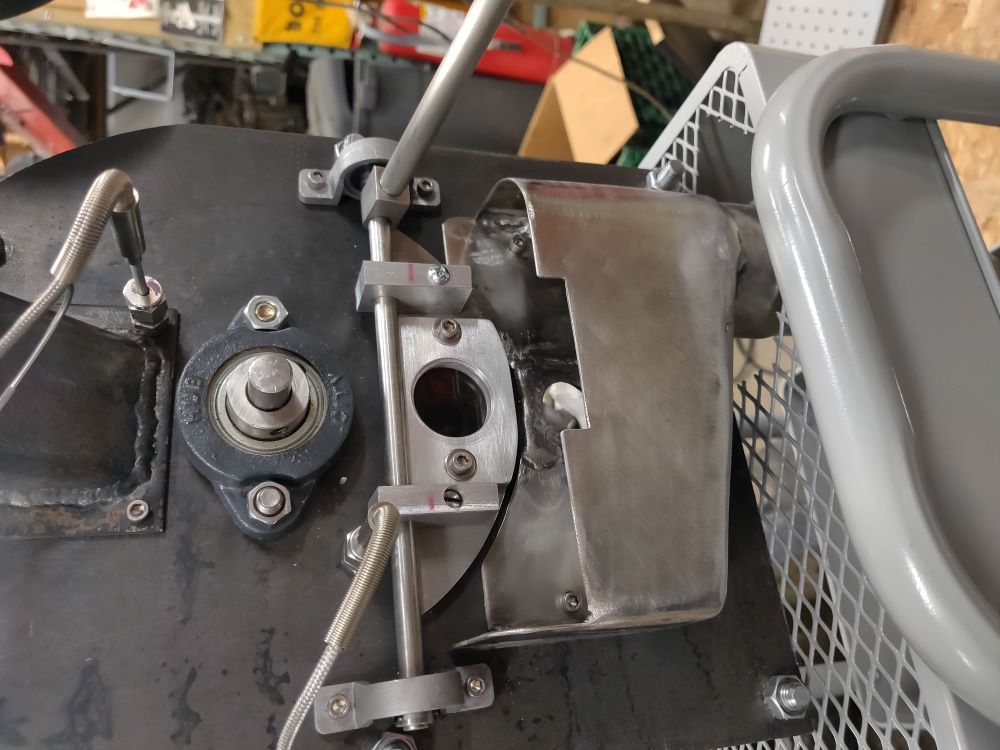
Edited by Scooter75 on 02/28/2020 8:41 PM |
|
|
|
| renatoa |
Posted on 02/29/2020 2:31 AM
|
|
Administrator Posts: 3017 Joined: September 30, 2016 |
What fan are you intending to use for cyclone exhaust ? |
|
|
|
| Scooter75 |
Posted on 02/29/2020 5:02 AM
|
|
Newbie Posts: 27 Joined: November 24, 2019 |
I have a draft fan from a furnace that I am going to use. |
|
|
|
| renatoa |
Posted on 02/29/2020 5:53 AM
|
|
Administrator Posts: 3017 Joined: September 30, 2016 |
Is there anything close for sale somewhere on the internet as we write ? If not handy for a picture, please can you describe in some words? Similar to a vac blower ? leaf blades, or centrifugal? size... ? cfm... Curious to hear how will adapt the 30 mm pipe of cyclone to this fan. |
|
|
|
| mkane |
Posted on 02/29/2020 12:09 PM
|
 1/4 Pounder  Posts: 151 Joined: October 23, 2017 |
big copper fittings
Always learning
|
|
|
|
| Scooter75 |
Posted on 03/01/2020 7:58 AM
|
|
Newbie Posts: 27 Joined: November 24, 2019 |
The fan will be built into a box on the middle tier. Pic of a fan similar to the one I am using: https://www.theac...tIEALw_wcB On the outlet of the cyclone I plan on having a 1" piece of copper pipe that I braze into a 1 1/2" tee. 1 1/2" stainless steel tube will fit inside the copper. Trim the SS tube to make a rotary damper in the tee and run one side of the tee down to the box the fan is mount in to draw suction. I know this is a little hard to picture so I will post pics when I have the materials to make it. Also plan on making another box next to the fan box that I can damp off and on to use as my cooling fan for the beans. My goal is to make this as small a foot print that I can. So far the only overhangs will be the control panel in the front, motor and cyclone in the back, and a small overhang on the right side for gas control. Edited by JackH on 03/01/2020 3:03 PM |
|
|
|
| renatoa |
Posted on 03/01/2020 8:43 AM
|
|
Administrator Posts: 3017 Joined: September 30, 2016 |
Yes, my goal too, small footprint, but so far didn't found any such motor in the 10 cm diameter of the cyclone, only leaf blade fans, for inline duct exhaust, that aren't as powerful as I like in the cooling phase... good for chaff, but not for fast heat exhaust. The fan you pictured here are at least 20 cm diameter the smallest... their inner hole is big enough to eat the upper part of cyclone  ... and too powerful I am afraid. ... and too powerful I am afraid. |
|
|
|
| Scooter75 |
Posted on 03/07/2020 10:22 PM
|
|
Newbie Posts: 27 Joined: November 24, 2019 |
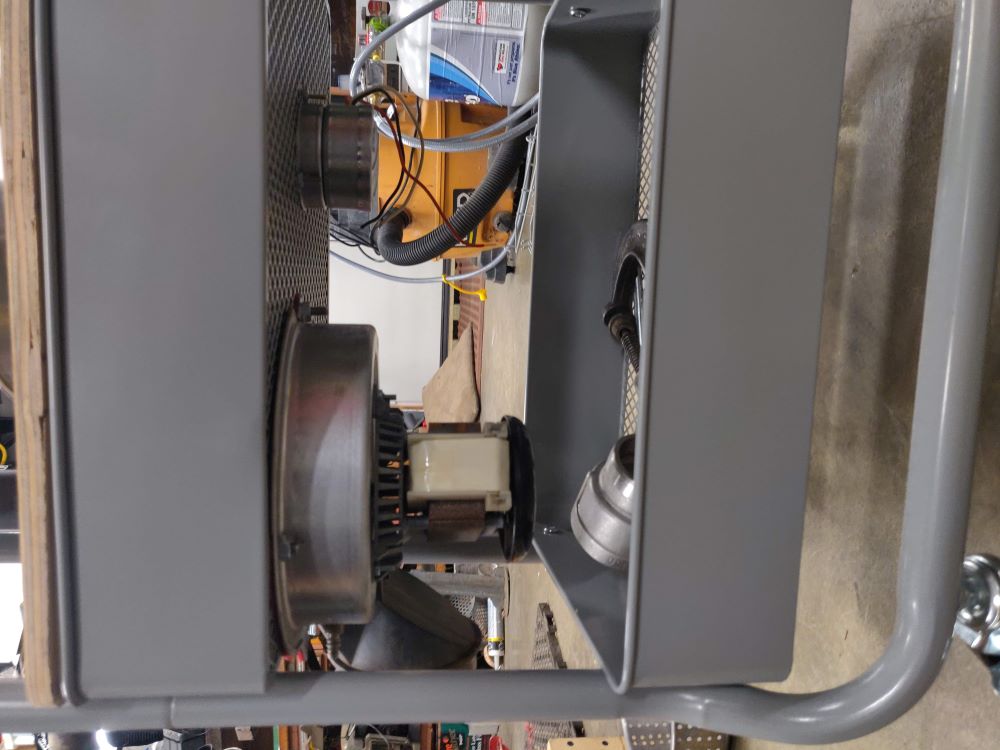
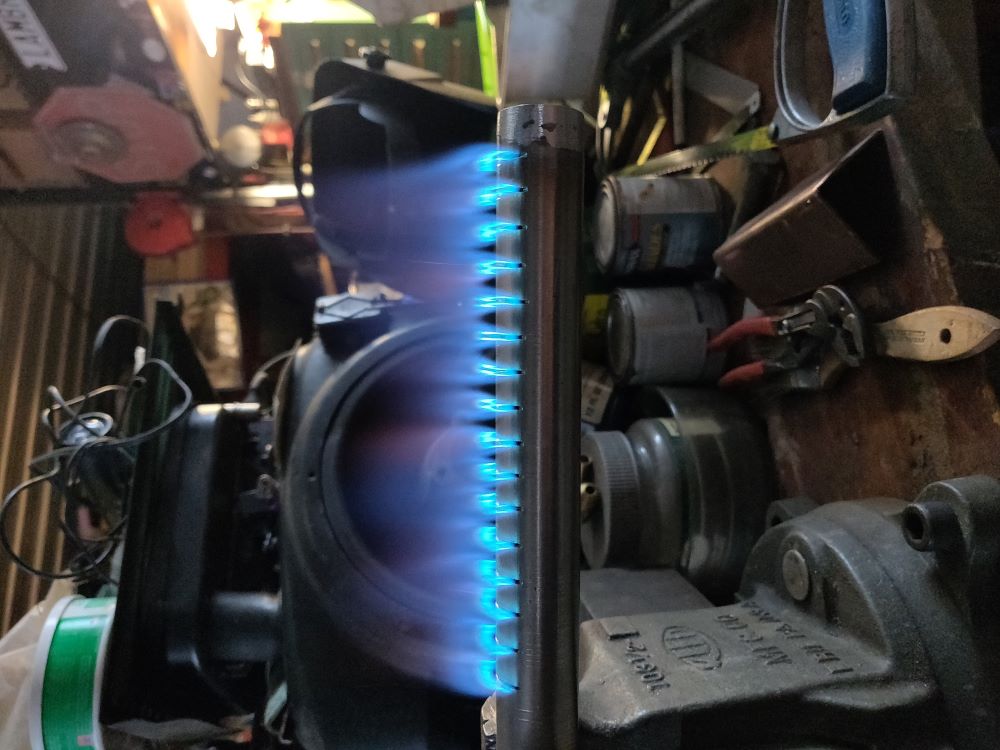
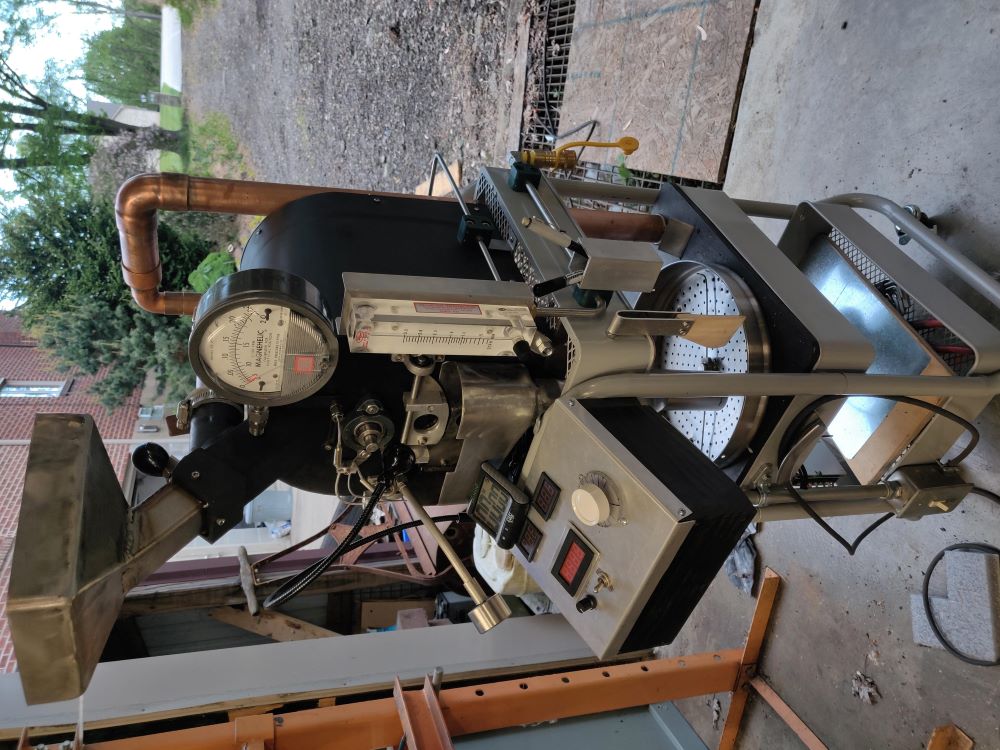
This weekends work. Focused on the middle tier. In it contains a cooling tray, for lack of better words vacuum box, a damper in between them and a rotary damper off the cyclone. Finalized the burner also. 1" ss tube, jet burner drilled out to 71 orifice and maxitrol 325-3 regulator regulated by Dwyer 1-5 scfm flow meter with needle valve.
Scooter75 attached the following images:
|
|
|
|
| Ringo |
Posted on 03/10/2020 3:06 PM
|
 Pounder  Posts: 474 Joined: January 14, 2010 |
i would think a draft fan for a furnace would be a great fan. More air than you need but put a gate before the fan and you can set it where you want. Your heat looks great, guessing you will have it turned back most of the time. But with air and heat its better to have too much then just cut it back to where you need it.
All you need in life is ignorance and confidence, and then success is sure. Mark Twain
|
|
|
|
| allenb |
Posted on 03/11/2020 4:05 PM
|
 Administrator Posts: 3861 Joined: February 23, 2010 |
I second Ringo's comments. Nice build and perfect flame mix from your burner! Keep the progress reports coming.
1/2 lb and 1 lb drum, Siemens Sirocco fluidbed, presspot, chemex, cajun biggin brewer from the backwoods of Louisiana
|
|
|
|
| Scooter75 |
Posted on 03/11/2020 5:29 PM
|
|
Newbie Posts: 27 Joined: November 24, 2019 |
Thanks for your positive comments Ringo! The T on top of the cyclone is a damper. I plan on putting the fan on a rheostat for control. Hoping to have this fired up in the next month. |
|
|
|
| goat4hooves |
Posted on 06/09/2020 5:42 PM
|
|
Newbie Posts: 17 Joined: June 04, 2020 |
Christian, Great build. Thanks for sharing. It looks like it will be a nice roaster. Will follow your progress. Keep up the good work. What vane configuration did you end up going with? Have you had a chance to test it out with beans in the drum to see how they tumble? |
|
|
|
| Scooter75 |
Posted on 06/11/2020 8:45 PM
|
|
Newbie Posts: 27 Joined: November 24, 2019 |
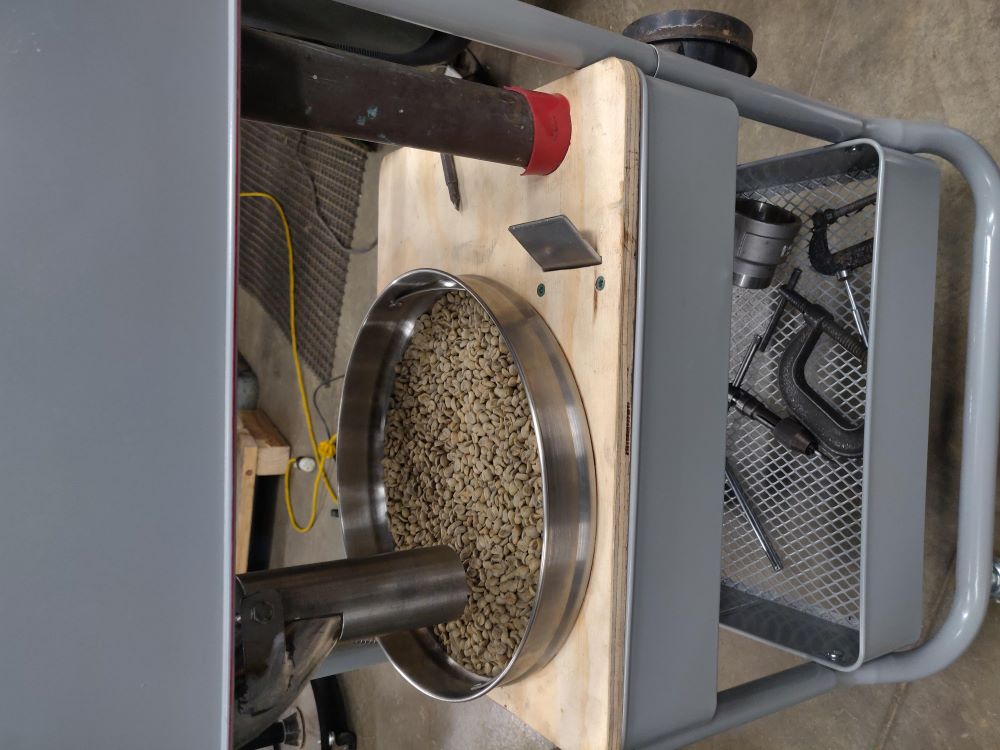
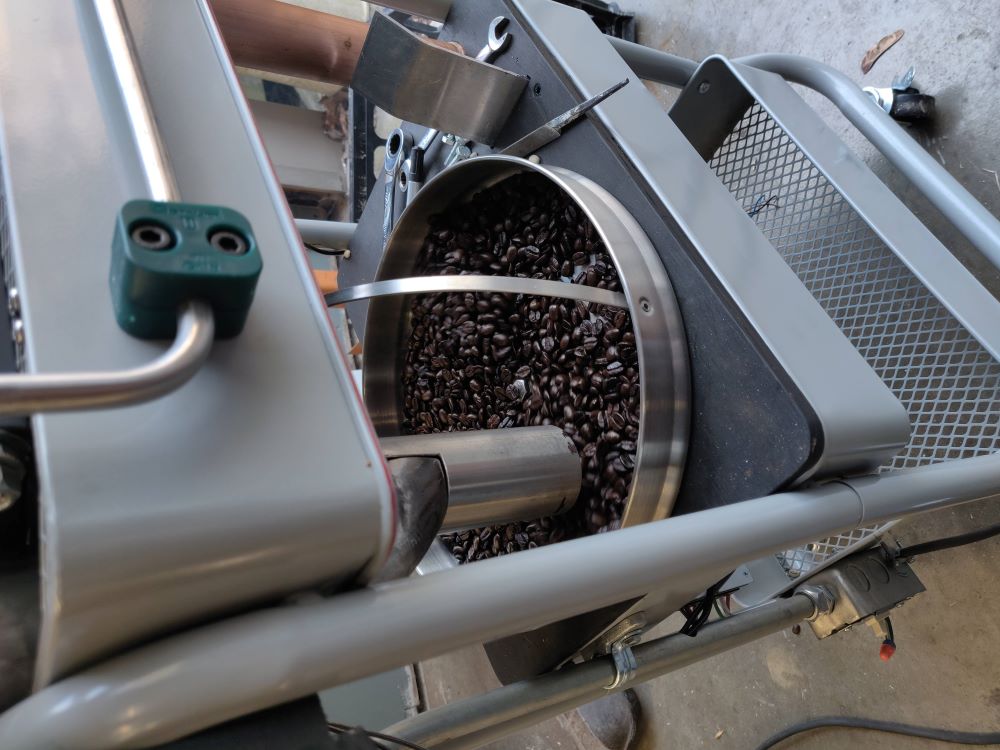
i haven't been very good about keeping this updated. It's finished! It is a 3 vane drum that has variable speed to 100 rpm. Been roasting at 75-80 rpm I have about 20 or so roasts on it now. Way different than my KKTO. I have a lot more to pay attention to, gas and air flow. Coffee is getting better, just lots to learn. Changed my original damper out to one closer to the exit of the roaster instead of on top of the cyclone. The speed control on the exhaust fan did not respond as fast nor as accurate as i would have liked so it was moved closer to where I sit. The damper on the cyclone worked really well just a reach. I wanted to thank everyone for there help with this, without you it would have been a lot more difficult with an extreme amount of trial and error.
Scooter75 attached the following images:
|
|
|
|
| allenb |
Posted on 06/12/2020 4:20 PM
|
|
Administrator Posts: 3861 Joined: February 23, 2010 |
Hey Scoot, You are one heck of a roaster builder! This is off the chart nice to say the least. It will take a little time to get to know your new roaster but soon you will have it down to where you are only making a couple of adjustments throughout a roast to keep the trajectory where you want it and will be cupping some fine coffee. Keep us updated often! Cheers 1/2 lb and 1 lb drum, Siemens Sirocco fluidbed, presspot, chemex, cajun biggin brewer from the backwoods of Louisiana
|
|
|
|
| Scooter75 |
Posted on 06/12/2020 9:07 PM
|
|
Newbie Posts: 27 Joined: November 24, 2019 |
Thanks Allen. It was a lot of fun to build. Thanks for all your support. It really did make a difference. I bought 15 pounds of a cheap brazilian to learn with and gave most of it away except for the couple of pounds I burnt. Been doing some Bolivian Bio-aribica, Yemen, sulawesi, and a tanzanian. Have a good friend who is even geekier with coffee than I am and he has been impressed with my roasting, so I guess I'm doing ok. I for the most part have enjoyed what I have done so far with it. Thanks again! |
|
|
|
| goat4hooves |
Posted on 06/13/2020 11:19 AM
|
|
Newbie Posts: 17 Joined: June 04, 2020 |
It's great to hear that the roaster is up and running. Happy roasting. It will be interesting to see where your roasters sweet spot ends up. How many oz or g are you able to roast at one time? Do you happen to have pictures of your mixing vane configuration that you would be willing to share? I look forward to future reports. |
|
|
|
| Scooter75 |
Posted on 06/15/2020 4:28 PM
|
|
Newbie Posts: 27 Joined: November 24, 2019 |
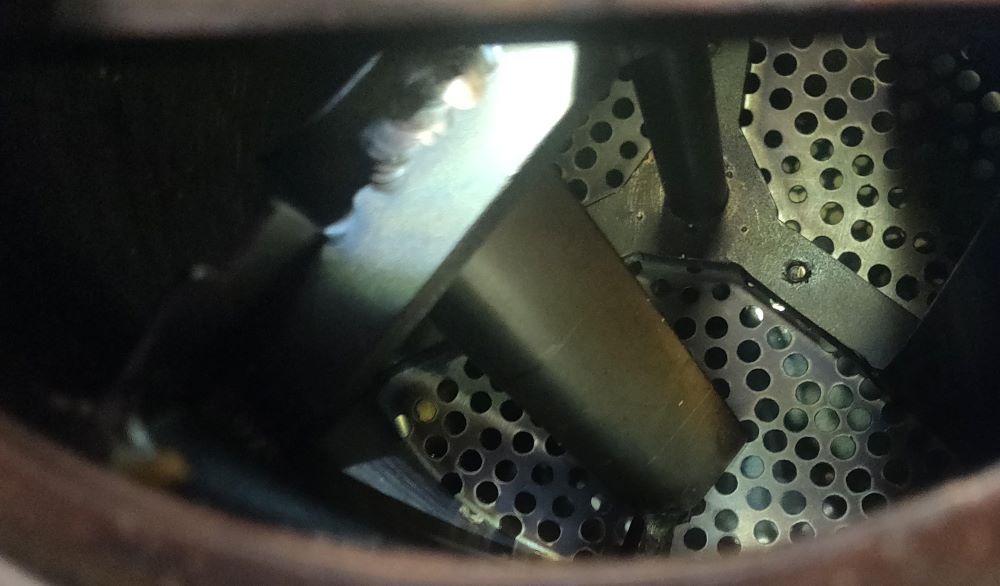
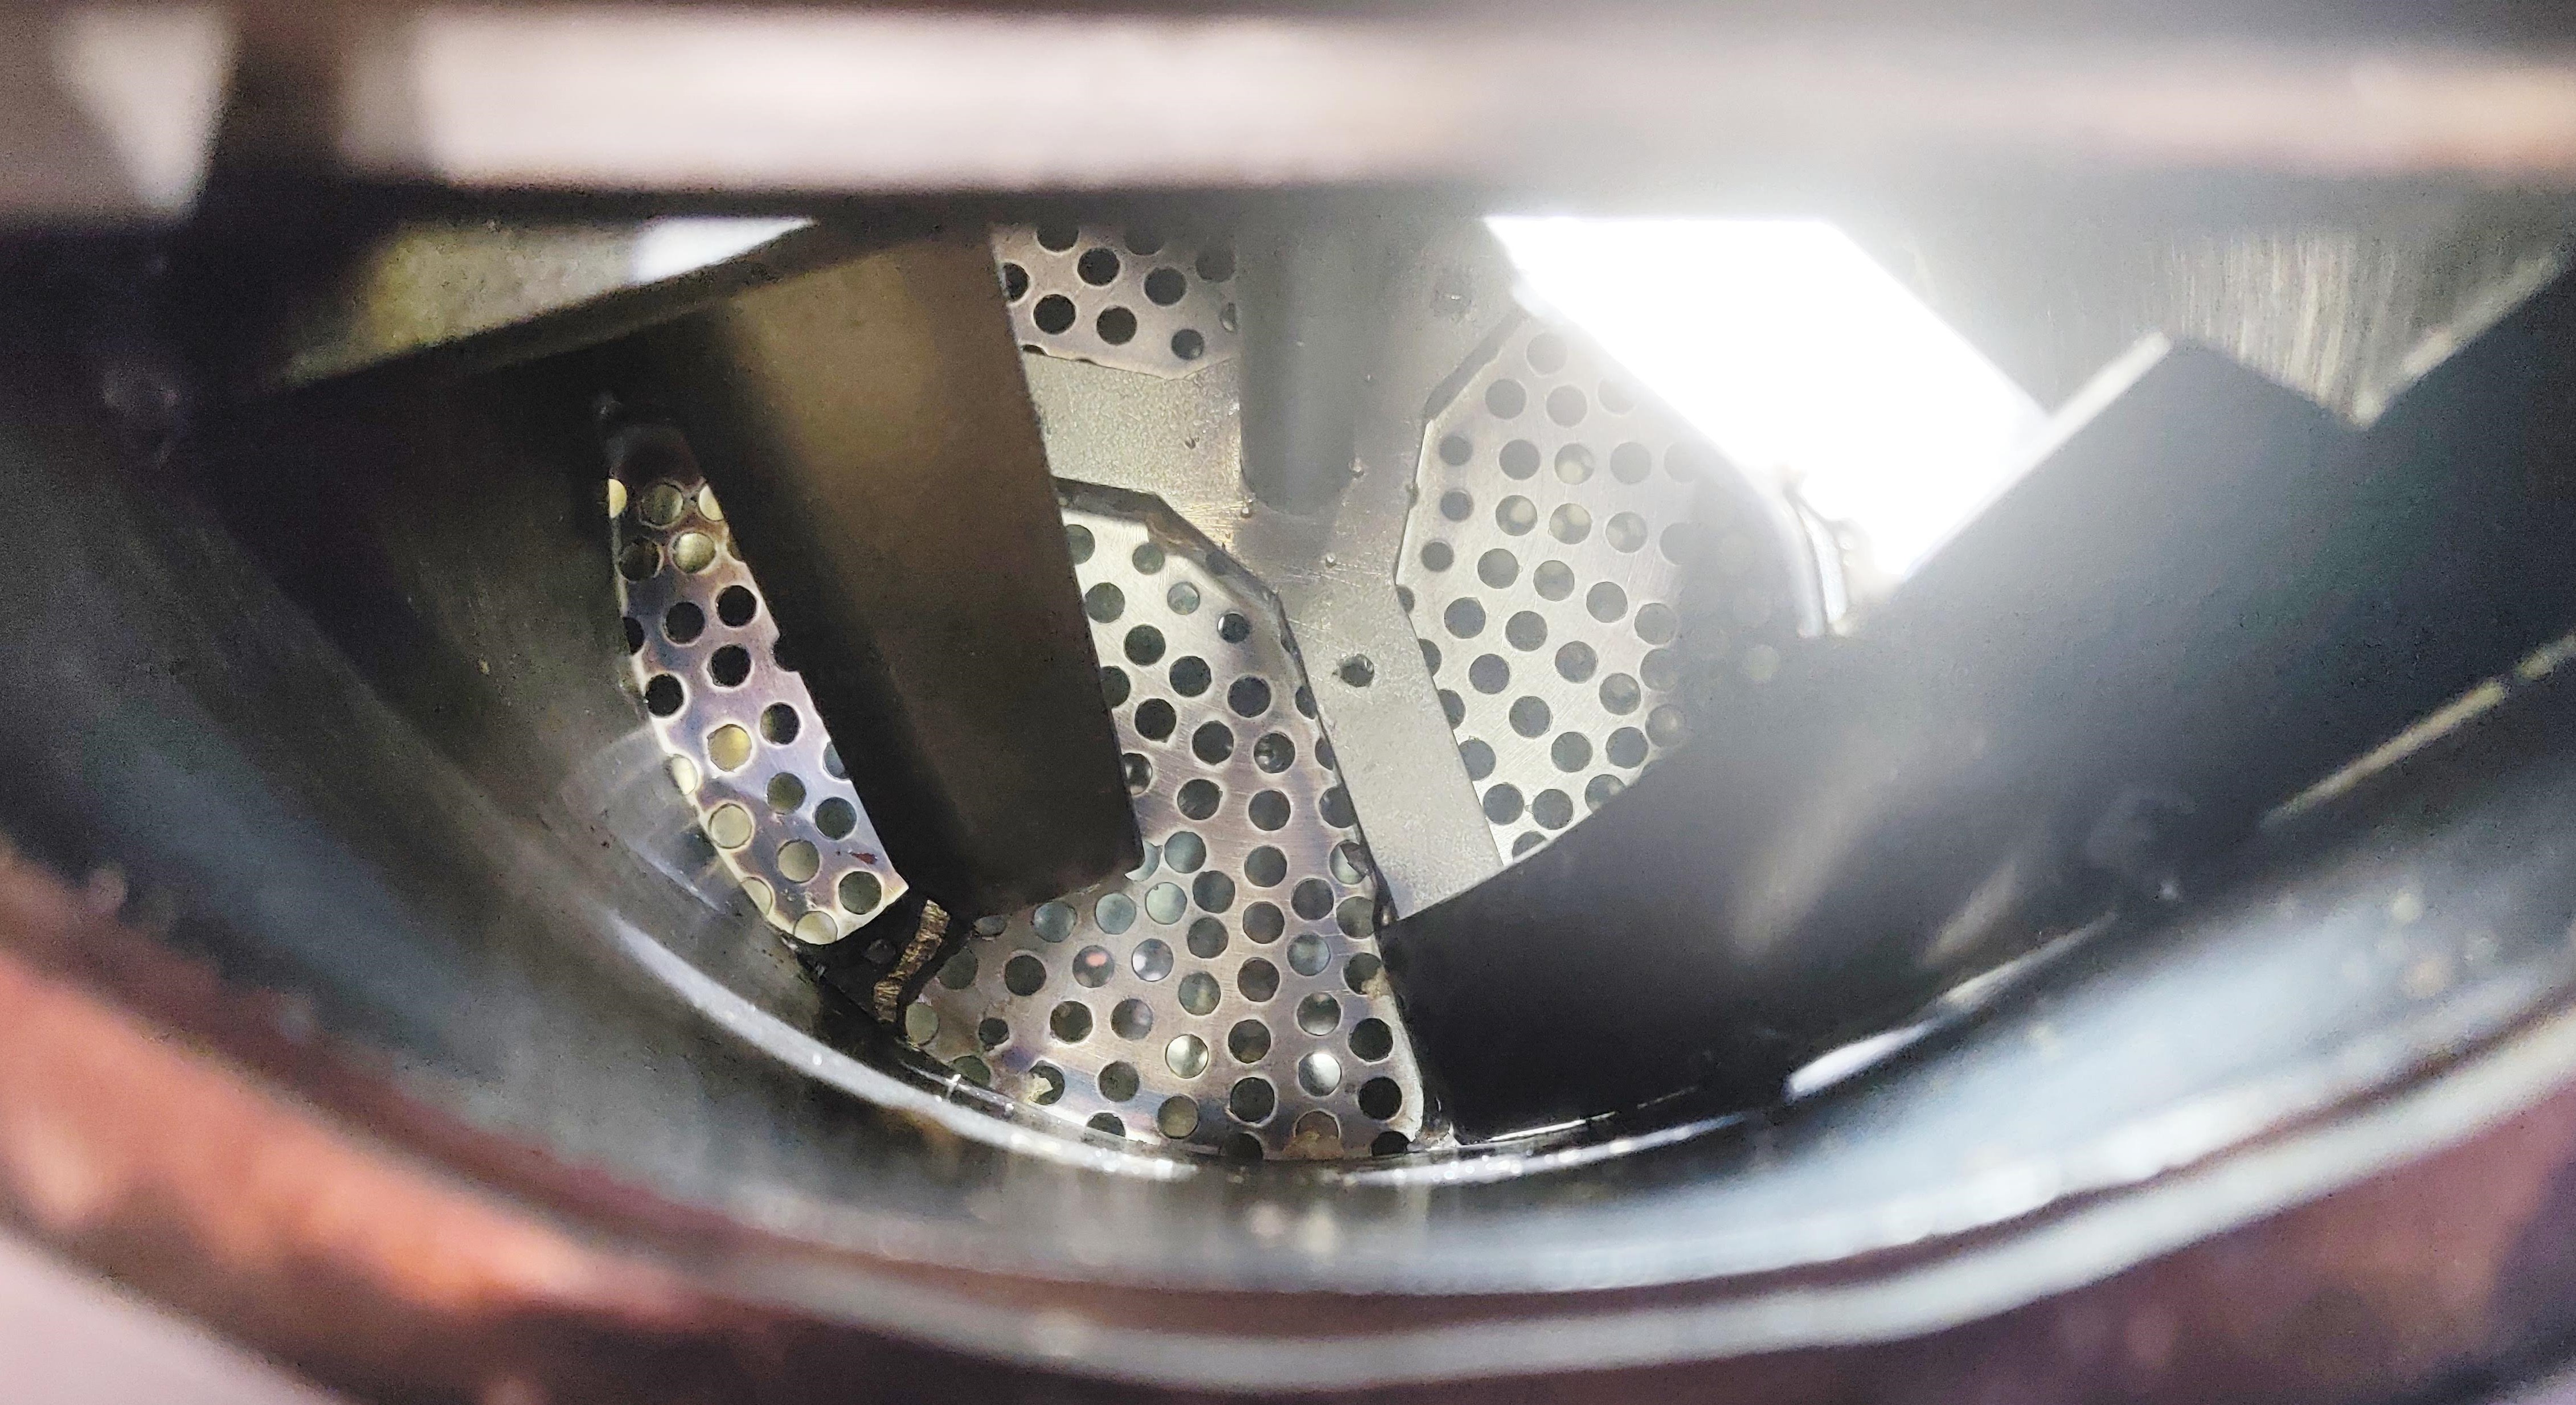
I roast 454 grams. When I built it I used the formula I found on here and according to it I can go to 575 grams. I just want to have an even number to roast so I haven't done much more than 454g but have done less because I had 400 grams of an Ethiopian that I needed to roast. It turned out well according to my coffee geek friend. Sorry, I totally forgot to take pictures of my drum and vanes when I had the chance to. I used a 3 vane that I welded to 2 spyders, one at the very back and one in about 2.75" from front skewed at about 25 degrees. The vane bringing the beans to the front comes up to about 3/4" from the front and the vane going to the back comes about 1 1/4" in front of the spyder to accommodate the BT thermocouple. My drum is made from 6" schedule 10 stainless steel pipe. Spiders are out of 304 ss plate and vanes are canned from 16ga 304 ss. Shaft is 1/2" cold rolled steel. Mesh on back is 18/8 ss from a steamer I picked up and added additional holes. I took a couple of pics just now from the drop door. I will post them later, I have to resize and rename them on my computer because I can't post pics directly from my phone. Just a warning, they are not very good but will give you an idea about how I did it. |
|
|
|
| Scooter75 |
Posted on 06/15/2020 8:26 PM
|
|
Newbie Posts: 27 Joined: November 24, 2019 |
promised pics, just not very good.
Scooter75 attached the following images:
|
|
|
|
| goat4hooves |
Posted on 06/18/2020 8:02 PM
|
|
Newbie Posts: 17 Joined: June 04, 2020 |
Christian, thanks for the info on the size of your roast loads and pictures. I really appreciate it. It is a great help to me as I am sizing my drum at the moment. All of your fabrication info is great too. Enjoy the sweet taste of success with you new machine as you refine your skills. You deserve it. |
|
|
|
| goat4hooves |
Posted on 08/19/2020 3:35 PM
|
|
Newbie Posts: 17 Joined: June 04, 2020 |
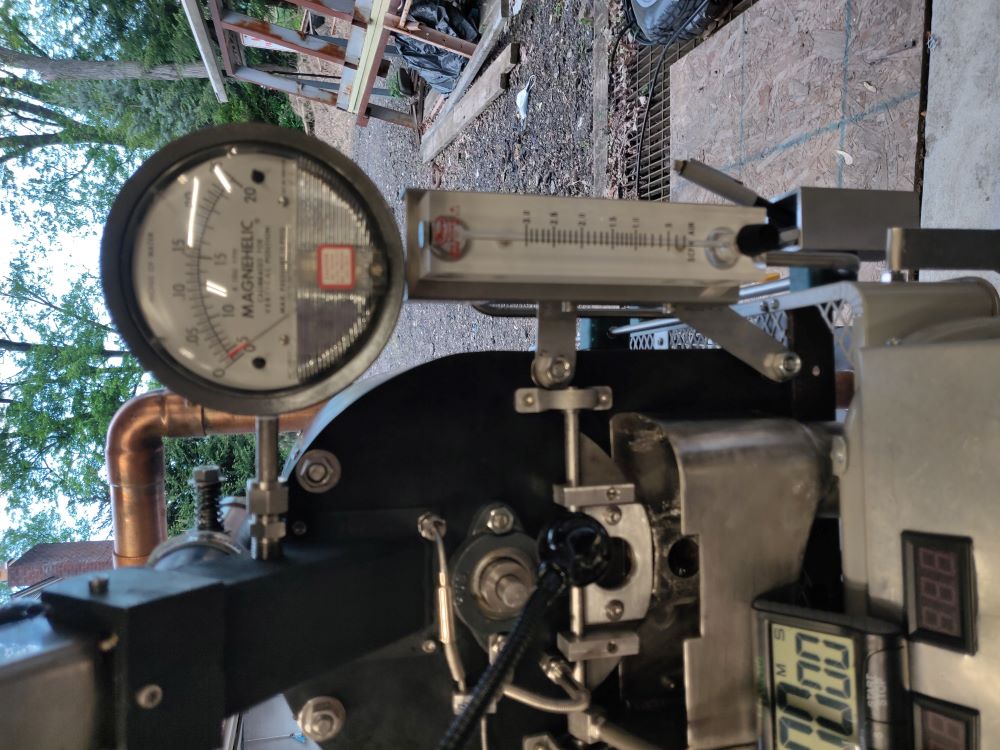
Christian, I'm curious to know what kind of flow rates you are measuring during your roasts? I know you were concerned about getting scale sized properly. If possible what are the max and min flow rates you typically see during your roasts? Thanks in advance. |
|
|
|
| Scooter75 |
Posted on 08/30/2020 10:53 PM
|
|
Newbie Posts: 27 Joined: November 24, 2019 |
Sorry for the delay. Haven't visited much lately. What flow rates do you want, gas or air,. |
|
|
|
| goat4hooves |
Posted on 09/01/2020 4:00 PM
|
|
Newbie Posts: 17 Joined: June 04, 2020 |
Mainly wondering what the propane flow rate is. Are you measuring the air flow rate through the drum or the pressure drop? You now have me curious as to what your air measurements are. Thanks for your reply. |
|
|
|

| Jump to Forum: |
Powered by PHP-Fusion Copyright © 2024 PHP-Fusion Inc
Released as free software without warranties under GNU Affero GPL v3
Designed with ♥ by NetriXHosted by skpacman