
Login

Shoutbox
You must login to post a message.
allenb
09/15/2024 8:05 PM
JKnight 
renatoa
09/15/2024 1:26 AM
JonnyPanic,  ?
?
?renatoa
09/13/2024 1:32 PM
Krush and jdspainhour,

renatoa
09/12/2024 1:06 AM
 , KnittyBrew
allenb
09/10/2024 1:55 PM
Welcome to all new HRO members!!!

Forum Threads
Newest Threads
Hello from eastern PAUsing a TC4 with Art...
Skywalker roaster mods
Skywalker Roasts
My Sight Glass FB Ro...
Hottest Threads
| Skywalker roaster... | [386] |
| Skywalker Roasts | [102] |
| War on Farmers by... | [53] |
| Using a TC4 with ... | [41] |
In Memory Of Ginny

Donations
Latest Donations
dmccallum - 10.00
JackH - 25.00
snwcmpr - 10.00
Anonymous - 2.00
Anonymous - 5.00
dmccallum - 10.00
JackH - 25.00
snwcmpr - 10.00
Anonymous - 2.00
Anonymous - 5.00
Users Online
Guests Online: 2
Members Online: 0
Total Members: 8,494
Newest Member: JKnight
Members Online: 0
Total Members: 8,494
Newest Member: JKnight
View Thread
Who is here? 2 guest(s)
 Skywalker roaster mods
|
|
| ctjameson |
Posted on 02/14/2024 4:35 PM
|
 Newbie  Posts: 31 Joined: January 09, 2024 |
Quote HarryDog wrote: So I have tested this code change and I can set 5 event buttons in one Multiple event sequence with no sleep and all executed, Now I did see one oddity that if you are testing this with say 3 fan changes (35%, 50%, 100%) the first one I cannot detect visually on the slider that it executed but the second and third I can see on the slider. No one would do this anyway, it was just my first test. I do think it executed because if I add the sleep I see the change on the slider using 5 event buttons 3 are not fan changes, none are skipped in that test. I also tested with extra Event Buttons in between fan changes so I have the chance to see the change and that worked as well. Just in case anyone was wondering about this edit. Did you ever have any case of runaway heating element in your testing/errors when roasting like I did? Skywalkerino - Arduino/artisan powered Ali Roaster
|
|
|
|
| Dan N |
Posted on 02/14/2024 4:54 PM
|
|
Newbie Posts: 30 Joined: January 06, 2024 |
Quote renatoa wrote: That line should be replaced by Code Download source String input = Serial.readStringUntil('\n');Good catch! I tested your change by sending a Multiple Event with 4 commands several times and each time all 4 commands were received and executed correctly on the roaster. The serial log shows all 4 commands were sent back-to-back as fast as possible which would have never worked before. |
|
|
|
| ctjameson |
Posted on 02/14/2024 5:19 PM
|
|
Newbie Posts: 31 Joined: January 09, 2024 |
Quote renatoa wrote: For losing commands execution I think the culprit is here: Code Download source String input = Serial.readString(); https://github.co...d.ino#L282 If many commands from Artisan are accumulated in the serial line buffer, the line above reads them all, clearing the buffer, but only the first is executed, the others are lost. That line should be replaced by Code Download source String input = Serial.readStringUntil('\n');... which reads only the first command, until reaching end of line, without clearing the rest of the commands in buffer, if more... The command just read is executed, then next loop the second command in the buffer is fetched, and so on. You have nothing to lose to give it a try... Just gave this a try and it worked flawlessly. Instant, 1:1 response on the roaster now. I'm going to do some roasts this evening and see if I experience the runaway issue again. I'm starting to worker if it's because I'm doing too many pounds back to back and it's overheating the control board or something. Skywalkerino - Arduino/artisan powered Ali Roaster
|
|
|
|
| HarryDog |
Posted on 02/14/2024 5:24 PM
|
 1/2 Pounder  Posts: 360 Joined: July 20, 2022 |
Quote ctjameson wrote: Did you ever have any case of runaway heating element in your testing/errors when roasting like I did? No Just lost commands and my Alarms stopped working after testing Multiple events that did not all run, but the Arduino would strangely not run the Alarms after that. Not sure this even caused it but it was the only thing I could think that I changed. Removing the card and detecting on a different port and all worked again. I never ran back to back Multiple events again until I changed this code. |
|
|
|
| Dan N |
Posted on 02/14/2024 5:26 PM
|
|
Newbie Posts: 30 Joined: January 06, 2024 |
Everything is working well for me so I'm almost done modding. The biggest weakness left for >430g roasts is the cooling system. A big batch with beans that expand a lot almost fills the tray and takes a long time to cool down, still hot to the touch after 3 minutes. Because air is pulled down the metal grate will get very hot and transfer heat to the bottom layer. Stirring brings cool beans down to be heated by the grate. I'm going to use my old DIY cooler of a window screen over a box fan. It's big enough that there's only 1 layer of beans and the air blows up so the screen is always cool. It can cool 1lb extremely fast. The roaster is already designed to work with an external cooler placed below it. With the cooling tray shut all the way the bean dump will come out bottom at each front corner. I've tested it with green beans and a few will bounce out the front which doesn't matter for me since they'll fall onto the big screen. I'll test it on my next roast in a couple days. |
|
|
|
| ctjameson |
Posted on 02/14/2024 6:10 PM
|
|
Newbie Posts: 31 Joined: January 09, 2024 |
Quote HarryDog wrote: Quote ctjameson wrote: Did you ever have any case of runaway heating element in your testing/errors when roasting like I did? No Just lost commands and my Alarms stopped working after testing Multiple events that did not all run, but the Arduino would strangely not run the Alarms after that. Not sure this even caused it but it was the only thing I could think that I changed. Removing the card and detecting on a different port and all worked again. I never ran back to back Multiple events again until I changed this code. Okay. I tried to replicate it when testing that code update and couldn't get it to replicate the same issue. So I think I'll just take a 10 minute full cool down break in between each 3 pounds just for good measure. I'm hoping I'm done with messing with this thing for now and can just push through the pounds. Skywalkerino - Arduino/artisan powered Ali Roaster
|
|
|
|
| ctjameson |
Posted on 02/14/2024 6:11 PM
|
|
Newbie Posts: 31 Joined: January 09, 2024 |
Quote Dan N wrote: Everything is working well for me so I'm almost done modding. The biggest weakness left for >430g roasts is the cooling system. A big batch with beans that expand a lot almost fills the tray and takes a long time to cool down, still hot to the touch after 3 minutes. Because air is pulled down the metal grate will get very hot and transfer heat to the bottom layer. Stirring brings cool beans down to be heated by the grate. I'm going to use my old DIY cooler of a window screen over a box fan. It's big enough that there's only 1 layer of beans and the air blows up so the screen is always cool. It can cool 1lb extremely fast. The roaster is already designed to work with an external cooler placed below it. With the cooling tray shut all the way the bean dump will come out bottom at each front corner. I've tested it with green beans and a few will bounce out the front which doesn't matter for me since they'll fall onto the big screen. I'll test it on my next roast in a couple days. Yeah I agree it needs an external cooler. I'm looking to make a small pedestal to put the ITOP on and have an external bean cooler underneath. Skywalkerino - Arduino/artisan powered Ali Roaster
|
|
|
|
| Mike_Mathis |
Posted on 02/14/2024 9:35 PM
|
|
1/4 Pounder  Posts: 127 Joined: August 06, 2019 |
About a minute. or, if you have company coming over. 
*Kaffelogic Nano 7
*Skywalker V1 *2023 BC-2 |
|
|
|
| renatoa |
Posted on 02/15/2024 3:39 AM
|
|
Administrator Posts: 3134 Joined: September 30, 2016 |
Quote Dan N wrote: The biggest weakness left for >430g roasts is the cooling system. A big batch with beans that expand a lot almost fills the tray and takes a long time to cool down, still hot to the touch after 3 minutes. Because air is pulled down the metal grate will get very hot and transfer heat to the bottom layer. Stirring brings cool beans down to be heated by the grate. Pound class... not there yet, planning to move to 333 grams soon. My actual routine, that seems affective for 250 grams, is pulling every minute the metal grate from the drawer, rotate it 90 degrees, and insert back. Each turn is also accompanied by a vigorous shaking of the beans bed. Edited by renatoa on 02/15/2024 7:23 AM |
|
|
|
| amaller |
Posted on 02/16/2024 1:07 PM
|
|
Newbie Posts: 8 Joined: January 05, 2024 |
Quote renatoa wrote: Quote darelleman wrote: Hi all, I just got this roaster about a week ago and did a few assisted roasts. Now I am onto incorporating sloppyjosh's Artisan mod. Wondering if there is a way to use the original touchscreen controller to operate the roaster while using the Arduino and Artisan just for logging the roast. Would something like a USB splitter work if I use it to connect both the Arduino and the controller to the roaster? I would rather not do any soldering on the Skywalker's components themselves but I could if necessary. Seems @darelleman was a visionary on this subject, because I arrived to the same conclusion... roast by roast  First was just experiments, to spy the Skywalker protocol... then realized that... hey, I can used this setup for roast too ! Then, the more I used, the more I found this way suits me better than the actual mode discussed so far in this thread. There are two main reasons I turned to this alternate way of using the roaster: - first, we have a protocol that is not 100% well understood, and a machine the is quite sensitive to any hiccup of our attempt to emulate its language. Experienced myself, and others reported... lost commands, locks or unable to connect at all. Keeping the factory control panel active, either Artisan or connection can crash, but we can conclude the roast without trashing the beans. - second, is about the control ergonomics. You can call me an old fart, but industry is still on physical knobs, buttons, and other control methods that provide physical/sensorial feedback of using them with closed eyes... unlike mouses and touch screens. I know that so far the Skywalker control panel gathered only critics, and even a total failure report (at least one), but for me it works and I like using it more than clicking on the Artisan screen. Plus, the factory controller implements the preheat and cooling modes, that requires special attention to be done in Artisan, especially for newbies. Lets see how is this different than before. We start with a USB-A Extension cable, as in the link below, or attached image if the link expires. https://www.amazo...12O5I?th=1 With a sharp cutter, we make a slot somewhere in the middle, and tap/branch the ground and data wires, using any method that suits your skills. Left the red wire intact, untouched, unused. The three wires will be connected to any available Arduino board you have around. Used a Nano, because the form factor allowing be to wrap it together with the cable, like a ferrite bead/choke. The connection mode is sketched in the attached schematic. The Arduino runs a sketch derived from original josh SkywalkerSpy code, with some slightly changes, for minimal Artisan commands processing required for data acquisition. It is attached as well. On Artisan side there is no need for ANY setup... nothing, nada, zip ! You can start directly with factory settings straight after install, followed by the basic TC4 setup... A typical roast session looks like: - preheat, using roaster control panel, - start roast on Artisan, using Start button, let stabilize some seconds to see graphics start plotting - charge beans, double R press, try doing this as close to the Artisan charge detection, to have the timers synced as close possible - wait TP happens on Artisan, and start power control maneuvers, using roaster control panel - as roast progress, mark Dry End and FC start, in Artisan - finish the roast by opening the exhaust door, then long press R, then DROP on Artisan. The later is not critical to be done as fast as possible, because you can readjust the event in Artisan using the power drop moment recorded in the graphic. - set the cooling mode on roaster, using control panel. - save Artisan roast session log file. That's all folks. @darelleman, I hope you are still reading here, and this is useful for you Have you had any performance issues using a nano? I know Josh initially used a Leonardo. |
|
|
|
| renatoa |
Posted on 02/16/2024 1:40 PM
|
|
Administrator Posts: 3134 Joined: September 30, 2016 |
This application is too easy to matter the version of the board used. On both boards it uses about 1/4 of board memory, and the processors have same speed. For experiments the board choice is simply a matter of what you have available around, left from other projects. You choose a specific board when you have to interface with a specific shield, or when size dictates it. The later was my criteria for choosing Nano. If you buy a new board especially for this job, and size does not matter, buy what make you feel comfortable. |
|
|
|
| Dan N |
Posted on 02/16/2024 2:27 PM
|
|
Newbie Posts: 30 Joined: January 06, 2024 |
There are lots of variants of Arduino clones and getting the wrong one could cause issues. Some have genuine Atmel 328P cpu, some have a counterfeit 328P with Atmel markings, and some use a clone like LGT8F328P. Some boards run slower than 16MHz or have a different usb chip that causes issues. You have to read the reviews carefully to be sure you'll actually get a 16MHz Atmel 328P cpu and CH340 usb chip (for Nano). |
|
|
|
| ctjameson |
Posted on 02/16/2024 2:29 PM
|
|
Newbie Posts: 31 Joined: January 09, 2024 |
Quote Dan N wrote: There are lots of variants of Arduino clones and getting the wrong one could cause issues. Some have genuine Atmel 328P cpu, some have a counterfeit 328P with Atmel markings, and some use a clone like LGT8F328P. Some boards run slower than 16MHz or have a different usb chip that causes issues. You have to read the reviews carefully to be sure you'll actually get a 16MHz Atmel 328P cpu and CH340 usb chip (for Nano). My generic $4.37 USB-C "arduino" micro pro from Ali has given me 10 reliable roasts so far. The only issue I've had with it, I also had with a genuine Arduino Leonardo board. Skywalkerino - Arduino/artisan powered Ali Roaster
|
|
|
|
| Dan N |
Posted on 02/16/2024 2:49 PM
|
|
Newbie Posts: 30 Joined: January 06, 2024 |
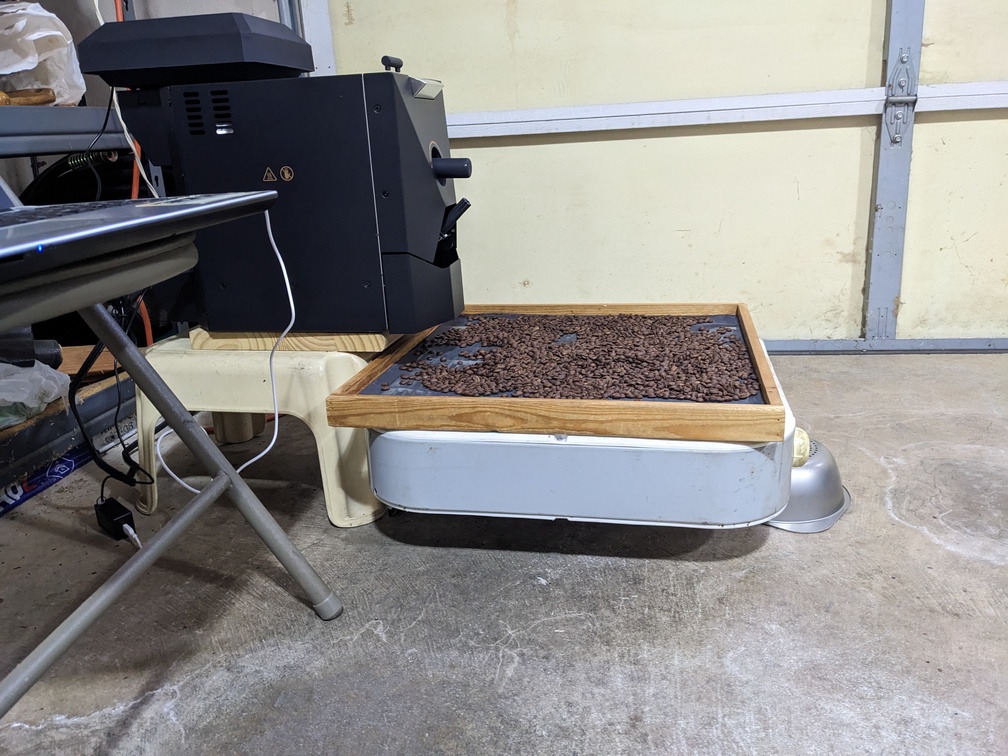
I tested my old diy bean cooler by temporarily putting the roaster on a foot step stool + board. As expected it cooled a 430g batch in less than a minute. A few beans spilled out the back, so a simple chute/diverter would help.
Dan N attached the following image:
|
|
|
|
| amaller |
Posted on 02/16/2024 4:11 PM
|
|
Newbie Posts: 8 Joined: January 05, 2024 |
Thanks everyone. I�ve got a random uno clone that looks like it has an Atmel 328P. Hopefully it works out! |
|
|
|
| Robotic Kitten |
Posted on 02/17/2024 8:07 PM
|
|
Newbie Posts: 24 Joined: December 04, 2023 |
I've tried creating a schematic for the original Skywalker roaster. Although, my PCB seems to differ from Josh's slightly. Here's the schematic https://1drv.ms/b...P?e=aL9qS3 it's a PDF and apparently forum does not allow attaching a PDF. I need to figure out how to keep the kickad project under GIT and add it to Josh's repo Regarding the MCU in the roaster, it is a Fremont Micro Devices, https://www.lcsc....rand=11443 but I couldn't figure out which one exactly. Mine has "FMD N3kKIKH" marking on it.
Robotic Kitten attached the following images:
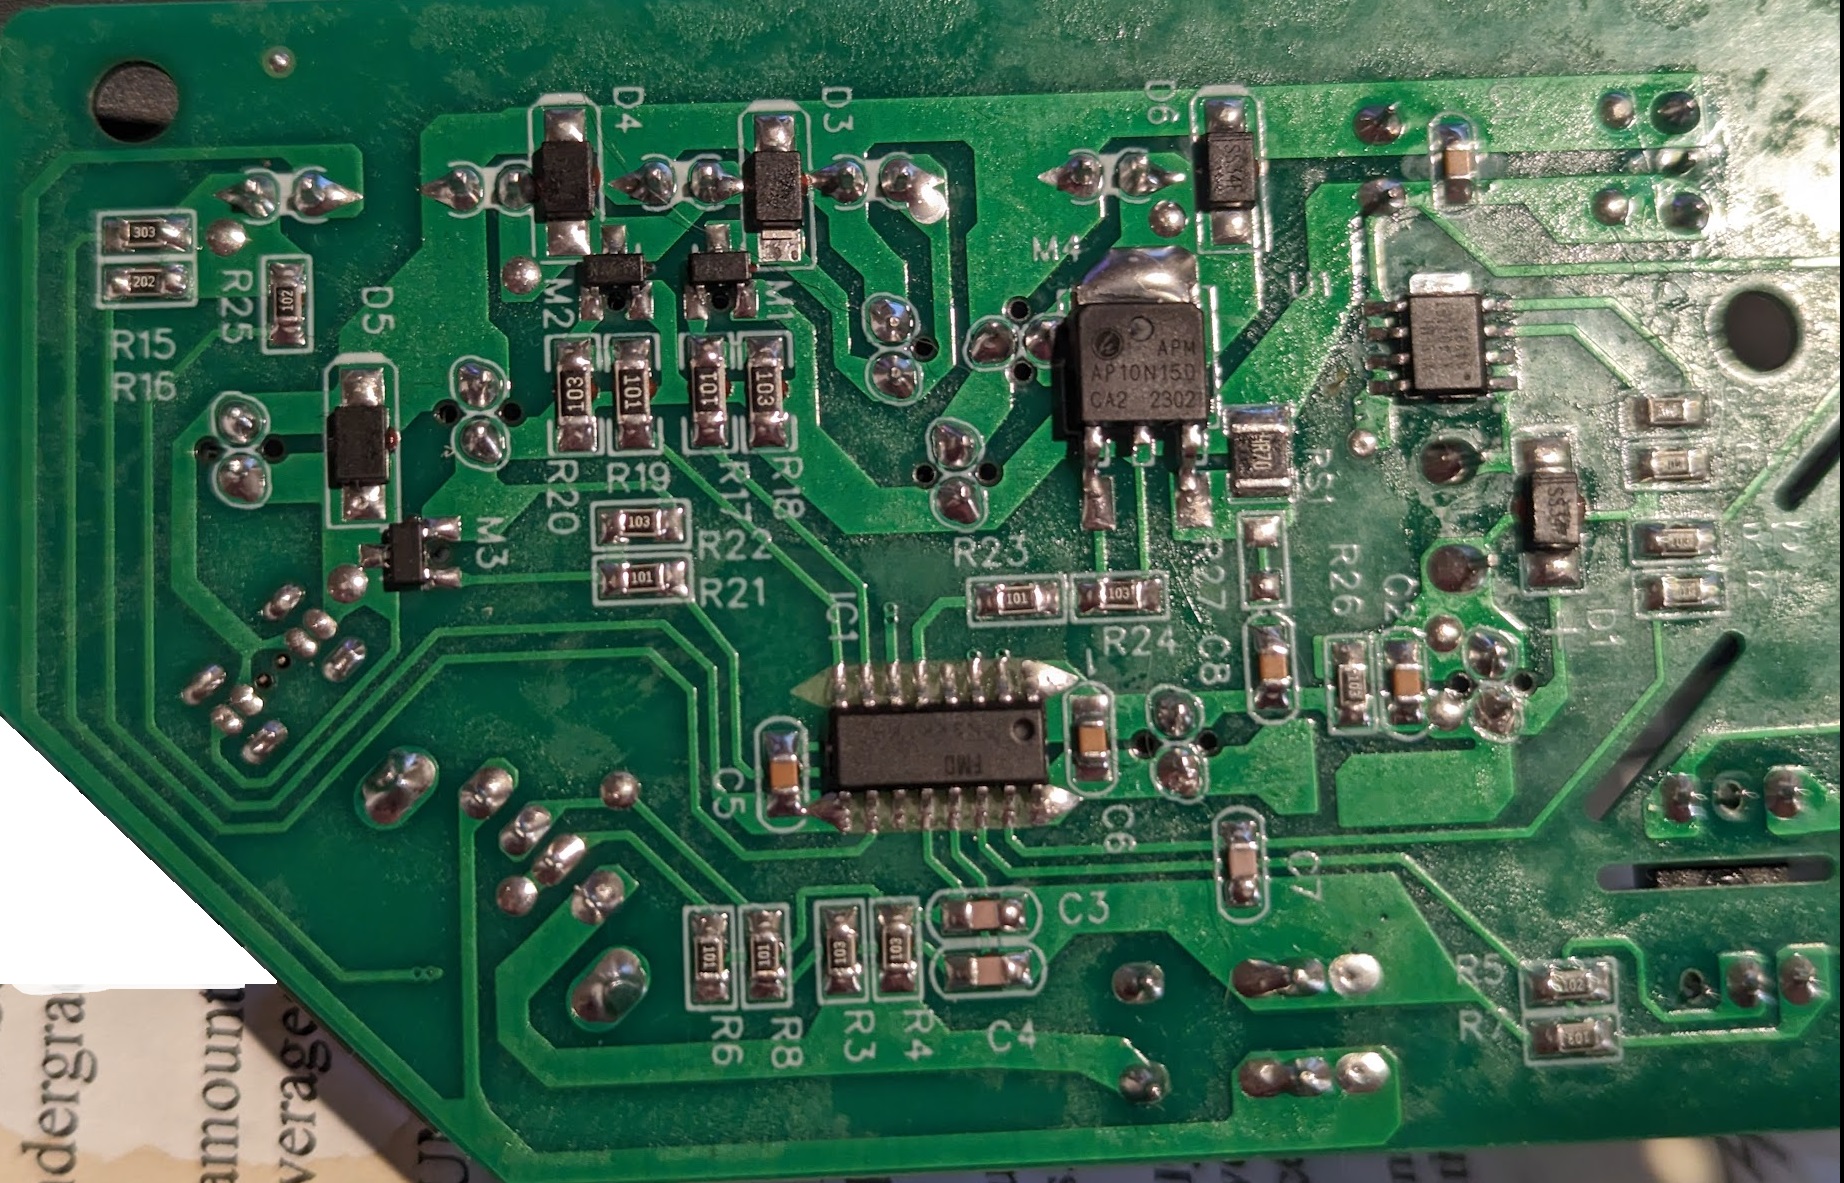
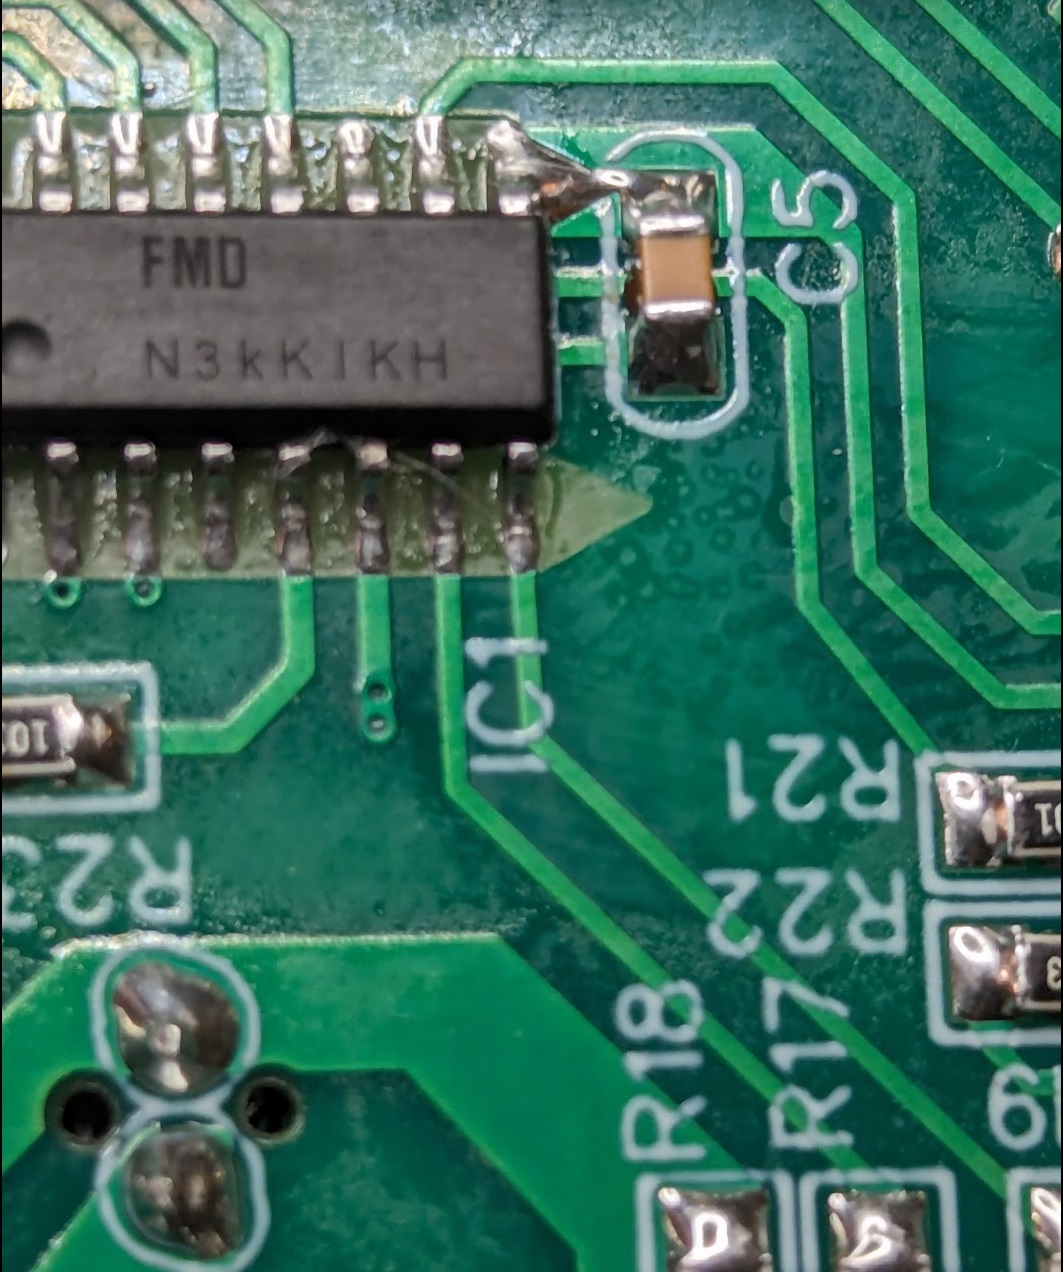
Edited by Robotic Kitten on 02/17/2024 8:57 PM |
|
|
|
| Robotic Kitten |
Posted on 02/17/2024 9:15 PM
|
|
Newbie Posts: 24 Joined: December 04, 2023 |
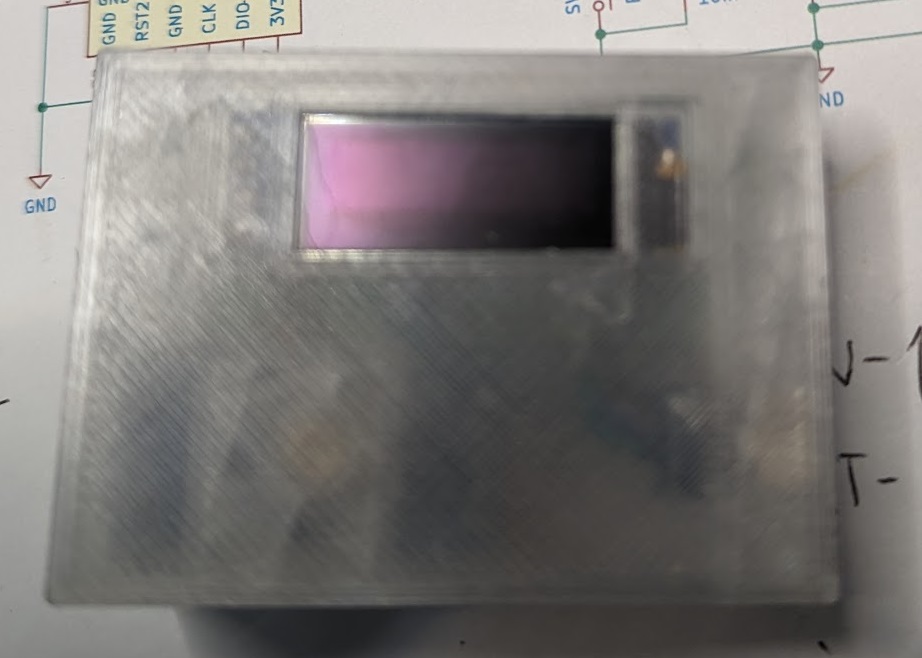
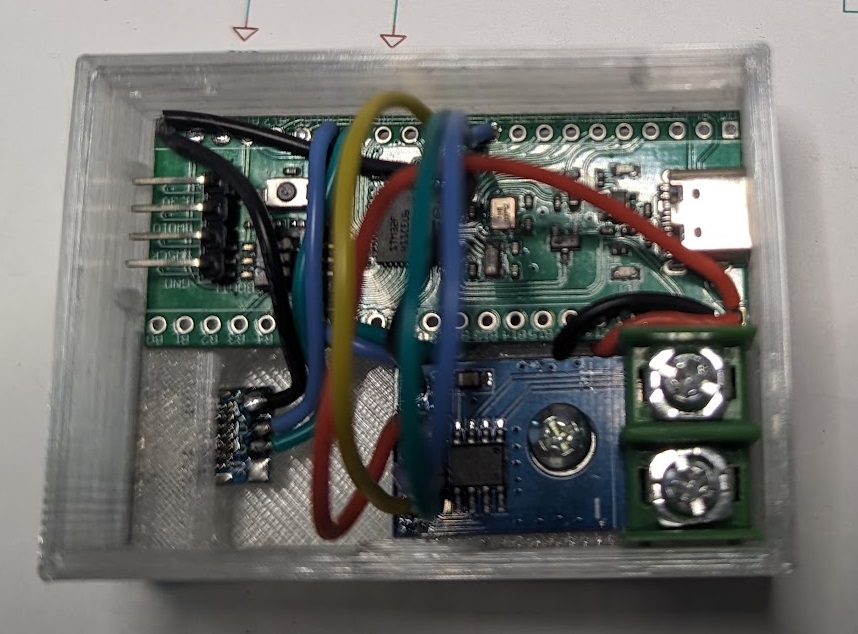
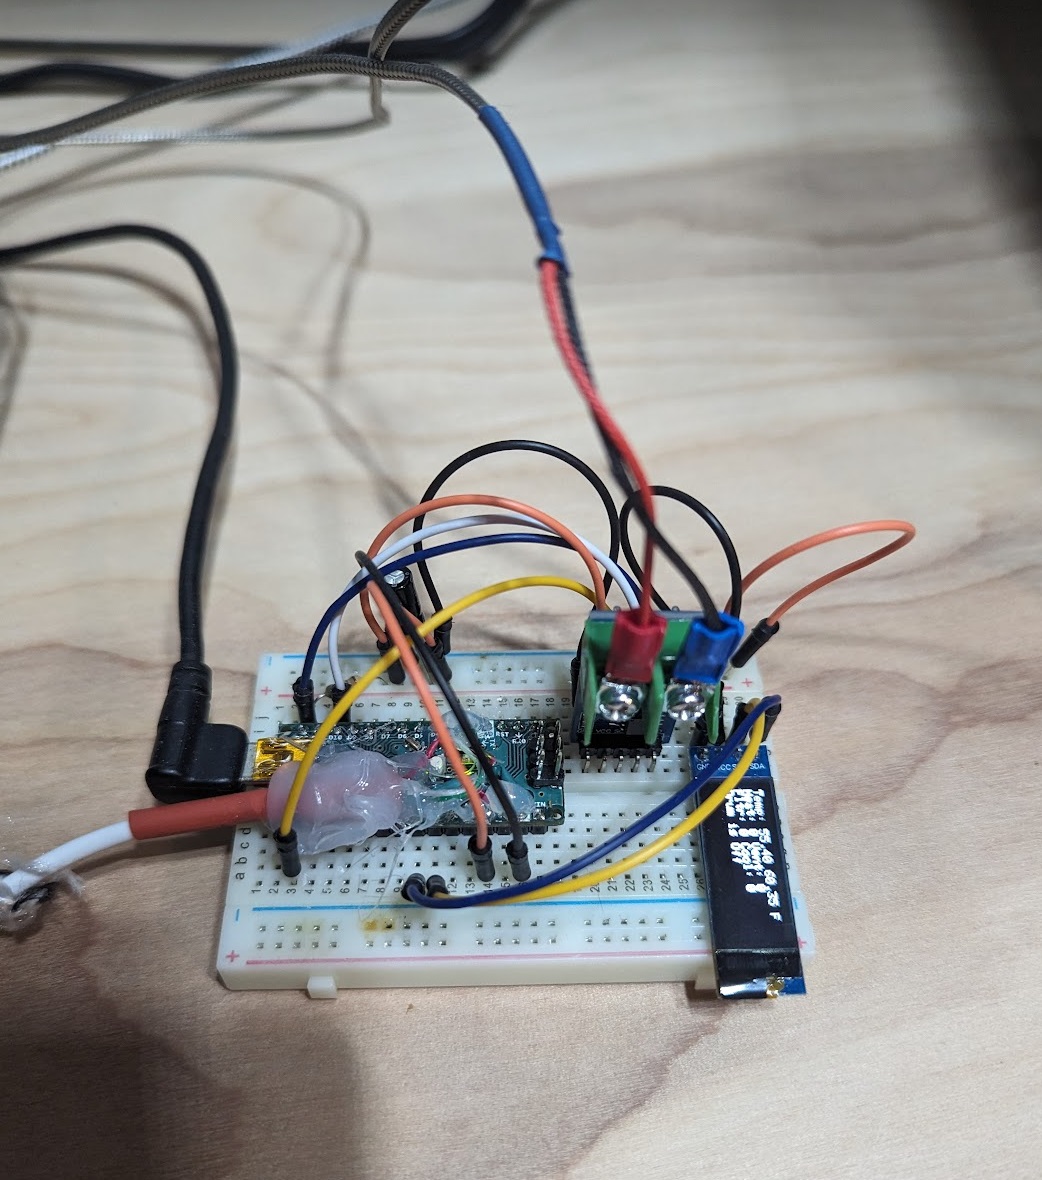
Decided to add a thermocouple to Josh's code. Went from bredboard to 3dprinted case
Robotic Kitten attached the following images:
|
|
|
|
| Robotic Kitten |
Posted on 02/18/2024 6:30 PM
|
|
Newbie Posts: 24 Joined: December 04, 2023 |
Quote Dan N wrote: Quote renatoa wrote: That line should be replaced by Code Download source String input = Serial.readStringUntil('\n');Good catch! I tested your change by sending a Multiple Event with 4 commands several times and each time all 4 commands were received and executed correctly on the roaster. The serial log shows all 4 commands were sent back-to-back as fast as possible which would have never worked before. Good catch indeed. Maybe change https://github.co...d.ino#L281 From: Code Download source if (Serial.available() > 0) {To: Code Download source while (Serial.available() > 0) {to process all commands in bulk? |
|
|
|
| renatoa |
Posted on 02/19/2024 2:35 AM
|
|
Administrator Posts: 3134 Joined: September 30, 2016 |
Nope, not working this way. An executive command, like OT1 (heater value set to...) needs a full loop cycle to be performed. The handleHeat routine only prepares the buffer contents, it doesn't actually send a message to the roaster.. The message sending is done once per loop, sendMessage(), at line 277, above/before the serial status query. |
|
|
|
| renatoa |
Posted on 02/19/2024 9:53 AM
|
|
Administrator Posts: 3134 Joined: September 30, 2016 |
After some roasts with the new way, i.e. parallel connected adapter, using control panel instead Artisan, the first improvement I feel the need the most imperative is a filtering of temperatures data stream, the values are simply too jumpy. For this purpose we have implemented the same filtering logic as used in TC4, and the same filtering control method from Artisan side, through the FILT command. For those non familiar with TC4 board, check the screen below in Artisan Device... dialog. Those 80% values define the ratio between actual value and past values average, for each of the four channels of TC4 board. For Skywalker only the first value is processed, highlighted in red ellipse. To detail, 80% filter weight means that what is sent to Artisan as "current" temperature is a rolling average between 20% of the last measurement value, and 80% of previous average, i.e. a history of past 4-5 temperatures. Because the current implementation of josh's code ensures about 3-4 temperature acquisitions per second, this weight of filtering will match pretty well the default 2 seconds sampling interval of Artisan. You can fine tune the balance between the temperature curve smoothness and measurement delays inherent to rolling averaging by changing this value in Artisan. The recommended range to play is between 50%, if sampling rate is reduced to one second, and 85% if sampling rate is raised to 5 seconds. The code for filtering is implemented actually in my Spy version only, code attached. Can be applied pretty straightforward to the "Command" version too, if you search for the occurrences of word "filt", and merge the lines associated with "filt" in the "Command" code If any problems, just cry and I am here too assist. ~~~
renatoa attached the following file:
renatoa attached the following image:

Edited by renatoa on 02/21/2024 6:36 AM |
|
|
|
| ctjameson |
Posted on 02/19/2024 11:27 PM
|
|
Newbie Posts: 31 Joined: January 09, 2024 |
So it turns out that the control boards were just getting hot on me. I extracted the boards and their little plastic coffin from inside the roaster, rerouted all the cables, and did some testing with the cooling fan relocated to cool the boards. I ran through 7 pounds back to back without a single minute of cool down other than when I kill power to dump and wait for all the beans to get out. This thing is an absolute champ and I'm super excited for the roasts to come with this thing. No thermal runaway or issues with control. I did have some small issues where it was cutting out, but I believe that was an issue with my power delivery in the house since once I cut the fluorescent in the room I was in, it started working just fine for every single minute after. It's officially gotten two friends interested in roasting because of the easy artisan connection. Hopefully V2 will be an instant recommend for even the most un-initiated. Edited by renatoa on 02/20/2024 2:42 AM |
|
|
|
| renatoa |
Posted on 02/20/2024 2:44 AM
|
|
Administrator Posts: 3134 Joined: September 30, 2016 |
Really, I too wondered how they thought the heater control thyristor would cool in that space, with no air flow at all...  |
|
|
|
| Mike_Mathis |
Posted on 02/20/2024 1:11 PM
|
|
1/4 Pounder Posts: 127 Joined: August 06, 2019 |
Hmmm.....I completely removed the slide-out tray from my unit for an alternative bean cooling strategy. I put a blank-off plate where the front of the tray was, so now I have these two little fans that will be pulling air from a complete void if I hit the bean cool button. Now, if I can figure out a way to remove these fans and move them to use for cooling the boards. Then I need to figure out how to run them the entire time the roaster is in service.
Edited by Mike_Mathis on 02/21/2024 11:54 AM *Kaffelogic Nano 7
*Skywalker V1 *2023 BC-2 |
|
|
|
| Robotic Kitten |
Posted on 02/20/2024 6:42 PM
|
|
Newbie Posts: 24 Joined: December 04, 2023 |
Quote renatoa wrote: Nope, not working this way. An executive command, like OT1 (heater value set to...) needs a full loop cycle to be performed. The handleHeat routine only prepares the buffer contents, it doesn't actually send a message to the roaster.. The message sending is done once per loop, sendMessage(), at line 277, above/before the serial status query. I'm running the code with a while, and don't experience any issues. I don't see any downside processing all the serial commands in a single loop pass. As you said, the commands are only updating the `sendbuffer`, so if there are multiple commands in the serial buffer, then just process them all once. |
|
|
|
| renatoa |
Posted on 02/21/2024 2:26 AM
|
|
Administrator Posts: 3134 Joined: September 30, 2016 |
It's just a matter of the commands mix you send. Some sequences could work, some not. If multiple commands of same type are sent, looping them through the while cycle doesn't mean fully processing, just half. The handleXXXX routine(s) overwrites the corresponding buffer value at each pass, and only the last value will be sent to roaster. For example if you send in a fast sequence three heater commands OT1;50-55-60, the buffer sent by sendMessage will contain only the 60 value, thus the false perception they were all three executed... but actually only the last was effective. If the commands in sequence will be of different type, like a fan and a heater command, they each affect a different byte in the buffer, so finally both values are sent to the roaster by sendMessage, thus you are right, while will work for such cases. For my curiosity, what could be the sequence of commands send to roaster so long and complicate that can't wait 200 ms to execute them individually ? Other than the DROP case, which means HRT:0;FAN:100;COOL:100 ... I can't think to other scenario... |
|
|
|

| Jump to Forum: |
Powered by PHP-Fusion Copyright © 2024 PHP-Fusion Inc
Released as free software without warranties under GNU Affero GPL v3
Designed with ♥ by NetriXHosted by skpacman