
Login

Shoutbox
You must login to post a message.
renatoa
05/04/2024 10:15 AM
ETaylor101,  ?
?
?renatoa
04/29/2024 1:50 AM
 , OptomAvad
allenb
04/26/2024 11:19 AM
Mongke

renatoa
04/26/2024 7:26 AM
 , bmartin1000
renatoa
04/25/2024 2:03 AM
AGZ and Intercolcoffee

Forum Threads
Newest Threads
My first roaster eve...Understanding the Curve
Skywalker, the ALM c...
War on Farmers by Su...
Lift blower
Hottest Threads
| Skywalker roaster... | [306] |
| Skywalker, the AL... | [215] |
| Rainfrog's Roastm... | [54] |
| War on Farmers by... | [41] |
| Understanding the... | [29] |
In Memory Of Ginny

Donations
Latest Donations
dmccallum - 10.00
JackH - 25.00
snwcmpr - 10.00
Anonymous - 2.00
Anonymous - 5.00
dmccallum - 10.00
JackH - 25.00
snwcmpr - 10.00
Anonymous - 2.00
Anonymous - 5.00
Users Online
Guests Online: 1
Members Online: 0
Total Members: 8,242
Newest Member: ETaylor101
Members Online: 0
Total Members: 8,242
Newest Member: ETaylor101
View Thread
Who is here? 1 guest(s)
Page 2 of 2: 12
|
 New bread machine roaster building thread
|
|
| Kafka-cloud |
Posted on 11/23/2013 10:25 PM
|
|
Newbie  Posts: 35 Joined: November 02, 2013 |
I am not doing calculation. peteH i see your concern, but i do not share them. Air is much more compressible then a liquid such has water. Air density is around 1.2 km/m3 and water is around 998 kg /m3 both at 20 degree celsius. If you look at a hoze, on top of great lenght of tube, you are also looking at significantly reduced diameter. You can see many nozzle for heat gun that will shrink the exhaust to a much smaller diameter then 1 inch. As for the conception of this system, i do not think that the reduction in the tube diameter for air will have any impact. Since the fan blows 23 cfm, +\- 23 cubic feet per minute enters the 1 inch tube. This will only create a small increase in air speed in the 1 inch tube. Air resistance in an open system shouldn't be high enough to create a resistance to the incoming air. As opposed to the water density creating a bottleneck when looking at smaller hose. I can actually see that it could be beneficial to have an increase air speed as the hot air would flow to the bottom of the roasting chamber. Potentially, giving a more even roast. I saw a couple of bm/hg using flexible steel tubing to have the air exiting the tube closer to the bean. Edited by Kafka-cloud on 11/23/2013 10:32 PM |
|
|
|
| Kafka-cloud |
Posted on 12/03/2013 3:24 PM
|
|
Newbie Posts: 35 Joined: November 02, 2013 |
I had time to work a little more yesterday. I'll post some pictures soon. Finished the top part. Drain and tube provide the support for my copper pipe to enter into the rc. The window has been installed, copper strapping riveted in place. Also prepared the exhaust and screen for the chaff. Couldn't continue because of the noise of my tool in the basement. For the controller, i have soldered all the arduino pins. I was able to test the sd card, the real time clock, and the lcd display. Next is testing the thermocouple. |
|
|
|
| Kafka-cloud |
Posted on 12/03/2013 7:53 PM
|
|
Newbie Posts: 35 Joined: November 02, 2013 |
Hello, Here is the update with pictures. New attachment to the top to fit the pipe in the roasting chamber. This is a stainless and brass sink drain.  Interior fixation  Window tight enough not to move. Also, I suspect that heat dilation will expand the metal more then the glass. But likely not enough to loosen the window.. experiment will tell.  Here is the air exhaust. Aluminium not galvanized. Its a 3 to 4 inch, because i will connect a leftover dryer flexible tubing to get the air out of the house.  Its attached with a combination of rivet and screws... Rivet was not the best choice in this case... Will likely maybe eventually replace with all screws. Didn't have anymore left. Below is the drain mesh, stainless steel, attached in the interior with an extrusion coming inside of the exhaust. Will likely act has a chaff accumulator   |
|
|
|
| Kafka-cloud |
Posted on 12/03/2013 7:55 PM
|
|
Newbie Posts: 35 Joined: November 02, 2013 |
Top piece with tubing coming below to bring the heat closer to the beans. Like the heat riser tube used in other bm/hg build.   |
|
|
|
| Kafka-cloud |
Posted on 12/03/2013 8:04 PM
|
|
Newbie Posts: 35 Joined: November 02, 2013 |
Here is a post of the machine! What is left, building a support for the heat gun and lid to ensure it does not flip or have strain which would lead to breakage or danger during a roasting session. I have a good idea for this one, should be awesome. |
|
|
|
| Lawnmowerman |
Posted on 12/03/2013 9:05 PM
|
 Pounder  Posts: 546 Joined: March 14, 2012 |
Very nice. How will you make a tight seal on the lid. If you see smoke pouring around the perimeter @ 1st crack you may have to fight to prevent stalling. As for insulation, i found firewall insulationworks well wrapped around the outer shroud. When you gonna roast? Looks like you could right away.
Bad coffee prevails when good coffee roasters stand by and do nothing.
|
|
|
|
| Kafka-cloud |
Posted on 12/03/2013 10:05 PM
|
|
Newbie Posts: 35 Joined: November 02, 2013 |
Actually, the rc slides about 1/2 inch into the lid. I may use nsulation... I ll look into it later. As for roasting... I am picking my bean package from sweet maria next week |
|
|
|
| David |
Posted on 12/04/2013 12:45 AM
|
 1 1/2 Pounder  Posts: 690 Joined: October 27, 2005 |
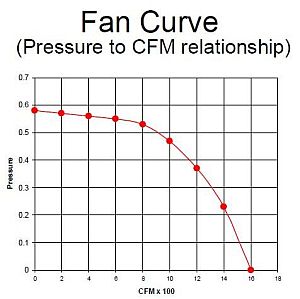
Quote Kafka-cloud wrote: Actually, i think it would be the contrary, the fan will blow the same quantity of air, so it will likely increase the cfm by around 30% to 50%. Love your project, the electrics and especially the pictures. I certainly don't want to discourage your work, but I do think your estimates of air flow won't bear out. It looks like you are assuming the the airflow will be the same 23 cfm regardless. Manufacturers rate their fans by measuring the cfm against varying degress of air resistance The graphic result of this is the "fan curve" for that specific fan. The 23cfm will be the rating with zero pressure impeding the flow. As the HVAC folks know, any amount of ducting will decrease air flow, especially if there are curves or angles. A diameter reduction will give even greater resistance to air flow. Since the manufacturers want to show their product in the best light, they choose the rating at zero pressure resistance. Here is a sample Fan Curve. Reading from left to right, as the resistance drops, the cfm goes up. Or conversely, as the pressure goes up, the cfm goes down. Having said all that, the bottom line is that you will find by experimentation what the right set-up for your rig turns out to be. I imagine you will be able to roast 1 - 1 1/2 lbs of beans, depending on the airflow over and though the beans. I maxed out my BM/HG at 2 lbs, but found that the heat wasn't fully penetrating the bean mass, so some of the beans remained under-roasted. I guess I could have tried to supercharge the Wagner heat gun, or even speed up the BM even more. But I took the easy way out and backed down towards 1 1/3 to 1 1/2 lbs. Onward! Your construction is impressive. Keep up the good work! David
David attached the following image:
|
|
|
|
| Lawnmowerman |
Posted on 12/04/2013 10:08 AM
|
|
Pounder Posts: 546 Joined: March 14, 2012 |
An outer shroud draping downwards around the lid will help to balance it. The extra weight also will aid in achieving a tighter seal. The aim is to see smoke pouring out the exhaust not the lid. I ended up using a lid and mating surface from a breadman grafted onto a zogurushi bm. I needed to use silicone, but over time the mating surface has distorted, allowing smoke to pour out around the lid perimeter. I may have one made from a ceramic tile. As for increasing yields, the nozzle extension helps but so does lenthening the stirring rod. But a tihht fitting lid is most important imho.
Bad coffee prevails when good coffee roasters stand by and do nothing.
|
|
|
|
| Lawnmowerman |
Posted on 12/04/2013 10:14 AM
|
|
Pounder Posts: 546 Joined: March 14, 2012 |
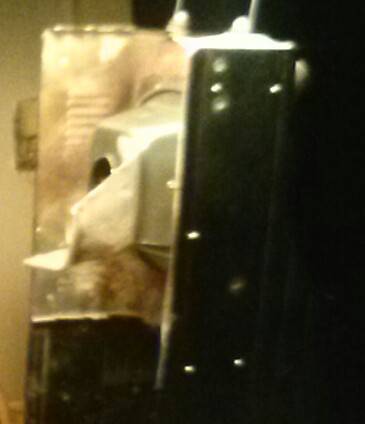
With my lid leaking as it is, i still have no problem with 1pound loads. A side effect of lenthening the bean rake is that it turned it into a bean flinger and I ended up with about 20 beans in the bottom on one corner. So i mounted yet one more baffle on one inside corner of the lid. No more beans wasted!
Lawnmowerman attached the following image:
Bad coffee prevails when good coffee roasters stand by and do nothing.
|
|
|
|
| Kafka-cloud |
Posted on 12/06/2013 8:50 PM
|
|
Newbie Posts: 35 Joined: November 02, 2013 |
Roasted my first batch today. I'll post some pictures soon. Smells so good. I am really happy with my result. I had a lot of fun while roasting, but realize that if the data was collecting by itself, it would have been much easier. Is there any recommended spreadsheet software. I have numbers on my mac but i >\?{*\?]*]?{?|!~!~!}?{*]*!!!!! it. That spreedsheet drives me nuts. Looking for a free/inexpensive spreadsheet wich would let me input value for x axis and have data for y axis to be plotted. Even better if it can do regressional analysis. At worst, i may just take a pen and paper and just to the graph myself, like in the old days. I am looking a solution for this, my datalogging was not implementee for this roast so i have my handnotes of time/ temp. But when it is implemented, i will have a hig volume of data. My first roast, fc at around 9 min, and completed before second crack at 13 min. Outside temp, 0 degree celsius. 16.5% lost of weight. Roasted 455 g and finished with 380 g. Some tanzanian from sweet maria xl sampler. Looking forward to tasting it tomorrow. I think the roast is between full city and full city+. |
|
|
|
| Kafka-cloud |
Posted on 12/07/2013 8:22 PM
|
|
Newbie Posts: 35 Joined: November 02, 2013 |
Hello, Roasted my second pound today. I left the heat full on today. A 11 minutes roast total. stopping at the sound of 2nd crack. FC at 8 minutes. Again a one pound load. 458g to start and 380g at the end. Roasting on my front porch.  Red spot is heater turned on during pre-heat.  thermocouple reader coupled to my arduino and LCD.  My oh, so delicious beans!!!  I also had my first cup of home roasted coffee, this morning, it was absolutely delicious. I believe I roasted yesterdays batch to full city. Today, I expect to have a full city + roast. I am going to friends tomorrow and were are already exchanging xmas gift. They are receiving my 2nd pound! Cheers. I still need to correct the programming and look at the lid for better balance. I may temproraly make a cutout crdboard box for my arduino, to minimize the chances of wire being pulled out. I am not going to do any additional wiring. |
|
|
|
| Airhan |
Posted on 12/07/2013 10:02 PM
|
 1/2 Pounder  Posts: 228 Joined: September 29, 2013 |
Looking great, I'm sure you'll have some neighbors ask what you are up to on your front porch :p
Aaron
"Grind it like it did you some great injustice!"D.L.Clark |
|
|
|

Page 2 of 2: 12
| Jump to Forum: |
Powered by PHP-Fusion Copyright © 2024 PHP-Fusion Inc
Released as free software without warranties under GNU Affero GPL v3
Designed with ♥ by NetriXHosted by skpacman