
Login

Shoutbox
You must login to post a message.
renatoa
04/29/2024 1:50 AM
 , OptomAvad
allenb
04/26/2024 11:19 AM
Mongke

renatoa
04/26/2024 7:26 AM
 , bmartin1000
renatoa
04/25/2024 2:03 AM
AGZ and Intercolcoffee

allenb
04/23/2024 7:01 PM
Paul Kalb
Forum Threads
Newest Threads
War on Farmers by Su...Lift blower
Roast Color Meter - ...
Skywalker roaster mods
Hello from Montreal ...
Hottest Threads
| Skywalker roaster... | [306] |
| Skywalker Roasts | [94] |
| Rainfrog's Roastm... | [54] |
| War on Farmers by... | [41] |
| Green coffee sellers | [18] |
In Memory Of Ginny

Donations
Latest Donations
dmccallum - 10.00
JackH - 25.00
snwcmpr - 10.00
Anonymous - 2.00
Anonymous - 5.00
dmccallum - 10.00
JackH - 25.00
snwcmpr - 10.00
Anonymous - 2.00
Anonymous - 5.00
Users Online
Guests Online: 2
Members Online: 0
Total Members: 8,234
Newest Member: OptomAvad
Members Online: 0
Total Members: 8,234
Newest Member: OptomAvad
View Thread
Who is here? 1 guest(s)
 Freshbeans Air-Roaster
|
|
| JETROASTER |
Posted on 09/19/2013 4:25 PM
|
 Administrator Posts: 1780 Joined: March 06, 2010 |
...and the final update for the moment; A quick peek into the new roast chamber. Going in from the top. Pushing aside the spring loaded deflector reveals a plate or 'wing' that directs the falling beans toward the perimeter of the roast chamber. The width of this chamber was needed to lower the depth of the bean mass. The drawback was poor circulation. The solution was a plate that the beans could pass through going up, and then glide off toward the perimeter on the way down. This was probably the fourth re-design of the wing. Earlier designs had a vertical pipe to guide the plume (and no wing at all). Once the wing grew to it's current diameter, the vertical pipe was no longer needed. The deflector was made to move aside so that it can eventually be part of the evacuation assembly. Cheers, -Scott |
|
|
|
| JETROASTER |
Posted on 05/05/2014 2:17 PM
|
|
Administrator Posts: 1780 Joined: March 06, 2010 |
A little update. The roasting results are great. I've doubled the capacity of the roaster using the same blower and fuel system. I think I have this machine pretty well maxed-out at 10lbs. So, it's time to start roughing in the new components needed to unload and reload. Getting the roasted beans out quickly and into a separate cooling chamber will be a big time saver. This will require 1 more blower, 2 chambers, and all the fittings and plumbing needed to tie it together. The new hardware includes 1.5" black iron, 1.5" chromed brass tube and connectors. Tying it together are some 2" conduit hangers with threaded rod. All the new stuff will clamp onto the existing skeleton. The cooling and reload system will wind up being an almost entirely separate machine intertwined with the roaster. The new chamber funnels are galvanized for the moment. Once they're proven, I'll have them duplicated in aluminum. The additional blower will serve to draw the roasted beans out of the roaster and cool them in one of the new chambers. Additionally, it will push the next load of beans into the roaster from the other new chamber. In this picture, the rough location of the 2 new chambers is decided, but only the lower/funnel sections are in place. The new cooling motor is mocked in place, but I may choose to keep it remote. The "in" and "out" ducting is roughly in place on opposite sides of the roast chamber, but incomplete. I'm still working on a color enhanced diagram to illustrate the air/bean paths. For now, the current state of affairs for the JTRSTR10. Cheers, -Scott
JETROASTER attached the following image:
|
|
|
|
| JETROASTER |
Posted on 05/05/2014 3:24 PM
|
|
Administrator Posts: 1780 Joined: March 06, 2010 |
....and a slightly closer view of all the bits
JETROASTER attached the following image:

|
|
|
|
| tamarian |
Posted on 05/05/2014 10:37 PM
|
|
1/2 Pounder  Posts: 320 Joined: January 21, 2012 |
I always enjoy looking at your tight, well thought out design. The addition of loading and evacuation pipes and chambers will just add to the tightness and complexity, making it more fun to behold :)
Wa'il. 1 Kg PID'ed gas-fired fluid bed roaster, GS/3MPS, K10F
|
|
|
|
| ginny |
Posted on 05/06/2014 9:33 AM
|
 Founder Posts: 3476 Joined: October 24, 2005 |
Scott: Love your vids and I would like to say what a beautiful roaster you have there... we will need a current picture to make a new banner for you, well done Scott. ginny  |
|
|
|
| JETROASTER |
Posted on 05/06/2014 10:31 AM
|
|
Administrator Posts: 1780 Joined: March 06, 2010 |
Thanks folks. The seemingly thoughtful design is actually a result of how long it takes for me to get to things. I have lots of time to ponder while I'm doing other stuff!! I'll get a banner pic as soon as I can. Thank You. Here's a slightly enhanced pic to illustrate the new functions. In blue will be "new" air being drawn through the cooling chamber. In green is the new beans being pushed into the RC by the exhaust air from the cooling blower. In brown are beans exiting the RC on their way to the cooling chamber. The view of new air and roasted beans entering the cooling chamber is obstructed, I'll try to get a pic of that this evening. Cheers, Scott
JETROASTER attached the following image:

|
|
|
|
| allenb |
Posted on 05/06/2014 5:41 PM
|
 Administrator Posts: 3860 Joined: February 23, 2010 |
Very nice Scott! Looking forward to video of this in action. I'll have to say the high density plumbing I'm seeing in your photos would most likely stump even the most capable master plumbers out there! Allen 1/2 lb and 1 lb drum, Siemens Sirocco fluidbed, presspot, chemex, cajun biggin brewer from the backwoods of Louisiana
|
|
|
|
| oldgearhead |
Posted on 05/07/2014 8:53 AM
|
 1 1/2 Pounder  Posts: 1128 Joined: February 10, 2011 |
AWESOME! |
|
|
|
| JETROASTER |
Posted on 05/07/2014 11:05 AM
|
|
Administrator Posts: 1780 Joined: March 06, 2010 |
Thank you all. So here's the hidden cooling section. The evacuation/cooling sequence Evacuation; blower on> RC valve open> drain port closed. Beans get drawn into cooling chamber. Cooling; blower remains on> drain port open> RC valve closed. Beans receive coolest possible air through the drain port, keeping the beans aloft. (as the beans cool, green beans are blown into the roast chamber) Dump; blower off. With no more airflow to keep the beans aloft in the cooling chamber, the beans fall from the drain port. Cheers, -Scott
JETROASTER attached the following images:


|
|
|
|
| oldgearhead |
Posted on 05/07/2014 12:29 PM
|
|
1 1/2 Pounder Posts: 1128 Joined: February 10, 2011 |
Will it run when you aren't home, from your cell phone? (lol) |
|
|
|
| JETROASTER |
Posted on 05/08/2014 10:35 AM
|
|
Administrator Posts: 1780 Joined: March 06, 2010 |
.....all in good time Sir! To be honest, that would be more exciting. By design, the roasting is a bit of a boring process. Once the load is in, there's not much for me to do.....which leaves time for packaging. The compact design and batch size are both driven by the desire to use this machine in the back of my ambulance. That's where I do my packaging. It would all be in one compact, enviromentally controlled space. The icing on the cake is that this machine now produces coffee at the same rate that I can package. That little detail makes this hobby/business much more ideal. Cheers, -Scott |
|
|
|
| JETROASTER |
Posted on 08/22/2014 1:34 PM
|
|
Administrator Posts: 1780 Joined: March 06, 2010 |
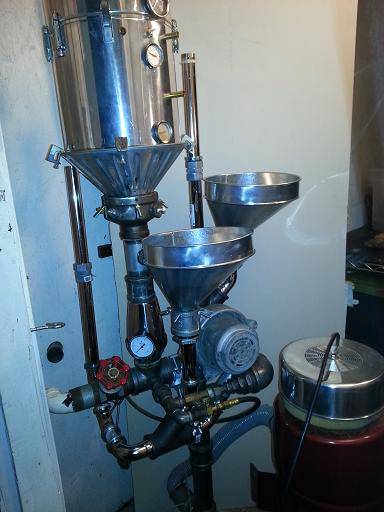
So this is the current state of affairs. This continues to be built around the original burner assembly. The main blower is the larger one towards the back. That was previously in the next room. The smaller blower in front is for the cooling/reload assembly. (That system is not functional yet.) I really prefer the tangential discharge blowers. The intakes and outputs are much easier to manage. Plenty yet to be done, and plenty of Frankenstein stuff in need of beautification. Although it is freestanding right now, the entire rebuild has to fit 17"deep by 25"wide by 48" high.( to fit in the truck) It's strange how things evolve. Critiques/advice are welcome and requested Cheers, Scott
JETROASTER attached the following image:

|
|
|
|
| snwcmpr |
Posted on 08/22/2014 4:38 PM
|
 1 1/2 Pounder Posts: 925 Joined: March 03, 2011 |
WOW!!
--------------
Backwoods Roaster "I wish I could taste as well as I wish I could roast." As Abraham Lincoln said "Do not trust everything you read on the internet". |
|
|
|
| allenb |
Posted on 08/22/2014 7:26 PM
|
|
Administrator Posts: 3860 Joined: February 23, 2010 |
Looking good Scott! I can't wait to see it after ignition and browning some beans! You don't fool me. "As he secretly designed and built a revolutionary propulsion system in his basement for traveling to distant worlds"
allenb attached the following image:

1/2 lb and 1 lb drum, Siemens Sirocco fluidbed, presspot, chemex, cajun biggin brewer from the backwoods of Louisiana
|
|
|
|
| tamarian |
Posted on 08/22/2014 11:51 PM
|
|
1/2 Pounder Posts: 320 Joined: January 21, 2012 |
This is so beautiful and tight! Awesome stuff.
Wa'il. 1 Kg PID'ed gas-fired fluid bed roaster, GS/3MPS, K10F
|
|
|
|
| Omega |
Posted on 08/30/2014 11:12 PM
|
 1/4 Pounder  Posts: 132 Joined: June 13, 2014 |
Truly amazing. This is a roaster that raises the bar for ingenuity and fabrication. What is possible just got expanded by quite a bit. Way to go, freshbeans!  Barry |
|
|
|
| JETROASTER |
Posted on 09/05/2014 1:21 PM
|
|
Administrator Posts: 1780 Joined: March 06, 2010 |
Thank you all for the encouragement. Your kind words were helpful as I spent the past 5-6 days scratching my head. There is one pic of the main assembly....on the floor, getting ready for some editing. The roast chamber is removed, the blower is removed. After roughly 12-13 years of using this thing, it seemed to me that there was a lot of stuff that wasn't needed, and I wanted to make more room for the upcoming cooling assy. (beginning to take shape around the burner) The gigantic elbow (in foreground) seemed like overkill. The entire blower path seemed to be larger than necessary. .....and so the editing began.... Changes in airflow. Changes in fuel delivery, and having to re-figure the combustion air/fuel mix in the new environment took the better part of a week. The left pic is where I'm at right know It is by no means complete yet, but it is roasting again. The internal burner changes seem to have made for better fuel efficiency. The flame is more diffuse and has better turn down. It's likely a bit safer as well. Scorch marks seem to indicate that at lower settings the flame was able to creep into the burner tube. I narrowed things up a bit to eliminate that risk. Again, thanks for the encouragement. I'll post a bit more when this part of the rebuild takes more shape. Cheers, Scott
JETROASTER attached the following images:


|
|
|
|
| allenb |
Posted on 09/05/2014 3:42 PM
|
|
Administrator Posts: 3860 Joined: February 23, 2010 |
Progress! Looking good and can't wait to see some roasting. Uh, but I'm sure you know you're going to have to start all over cause you can't mix black iron and galvanized fittings. But, you may be in luck, according to the homemade roaster engineering handbook on page 90,033, 19th paragraph it clearly states that this rule can be dismissed if the heat source is a Freshbeans designed cannular style burner so I think you're ok.  Allen 1/2 lb and 1 lb drum, Siemens Sirocco fluidbed, presspot, chemex, cajun biggin brewer from the backwoods of Louisiana
|
|
|
|
| JETROASTER |
Posted on 09/06/2014 8:46 AM
|
|
Administrator Posts: 1780 Joined: March 06, 2010 |
Quote allenb wrote: > Uh, but I'm sure you know you're going to have to start all over cause you can't mix black iron and galvanized fittings.<. Allen It's true, I do want to start over. I would redo the whole thing in aluminum....if only I could find the stuff. I've done the basic internet searches in hopes of finding aluminum fittings to build a second machine. It may be that I don't know what I'm searching for....or it doesn't exist. I've found threaded aluminum nipples of all sizes, but no fittings.(90's, unions, couplers, etc.) If anyone has an idea or design logic that could recreate this in aluminum, I would appreciate the feedback. Perhaps I just haven't found the right vendor? In any case, Thanks in advance for any input. Cheers, Scott |
|
|
|
| oldgearhead |
Posted on 09/06/2014 9:12 AM
|
|
1 1/2 Pounder Posts: 1128 Joined: February 10, 2011 |
You might try doing it like an engine block. maybe in two bolt-together halves. Just haul a big block of aluminum to your local machine shop and start in... keep up the great work! |
|
|
|
| JETROASTER |
Posted on 10/03/2014 2:31 PM
|
|
Administrator Posts: 1780 Joined: March 06, 2010 |
The aluminum block idea was viable but.... I edited down far enough to be comfortable with what's left. It did get me thinking though. I really needed some way to make a roasting chamber and cooling chamber fit within a compact space...and keep the weight down as much as possible. I decided to make/find a compartment that could be divided internally to house both tasks....preferably aluminum. So, I'm switching from round roast chamber to square. I plan to modify a 30" tool box to accommodate both chambers. I'll be removing the lid and flipping the whole thing over so that it latches on top of two square 45dg funnels. The box is due in Monday. From there I can fabricate the funnels. C'mon, who doesn't like diamond tread?! This will be my first venture into a square roast chamber. What are the pitfalls? Cheers, Scott
JETROASTER attached the following image:

|
|
|
|

| Jump to Forum: |
Powered by PHP-Fusion Copyright © 2024 PHP-Fusion Inc
Released as free software without warranties under GNU Affero GPL v3
Designed with ♥ by NetriXHosted by skpacman