
Login

Shoutbox
You must login to post a message.
renatoa
05/18/2024 4:18 AM
Tech2C, 
renatoa
05/17/2024 11:29 AM
 jhondue
renatoa
05/16/2024 2:02 AM
Dbic and buddy_magi,
 ?
?
?allenb
05/15/2024 5:30 PM
buorus

renatoa
05/14/2024 7:01 AM
 , kazozero
Forum Threads
Newest Threads
Roasting Peru WashedSkywalker, the ALM c...
Skywalker bearing ch...
The Hakko FA-430 Fum...
New to roasting. Co...
Hottest Threads
| Skywalker roaster... | [320] |
| Skywalker, the AL... | [232] |
| War on Farmers by... | [41] |
| Understanding the... | [29] |
| New to roasting. ... | [26] |
In Memory Of Ginny

Donations
Latest Donations
dmccallum - 10.00
JackH - 25.00
snwcmpr - 10.00
Anonymous - 2.00
Anonymous - 5.00
dmccallum - 10.00
JackH - 25.00
snwcmpr - 10.00
Anonymous - 2.00
Anonymous - 5.00
Users Online
Guests Online: 3
Members Online: 0
Total Members: 8,269
Newest Member: Tech2C
Members Online: 0
Total Members: 8,269
Newest Member: Tech2C
View Thread
Who is here? 1 guest(s)
 Skywalker Roasts
|
|
| HarryDog |
Posted on 01/23/2024 9:10 PM
|
 1/2 Pounder  Posts: 346 Joined: July 20, 2022 |
I put my TC in before using Josh's Skycommand, so it is lower and to the right of the original and shorter. My PT100 has not arrived yet. I'm going to remove it from the graph for now. Filter Fan is just off or on. I don't use it. I changed my buttons a bit already. I weigh the beans and calculate the loss, to get close on color you need to grind and then measure the color level, I used a cheap color meter for a little while but not sure it's much of a benefit. |
|
|
|
| Mike_Mathis |
Posted on 01/24/2024 9:44 AM
|
|
1/4 Pounder  Posts: 119 Joined: August 06, 2019 |
Quote renatoa wrote: Another senior moment during last roast, another lesson to share. This story is especially intended for those who have "learned to love the bomb", i.e. the manual mode, and even brave enough to tackle the automatic stop of roasting based on reaching a certain value. So, the story starts with last roast FC happening at 179C degrees, at 6:45 moment. As usual, that moment I am dialing an auto stop roast value for 8C degrees development, in this case intended to set this value at 187C. By accident, I was distracted, with my finger resting on the minus key, to decrease the auto-stop value from the default 230... and suddenly I hear the beep announcing the end of roasting !  When I look at the display... 183C, the auto-stop has advanced too far, reaching the current bean temperature, stopping the timer at 7:00, so only 15 seconds into the development phase... Frozen... trying to think as fast as I can what to do... restart roast or let it go... Decided to let it as is, so started a timer to see what happens... time pass and, surprise, no sign of temperature drop ! 30 seconds passed and still steady 182C, and beans cracking happily... After 30 seconds, when the temperature finally dropped to 181C, I said 45 seconds of development was acceptable, ie 10% DTR, so I opened the drop door. To my surprise the roast turned out as good as it gets, in this troubled context. Even in the cup today I was delighted to have no cardboard flavor, as is usually preached as a sign of the baked beans apocalypse... when the damn flat zero RoR happens during development. Now I think to try again this recipe, but in a controlled way, i.e. voluntarily lower the heater during development, to force sinking the RoR on the finish as much as I can, but above zero...   Wow! We need cowboy hat and spurs to use this roaster! Thanks for some valuable experience notes using this little controller. I have decided I wish there was a little more tactical feedback when pressing the buttons. Maybe I need to search out and find some little more stiffer springs. I had already decided to use your info on setting a drop temp with the temp adjustment. I will keep my eyes glued on the readout. Your post is what these forums are all about. 
*Fresh Roast SR800 w/ext tube Phidgets & Artisan
*Kaffelogic Nano 7 *Skywalker V1 (heavily modded) *2023 BC-2 |
|
|
|
| HarryDog |
Posted on 01/27/2024 2:41 PM
|
|
1/2 Pounder Posts: 346 Joined: July 20, 2022 |
If anyone is getting strange slider movement it might be caused by Artisan trying to read changes on the roaster. I removed the check marks on the Quantifiers and so far the sliders seem stable. From what I read this would be for reading changes from a controller attached to the roaster. Still need to test during a roast to make sure all works?
HarryDog attached the following image:
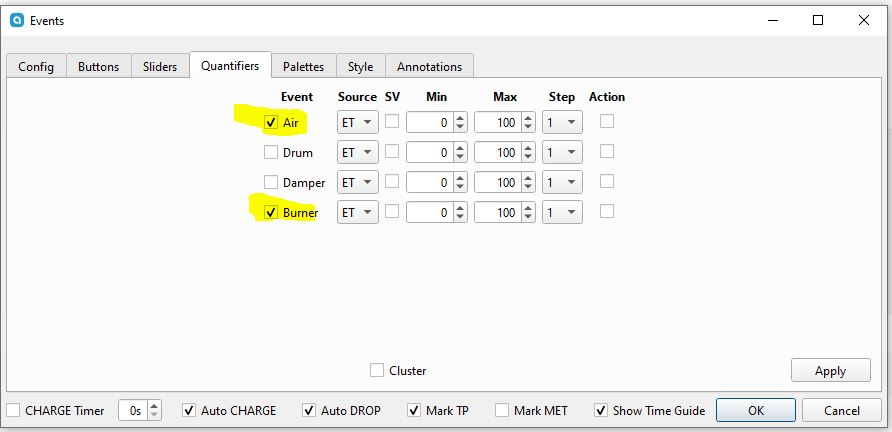
Edited by HarryDog on 01/27/2024 2:52 PM |
|
|
|
| renatoa |
Posted on 01/28/2024 1:13 AM
|
|
Administrator Posts: 3039 Joined: September 30, 2016 |
The "reading changes" part puzzled me... I don't know any TC4 command for this purpose, can you develop? |
|
|
|
| HarryDog |
Posted on 01/28/2024 2:40 AM
|
|
1/2 Pounder Posts: 346 Joined: July 20, 2022 |
So when testing I saw the Slider values in Artisan change by itself, at first I thought this could be noise so I put the Uno on the isolated hub, it would still do it at random. It would also do it when I click "ON" to start a roast, it looks to also happen when the Phigets and the TC4 is initialized at the top of Artisan, I thought it was getting worse? The changes during this initialization part look to be erroneous and just change the sliders and not the Fan or Heater but can cause them to also be out of position, during one test the sliders both said 25 but one was higher then the other??? When I googled the issue I found this thread https://github.co...sions/1081 After removing those check marks the sliders have been accurate during all my tests. Not sure where I got those settings from as it could have been from a config I loaded? This issue looks to be from the Artisan code as far as I can see, was thinking this could be helpful on the Skywalkerspy code but have not even looked at that. Edited by HarryDog on 01/28/2024 9:11 AM |
|
|
|
| renatoa |
Posted on 01/28/2024 10:46 AM
|
|
Administrator Posts: 3039 Joined: September 30, 2016 |
As a general guideline, if you borrow a setup from other machine, check to NOT have ANY reference to Modbus or Phidget devices, if any remove them ! These devices have protocols a lot more handshaking and complicate than TC4. so that solutions for issues of setups based on Mobdus/Phidget based devices are very specific. For a new machine, like Skywalker, preferable is to start a new device setup using Artisan factory settings. Because all the quantifiers are unchecked in the factory settings, this problem should not have existed from the start. |
|
|
|
| HarryDog |
Posted on 01/28/2024 11:08 AM
|
|
1/2 Pounder Posts: 346 Joined: July 20, 2022 |
For sure always better to start from scratch. Just as a test I removed the Phigets setup as it was just for the added TC and ambient temp. Save settings and restart. Same issue and it does this with the initializing of Scope monitoring and then again when initializing the TC4. I can start over from scratch but it looks like Artisan is still attempting to read from the Roaster if those are checked. Simple to just uncheck in my case. |
|
|
|
| BigPastor |
Posted on 01/29/2024 11:50 AM
|
|
Newbie  Posts: 3 Joined: January 06, 2024 |
New guy here� Is there a good video walkthrough on how to use artisan? I would like to set my Skywalker up with it but it will be my first attempt at using it. I have the mod instructions for hardware setup on the Skywalker. I just need to understand the software before my first attempt. |
|
|
|
| renatoa |
Posted on 01/29/2024 12:04 PM
|
|
Administrator Posts: 3039 Joined: September 30, 2016 |
Probably the tutorials on their site... and quick start guide. https://artisan-s... |
|
|
|
| BigPastor |
Posted on 01/29/2024 1:01 PM
|
|
Newbie Posts: 3 Joined: January 06, 2024 |
Quote Oh wow! How did I miss that! Thank you! |
|
|
|
| Lostx403 |
Posted on 01/29/2024 1:53 PM
|
|
Newbie Posts: 17 Joined: December 07, 2023 |
Lots of various good tutorial videos on YouTube as well. They might be referencing different roasters but the info still applies. |
|
|
|
| renatoa |
Posted on 01/30/2024 10:44 AM
|
|
Administrator Posts: 3039 Joined: September 30, 2016 |
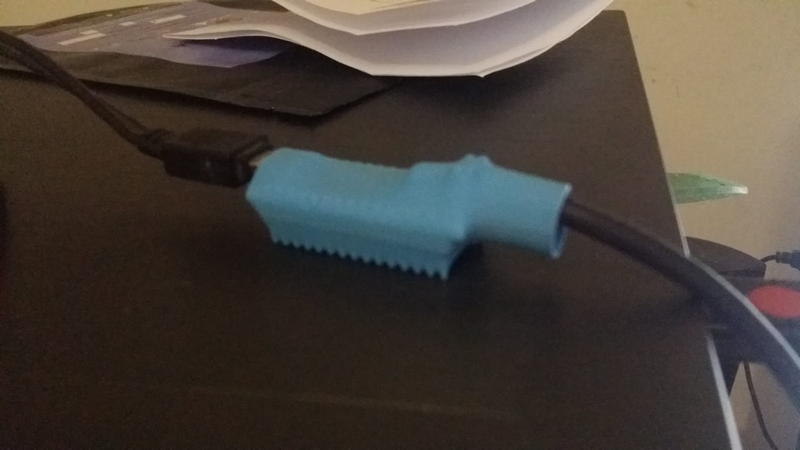
A fellow of our local community asked me a favor of building him a circuit for Artisan connection. My choice was to use an Arduino Nano, in order to obtain a much supple form factor, like a dongle. No casing was used for Arduino Nano, just thermo shrink wrapping. For the Artisan settings I used the most minimalistic approach that ensured the functionality I wanted. Just two sliders for analog controls, and commands on predefined events, as in the attached screens. The only out of the box button meaning redefinition I did, was to use the factory defined FCend button as heater cut-off, at the end of the roast. So, the roasting routine for finish is: wait for FC, mark, wait for development, press FC end, i.e. heater OFF, open the dump door, press DROP = starting cooling. ~~~
renatoa attached the following images:


Edited by renatoa on 01/31/2024 1:38 AM |
|
|
|
| Dan N |
Posted on 01/31/2024 8:40 AM
|
|
Newbie Posts: 26 Joined: January 06, 2024 |
Over many years I've done ~800 roasts on a couple of diy roasters. I'm thrilled to finally have a store bought roaster, but have to start over learning its response to heat/air. I'm really impressed with the power of this roaster. It easiliy handled a quick light roast of 420g. This is my 3rd roast on the Skywalker and my 2nd ever with Artisan control. The actual drop happened 5-10 seconds before the DROP marked on the graph. This natural had a LOT of chaff, the tray was almost full, the back was packed up to the drum and had some black burnt chaff. The result is a wonderful light roast that I'm enjoying as a straight espresso. Nice fruit aroma and flavor, medium acidity and no hint of underdeveloped grass/sour/veg.
Dan N attached the following image:

|
|
|
|
| renatoa |
Posted on 01/31/2024 9:34 AM
|
|
Administrator Posts: 3039 Joined: September 30, 2016 |
Which scale can we read the Heat/Fan levels ? |
|
|
|
| Dan N |
Posted on 01/31/2024 9:42 AM
|
|
Newbie Posts: 26 Joined: January 06, 2024 |
Quote Each gray/white band is 10%. Also 10*RoR (10 = 100%) |
|
|
|
| renatoa |
Posted on 01/31/2024 10:49 AM
|
|
Administrator Posts: 3039 Joined: September 30, 2016 |
So you start with fan at 20% and heater at 90% ? :confused: Imo, the airflow in this machine is just a light breeze compared with the airflow in a conventional drum. I am puzzled about its real purpose (of the airflow) in this machine. Clearly it is not involved in chaff exhaust, and also nor in heating... rather the opposite, in the cooling of beans. Probably the main purpose is to exhaust the smoke and gases. At start I was amazed by the apparently high, 65%, level of airflow in their automatic operation, but later I thought they are right, is hard to notice +/- 10-20% changes around 50%. It can be also used in development phase control, modulating the airflow provides faster and finer control than a 5% heating step. |
|
|
|
| Mike_Mathis |
Posted on 02/10/2024 8:43 AM
|
|
1/4 Pounder Posts: 119 Joined: August 06, 2019 |
Quote renatoa wrote: A fellow of our local community asked me a favor of building him a circuit for Artisan connection. My choice was to use an Arduino Nano, in order to obtain a much supple form factor, like a dongle. No casing was used for Arduino Nano, just thermo shrink wrapping. For the Artisan settings I used the most minimalistic approach that ensured the functionality I wanted. Just two sliders for analog controls, and commands on predefined events, as in the attached screens. The only out of the box button meaning redefinition I did, was to use the factory defined FCend button as heater cut-off, at the end of the roast. So, the roasting routine for finish is: wait for FC, mark, wait for development, press FC end, i.e. heater OFF, open the dump door, press DROP = starting cooling. ~~~ The shrink wrap is a great idea. I can see it reinforcing the wire placement nicely. I'm thinking the 80% max on heat is all that is necessary or a heater element protects longevity thing. Is this a 250g charge? *Fresh Roast SR800 w/ext tube Phidgets & Artisan
*Kaffelogic Nano 7 *Skywalker V1 (heavily modded) *2023 BC-2 |
|
|
|
| renatoa |
Posted on 02/10/2024 9:13 AM
|
|
Administrator Posts: 3039 Joined: September 30, 2016 |
80% heater and 50% air during preheat is to make the lamp life easier, imo. Not a scientifical proof, but smaller thermal stress usually led to prolonged life in high temperature industries equipment. |
|
|
|
| Isdel7 |
Posted on 02/10/2024 9:49 PM
|
|
Newbie Posts: 2 Joined: December 04, 2023 |
Quote renatoa wrote: A fellow of our local community asked me a favor of building him a circuit for Artisan connection. My choice was to use an Arduino Nano, in order to obtain a much supple form factor, like a dongle. No casing was used for Arduino Nano, just thermo shrink wrapping. Could you provide some more info on the thermo shrink wrapping thing? I just ordered a Nano and looking for options regarding cases but I am a complete noob to DIY stuff, so I have no idea what "thermo shrink wrapping" even is. Or if you have one, a photo would be really appreciated. Thanks |
|
|
|
| renatoa |
Posted on 02/11/2024 2:32 AM
|
|
Administrator Posts: 3039 Joined: September 30, 2016 |
Sorry for image quality, but this is the light available here... and old phone camera. The duller image, with the tube shrunk, is the first adapter I did. The second is an actual work in progress, thus the tube is in the non contracted state, as is sold. When wires soldering and other electro-mechanical jobs finished on Nano board, will fully insert it into the tube, and apply a blast of hot air, hotgun or above a stove flame some seconds until it shrinks. The tube is sold in electrical stores, or online like this: www.amazon.com/Di...ref=sr_1_1 ~~~
renatoa attached the following images:
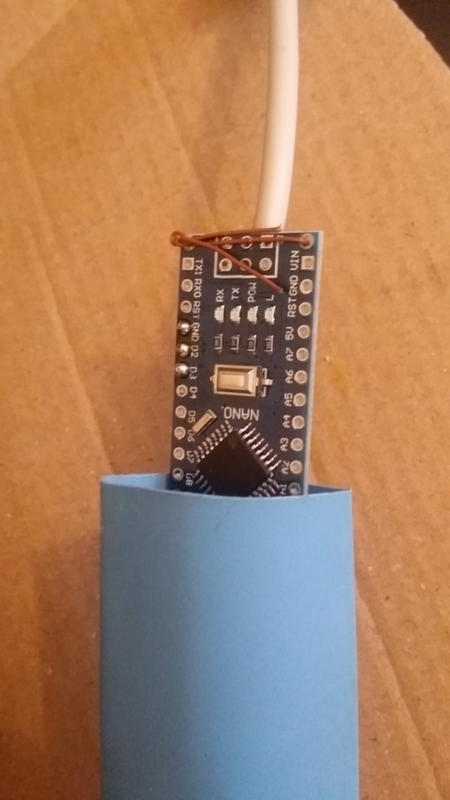
|
|
|
|
| renatoa |
Posted on 02/11/2024 2:42 AM
|
|
Administrator Posts: 3039 Joined: September 30, 2016 |
One more notice about a special case airflow usage... to compensate for colder environments Because the heat source is inside the drum, and the machine heat loss does not impact the beans heat absorption, the main influence of the ambient temperature is due to the air moved through the drum. A fellow is forced to roast in a very cold basement, about 14C degrees there... ... for this reason his power levels are unusual higher than the norm, and the dry phase start is very slow.For example the automatic 22 program, starting the roast with 70% level, led for him to a dry end in the minute 6 ballpark. The cure was to reduce the airflow, from the default 65%, to 55%, and he is back in the average roast times and power levels. I think the opposite should apply too... in the summer, when roasting in hotter ambient, close to 30C for example, dialing +5-10% airflow could help... to be verified in 3 months from now |
|
|
|
| Mike_Mathis |
Posted on 02/11/2024 1:49 PM
|
|
1/4 Pounder Posts: 119 Joined: August 06, 2019 |
 Interesting and valuable information. It makes sense and it increases my coffee seed cooking success rate. Thanks for posting. Interesting and valuable information. It makes sense and it increases my coffee seed cooking success rate. Thanks for posting.
*Fresh Roast SR800 w/ext tube Phidgets & Artisan
*Kaffelogic Nano 7 *Skywalker V1 (heavily modded) *2023 BC-2 |
|
|
|
| HarryDog |
Posted on 02/12/2024 5:15 PM
|
|
1/2 Pounder Posts: 346 Joined: July 20, 2022 |
Any Tips for Decaf Roasting in the Skywalker? 350g Charge Was thinking of 185c charge at TP going to 75% for 1 minute Then 85% to finish drying? Would you keep your normal drop temp? |
|
|
|
| amaller |
Posted on 02/13/2024 2:07 PM
|
|
Newbie Posts: 8 Joined: January 05, 2024 |
Quote HarryDog wrote: Any Tips for Decaf Roasting in the Skywalker? 350g Charge Was thinking of 185c charge at TP going to 75% for 1 minute Then 85% to finish drying? Would you keep your normal drop temp? I recently did a 325g Colombian WP decaf roast using the 011 profile on the roast controller. It�s honestly the best decaf I�ve ever roasted. After a few days of degassing it still had a nice chocolate orange thing going on with minimal decaf maltiness. Preheat on that profile I believe is 200C. Roast finished at 10 min 30 sec with 15% development time. |
|
|
|
| HarryDog |
Posted on 02/13/2024 2:30 PM
|
|
1/2 Pounder Posts: 346 Joined: July 20, 2022 |
How was the color, oils on the beans any scorching? Will check my notes on the 011 profile changes. |
|
|
|

| Jump to Forum: |
Powered by PHP-Fusion Copyright © 2024 PHP-Fusion Inc
Released as free software without warranties under GNU Affero GPL v3
Designed with ♥ by NetriXHosted by skpacman