
Login

Shoutbox
You must login to post a message.
allenb
09/19/2024 11:19 AM
Firaollemecha 
allenb
09/15/2024 8:05 PM
JKnight
renatoa
09/15/2024 1:26 AM
JonnyPanic,  ?
?
?renatoa
09/13/2024 1:32 PM
Krush and jdspainhour,

renatoa
09/12/2024 1:06 AM
 , KnittyBrew
Forum Threads
Newest Threads
Hello from eastern PAHome Roaster Color M...
My Sight Glass FB Ro...
Coffee Crafters Flui...
First Roaster, DIY S...
Hottest Threads
| Skywalker roaster... | [386] |
| Skywalker Roasts | [102] |
| Using a TC4 with ... | [41] |
| Green coffee reviews | [10] |
In Memory Of Ginny

Donations
Latest Donations
dmccallum - 10.00
JackH - 25.00
snwcmpr - 10.00
Anonymous - 2.00
Anonymous - 5.00
dmccallum - 10.00
JackH - 25.00
snwcmpr - 10.00
Anonymous - 2.00
Anonymous - 5.00
Users Online
Guests Online: 2
Members Online: 0
Total Members: 8,498
Newest Member: Firaollemecha
Members Online: 0
Total Members: 8,498
Newest Member: Firaollemecha
View Thread
Who is here? 1 guest(s)
 4-channel TC meter and datalogger project
|
|
| randytsuch |
Posted on 09/13/2010 8:55 AM
|
 1/2 Pounder  Posts: 394 Joined: June 20, 2009 |
So I think I declared victory too soon, on a couple of fronts. Fan control is working, but controlling the fan with a PWM signal causes it to pulse. The roasts I have done with auto fan control are longer and slower, and I don't think they taste as good. I need to do some more experimentation, but right now I am probably going back to manual control until I figure this out. I also tried ROR control last night, and it didn't work. It should be simple, but I have some bug I need to figure out in the code. BTW, my pre arduino fan control schematic is here http://randytsuch...gspot.com/ The fan control switch became a 3 way switch, with ON-OFF-AUTO as the positions. Auto is a SSR, controlled by the 2nd arduino PWM output from the TC4 board. Randy |
|
|
|
| bvwelch |
Posted on 09/13/2010 9:17 AM
|
 1 1/2 Pounder  Posts: 1064 Joined: December 27, 2007 |
If you have a DC fan or a 'universal motor' like the P1 which can run on DC just as well as AC, then you can use a power mosfet or similar to control the speed -- like Doug Strait did on his P1 mod. Use your PWM signal to drive an opto-isolator connected to a power mosfet. If you're stuck with an AC motor, I have some ideas that I got from a friend, but haven't tested yet. The idea is to spread the total on-off time over a few seconds, and make sure the motor is 'on' long enough during each 'on time' to run smoothly. |
|
|
|
| randytsuch |
Posted on 09/13/2010 12:03 PM
|
|
1/2 Pounder Posts: 394 Joined: June 20, 2009 |
Quote bvwelch wrote: If you have a DC fan or a 'universal motor' like the P1 which can run on DC just as well as AC, then you can use a power mosfet or similar to control the speed -- like Doug Strait did on his P1 mod. Use your PWM signal to drive an opto-isolator connected to a power mosfet. If you're stuck with an AC motor, I have some ideas that I got from a friend, but haven't tested yet. The idea is to spread the total on-off time over a few seconds, and make sure the motor is 'on' long enough during each 'on time' to run smoothly. I'I have the original Pumper, which has the same guts as the P1, I didn't know you could run this off of DC? I guess I need to find Doug's P1 mod, and see what he did. I was actually thinking about getting a X10 fan dimmer, and an X10 controller, and use that to control the fan speed. They are both fairly inexpensive, and the arduino has x10 libraries, so it should be pretty simple to do. EDIT Bill, I found some threads about your modded P1, but it has a preliminary schematic, but I did not see the final one. It also mentioned you may have some boards made. It that the circuit you are talking about? Randy Edited by randytsuch on 09/13/2010 12:25 PM |
|
|
|
| JimG |
Posted on 09/13/2010 5:18 PM
|
|
1 1/2 Pounder Posts: 834 Joined: October 23, 2008 |
Quote randytsuch wrote: ... controlled by the 2nd arduino PWM output from the TC4 board. Both OT1 and OT2 on the TC4 board are run by the same 16-bit timer. So you are stuck with using the same PWM frequency on both. The upshot of this is that if you are using OT1 to drive a heater SSR with, say, a 1 second time base, then OT2 will need to have a 1 second time base, too. To have different PWM frequencies, then the best option on the original TC4 board would be to use analogWrite to Arduino pin 3. By default, pin 3 will be set up by the Arduino core library for 490Hz. On the new TC4 shields, pin 3 is tied to I/O3, making it easily accessible for a higher frequency PWM option using analogWrite(). Jim |
|
|
|
| bvwelch |
Posted on 09/14/2010 5:31 AM
|
|
1 1/2 Pounder Posts: 1064 Joined: December 27, 2007 |
Quote randytsuch wrote: Bill, I found some threads about your modded P1, but it has a preliminary schematic, but I did not see the final one. It also mentioned you may have some boards made. It that the circuit you are talking about? Randy Yes, WesT and I had thought to build a nice safe controller box, but never brought it to market. We had two versions -- one for the original P1 and Pumpers with the nice big 'universal' motor. We had another version for the cheapo P2-style poppers. We built PCBs and several prototypes and they worked well - I've been using one for nearly two years now. I may have a few PC boards and parts-kits left. |
|
|
|
| SteveN |
Posted on 09/14/2010 8:42 AM
|
 1/4 Pounder  Posts: 127 Joined: March 16, 2010 |
Anyone have an online source for the mcp3424? Everywhere I've checked is backordered at least one month. |
|
|
|
| JimG |
Posted on 09/14/2010 11:39 AM
|
|
1 1/2 Pounder Posts: 834 Joined: October 23, 2008 |
This morning I received a small shipment (11) of MCP3424E/SL chips from MicroChip. I saw they were available last week and snatched them up for TC4 buyers. If you have a TC4 (or want to order one) and need this chip to build your board, PM me. I'll sell them til they're gone for $5 for the chip plus $2 for shipping. This ($5) is break-even for me after paying for shipping from Thailand. Jim |
|
|
|
| randytsuch |
Posted on 09/14/2010 2:14 PM
|
|
1/2 Pounder Posts: 394 Joined: June 20, 2009 |
I thought about my fan issues yesterday, and decided against trying something with x10. I think it would have been a slick solution, but the problem with digital dimmers is that you get a limited number of discrete steps. I am used to using a analog dimmer, where you have "infinite" steps. In practice, a x10 digital dimmer may have fine enough resolution to work, but I don't want to spend the money to find out. This leads me to Bill's suggestion to rectify my AC, and then use a mosfet controlled by one of the PWM outputs to control fan speed. This will work for me, and I am planning to do this to get my setup working, but it is not a very universal solution. It works for anyone with a P1 or Pumper, but not many others. In the future, I may try for a different, more universal solution. I am planning to use an Arduino to replace my PID on my espresso machine, and for that application, will need to figure out how to control the pump pressure. I do it now manually with a light dimmer, so it is very similar to this problem, and I can't (at least I don't think I can) feed that pump DC. Randy |
|
|
|
| randytsuch |
Posted on 09/14/2010 11:58 PM
|
|
1/2 Pounder Posts: 394 Joined: June 20, 2009 |
So I fixed a few bugs, and got manual ror roasting working. Attached is the graph from my roast. I didn't slow it down soon enough, but it was just a test anyway. Randy
randytsuch attached the following image:
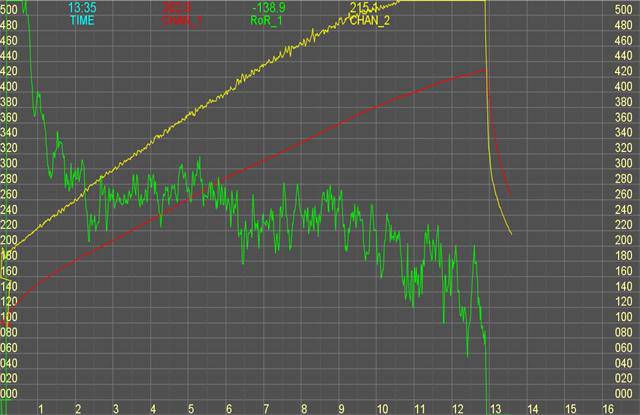
Edited by randytsuch on 09/14/2010 11:59 PM |
|
|
|
| randytsuch |
Posted on 09/18/2010 10:19 PM
|
|
1/2 Pounder Posts: 394 Joined: June 20, 2009 |
I just uploaded a new version of Kona, which supports a manual ror roasting mode (mode 3). I also uploaded a p_Kona processing program, which you need to run with it, if you want to get the graph on a PC, and get a log file. I modified pBourbon to add some more parameters to the log file and the display. p_Kona will display the setpoint, step number and count down timer, along with all of the other information. I am also close to releasing my initial version of "Moka". Moka is a ROR based PID program. It supports profiles based on ROR and Monitor temp (MT). MT is BT in my setup. Each step has a ROR defined, and that ROR is maintained until a target MT is reached. It also support soaking at a constant temp, for a time period. Randy |
|
|
|
| JimG |
Posted on 09/19/2010 8:05 AM
|
|
1 1/2 Pounder Posts: 834 Joined: October 23, 2008 |
Randy - The Kona application is a great contribution. Congrats and thanks! I think it might be helpful to load your current code into the SVN source tree on the project site. I don't know the best way to do this, but I'm confident that Bill would provide guidance. I've have made many improvements to the "early" TC4 code, and some of that early code is incorporated in Kona. Putting the Kona code into the SVN tree would let me update those particular portions of the Kona code in a way where you can easily review and accept/reject proposed revisions. (Just one example: I no longer use the Riser library because I have found that digital RC filtering works better, is much more easily adjusted for performance, and requires less code). Jim |
|
|
|
| randytsuch |
Posted on 09/19/2010 11:19 AM
|
|
1/2 Pounder Posts: 394 Joined: June 20, 2009 |
Quote JimG wrote: Randy - The Kona application is a great contribution. Congrats and thanks! I think it might be helpful to load your current code into the SVN source tree on the project site. I don't know the best way to do this, but I'm confident that Bill would provide guidance. I've have made many improvements to the "early" TC4 code, and some of that early code is incorporated in Kona. Putting the Kona code into the SVN tree would let me update those particular portions of the Kona code in a way where you can easily review and accept/reject proposed revisions. (Just one example: I no longer use the Riser library because I have found that digital RC filtering works better, is much more easily adjusted for performance, and requires less code). Jim Hi Jim I know that you made improvements to Boubon as I worked on Kona, but I didn't know what they were, and if it was worth incorporating them into Kona. It would be great if you could look at Kona, and see what should be done. I spent a little time trying to figure out SVN, and wasn't able to. So, I need help to put it into the SVN tree. BTW, for Moka, I started using the tabs feature in Arduino, and I think will make it easier to support the code, although it does create seperate files for some of the routines, and you need to know out where the routine you are looking for is. Randy |
|
|
|
| allenb |
Posted on 09/19/2010 11:38 AM
|
 Administrator Posts: 3885 Joined: February 23, 2010 |
Quote randytsuch wrote: So I fixed a few bugs, and got manual ror roasting working. Attached is the graph from my roast. I didn't slow it down soon enough, but it was just a test anyway. Randy Did you have infinite control over selection of RoR rates or pick from a few preset rates? Did you find it to be a useful method? Allen 1/2 lb and 1 lb drum, Siemens Sirocco fluidbed, presspot, chemex, cajun biggin brewer from the backwoods of Louisiana
|
|
|
|
| JimG |
Posted on 09/19/2010 12:53 PM
|
|
1 1/2 Pounder Posts: 834 Joined: October 23, 2008 |
Quote randytsuch wrote: So, I need help to put it into the SVN tree. I downloaded your zip file, renamed the Arduino source to aKona.pde, and placed it where I thought it made sense in the SVN repository. I did not make any revisions except to rename the file. http://code.googl.../aKona.pde Open this page and click on the "diff" link to see the changes made since your original back in July. If you like, you can use TortoiseSVN to checkout the file, edit it, then "commit" it back to the archive. Jim |
|
|
|
| randytsuch |
Posted on 09/19/2010 3:03 PM
|
|
1/2 Pounder Posts: 394 Joined: June 20, 2009 |
Quote allenb wrote: Quote randytsuch wrote: So I fixed a few bugs, and got manual ror roasting working. Attached is the graph from my roast. I didn't slow it down soon enough, but it was just a test anyway. Randy Did you have infinite control over selection of RoR rates or pick from a few preset rates? Did you find it to be a useful method? Allen If you hold the + or - button down for 1 sec, it changes ROR by 1 deg/min. Hold for 2 secs, it changes by 5 deg/min. This user interface could use a little tweaking, but it works well enough for now. I've only done a couple roasts with manual ROR, and so far I didn't slow down soon enough, so my ror was too fast after first, and I couldn't stretch the time from first to end enough. I don't really see using this method that much, I expect to use Moka after I get my profiles down for ror roasting. Randy |
|
|
|
| mikeasr |
Posted on 09/21/2010 4:15 PM
|
|
Newbie  Posts: 11 Joined: September 06, 2010 |
Please help. I finished v.3 board but when I plug it into the Arduino, I lose communication.....my COM port goes away. I noticed the lights on the Arduino go away as well. I have two thermocouples in TC1 and TC2. I'm not sure about TC polarity....I have black as positive, red negative. Is it necessary to jumper TC3 and TC4? I looked the board over and can't see any bridged solder joints, or cold joints....maybe I need more magnification. Advice appreciated. Mike Asher |
|
|
|
| JimG |
Posted on 09/21/2010 5:27 PM
|
|
1 1/2 Pounder Posts: 834 Joined: October 23, 2008 |
Hi, Mike - Best guess is that you should be looking for a short. I saw those exact symptoms once when I accidentally connected +5V and GND together on a breadboard. The TC connections, I think, are unrelated to the problem. But in answer to your question, you can leave TC3 and TC4 open. Type K thermocouple color code: yellow = positive red = negative Jim Edited by JimG on 09/21/2010 5:30 PM |
|
|
|
| mikeasr |
Posted on 09/21/2010 8:16 PM
|
|
Newbie Posts: 11 Joined: September 06, 2010 |
Thanks Jim, I found it.....eeprom mounted upside down. That's the only component I wasn't clear on. I should have looked closer at the picture of your completed board. It appears that I didn't damage the chip as pBourbon processing prog is displaying correctly...I think, Mike |
|
|
|
| JimG |
Posted on 09/21/2010 9:39 PM
|
|
1 1/2 Pounder Posts: 834 Joined: October 23, 2008 |
Mike - I don't like the silkscreen for that EEPROM chip. I have to go look at the schematic every time I solder one to a board. But that's what in my Eagle library, so I'm stuck with it until/unless I figure out how to fix it. Jim |
|
|
|
| randytsuch |
Posted on 09/22/2010 12:45 AM
|
|
1/2 Pounder Posts: 394 Joined: June 20, 2009 |
Quote mikeasr wrote: Thanks Jim, I found it.....eeprom mounted upside down. That's the only component I wasn't clear on. I should have looked closer at the picture of your completed board. It appears that I didn't damage the chip as pBourbon processing prog is displaying correctly...I think, Mike I don't think pBourbon uses the eeprom, does it? I would guess that your eeprom is dead, chips don't like to be installed backwards, and then powered up. Randy |
|
|
|
| mikeasr |
Posted on 09/22/2010 5:53 AM
|
|
Newbie Posts: 11 Joined: September 06, 2010 |
Jim, I should have done the same......look and the layout/schematic...duh. Randy, I was thinking the chip should have been a goner as well. As I remember the EEPROM was to be used to store calibration data, right? Is there a piece of code I could use to read/write to it, to verify it's bad? Thanks, Mike |
|
|
|
| JimG |
Posted on 09/22/2010 9:16 AM
|
|
1 1/2 Pounder Posts: 834 Joined: October 23, 2008 |
Quote As I remember the EEPROM was to be used to store calibration data, right? Is there a piece of code I could use to read/write to it, to verify it's bad? Yes, the EEPROM was added with the intention of being able to store calibration information. It was also contemplated that having the EEPROM would allow storing PID parameters, roast profiles, etc. with future software versions. I wrote an open source "mcEEPROM" library to be used for accessing the EEPROM. But the EEPROM is not used by the current version of the Bourbon application. It is not used by Randy's Kona PID application either. There are some programs on the project site, however, that you can run to test the EEPROM. I used these demos for debugging the mcEEPROM library. http://code.googl...EEPROM.pde http://code.googl...EPROM2.pde http://code.googl...EPROM3.pde To compile these programs, you will also have to have the mcEEPROM library (2 files) on your computer. First, create a mcEEPROM folder in your sketchbook libraries folder (in Windows, this is normally: My Documents/arduino/libraries). Then copy files mcEEPROM.h and mcEEPROM.cpp from the project site and put them into your new ../libraries/mcEEPROM folder. http://code.googl...EEPROM.cpp http://code.googl...mcEEPROM.h This is much harder to explain than it is to do! The demo programs are pretty simple. They each write a different type of data to the EEPROM, and then try and read it back. The results are viewable on the serial monitor. Jim |
|
|
|
| randytsuch |
Posted on 09/22/2010 9:17 AM
|
|
1/2 Pounder Posts: 394 Joined: June 20, 2009 |
Mike I have not used the eerom yet, but Jim may have something to test it with. To any early adopters of Kona, I am coming out with yet another revision soon, and a major one. I decided to merge Kona and Moka, so Moka as a stand alone program will not be released. The new Kona supports time/temp profiles, ror profiles and manual ror roasting. I did an automatic ror roast last night, the graph is attached. Other major changes in this version is the use of "tabs" in Arduino, which is really putting different routines in different files. I think it makes it easier to support this way. So, I have made an include file, and a .pde file which contain the information that people would want to customize. The pde file contains the profiles, and the PID constants and other things are in the include file. This should make it easier to make future revision upgrades, you should only have to save these two files when upgrading. I also made a compensation algorithm, instead of using an offset by step. This would work better if you are doing manual ror roasts, but you do need to figure out the offset algorithm for your roaster. It still supports offset by step, and I will disable the compensation by default. Note; The hump in the graph was because I adjusted fan speed at that point. Randy
randytsuch attached the following image:
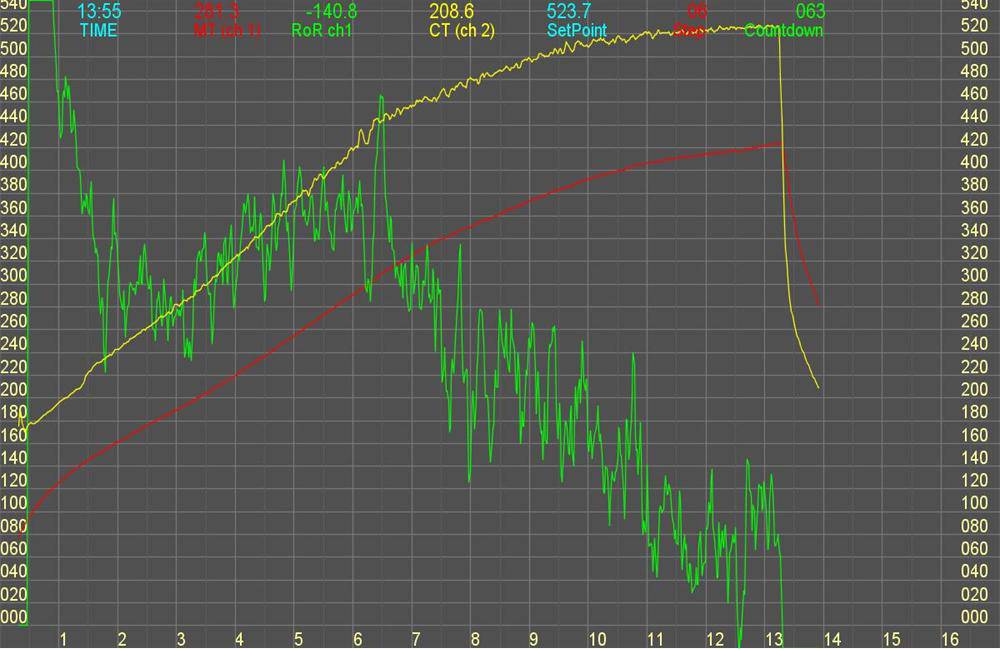
Edited by randytsuch on 09/22/2010 9:18 AM |
|
|
|
| mikeasr |
Posted on 09/22/2010 11:26 AM
|
|
Newbie Posts: 11 Joined: September 06, 2010 |
Does this look right? I copy/pasted from processing app.... Code Download source COM Port: COM13 |
|
|
|
| JimG |
Posted on 09/22/2010 5:19 PM
|
|
1 1/2 Pounder Posts: 834 Joined: October 23, 2008 |
Yes, Mike, the readback from the EEPROM does look right. Looks like it survived its minor calamity  There is a little simpler way to test the EEPROM that does not require the use of Processing. Click the icon in the Arduino IDE to upload an EEPROM demo sketch. Wait for it to say it is done uploading, or watch for it to turn from orange back to white. Then click the icon for the serial monitor (still in the Arduino IDE). You may need to adjust the baud rate to 57600. Just check and see what the serial monitor window says in the lower right corner. Jim |
|
|
|

| Jump to Forum: |
Powered by PHP-Fusion Copyright © 2024 PHP-Fusion Inc
Released as free software without warranties under GNU Affero GPL v3
Designed with ♥ by NetriXHosted by skpacman