
Login

Shoutbox
You must login to post a message.
renatoa
07/26/2024 3:49 PM
Bill grubbe and Jk, 
allenb
07/26/2024 5:15 AM
Spiderkw Welcome to HRO!

renatoa
07/24/2024 8:31 AM
ramiroflores and John123,

 ?
?
?renatoa
07/21/2024 1:18 AM
 , Luislobo
renatoa
07/19/2024 11:28 AM
Koepea,
Forum Threads
Newest Threads
Skywalker roaster modsBackground Roast Iss...
Hello from Arkansas
TC4ESP
Green coffee reviews
Hottest Threads
| Skywalker roaster... | [375] |
| TC4ESP | [115] |
| War on Farmers by... | [47] |
| Adventures in flu... | [26] |
| Hello! (soon) Roa... | [17] |
In Memory Of Ginny

Donations
Latest Donations
dmccallum - 10.00
JackH - 25.00
snwcmpr - 10.00
Anonymous - 2.00
Anonymous - 5.00
dmccallum - 10.00
JackH - 25.00
snwcmpr - 10.00
Anonymous - 2.00
Anonymous - 5.00
Users Online
Guests Online: 9
Members Online: 0
Total Members: 8,393
Newest Member: Bill grubbe
Members Online: 0
Total Members: 8,393
Newest Member: Bill grubbe
View Thread
Who is here? 1 guest(s)
 The Sample Roaster Project
|
|
| qajariaq |
Posted on 01/23/2009 8:56 PM
|
|
1/4 Pounder  Posts: 127 Joined: November 22, 2008 |
Thanks for the info and advice! :BowDown: I know the 1 mfd run capacitors are available, so I'll give it a shot. The stainless funnel could be cut down, but I'm probably going a different direction on the drum - solid drum instead of the Behmor basket. The solid drum is more compact and should help shield the beans from direct heat (the 18k BTU burner can't be throttled back enough even for the skillet method I'm using at the moment). Quote Dan wrote: I would just use the 1mfd. It is close enough. Run capacitors jump in 2.5 and 5mfd increments, so they can't be that touchy. I think it is more important that you use something made as a run capacitor. Besides capacitance and voltage, they have to be able to deal with a certain amperage, too. Can't you just cut down the large SS funnel to fit the Behmore drum? |
|
|
|
| qajariaq |
Posted on 01/29/2009 4:38 PM
|
|
1/4 Pounder Posts: 127 Joined: November 22, 2008 |
So the gear motor and run capacitor arrived. Early tests indicate that its more than powerful enough and the 1 mfd capacitor works just fine. The motor is of the synchronous type, so it turns fairly slow on its own (the gear reduction looks like 5:1 or so). The motor is surplus, so it didn't come with much in the way of tech data or instructions. I'm not too familiar with synchronous motors and I'm not sure I can vary the RPM much if at all. No big deal... Its a sweet little motor though, very compact and whisper quiet. Now to get on with finishing the drum!   |
|
|
|
| seedlings |
Posted on 01/30/2009 8:23 AM
|
 1 1/2 Pounder  Posts: 4226 Joined: June 27, 2007 |
Aweseome progress! One thing to consider is if you can't vary the speed of the motor, you can have different diameter drums. A larger diameter drum will be move the beans faster than a smaller diameter for each revolution. CHAD Roaster: CoffeeAir II 2# DIY air roaster
Grinder: Vintage Grindmaster 500 Brewers: Vintage Cory DCU DCL, Aeropress, Press, Osaka Titanium pourover |
|
|
|
| qajariaq |
Posted on 04/09/2009 5:12 PM
|
|
1/4 Pounder Posts: 127 Joined: November 22, 2008 |
I keep dragging my feet on this project. Every time I get worked up into a lather about getting my butt into high gear, I see something like this: And it reminds me again that problems do not always require a 'new' and relatively complex "solution!" My stainless pot over a grill side burner looks pretty space age by comparison!  Worst thing is that it will actually roast some decent coffee!! Now what's gonna push me over the edge to finally build a drum roaster?? lol! Worst thing is that it will actually roast some decent coffee!! Now what's gonna push me over the edge to finally build a drum roaster?? lol! |
|
|
|
| Mike |
Posted on 04/11/2009 10:28 PM
|
 1/2 Pounder  Posts: 283 Joined: October 24, 2005 |
Sounds like you still have some questions about the motor. The best primer on small motors, motors with gear reducers and the associated theories that I have run into is at: http://www.bodine...ctric.com/ do a search there for the file: bodinehandbook all chapters.pdf Good reading while you're roasting over the idyllic wood powered roaster ;~) Mike B) Edited by John Despres on 04/12/2009 5:42 AM |
|
|
|
| qajariaq |
Posted on 05/01/2009 9:55 PM
|
|
1/4 Pounder Posts: 127 Joined: November 22, 2008 |
I have managed to carve out a little time to do some work on the drum: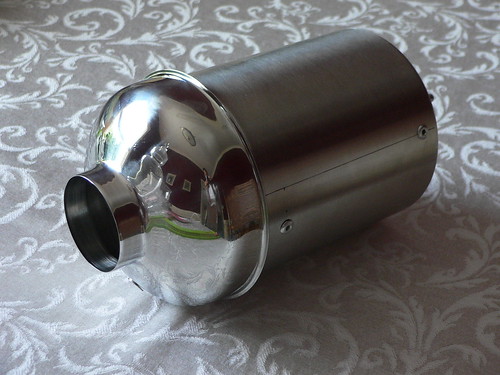 The two main components are a stainless canister and canning funnel. The vanes and brackets were cobbled together from 1" wide strips of 0.080" aluminum (those massive pop rivets just happened to be what I had on hand, though 1/8" would probably have been better...). 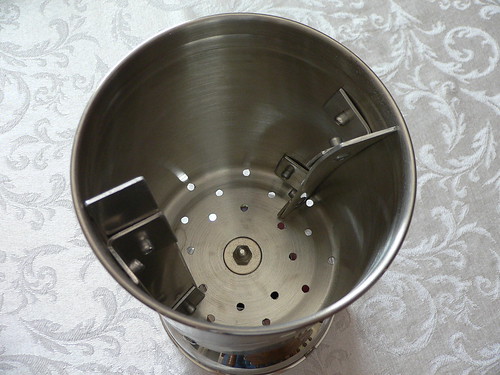 The vanes are angled and twisted to help push the beans towards the back and away from the front opening while the roast is under way. The largest circle of holes in the back are placed right at the 'corner' of the canister bottom to allow chaff to fall out. At least that's the theory, anyway (and more holes may still be added). 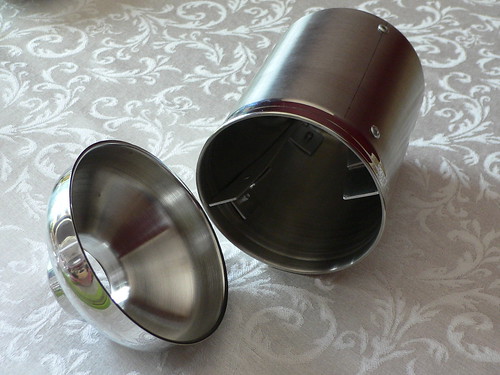 The funnel is not attached yet, and I'm not sure I'll ever permanent fix it in place. It fits snugly on the canister, but allows me to remove it for easier cleaning and debugging at this stage. Batch size seems to be dictated by how far off horizontal the drum's axis is. Three quarters of a pound of greens seems to work fine without having a really steep drum inclination, but I have yet to determine if beans will spill out the front when expansion occurs during roasting. I'm going to try and rig up some kind of contraption to allow me to run a few test roasts using the drum and motor assembly without any housing before I commit to a lot more metal work. My first attempt, with the drum chucked in my cordless drill, went nicely until the battery died just before first crack.... :@ |
|
|
|
| seedlings |
Posted on 05/02/2009 11:13 AM
|
|
1 1/2 Pounder Posts: 4226 Joined: June 27, 2007 |
Oh, man! Died before first crack! Did you do an emergency dutch-oven on the stove finish? Great to see progress! CHAD Roaster: CoffeeAir II 2# DIY air roaster
Grinder: Vintage Grindmaster 500 Brewers: Vintage Cory DCU DCL, Aeropress, Press, Osaka Titanium pourover |
|
|
|
| qajariaq |
Posted on 05/02/2009 11:28 AM
|
|
1/4 Pounder Posts: 127 Joined: November 22, 2008 |
I did save it, grabbed the stainless stock pot I've been using and kept on cookin'. The roast turned out fine, although it has an odd sort of brightness that I wasn't expecting despite finishing up close to second crack. I'm sure it has something to do with the pause and subsequent temp drop right before first crack... |
|
|
|
| Aaron |
Posted on 01/14/2010 6:14 PM
|
|
Newbie  Posts: 16 Joined: January 14, 2010 |
This is exactly the drum roaster I wanted to replicate. I am interested to see if you have made any more progress on this build. I was considering angling the drum about 10 degrees but I'm not sure its necessary. What is the dimensions of your drum? and how much coffee do you think it will hold? Sorry for all the questions but this is my first drum roaster project and I think yours will be a great "proof of concept" and building guide (If you dont mind) |
|
|
|
| qajariaq |
Posted on 01/15/2010 9:49 AM
|
|
1/4 Pounder Posts: 127 Joined: November 22, 2008 |
Welcome Aaron! I'm glad you jogged my memory of this thread, since I've been attempting to get back into this project the last few weeks, trying to finalize the direction it will take. I didn't make a lot of progress in 2009... I've been happy with exploring the skillet roasting method, but with its extreme inconsistency I don't feel like I'm getting the most out of my beans. Even a small amount of repeatability will be nice! Anyway, the drum that I have (in photos above) is about 5.25" inside diameter, about 6.25" tall (without the funnel). Using the assumption that you need 10 cubic inches of drum volume for each ounce of beans, the drum should be able to roast just under 14 oz. With the large funnel opening, the drum has to have a significant rearward tilt to keep the beans from falling out with 14 oz. in it. I suspect that it will work better with 8 to 10 oz. so that it doesn't need to be tilted back so severely. Stirring vanes that are angled to push beans back away from the front helps a lot. Another tidbit while I'm thinking about it: I'm very likely going to switch to electric heat since the propane burner I have is way too much heat for a small drum. Even on its lowest setting, it will roast more than a pound in a skillet too quickly. The burner is over 5000W (18k BTU), for a small drum roaster I figure it should be less than 2000W. Besides, I'd like to add PID control at some point, and electric heat is much simpler to set up, from what I gather. I'm looking at 6" 1500W+ kitchen range/hot plate elements since they are cheap and easy to acquire (a nichrome element would be a nice option, too). Something along the lines of this:  |
|
|
|
| Aaron |
Posted on 01/28/2010 5:35 PM
|
|
Newbie Posts: 16 Joined: January 14, 2010 |
cool idea, I think I'm going to stick with propane since the price of electricity in Australia is tipped to go up 60% in the next two years. Its good to get an idea of the size of burner though, I think I will make sure that I have the option of changing out the burners in the design in case I need to make adjustments. |
|
|
|
| qajariaq |
Posted on 09/07/2010 3:15 PM
|
|
1/4 Pounder Posts: 127 Joined: November 22, 2008 |
Wow, been a while since I updated this thread... Have made considerable progress (pics will be forthcoming) but the final appearance will be similar to this rendering: 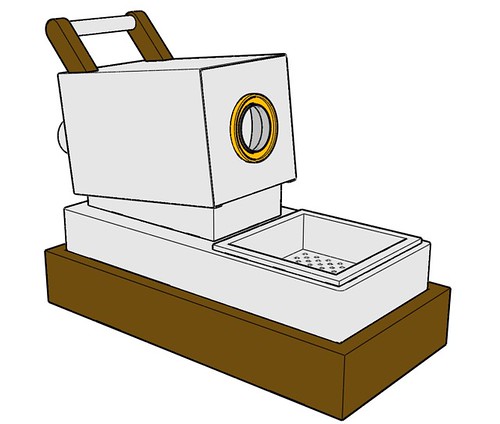 I went back to the propane burner (10k BTU camp stove), built a new drum (holds a full pound now), and have a great deal of the aluminum housing completed. Will also have controls/switches on one side, handles on the cooling tray for easier removal, and I'm going to try mounting the snout bearing on the inside of the front cover to keep up the minimalist appearance. The cooling tray will be ducted out the back for attachment to a shop vac. If I can only keep up the momentum.... |
|
|
|
| Dan |
Posted on 09/07/2010 3:44 PM
|
|
1 1/2 Pounder Posts: 1662 Joined: October 24, 2005 |
You are going to like having a one-pound sample roaster! I would recommend putting the snout bearing on the front. To me, it is more attractive than a hole in a piece of sheet metal. And, because it will be easier to oil. I put one drop of turbine oil on mine at the beginning of every roast session. Mine wasn't anything fancy, just a ring of 1/4" red brass. Nothing exotic like bronze or oilite. It has made hundreds of roasts and still looks good. Electric stove elements are cheap, but they react slowly, so might be difficult for a PID to control. |
|
|
|
| qajariaq |
Posted on 09/07/2010 4:14 PM
|
|
1/4 Pounder Posts: 127 Joined: November 22, 2008 |
I am going to try using a graphite impregnated bronze thrust bearing for the snout bearing; being much wider than what I have drawn, I'd like to hide it for aesthetic reasons... Should I go with something smaller, outside is fine. B) While the stove element was a neat idea, I wanted faster response and knew the stove element would not provide it. After I found a suitable nichrome dryer heating element to modify, complete with ceramic insulators, searched for (but never purchased) a PID controller, and tried to build a manual heater control, I ended up going back to propane... Its about the adventure as much as the end result, right? ;) Perhaps I will try to add PID control later on (with propane or maybe switch to electric heat) but I think for now manual control is fine for rudimentary profiles. It will still be way better than what I've been doing. I've been testing/using the drum (rotisserie-style over the good ol' grill burner) for a couple months now, and it is working great. Even in that set up, roasts have been way more controllable than the hand-stirred stock pot ever was! |
|
|
|
| qajariaq |
Posted on 09/08/2010 5:18 PM
|
|
1/4 Pounder Posts: 127 Joined: November 22, 2008 |
A few pictures: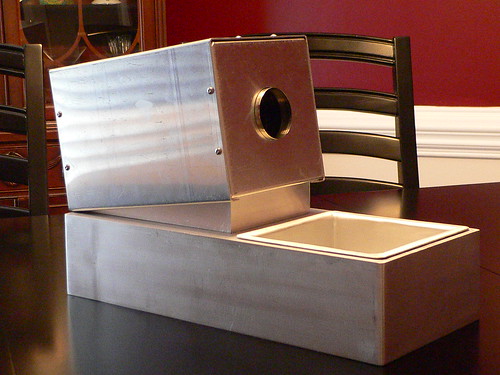 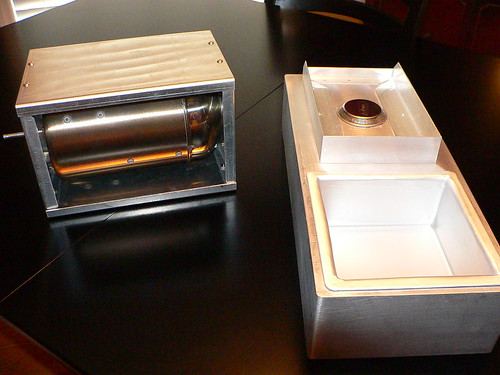 Still have a lot of work to do! :trink25: |
|
|
|
| Unta |
Posted on 09/08/2010 8:37 PM
|
 1 1/2 Pounder Posts: 788 Joined: January 26, 2010 |
Very nice fabrication. sean Sean Harrington
educate. |
|
|
|
| Koffee Kosmo |
Posted on 09/08/2010 9:14 PM
|
 Administrator Posts: 1621 Joined: December 31, 2008 |
Fantastic job Hope its working to expectations KK I home roast and I like it. Designer of the KKTO
Roaster Build information https://homeroast...ad_id=1142 https://docs.goog...lide=id.i0 Blog - http://koffeekosm...gspot.com/ Bezzera Strega, Mazzer Robur Grinder, Pullman Tamper Convex, (KKTO) Turbo Oven Home Roaster. |
|
|
|
| JETROASTER |
Posted on 09/09/2010 8:03 AM
|
 Administrator Posts: 1780 Joined: March 06, 2010 |
Gorgeous!!! -Scott |
|
|
|
| Dan |
Posted on 09/09/2010 12:29 PM
|
|
1 1/2 Pounder Posts: 1662 Joined: October 24, 2005 |
Excellent work. You put us all to shame! Now you just need to is connect up one of the new Arduino PIDs and you'll have the latest and greatest! |
|
|
|
| ginny |
Posted on 09/09/2010 2:43 PM
|
 Founder Posts: 3476 Joined: October 24, 2005 |
AWESOME dude!! Simply beautiful art work!!!~ ginny:Clap::BowDown: |
|
|
|
| seedlings |
Posted on 09/09/2010 3:14 PM
|
|
1 1/2 Pounder Posts: 4226 Joined: June 27, 2007 |
Your mad skills are showing! (I'm embarrassed) CHAD Roaster: CoffeeAir II 2# DIY air roaster
Grinder: Vintage Grindmaster 500 Brewers: Vintage Cory DCU DCL, Aeropress, Press, Osaka Titanium pourover |
|
|
|
| qajariaq |
Posted on 10/20/2010 3:05 PM
|
|
1/4 Pounder Posts: 127 Joined: November 22, 2008 |
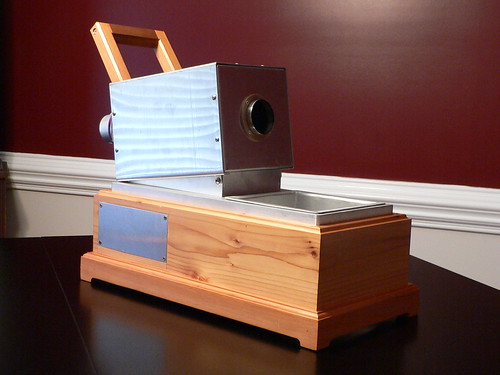 Making some progress, built the wood base and have been working out the remaining functional details. The motor/vacuum/flame controls will be mounted on the aluminum plate seen on the back corner. Should leave plenty of room for a PID later on... Still needs the ducting to allow a shop vac to pull air through the cooling tray, and a few other minor bits a pieces before its ready to go. Barring anything to break the momentum, it will be roasting by Halloween!  |
|
|
|
| Unta |
Posted on 10/20/2010 3:16 PM
|
|
1 1/2 Pounder Posts: 788 Joined: January 26, 2010 |
wood looks very nice, what type? sean Sean Harrington
educate. |
|
|
|
| qajariaq |
Posted on 10/20/2010 4:20 PM
|
|
1/4 Pounder Posts: 127 Joined: November 22, 2008 |
Western red cedar - happened to have a wide board left over from my last canoe building project. Perhaps a bit soft for such an application, but it will take on a "patina" more quickly than most hardwoods... ;) |
|
|
|
| Unta |
Posted on 10/20/2010 5:08 PM
|
|
1 1/2 Pounder Posts: 788 Joined: January 26, 2010 |
fantastic job, now .....lets see the shop. ;) Sean Sean Harrington
educate. |
|
|
|

| Jump to Forum: |
Powered by PHP-Fusion Copyright © 2024 PHP-Fusion Inc
Released as free software without warranties under GNU Affero GPL v3
Designed with ♥ by NetriXHosted by skpacman