
Login

Shoutbox
You must login to post a message.
renatoa
07/26/2024 3:49 PM
Bill grubbe and Jk, 
allenb
07/26/2024 5:15 AM
Spiderkw Welcome to HRO!

renatoa
07/24/2024 8:31 AM
ramiroflores and John123,

 ?
?
?renatoa
07/21/2024 1:18 AM
 , Luislobo
renatoa
07/19/2024 11:28 AM
Koepea,
Forum Threads
Newest Threads
Background Roast Iss...Skywalker roaster mods
Hello from Arkansas
TC4ESP
Green coffee reviews
Hottest Threads
| Skywalker roaster... | [374] |
| TC4ESP | [115] |
| War on Farmers by... | [47] |
| Adventures in flu... | [26] |
| Hello! (soon) Roa... | [17] |
In Memory Of Ginny

Donations
Latest Donations
dmccallum - 10.00
JackH - 25.00
snwcmpr - 10.00
Anonymous - 2.00
Anonymous - 5.00
dmccallum - 10.00
JackH - 25.00
snwcmpr - 10.00
Anonymous - 2.00
Anonymous - 5.00
Users Online
Guests Online: 7
Members Online: 0
Total Members: 8,393
Newest Member: Bill grubbe
Members Online: 0
Total Members: 8,393
Newest Member: Bill grubbe
View Thread
Who is here? 1 guest(s)
 Bean Insert & Cooler to easy
|
|
| Koffee Kosmo |
Posted on 01/23/2009 7:56 PM
|
 Administrator Posts: 1621 Joined: December 31, 2008 |
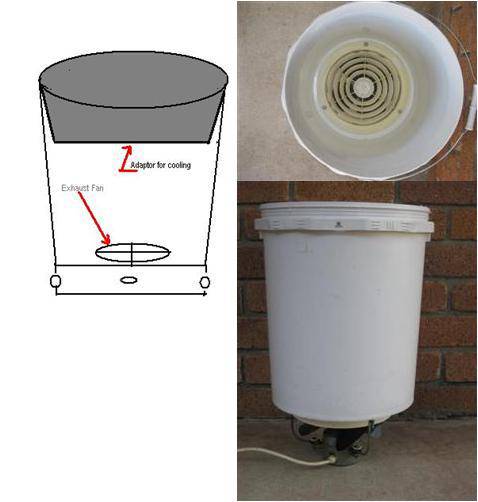
The capacity of this Bean Cooler Insert is only limited by the utensil used Part 1 The Insert The insert is used to accommodate several types of kitchen utensils you have on hand e.g. steamer insert, colander, wire strainer, spaghetti strainer The choice is only limited by what you have in your cupboard To make the insert you get a hold of a small round laundry tub and cut out the centre but leave a 1 inch lip (see photos) This lip is for guiding & providing a good air seal in the utensil of choice It also guides & centres the utensil in place. This insert is used in conjunction with the cooler made with a 2 buckets 1X 20litre & 1x 10 litre powered by an exhaust fan KK
Koffee Kosmo attached the following image:

I home roast and I like it. Designer of the KKTO
Roaster Build information https://homeroast...ad_id=1142 https://docs.goog...lide=id.i0 Blog - http://koffeekosm...gspot.com/ Bezzera Strega, Mazzer Robur Grinder, Pullman Tamper Convex, (KKTO) Turbo Oven Home Roaster. |
|
|
|
| Koffee Kosmo |
Posted on 01/23/2009 8:01 PM
|
|
Administrator Posts: 1621 Joined: December 31, 2008 |
Part 2 the exhaust chamber Take 1x 20 litre bucket and cut out a hole in the bottom This hole should accommodate your brand of exhaust fan (a bathroom exhaust fan is most suitable) Fit and secure the exhaust fan in the bottom of the bucket I like it to suck but it can be fitted to blow the choice is yours KK
Koffee Kosmo attached the following image:
Edited by Koffee Kosmo on 01/24/2009 6:32 PM I home roast and I like it. Designer of the KKTO
Roaster Build information https://homeroast...ad_id=1142 https://docs.goog...lide=id.i0 Blog - http://koffeekosm...gspot.com/ Bezzera Strega, Mazzer Robur Grinder, Pullman Tamper Convex, (KKTO) Turbo Oven Home Roaster. |
|
|
|
| Koffee Kosmo |
Posted on 01/23/2009 8:06 PM
|
|
Administrator Posts: 1621 Joined: December 31, 2008 |
Part 3 service and stand Now its time to use the 10 litre bucket Use a hole saw and drill some exhaust holes Place the 20 litre bucket inside it and you get 1) An easy pull apart cooler for easy service 2) A pedestal or stand 3) A directional exhaust 4) Water proof and clearance area for the exhaust fan KK
Koffee Kosmo attached the following image:
I home roast and I like it. Designer of the KKTO
Roaster Build information https://homeroast...ad_id=1142 https://docs.goog...lide=id.i0 Blog - http://koffeekosm...gspot.com/ Bezzera Strega, Mazzer Robur Grinder, Pullman Tamper Convex, (KKTO) Turbo Oven Home Roaster. |
|
|
|
| Koffee Kosmo |
Posted on 01/23/2009 8:12 PM
|
|
Administrator Posts: 1621 Joined: December 31, 2008 |
Now you can use the cooler To easy Cost Analysis 2 x buckets I got free 1 x exhaust fan $2.00 at a garage/yard sale 1 x utensil free from my kitchen Total Cost $2.00 Point to note the 2 buckets should be from the same maker As different makers may use different diameters KK
Koffee Kosmo attached the following image:

I home roast and I like it. Designer of the KKTO
Roaster Build information https://homeroast...ad_id=1142 https://docs.goog...lide=id.i0 Blog - http://koffeekosm...gspot.com/ Bezzera Strega, Mazzer Robur Grinder, Pullman Tamper Convex, (KKTO) Turbo Oven Home Roaster. |
|
|
|
| MrPeaberry |
Posted on 06/09/2016 6:59 PM
|
 Newbie  Posts: 16 Joined: October 13, 2015 |
Quote Koffee Kosmo wrote: The capacity of this Bean Cooler Insert is only limited by the utensil used Part 1 The Insert The insert is used to accommodate several types of kitchen utensils you have on hand e.g. steamer insert, colander, wire strainer, spaghetti strainer The choice is only limited by what you have in your cupboard To make the insert you get a hold of a small round laundry tub and cut out the centre but leave a 1 inch lip (see photos) This lip is for guiding & providing a good air seal in the utensil of choice It also guides & centres the utensil in place. This insert is used in conjunction with the cooler made with a 2 buckets 1X 20litre & 1x 10 litre powered by an exhaust fan KK Hey KK, Just wanted to extend a big THANK YOU for your post on this cooling system. I had Mickey Moused a cooling system that did not survive my first roast. Well, I can't say it didn't survive, but I realized that there was a better answer, so I searched "Cooling tray" here and found this thread. My version varies from yours in that I used an "in-line" exhaust fan like this: https://continent...sidential/ The one I purchased off Craigslist for $25.00 has airflow rated at just under 4cf/sec unimpeded. I used your bowl/insert configuration, and will be adding another insert or two as I find. The one I have came from a thrift store for $1.50 (US), and had been a strainer insert from some stock pot long since removed. I remounted the junction box seen on the side of the fan to the pair of 5 gallon buckets I used, and added an on/off toggle switch so I can use on demand while roasting. Again...Thanks for being so generous with your innovations! Cheers, Peaberry  FYI - I suffer from OCD (Obsessive Coffee Disorder), please be kind. |
|
|
|
| Koffee Kosmo |
Posted on 06/10/2016 5:22 AM
|
|
Administrator Posts: 1621 Joined: December 31, 2008 |
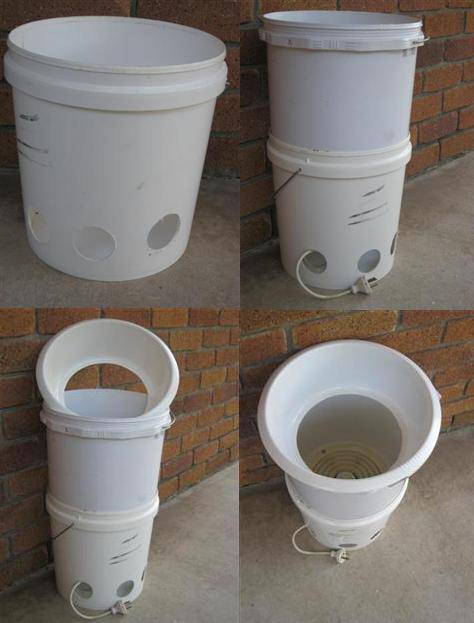
The pleasure is all mine Mr Peaberry This very same unit is still in service and still working after 2000 + roasts As an update to this thread More modern exhaust fan designs now have a larger diameter frame This means that you only need a single bucket Reason is that as the bucket tappers down - the frame of the fan wedges down just past the midway point Please see a recent bean cooler build I did for another coffee roasting enthusiast All the same design principles have been applied KK
Koffee Kosmo attached the following images:


I home roast and I like it. Designer of the KKTO
Roaster Build information https://homeroast...ad_id=1142 https://docs.goog...lide=id.i0 Blog - http://koffeekosm...gspot.com/ Bezzera Strega, Mazzer Robur Grinder, Pullman Tamper Convex, (KKTO) Turbo Oven Home Roaster. |
|
|
|
| MrPeaberry |
Posted on 06/10/2016 7:16 PM
|
|
Newbie Posts: 16 Joined: October 13, 2015 |
Here is what I pieced together in a day. Of course I am still going to add a tray with more holes to allow for more rapid cooling, but this works fine. The base bucket will be replaced when I have time to drill out perfectly aligned vent holes with a hole saw. Thanks again KK! (pictures are not uploading...will come back later and try to figure out why) FYI - I suffer from OCD (Obsessive Coffee Disorder), please be kind. |
|
|
|
| ginny |
Posted on 06/11/2016 1:06 PM
|
 Founder Posts: 3476 Joined: October 24, 2005 |
PHOTO HELP: PHOTO'S to a new post or reply: You cannot use the 'quick reply' feature at the bottom of every thread. Instead, click on 'New Topic' or 'Post Reply' buttons. At the bottom you will see the attachment field. Browse to your image, select it, and then hit 'Post Thread.' Hint: If you 'Preview Thread' you will not see your image, and you will have to reselect it before you 'Post Thread.' Images MUST NOT be larger than 800 x 800 pixels. System admins will adjust to size or delete post if photo is larger then 800x800 pixels. Also, please note: Save your file on your hard drive with no spaces in the name: thisisthenameofmyfile.jpg MORE INFORMATION ABOUT IMAGES Before attaching a picture or file to a post, there are two key rules: 1) The picture must be less than 800 x800 pixels. 2) The file must be less than 268Kb So, all of us with 7+ megapixel cameras have to do some editing otherwise the picture won't attach. How do you know if your picture is too big? Hover your mouse over the thumbnail or icon of the picture on your computer. The little popup box will say "Dimensions: 1600x1200" or larger or smaller (or right click and go to "Properties"). 1600 pixels is too large. Homeroasters wants 800 pixels as the largest dimension. So... some math: 800 / Largest Dimension = % reduction required In our case that's: 800 / 1600 = .5 or 50% (always round DOWN) Now, open your picture in MS Paint (right click, select "Open With" then "Paint"). Go to "Image" then "Stretch/skew" ("Re size and Skew" for Windows 7 paint). In the Horizontal AND Vertical windows type in the % reduction, 50 in our case. Click OK. Save the file, and use this as the attachment! Viola! How to attach it? When you go to make a new post, or to add a reply to an existing post, you'll see the "Attachment" section right above the "Preview Thread" and "Post Thread" buttons. Click "Browse" then find your re-sized image and attach it. If you click "Preview Thread" you won't see your picture AND you will have to RE-ATTACH it before clicking "Post Thread". You must have typed something in the window in order to attach a picture. Any trouble, just contact an Admin or Moderator by clicking on a name, then send a "PM" (Personal Message) and we'll help you pretty quick. HRO Adminstation VIDEO'S: You tube videos in my post: Find the URL for the YouTube video you wish to embed. Find the ID of that video (whatever is after the v= in the URL. Let's say the ID is vr3x_RRJdd4 (which is the ID of a video for the Free Hugs Campaign) Then you would enter the following into your post to embed the video: PHP Code: Please note that some browsers (Android) do not support Flash player and the video will not be seen with the [youtube] tag. Use the [video] tag instead with the full address of the video: [video]http://www.youtube.comvr3x_RRJdd4[/video] hope this helps, ginny  |
|
|
|
| MrPeaberry |
Posted on 06/14/2016 2:43 PM
|
|
Newbie Posts: 16 Joined: October 13, 2015 |
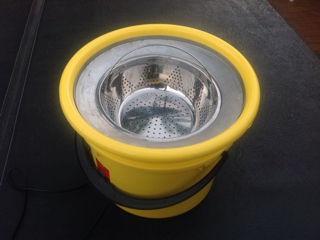
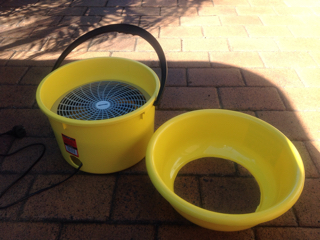
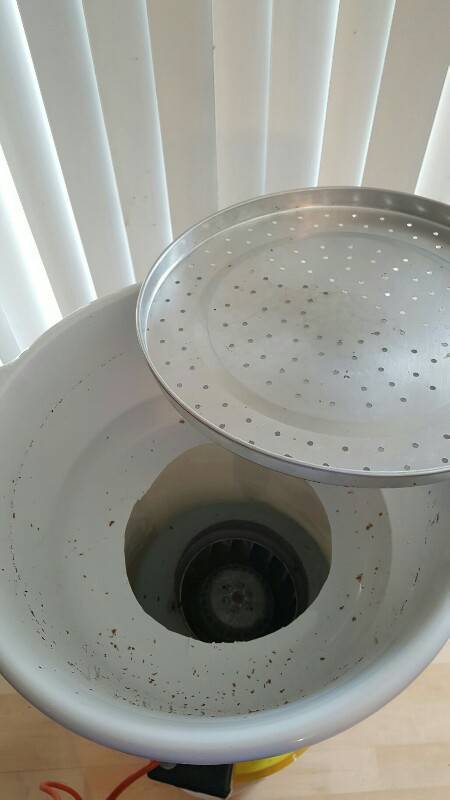
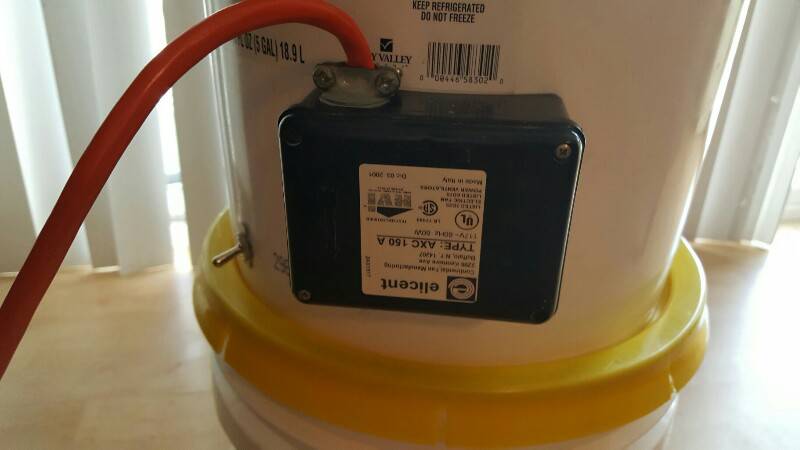
Thanks Ginny, Of course it helps! I am an expert at receiving help...a lifetime of experience! So my attached photos show (not in order...don't know the protocol for how they are displayed in the post): the complete bean cooling apparatus; the "business end" removed and placed next to the "riser" (the cutouts were placed strategically near the top on the riser in order to fill with water as a way to add & remove weight for stability while in use); the inline exhaust fan inside the double buckets (the exterior bucket has it's bottom cut out so that they will set level onto the bottom of the bucket rather than on the fan housing when removed from the riser bucket); the laundry basin and bean tray; the remounted junction box from the exhaust fan and on/off toggle switch. Hope some of y'all find this adaptation of KK's design helpful! Cheers, Peaberry
MrPeaberry attached the following images:


Edited by MrPeaberry on 06/14/2016 2:49 PM FYI - I suffer from OCD (Obsessive Coffee Disorder), please be kind. |
|
|
|
| oldgearhead |
Posted on 06/14/2016 3:01 PM
|
 1 1/2 Pounder  Posts: 1128 Joined: February 10, 2011 |
The second thing a purchased when I started coffee roasting was a small shop vac, and the third thing was this PVC fitting. Very rugged, 7 years old and used around 759 times.
oldgearhead attached the following image:

No oil on my beans...
|
|
|
|
| MrPeaberry |
Posted on 06/14/2016 7:26 PM
|
|
Newbie Posts: 16 Joined: October 13, 2015 |
OGH, that is a clever adaptation of a PVC fitting! What I like about the exhaust fan in my build is that it is very very quiet. In my first rendition of the cooling apparatus, I did use my shop vac, but man that noise is a bit annoying. I'm sure I could find a bit of ducting that would allow me to hook up a similar arrangement to yours using the inline from mine....
FYI - I suffer from OCD (Obsessive Coffee Disorder), please be kind. |
|
|
|

| Jump to Forum: |
Powered by PHP-Fusion Copyright © 2024 PHP-Fusion Inc
Released as free software without warranties under GNU Affero GPL v3
Designed with ♥ by NetriXHosted by skpacman