
Login

Shoutbox
You must login to post a message.
renatoa
07/26/2024 3:49 PM
Bill grubbe and Jk, 
allenb
07/26/2024 5:15 AM
Spiderkw Welcome to HRO!

renatoa
07/24/2024 8:31 AM
ramiroflores and John123,

 ?
?
?renatoa
07/21/2024 1:18 AM
 , Luislobo
renatoa
07/19/2024 11:28 AM
Koepea,
Forum Threads
Newest Threads
Skywalker roaster modsBackground Roast Iss...
Hello from Arkansas
TC4ESP
Green coffee reviews
Hottest Threads
| Skywalker roaster... | [375] |
| TC4ESP | [115] |
| War on Farmers by... | [47] |
| Adventures in flu... | [26] |
| Hello! (soon) Roa... | [17] |
In Memory Of Ginny

Donations
Latest Donations
dmccallum - 10.00
JackH - 25.00
snwcmpr - 10.00
Anonymous - 2.00
Anonymous - 5.00
dmccallum - 10.00
JackH - 25.00
snwcmpr - 10.00
Anonymous - 2.00
Anonymous - 5.00
Users Online
Guests Online: 6
Members Online: 0
Total Members: 8,393
Newest Member: Bill grubbe
Members Online: 0
Total Members: 8,393
Newest Member: Bill grubbe
View Thread
Who is here? 1 guest(s)
 CoffeeAir II Roaster Build
|
|
| JETROASTER |
Posted on 09/13/2010 2:55 PM
|
 Administrator Posts: 1780 Joined: March 06, 2010 |
This thread just keeps gettin' better. Thanks Chad |
|
|
|
| SteveN |
Posted on 09/14/2010 8:40 AM
|
 1/4 Pounder  Posts: 127 Joined: March 16, 2010 |
I'd be interested to see what the air temperature post-bean is in this setup. Would it be better to PID off that? |
|
|
|
| seedlings |
Posted on 09/14/2010 9:51 AM
|
 1 1/2 Pounder  Posts: 4226 Joined: June 27, 2007 |
Quote SteveN wrote: I'd be interested to see what the air temperature post-bean is in this setup. Would it be better to PID off that? Good question Steve. I'm picking up some more TC wire to make a probe long enough to put in different places, and this is one position I'm curious about. I've read that exhaust temp is a good measurement for profiling, but I think that was for a Drum roaster - might be applicable here too. CHAD Roaster: CoffeeAir II 2# DIY air roaster
Grinder: Vintage Grindmaster 500 Brewers: Vintage Cory DCU DCL, Aeropress, Press, Osaka Titanium pourover |
|
|
|
| Ringo |
Posted on 09/14/2010 11:08 AM
|
 Pounder  Posts: 474 Joined: January 14, 2010 |
Quote freshbeans wrote: This thread just keeps gettin' better. Thanks Chad +1 Just like watching a child grow, first he crawls, then he walks, soon he will run fast. I have enjoyed watching him develope. All you need in life is ignorance and confidence, and then success is sure. Mark Twain
|
|
|
|
| Unta |
Posted on 09/15/2010 4:43 PM
|
 1 1/2 Pounder Posts: 788 Joined: January 26, 2010 |
Not to hijack, but CHAD and I had a chat about air temp, pre perf plate vs bean temp. I ran two distinctly different scenarios today. One was 1lb samples and the other were 5 kilo batches, which is really the upper end of what my machine can handle. my temp ranges on the one pound load where between 50 and 100 degrees above the bean temp..after 3 or 4 minutes o roasting. before that they were a bit higher. on the one pound load I only run my half horse dust collector, pushing through the redi heater. those familiar with my machine might remeber this. it was the first way i had set up my componants. the 5 kilo batches were running with inlet air temps in excess of 800 degrees! I was pretty suprised. the setting on the Readii heater were only a turn of the fuel adjustment dial on the heater about an 1/8th to 3/16th of an inch above where i run the 1lb loads. I cant tell you exactly how many more BTU's that is that are burning, but I run at the lowest setting possible without the flame going out on the small loads.his set up has both the suction side @ full capacity to start plus the inlet air at full.. see the graphs. you can move this to another thread if you dont think it fits chad. i was just thinking about your roasters and your inlet temps. Sean
Unta attached the following image:
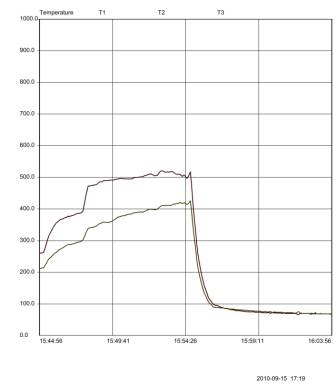
Sean Harrington
educate. |
|
|
|
| Unta |
Posted on 09/15/2010 4:46 PM
|
|
1 1/2 Pounder Posts: 788 Joined: January 26, 2010 |
5 kilo graph not to forget, I think that Rob and Scott where in on this chat also.. The chat room was working that day.. ) )
Unta attached the following image:
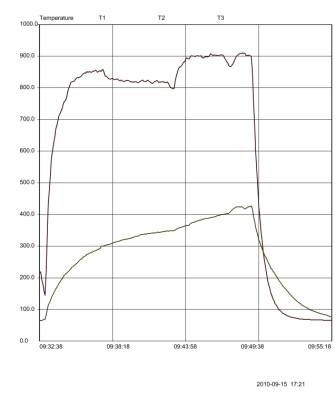
Edited by Unta on 09/15/2010 4:49 PM Sean Harrington
educate. |
|
|
|
| seedlings |
Posted on 09/15/2010 5:01 PM
|
|
1 1/2 Pounder Posts: 4226 Joined: June 27, 2007 |
5 kilos is insane! I have 800F air with a load under 2#... and that roast from the video is very flat tasting. CHAD Roaster: CoffeeAir II 2# DIY air roaster
Grinder: Vintage Grindmaster 500 Brewers: Vintage Cory DCU DCL, Aeropress, Press, Osaka Titanium pourover |
|
|
|
| endlesscycles |
Posted on 09/15/2010 5:22 PM
|
 Pounder Posts: 420 Joined: April 11, 2009 |
I stopped paying attention to air temp long ago.
-Marshall Hance
Asheville, NC |
|
|
|
| RoasterRob |
Posted on 09/15/2010 7:56 PM
|
 1/2 Pounder  Posts: 330 Joined: March 03, 2007 |
Quote I stopped paying attention to air temp long ago. After a few dozen roasts (with this roaster) you realize you don't need the air temp. I looked at the last 6 roasts on my roast temp log. At 11minutes into the roast the bean mass temp on 5 roasts was 225 C and 224 on the other. I wasn't try to keep temps at certain times the same. Just maually trying to keep the change every 30 seconds to to a certain rate. ie 7deg C increase per 30 seconds from about 150 C thru to 200C then as 1C starts it slow to 3 or 4 degC /30 sec then it tries to pick up again at which point i am trimming down the gas to keep it to about 4C/30sec till dump at 230 which is bout 30secs into 2C on my setup. To make a pid work on this setup i think it would have to base its data on the ROR. As it is the temp profile happens just by turning the air flow down slowly throughout the roast with very little and sometimes no need to touch the gas at all during the roast. Rob vL NZ VBM Minimax 2gp, 1gp Reneka Techno, 2 gp la Pavoni Pub, la Cimbali M28, SJ Maz, FB 6kg HM roaster and other stuff
|
|
|
|
| seedlings |
Posted on 09/16/2010 10:54 AM
|
|
1 1/2 Pounder Posts: 4226 Joined: June 27, 2007 |
 David! :Clap: David! :Clap:Got the J TC wire last night... should be able to play with other TC placement options tonight. I would REALLY like to profile with bean temperature as reference, so hopefully this will be able to happen. The RoR of the bean temperature is a very good reference! CHAD Edited by seedlings on 09/16/2010 11:00 AM Roaster: CoffeeAir II 2# DIY air roaster
Grinder: Vintage Grindmaster 500 Brewers: Vintage Cory DCU DCL, Aeropress, Press, Osaka Titanium pourover |
|
|
|
| dja |
Posted on 09/16/2010 11:01 AM
|
 1 1/2 Pounder Posts: 701 Joined: November 07, 2008 |
I didn't measure it hope what I cut off is enough.
I pour Iron and roast Coffee Beans
 If life seems normal your not going fast enough Mario Andrette |
|
|
|
| seedlings |
Posted on 09/16/2010 11:30 AM
|
|
1 1/2 Pounder Posts: 4226 Joined: June 27, 2007 |
Quote dja wrote: I didn't measure it hope what I cut off is enough. It looks like a country mile to me! CHAD Roaster: CoffeeAir II 2# DIY air roaster
Grinder: Vintage Grindmaster 500 Brewers: Vintage Cory DCU DCL, Aeropress, Press, Osaka Titanium pourover |
|
|
|
| RoasterRob |
Posted on 09/16/2010 7:56 PM
|
|
1/2 Pounder Posts: 330 Joined: March 03, 2007 |
Quote seedlings wrote: David! :Clap:.... The RoR of the bean temperature is a very good reference! CHAD For me it is almost the only reference you need Rob VBM Minimax 2gp, 1gp Reneka Techno, 2 gp la Pavoni Pub, la Cimbali M28, SJ Maz, FB 6kg HM roaster and other stuff
|
|
|
|
| Unta |
Posted on 09/16/2010 9:00 PM
|
|
1 1/2 Pounder Posts: 788 Joined: January 26, 2010 |
Quote The RoR of the bean temperature is a very good reference! CHAD Its what I use..I monitor incoming air only to make sure things are functioning properly..up when its supposed to be down when its supposed to be..Excited to see this PID work.. Sean Sean Harrington
educate. |
|
|
|
| seedlings |
Posted on 09/17/2010 6:36 PM
|
|
1 1/2 Pounder Posts: 4226 Joined: June 27, 2007 |
Aw, man! David, that J-type TC wire has insulation that melts around 400F. Boo. Who designed this anyway? :@ FAIL! ...Grrrr... CHAD Roaster: CoffeeAir II 2# DIY air roaster
Grinder: Vintage Grindmaster 500 Brewers: Vintage Cory DCU DCL, Aeropress, Press, Osaka Titanium pourover |
|
|
|
| dja |
Posted on 09/17/2010 7:01 PM
|
|
1 1/2 Pounder Posts: 701 Joined: November 07, 2008 |
sorry about that, its got PVC insulation, thought you would know that by looking, pick you up a Cheap J probe to use with it.
I pour Iron and roast Coffee Beans
If life seems normal your not going fast enough Mario Andrette |
|
|
|
| seedlings |
Posted on 09/27/2010 8:23 PM
|
|
1 1/2 Pounder Posts: 4226 Joined: June 27, 2007 |
Test beans from Ginny arrived today, and I need to get this roaster figured out! Here are 3 test roasts. Jumps in ET are related to adjusting the fan speed. ET and BT are measured as described in earlier posts. Preheat 400F. 2# charge, 19:32 to get to 440F:  Preheat 450F. 2# charge, 17:22 to get to 440F:  Preheat 400F. 1.5# charge, 13:28 to get to 445F:  Obviously the 1.5# charge is a much more reasonable profile, so this is probably the upper limit of the roaster instead of the two pounds I'd hoped to roast. Lower ambient temperatures will probably further reduce the capacity. I'd like to add the ability to recirculate some of the hot air, improving efficiency. In all 3 roasts the heater was on full throughout the entire roast. CHAD Edited by seedlings on 09/27/2010 8:32 PM Roaster: CoffeeAir II 2# DIY air roaster
Grinder: Vintage Grindmaster 500 Brewers: Vintage Cory DCU DCL, Aeropress, Press, Osaka Titanium pourover |
|
|
|
| seedlings |
Posted on 09/29/2010 5:04 PM
|
|
1 1/2 Pounder Posts: 4226 Joined: June 27, 2007 |
Two 'successful' 2-pound roasts tonight. This time I used a lid to partially block the top of the chamber. This helped tremendously to get to second crack in 15 minutes: Preheat 400, 2#:  Preheat 450, 2#:  CHAD Edited by seedlings on 09/29/2010 5:05 PM Roaster: CoffeeAir II 2# DIY air roaster
Grinder: Vintage Grindmaster 500 Brewers: Vintage Cory DCU DCL, Aeropress, Press, Osaka Titanium pourover |
|
|
|
| Unta |
Posted on 09/29/2010 5:35 PM
|
|
1 1/2 Pounder Posts: 788 Joined: January 26, 2010 |
how much of the opening are you covering? sean Sean Harrington
educate. |
|
|
|
| seedlings |
Posted on 09/30/2010 7:30 AM
|
|
1 1/2 Pounder Posts: 4226 Joined: June 27, 2007 |
Quote Unta wrote: how much of the opening are you covering? sean I have 3 squares of cement board (stacked on top of each other), about 5"x5" and I slide that across the top until it wants to blow off, then back it off a little from there. It's about 80% covered. CHAD Edited by seedlings on 09/30/2010 7:31 AM Roaster: CoffeeAir II 2# DIY air roaster
Grinder: Vintage Grindmaster 500 Brewers: Vintage Cory DCU DCL, Aeropress, Press, Osaka Titanium pourover |
|
|
|
| SteveN |
Posted on 09/30/2010 9:13 AM
|
|
1/4 Pounder Posts: 127 Joined: March 16, 2010 |
Any idea as to how much more power you'd want to do the 2# unassisted (no blocking airflow)? I'm interested, obviously, since my roaster is based fairly closely to your design. |
|
|
|
| seedlings |
Posted on 09/30/2010 9:29 AM
|
|
1 1/2 Pounder Posts: 4226 Joined: June 27, 2007 |
Steve, I'd like to have double the heat power. That would be overkill, but... more than enough is always enough. I'd like to be able to re-circulate a portion of the hot air, which should give the boost I need in the 300F-375F range. If I could open a damper to allow the hot air intake, then close it before the onset of first crack, that's the boost I want. Really, I'm happy with these curves. If I want to go a little faster, I'd just lighten the load slightly. CHAD Edited by seedlings on 09/30/2010 9:31 AM Roaster: CoffeeAir II 2# DIY air roaster
Grinder: Vintage Grindmaster 500 Brewers: Vintage Cory DCU DCL, Aeropress, Press, Osaka Titanium pourover |
|
|
|
| dja |
Posted on 09/30/2010 10:40 AM
|
|
1 1/2 Pounder Posts: 701 Joined: November 07, 2008 |
You would need a top for your roaster with two outlets on it, and probably have to have dampers in both sides, that way you could push as much exhaust air as you wanted to back thru the VC Motor. you will also have to have your VC opening partially open. What are you planing on for the chaff, it will have to be removed before it hits the heating element?. I would make a V connection out of some 2", 062, wall tubing and weld it to a plate, then make me a couple dampers, (like the throttle plates in a Carburator) put one in each side. you put em in there right and u could tie them to gether so they would open and close at the same time, lenght of arms would determine the timing. I pour Iron and roast Coffee Beans
If life seems normal your not going fast enough Mario Andrette |
|
|
|
| seedlings |
Posted on 10/01/2010 6:05 PM
|
|
1 1/2 Pounder Posts: 4226 Joined: June 27, 2007 |
Let me say that having 30 pounds of test coffee is THE WAY to figure out your new roaster. I'm confident now that this roaster is capable of 2# loads - and having an auto-logger so I don't have to write or click a mouse every few degrees would give more control. 2 Pounds, 450F preheat, set temp 630F (took 11:00 to get there):  First Crack starts at 10:00, outliers before that, and 2nd crack started at 13:52, but I could have stretched that out. The zig-zags in the blue ET graph correspond to blower adjustments, until just before first crack, when the blower was at the lowest setting. What I've learned: 1) the beans respond very well when the ET is 200F or more above BT 2) the heaters must operate at full power until somewhere around the end of first crack 3) drying phase can be stretched or shortened, time between cracks can be stretched or shortened, but 300F-400F can not be shortened without reducing bean load 4) partially covering the top of the hopper is a must, and shortens roast time 5) for a smooth ET curve, circulation needs almost continuous, slow, adjustment down, until about first crack, when the blower is at the lowest setting 6) 2 pounds of beans produce a significant amount of chaff 7) concern that lower ambient temperatures might extend roast times CHAD Edited by seedlings on 10/01/2010 6:13 PM Roaster: CoffeeAir II 2# DIY air roaster
Grinder: Vintage Grindmaster 500 Brewers: Vintage Cory DCU DCL, Aeropress, Press, Osaka Titanium pourover |
|
|
|
| Unta |
Posted on 10/01/2010 6:22 PM
|
|
1 1/2 Pounder Posts: 788 Joined: January 26, 2010 |
Quote Seedlings Wrote:Let me say that having 30 pounds of test coffee is THE WAY to figure out your new roaster. I'm confident now that this roaster is capable of 2# loads - and having an auto-logger so I don't have to write or click a mouse every few degrees would give more control. sean Sean Harrington
educate. |
|
|
|

| Jump to Forum: |
Powered by PHP-Fusion Copyright © 2024 PHP-Fusion Inc
Released as free software without warranties under GNU Affero GPL v3
Designed with ♥ by NetriXHosted by skpacman