
Login

Shoutbox
You must login to post a message.
renatoa
07/26/2024 3:49 PM
Bill grubbe and Jk, 
allenb
07/26/2024 5:15 AM
Spiderkw Welcome to HRO!

renatoa
07/24/2024 8:31 AM
ramiroflores and John123,

 ?
?
?renatoa
07/21/2024 1:18 AM
 , Luislobo
renatoa
07/19/2024 11:28 AM
Koepea,
Forum Threads
Newest Threads
Skywalker roaster modsBackground Roast Iss...
Hello from Arkansas
TC4ESP
Green coffee reviews
Hottest Threads
| Skywalker roaster... | [375] |
| TC4ESP | [115] |
| War on Farmers by... | [47] |
| Adventures in flu... | [26] |
| Hello! (soon) Roa... | [17] |
In Memory Of Ginny

Donations
Latest Donations
dmccallum - 10.00
JackH - 25.00
snwcmpr - 10.00
Anonymous - 2.00
Anonymous - 5.00
dmccallum - 10.00
JackH - 25.00
snwcmpr - 10.00
Anonymous - 2.00
Anonymous - 5.00
Users Online
Guests Online: 2
Members Online: 0
Total Members: 8,393
Newest Member: Bill grubbe
Members Online: 0
Total Members: 8,393
Newest Member: Bill grubbe
View Thread
Who is here? 1 guest(s)
 CoffeeAir II Roaster Build
|
|
| seedlings |
Posted on 10/01/2010 7:53 PM
|
 1 1/2 Pounder  Posts: 4226 Joined: June 27, 2007 |
I haven't measured the air exiting the roaster, but my original plan was to have a blower fan above the roaster and have the chaff blow outside for the birds to eat. A vent, like on the clothes dryer. A chaff collector wouldn't be too tough to build, but I'll cross that bridge later. CHAD Roaster: CoffeeAir II 2# DIY air roaster
Grinder: Vintage Grindmaster 500 Brewers: Vintage Cory DCU DCL, Aeropress, Press, Osaka Titanium pourover |
|
|
|
| RoasterRob |
Posted on 10/03/2010 4:58 AM
|
 1/2 Pounder  Posts: 330 Joined: March 03, 2007 |
Quote First Crack starts at 10:00, outliers before that, and 2nd crack started at 13:52, but I could have stretched that out. The zig-zags in the blue ET graph correspond to blower adjustments, until just before first crack, when the blower was at the lowest setting. What I've learned: 1) the beans respond very well when the ET is 200F or more above BT 2) the heaters must operate at full power until somewhere around the end of first crack 3) drying phase can be stretched or shortened, time between cracks can be stretched or shortened, but 300F-400F can not be shortened without reducing bean load Hi Chad Is this hooked to the pid or manual control? Are you aiming for a roast time of near 14 minutes or is this as fast as the roaster will get there? Your ROR seems a bit fast to 300, then a bit slow from 300 to right thru to dump. Based on the RC size 2lbs might be a stretch. Quote 4) partially covering the top of the hopper is a must, and shortens roast time Does covering the top of the RC affect the airflow and thus the bean movement? Quote 5) for a smooth ET curve, circulation needs almost continuous, slow, adjustment down, until about first crack, when the blower is at the lowest setting Yup. I turn mine down almost mm by mm. To me having a pid didn?t seem that useful unless it was operating as the fan control. Quote 6) 2 pounds of beans produce a significant amount of chaff You want see what 5lbs does for chaff, (soon to be 13 lbs) Quote 7) concern that lower ambient temperatures might extend roast times yes it will Rob vL NZ Edited by RoasterRob on 10/03/2010 5:00 AM VBM Minimax 2gp, 1gp Reneka Techno, 2 gp la Pavoni Pub, la Cimbali M28, SJ Maz, FB 6kg HM roaster and other stuff
|
|
|
|
| seedlings |
Posted on 10/04/2010 8:43 AM
|
|
1 1/2 Pounder Posts: 4226 Joined: June 27, 2007 |
Quote RoasterRob wrote: Hi Chad Is this hooked to the pid or manual control? Are you aiming for a roast time of near 14 minutes or is this as fast as the roaster will get there? Your ROR seems a bit fast to 300, then a bit slow from 300 to right thru to dump. Based on the RC size 2lbs might be a stretch. Right now the heat is full-on, so PID won't help, except... I could easily extend the drying time to 300 by keeping the set temp at 500 for X minutes before going to full power. I like the ability to get to first crack in 10 minutes... from there I can extend times as needed. 2lbs is the outer limit, agreed. Quote Does covering the top of the RC affect the airflow and thus the bean movement? No. I don't block enough off to change flow or circulation. My guess is that it keeps a 'cushion' of hot air above the beans (but that might be my imagination). Quote You want see what 5lbs does for chaff, (soon to be 13 lbs) HA! The Rwanda I roasted Friday night was like nuclear fallout! With no breeze outside it left an even coating on the garage, mower, sidewalk, yard, my hair, the laptop... Quote seedlings wrote: 7) concern that lower ambient temperatures might extend roast times Quote yes it will I figured. Need to get partial recirculation up and running. CHAD Roaster: CoffeeAir II 2# DIY air roaster
Grinder: Vintage Grindmaster 500 Brewers: Vintage Cory DCU DCL, Aeropress, Press, Osaka Titanium pourover |
|
|
|
| JETROASTER |
Posted on 10/04/2010 8:54 AM
|
 Administrator Posts: 1780 Joined: March 06, 2010 |
Hi Chad, Looking forward to the video!! On the recirc; In the past, I used the exhaust line as a sort of heat exchanger by sleeving it with larger duct. Using the 'sleeve' air as intake air for the blower really helped during the winter. It's not a recirc, but it helped. Good Luck -Scott |
|
|
|
| seedlings |
Posted on 10/04/2010 9:55 AM
|
|
1 1/2 Pounder Posts: 4226 Joined: June 27, 2007 |
Quote freshbeans wrote: Hi Chad, Looking forward to the video!! -Scott J. J. Abrams turned me down (something about 'profit' or whatever), Tarantino and the Coen Brothers haven't called back yet. CHAD Roaster: CoffeeAir II 2# DIY air roaster
Grinder: Vintage Grindmaster 500 Brewers: Vintage Cory DCU DCL, Aeropress, Press, Osaka Titanium pourover |
|
|
|
| Unta |
Posted on 10/04/2010 10:03 AM
|
 1 1/2 Pounder Posts: 788 Joined: January 26, 2010 |
qunetin will just add zombies..I'd go Coen. my 2 cents. sean Sean Harrington
educate. |
|
|
|
| JETROASTER |
Posted on 10/04/2010 10:20 AM
|
|
Administrator Posts: 1780 Joined: March 06, 2010 |
Obviously, they have not seen the 'Sierra Mist Depth Charge'. Who needs them anyway! ...Punks. -Scott |
|
|
|
| seedlings |
Posted on 11/04/2010 10:03 PM
|
|
1 1/2 Pounder Posts: 4226 Joined: June 27, 2007 |
1.75# is the perfect charge for this roaster... with ambient temps above 60F. With today's high winds and 50s temps the air temp stalled at 583F. A buddy was over roasting, so his Rwanda took 5 minutes to get from 405 (rolling first crack) to 430F final temp. Honestly, I don't know if it would've made it to second crack without recirculation. I'll post another video soon of an entire roast (since youtube upped the time limit). CHAD Edited by seedlings on 11/04/2010 10:03 PM Roaster: CoffeeAir II 2# DIY air roaster
Grinder: Vintage Grindmaster 500 Brewers: Vintage Cory DCU DCL, Aeropress, Press, Osaka Titanium pourover |
|
|
|
| greencardigan |
Posted on 11/23/2010 10:41 PM
|
 1 1/2 Pounder Posts: 1185 Joined: November 21, 2010 |
Any updates on this one?? I am liking the square design. And I sense I might be building a copy in the near future. :BowDown: |
|
|
|
| seedlings |
Posted on 11/24/2010 11:06 AM
|
|
1 1/2 Pounder Posts: 4226 Joined: June 27, 2007 |
Quote greencardigan wrote: Any updates on this one?? I am liking the square design. And I sense I might be building a copy in the near future. :BowDown: Hey, welcome to the forums, and thanks for asking! It works great. The PID on the heat is completely unnecessary. I leave it on full power and adjust the airflow down, which increases the heat. It was in the low 40s when I roasted a couple of days ago. I was roasting 1.75# and the ramp from 300F-400F was going a little slow due to the cold. I turned the heatgun on low and pointed it at the roaster's inlet and watched the air temp jump 20 degrees. I had the heatgun far enough away from the inlet that I could hold my hand there. It was hot... maybe 120F? But not like roasting temperatures. I really want to work on partial recirculation of heat... with that I might be able to roast up to 3 pounds....? Who knows. It's a very fun project! CHAD Roaster: CoffeeAir II 2# DIY air roaster
Grinder: Vintage Grindmaster 500 Brewers: Vintage Cory DCU DCL, Aeropress, Press, Osaka Titanium pourover |
|
|
|
| greencardigan |
Posted on 11/25/2010 11:05 PM
|
|
1 1/2 Pounder Posts: 1185 Joined: November 21, 2010 |
A quick question. How is the RC attached to the base/heater section? In the your pics it looks like it's just sitting on top? Edited by greencardigan on 11/25/2010 11:07 PM |
|
|
|
| seedlings |
Posted on 11/26/2010 6:18 PM
|
|
1 1/2 Pounder Posts: 4226 Joined: June 27, 2007 |
Quote greencardigan wrote: A quick question. How is the RC attached to the base/heater section? In the your pics it looks like it's just sitting on top? Gravity keeps it together. Takes a heck of a blower to launch 2# of beans plus 5# of steel and glass off the top- blowing through perforations... Yep, that'll do it. If your hopper were significantly lighter, there may be an issue. CHAD Roaster: CoffeeAir II 2# DIY air roaster
Grinder: Vintage Grindmaster 500 Brewers: Vintage Cory DCU DCL, Aeropress, Press, Osaka Titanium pourover |
|
|
|
| RoasterRob |
Posted on 11/26/2010 6:37 PM
|
|
1/2 Pounder Posts: 330 Joined: March 03, 2007 |
Quote seedlings wrote: ...... It works great. The PID on the heat is completely unnecessary. I leave it on full power and adjust the airflow down, which increases the heat....... ;) VBM Minimax 2gp, 1gp Reneka Techno, 2 gp la Pavoni Pub, la Cimbali M28, SJ Maz, FB 6kg HM roaster and other stuff
|
|
|
|
| seedlings |
Posted on 11/26/2010 6:39 PM
|
|
1 1/2 Pounder Posts: 4226 Joined: June 27, 2007 |
Yes, I know you told us so, Rob... I just wanted to... be.... ...cool. B) CHAD Roaster: CoffeeAir II 2# DIY air roaster
Grinder: Vintage Grindmaster 500 Brewers: Vintage Cory DCU DCL, Aeropress, Press, Osaka Titanium pourover |
|
|
|
| RoasterRob |
Posted on 11/26/2010 7:46 PM
|
|
1/2 Pounder Posts: 330 Joined: March 03, 2007 |
I guess the ;) wasn't really that subtle. Cool is overrated. This is Zen PID - be the PID. The ideal for control on this type of roaster (IMO) without going to a form of full automation of fan and heat is to have the fan controlled by a PID/PLC based on BMT and a manual fine control on the fan. Then the roaster would practically follow a profile which you could tweak with the fan fine control or the heat source control if it was slightly out because of ambient temp etc. Rob VBM Minimax 2gp, 1gp Reneka Techno, 2 gp la Pavoni Pub, la Cimbali M28, SJ Maz, FB 6kg HM roaster and other stuff
|
|
|
|
| dja |
Posted on 12/10/2010 7:12 AM
|
 1 1/2 Pounder Posts: 701 Joined: November 07, 2008 |
Chad, Since the part numbers came from you thread I decided to post the question here. I picked up two coils like the ones you use except that the ones I got are 1000 watters. how did you supend the coils in the tubes in your roaster or do you have them just hanging in there, and what type of wire did you use to hook up with, wire with regular insulation, or wire intended for high temp applications??????????? I and going to shorten the heating section of my roaster and hopefully mount the coils open air like inside the heater section side by side, still have to go cabbage up some high temp wire, maybe trash one of the poppers I have or go to the thrift store for a toaster. on the coils, right now I am looking at milling out a bar with two slots for the wide end of the coil ceramic to fit into, them spreadind and supporting the other end with like 6/32 stainless steel all thread, or a road with threaded ends thru some small tubing with the road passign through a central support. David I pour Iron and roast Coffee Beans
 If life seems normal your not going fast enough Mario Andrette |
|
|
|
| seedlings |
Posted on 12/10/2010 7:51 AM
|
|
1 1/2 Pounder Posts: 4226 Joined: June 27, 2007 |
David, I soldered 12ga solid copper wire to the terminal leads, and that wire goes out either side of the chamber. Since it is stiff, it does suspend the coils up into the riser tubes. The only thing holding them there is wire and the fact that the clearance is tight and they can't go anywhere. Chamber: 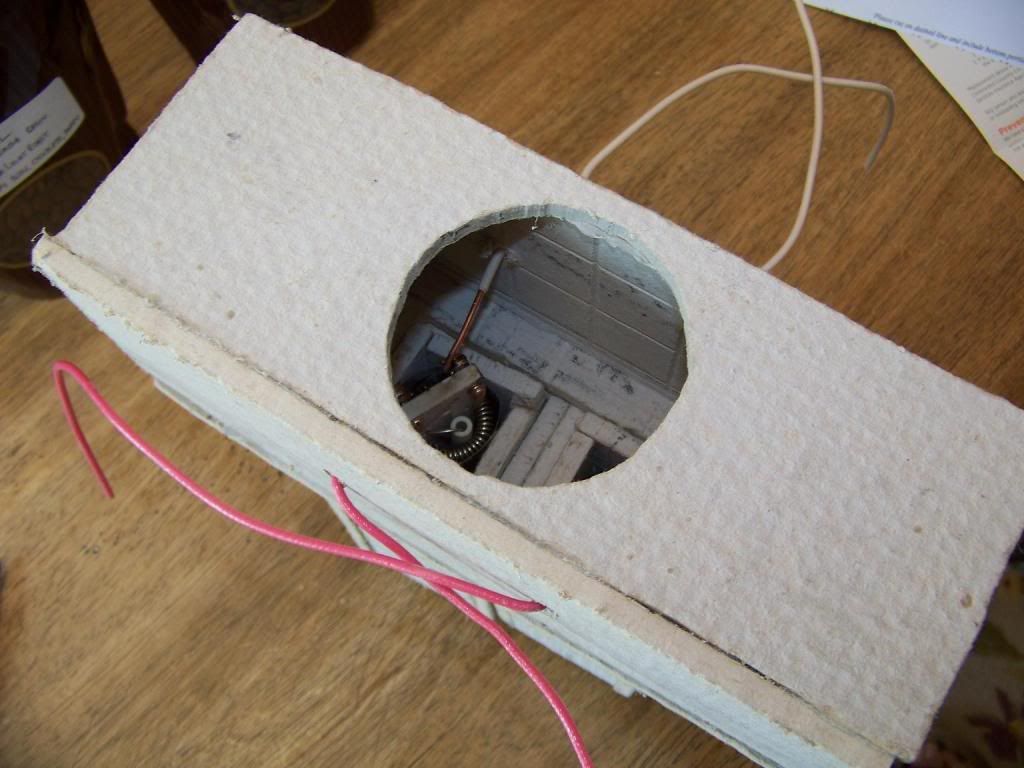 Zoomed in on elements inside (this is the underneath/bottom where cool air enters): 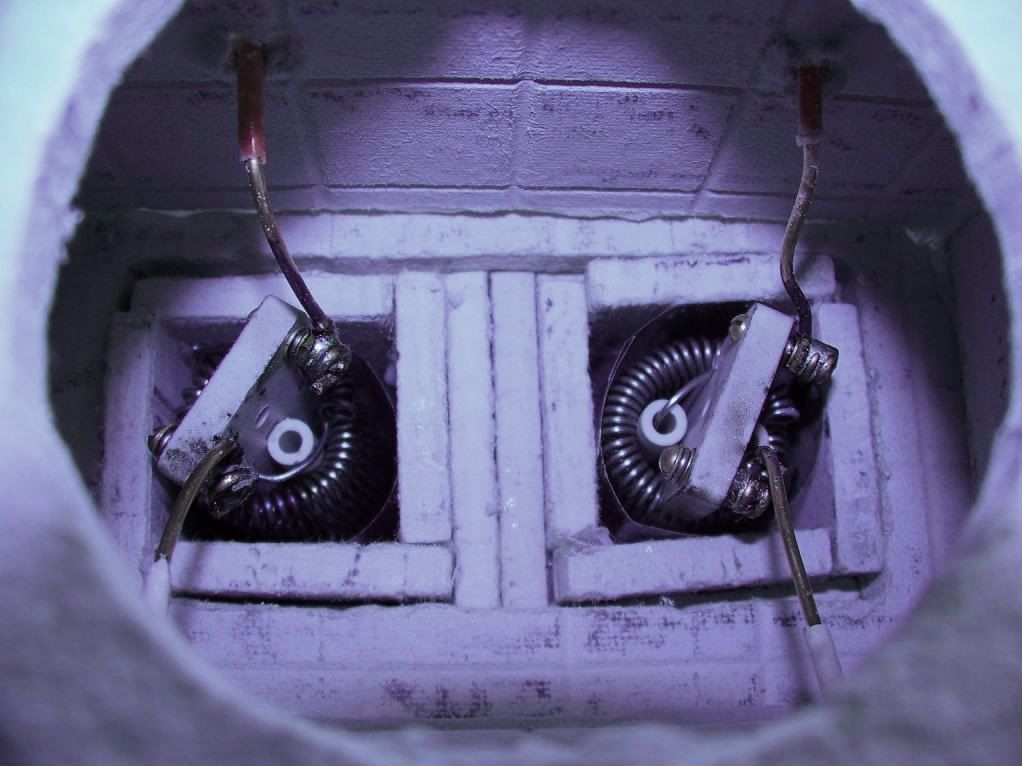 These elements are 8 ohms each, wired in series. With 240V from the wall that's: P=(V^2)/R P=57600/16 P=3600W CHAD Roaster: CoffeeAir II 2# DIY air roaster
Grinder: Vintage Grindmaster 500 Brewers: Vintage Cory DCU DCL, Aeropress, Press, Osaka Titanium pourover |
|
|
|
| dja |
Posted on 12/10/2010 12:59 PM
|
|
1 1/2 Pounder Posts: 701 Joined: November 07, 2008 |
the ones I got are suppose to be 1000 watts apeice, at 700 degrees is what they are suppose to put out, have you had any problems with the electrical solder getttign hot and soft?? Will post pictures when I get mine mounted. David I pour Iron and roast Coffee Beans
If life seems normal your not going fast enough Mario Andrette |
|
|
|
| seedlings |
Posted on 12/10/2010 1:28 PM
|
|
1 1/2 Pounder Posts: 4226 Joined: June 27, 2007 |
Quote dja wrote: the ones I got are suppose to be 1000 watts apeice, at 700 degrees is what they are suppose to put out, have you had any problems with the electrical solder getttign hot and soft?? Will post pictures when I get mine mounted. David Well, I haven't looked at the solder. I just figure it's on the cold air side of the heat. CHAD Roaster: CoffeeAir II 2# DIY air roaster
Grinder: Vintage Grindmaster 500 Brewers: Vintage Cory DCU DCL, Aeropress, Press, Osaka Titanium pourover |
|
|
|
| dja |
Posted on 12/10/2010 1:41 PM
|
|
1 1/2 Pounder Posts: 701 Joined: November 07, 2008 |
ok I may get away with using ire with regular insulation them my problem is I need soft wire with the way that I plan on mounting the coils.
I pour Iron and roast Coffee Beans
If life seems normal your not going fast enough Mario Andrette |
|
|
|
| dja |
Posted on 12/10/2010 1:45 PM
|
|
1 1/2 Pounder Posts: 701 Joined: November 07, 2008 |
I thought the coils you used from looking in Grangiers catalog were 700 watts each????
I pour Iron and roast Coffee Beans
If life seems normal your not going fast enough Mario Andrette |
|
|
|
| seedlings |
Posted on 12/11/2010 7:13 PM
|
|
1 1/2 Pounder Posts: 4226 Joined: June 27, 2007 |
David- I have two replacement elements from this heatgun: http://www.graing...Pid=search CHAD Roaster: CoffeeAir II 2# DIY air roaster
Grinder: Vintage Grindmaster 500 Brewers: Vintage Cory DCU DCL, Aeropress, Press, Osaka Titanium pourover |
|
|
|
| dja |
Posted on 12/12/2010 11:28 AM
|
|
1 1/2 Pounder Posts: 701 Joined: November 07, 2008 |
thats the same element that I plan on using, do you have your elements connected in parrallel or so that you can control them seperately? I plan to connect mine up in a straight 220 circuit, from the roast that I was able to do before the element shorted into where I had spliced it (grimped the two ends together in half a butt splice), I did no control of bean temp with the Heat all control was with air flow. I pour Iron and roast Coffee Beans
If life seems normal your not going fast enough Mario Andrette |
|
|
|
| endlesscycles |
Posted on 12/12/2010 5:39 PM
|
 Pounder  Posts: 420 Joined: April 11, 2009 |
Quote dja wrote: thats the same element that I plan on using, do you have your elements connected in parrallel or so that you can control them seperately? I plan to connect mine up in a straight 220 circuit,... Doubling voltage quadruples power. Let me know how that goes. I've got three of them that I plan to use in time. I suspect it is heat that fails nichrome, not total watts. I need to invest in some things before I can actually check it out, though. -Marshall Hance
Asheville, NC |
|
|
|
| seedlings |
Posted on 12/13/2010 9:32 AM
|
|
1 1/2 Pounder Posts: 4226 Joined: June 27, 2007 |
David, if you put 220V across your element, I believe it would fail much sooner than the last element. Mine are in series, so each element gets it's designed 120V. CHAD Roaster: CoffeeAir II 2# DIY air roaster
Grinder: Vintage Grindmaster 500 Brewers: Vintage Cory DCU DCL, Aeropress, Press, Osaka Titanium pourover |
|
|
|

| Jump to Forum: |
Powered by PHP-Fusion Copyright © 2024 PHP-Fusion Inc
Released as free software without warranties under GNU Affero GPL v3
Designed with ♥ by NetriXHosted by skpacman