
Login

Shoutbox
You must login to post a message.
renatoa
07/26/2024 3:49 PM
Bill grubbe and Jk, 
allenb
07/26/2024 5:15 AM
Spiderkw Welcome to HRO!

renatoa
07/24/2024 8:31 AM
ramiroflores and John123,

 ?
?
?renatoa
07/21/2024 1:18 AM
 , Luislobo
renatoa
07/19/2024 11:28 AM
Koepea,
Forum Threads
Newest Threads
Skywalker roaster modsBackground Roast Iss...
Hello from Arkansas
TC4ESP
Green coffee reviews
Hottest Threads
| Skywalker roaster... | [375] |
| TC4ESP | [115] |
| War on Farmers by... | [47] |
| Adventures in flu... | [26] |
| Hello! (soon) Roa... | [17] |
In Memory Of Ginny

Donations
Latest Donations
dmccallum - 10.00
JackH - 25.00
snwcmpr - 10.00
Anonymous - 2.00
Anonymous - 5.00
dmccallum - 10.00
JackH - 25.00
snwcmpr - 10.00
Anonymous - 2.00
Anonymous - 5.00
Users Online
Guests Online: 6
Members Online: 0
Total Members: 8,393
Newest Member: Bill grubbe
Members Online: 0
Total Members: 8,393
Newest Member: Bill grubbe
View Thread
Who is here? 1 guest(s)
 Heat Gun...Max Capability?
|
|
| JETROASTER |
Posted on 06/16/2011 2:49 PM
|
 Administrator Posts: 1780 Joined: March 06, 2010 |
....And a little cool-down video. Warning!!!! This is a bit boring!!!! It's 3 minutes of gauges dropping, shot with a droid, with little caffiene in my system.....you were warned. Very little variation between the gauges...that's during the roast as well. That is not the case with the larger roaster. I guess size matters. -Scott [video]http://www.youtube.com/watch?feature=player_profilepage&v=cQg6Fv8Uh3U[/video] |
|
|
|
| allenb |
Posted on 06/16/2011 8:27 PM
|
 Administrator Posts: 3869 Joined: February 23, 2010 |
Quote freshbeans wrote: ....And a little cool-down video. Warning!!!! This is a bit boring!!!! It's 3 minutes of gauges dropping, shot with a droid, with little caffiene in my system.....you were warned. Very little variation between the gauges...that's during the roast as well. That is not the case with the larger roaster. I guess size matters. -Scott [video]http://www.youtube.com/watch?feature=player_profilepage&v=cQg6Fv8Uh3U[/video] Scott, no roaster video is boring! Looking good. In your previous post you mentioned cooling down to 150 in 2 1/2 min. I'm sure this is plenty fast enough to not cause baked flavors to appear. It seems the thermal mass of this roaster is low enough to allow in-chamber cooling. Brad had asked what the max time for cooling should be. I'm not aware of a study that has quantified this but maybe there is such a study. I'd like to hear more about this also. I've always heard the most important part of the cool down is getting the first 100 degrees very quickly but also to have it down to 200 F in no more than 2 1/2 min. Allen 1/2 lb and 1 lb drum, Siemens Sirocco fluidbed, presspot, chemex, cajun biggin brewer from the backwoods of Louisiana
|
|
|
|
| JETROASTER |
Posted on 06/16/2011 10:00 PM
|
|
Administrator Posts: 1780 Joined: March 06, 2010 |
......And also,there was a thing Dan had taken note of somewhere ....that a quick roast cycle should get a more protracted cooling cycle. I personally feel that a quick roast also needs a longer rest. I guess I just believed that a quicker cooling was always better . Now, I guess I'm not as sure. The variables are killing me. I may need to do some tests roasts, then send them to someone else for tasting. -Scott |
|
|
|
| JETROASTER |
Posted on 07/20/2011 10:31 AM
|
|
Administrator Posts: 1780 Joined: March 06, 2010 |
Well, I saw a couple threads talking about bean removal. OGH sucked 'em right out...very nice. GC was thinking about just pressurizing them out, so I figured I'd give it a shot. I had to alter the baffle inside the MH-1. It was mounted up high in the RC to prevent beans from flying up and out. It was also preventing me from inserting a tube to remove the beans. So, I re-installed the baffle on a spring, vs. the rigid bolt I used previously. The baffle still prevents rogue beans from escaping, but allows a 1.25" tube to be inserted. Inserting the tube alone does not get the job done... Pressure has to be created to force the beans out. Simply obstructing the rest of exhaust port by hand (literally) did the trick. So here's a little video featuring mostly my elbow. In the background you'll notice beans leaving the roaster. I used green just to make it challenging. Only 2 stragglers were left behind. -Cheers , -Scott [video]http://www.youtube.com/watch?feature=player_profilepage&v=bwqfxv3-qtE[/video]
JETROASTER attached the following image:

Edited by JETROASTER on 07/20/2011 10:37 AM |
|
|
|
| greencardigan |
Posted on 07/20/2011 9:43 PM
|
 1 1/2 Pounder  Posts: 1185 Joined: November 21, 2010 |
Excellent! I tried the same thing yesterday and also found that I had to seal off the top of the roast chamber. I had trouble catching the beans coming out the end of the tube. How are you dissipating the air? I had beans spraying out everywhere and getting blown out of my collection container. |
|
|
|
| seedlings |
Posted on 07/21/2011 8:13 AM
|
 1 1/2 Pounder Posts: 4226 Joined: June 27, 2007 |
Wow!!! Your hand can really take the heat!!!!  Great demos! CHAD Roaster: CoffeeAir II 2# DIY air roaster
Grinder: Vintage Grindmaster 500 Brewers: Vintage Cory DCU DCL, Aeropress, Press, Osaka Titanium pourover |
|
|
|
| JETROASTER |
Posted on 07/21/2011 8:43 AM
|
|
Administrator Posts: 1780 Joined: March 06, 2010 |
The tube is part of a 1.25" drain fitting. It's the second half of an 'S' trap. I discharged into a #2.5 mylar pouch. I think dropping into something deep helps create the dead air space needed. Discharging into jute would likely work as well. This demo was roasted and cooled to roughly 180f , hence the gloves. The metal fittings still retain a bit of heat. Costa Rican, Finca Genesis. The Bomb!! -Scott [video]http://www.youtube.com/watch?v=sOSzojPVUyg[/video]
JETROASTER attached the following image:

Edited by JETROASTER on 07/21/2011 8:51 AM |
|
|
|
| Unta |
Posted on 07/21/2011 10:50 AM
|
 1 1/2 Pounder Posts: 788 Joined: January 26, 2010 |
NICE WORK MR WILLIAMS, AS ALWAYS.
Sean Harrington
educate. |
|
|
|
| dja |
Posted on 07/21/2011 12:06 PM
|
 1 1/2 Pounder Posts: 701 Joined: November 07, 2008 |
Scott, Kuddos to you, I have cooled the last two roast I have done in the roaster from roast temp down to under two hundred degrees in like 2 minutes, nice thing is that while cooling the beans I am also stripping all that latent heat out of the roaster lower section, I had the thing a part the other day and pulled the coil tubes out, you would be amazed at what the stainless steel coil tubes look likes at the outlet ends, I mean they were like really oxidized from the heat. But for my actual original reason for this post, do you really have to have a tube that long or would one that is barely inside the top of the roaster acheive the same results??? My last roast was 1.750 pounds of a Brazilian /Kenyian mix 17 minutes from start to Full City finsih with beans in the bowl at a barely warm 199 degrees, roast was taken all the way to 450 degrees in stages where it was allowed to finish with the beans a rich chocolate color. David, Edited by dja on 07/21/2011 12:10 PM I pour Iron and roast Coffee Beans
 If life seems normal your not going fast enough Mario Andrette |
|
|
|
| JETROASTER |
Posted on 07/21/2011 12:59 PM
|
|
Administrator Posts: 1780 Joined: March 06, 2010 |
Quote dja wrote: ....do you really have to have a tube that long or would one that is barely inside the top of the roaster acheive the same results??? David, Thanks Sean! Hi David, Thanks! It seems like you could roast some beans on the hood of your truck there today!!! The tube; Truly effective discharge begins with the tube half-way into the bean mass, I finish the stragglers with the tube about 1" off the perf. The pipe is about 10" too long, but it was kicking around the basement, so it got victimized. Next time you dis-assemble, take a shot of that oxidation! Cheers,-Scott Edited by JETROASTER on 07/21/2011 2:02 PM |
|
|
|
| yamhill |
Posted on 08/24/2011 4:12 PM
|
 1/4 Pounder  Posts: 111 Joined: December 18, 2009 |
Scott, This is an awesome thread, and I really like the roaster. I see where you say that you are running this on two circuits. Have you measured the current draw on these circuits? I'm wondering how much tuning or recirculation would be required to get this working on one 15 amp circuit. John |
|
|
|
| JETROASTER |
Posted on 08/24/2011 4:41 PM
|
|
Administrator Posts: 1780 Joined: March 06, 2010 |
Thanks, you are kind. I never measured after the surgery on the heat element. The element started at 16 amps, I removed roughly 25% of it. 19ish? 20 amps? Somewhere in there. The blower is another 2-3 amps. I separated the circuits primarily to leave it as an open design platform. There is the chance of using less velocity by choosing vessels that are slightly wider. You could get away with a couple less amps. I tried alot of variations in the plate to somehow fluidize with less...and this is where I landed. A little recirc might do it, but a different type blower would be needed (bypass). The roaster was scheduled to go to the 'Burning Man' festival. If that doesn't happen, it's time to break it down and inspect. I've put around 30lbs thru it so far. Thanks again, -Scott |
|
|
|
| JETROASTER |
Posted on 12/30/2011 3:23 PM
|
|
Administrator Posts: 1780 Joined: March 06, 2010 |
The MH-1 is leaving home. It will be going to another good HRO home to be looked over and pondered as part of a group project. Things that are learned will be used in constructing a second machine. That is the group project. Right now, the intent is that the original will eventually find its way home. We'll see. You never know how things might evolve. The next shipments will be the basic components needed to create the second machine. The question put to me was; "What is your intent for what it should end up like in the end." The answer is; I have no pre-concieved notions. The MH-1 ver.1, is what it is.... The second version will be determined by the participants of HRO that build it. Many thanks to Allen for taking this first part on. I have no sketches or diagrams or documentation of any kind to work from. It was created 'organically'. ....which is a nice way of saying "I pulled it out of my @$$" Thanks again. -Scott
JETROASTER attached the following image:

|
|
|
|
| JETROASTER |
Posted on 01/09/2012 1:04 PM
|
|
Administrator Posts: 1780 Joined: March 06, 2010 |
Are there any of these MASTER APPLIANCE heat guns that use a metal impeller? It might provide a shot at reducing amp draw, by doing a little recirc. Little squirrel-cage fans are not my first choice, but maybe I could make one work for 1 lb.....but I'd prefer metal. Thanks, -Scott |
|
|
|
| JETROASTER |
Posted on 03/16/2012 1:00 PM
|
|
Administrator Posts: 1780 Joined: March 06, 2010 |
An update; As per Allens advice, I'm sending a new 'yoke' (drain fitting) for the MH-1. (Sending a few exhaust components and the evacuation tube as well)
JETROASTER attached the following image:

|
|
|
|
| JETROASTER |
Posted on 03/16/2012 1:01 PM
|
|
Administrator Posts: 1780 Joined: March 06, 2010 |
The diameter of the flange has been reduced. This will situate the yoke further down in the RC. The reduced 'flat' area should allow better bean flow. It will also slightly increase the depth of the bean mass, relative to the width. So, assuming the same fluid velocity, will this stall the beans, or provide better energy transfer? -Scott
JETROASTER attached the following image:
|
|
|
|
| JETROASTER |
Posted on 04/03/2012 12:55 PM
|
|
Administrator Posts: 1780 Joined: March 06, 2010 |
Sorry, I was a bit mis-leading. I increased amp draw when I shortened the element.(from 16amps to 19ish) If bean flow were a bit different, I could have potentially kept the element at original length (16amps) -Scott |
|
|
|
| JETROASTER |
Posted on 04/03/2012 1:23 PM
|
|
Administrator Posts: 1780 Joined: March 06, 2010 |
It would alter the amp draw of the entire device. Overall amp draw would be reduced by the amount of amperage the blower uses. Is that what you're asking? -Scott |
|
|
|
| JETROASTER |
Posted on 04/12/2012 8:58 AM
|
|
Administrator Posts: 1780 Joined: March 06, 2010 |
That looks like 500dg at 17 cfm. You'll likely need more airflow than that...which will reduce your temp. Have a look around up your way for one of these. http://www.graing...Pid=search They are also available in 220v -Scott |
|
|
|
| JETROASTER |
Posted on 04/12/2012 9:35 AM
|
|
Administrator Posts: 1780 Joined: March 06, 2010 |
For the MH-1...I backpressure the blower to 6-7" H2O-lift, which probably leaves around 30 cfm going thru the beans. (AllenB might have gotten some better measurements ) -Scott |
|
|
|
| JETROASTER |
Posted on 04/12/2012 10:04 AM
|
|
Administrator Posts: 1780 Joined: March 06, 2010 |
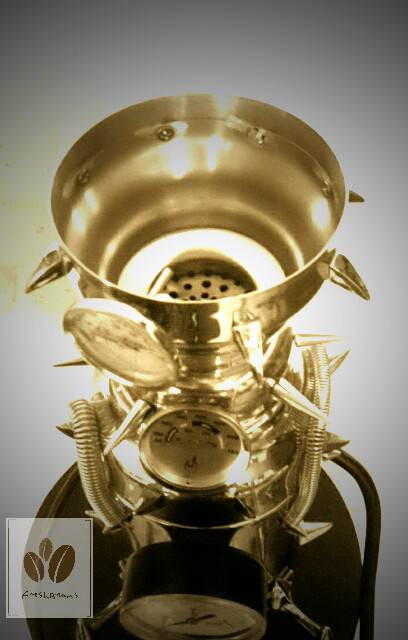
The lowest gauge is the pressure. It reads pressure below the perf plate. Using the plate to increase pressure in the furnace area is my own personal preference. For me, it makes for a less 'bouncy' bean mass. It also allows for increased control of how the airstream is routed thru the heat element/ liner. -Scott
JETROASTER attached the following image:

|
|
|
|
| JETROASTER |
Posted on 04/12/2012 10:30 AM
|
|
Administrator Posts: 1780 Joined: March 06, 2010 |
Sorry, I wasn't very clear. I don't calculate lift....the gauge reads it for me. In this fairly low pressure case, pressure is measured in 'inches of water lift' In a much higher scenario, we'd likely measure pressure 'pounds per square inch' -Scott |
|
|
|
| JETROASTER |
Posted on 04/12/2012 11:05 AM
|
|
Administrator Posts: 1780 Joined: March 06, 2010 |
http://www.graing...mp;sst=All Cheap, and worth every penny! -Scott
JETROASTER attached the following image:
|
|
|
|
| JETROASTER |
Posted on 04/12/2012 12:21 PM
|
|
Administrator Posts: 1780 Joined: March 06, 2010 |
That's the ticket! (top-mount) -Scott |
|
|
|
| JETROASTER |
Posted on 04/12/2012 3:23 PM
|
|
Administrator Posts: 1780 Joined: March 06, 2010 |
Yup, both threads represent the same machine. 'Max capability' was the initial build. 'HRO Edition' is a group effort to improve the original design. -Scott |
|
|
|

| Jump to Forum: |
Powered by PHP-Fusion Copyright © 2024 PHP-Fusion Inc
Released as free software without warranties under GNU Affero GPL v3
Designed with ♥ by NetriXHosted by skpacman