
Login

Shoutbox
You must login to post a message.
renatoa
07/26/2024 3:49 PM
Bill grubbe and Jk, 
allenb
07/26/2024 5:15 AM
Spiderkw Welcome to HRO!

renatoa
07/24/2024 8:31 AM
ramiroflores and John123,

 ?
?
?renatoa
07/21/2024 1:18 AM
 , Luislobo
renatoa
07/19/2024 11:28 AM
Koepea,
Forum Threads
Newest Threads
Skywalker roaster modsBackground Roast Iss...
Hello from Arkansas
TC4ESP
Green coffee reviews
Hottest Threads
| Skywalker roaster... | [375] |
| TC4ESP | [115] |
| War on Farmers by... | [47] |
| Adventures in flu... | [26] |
| Hello! (soon) Roa... | [17] |
In Memory Of Ginny

Donations
Latest Donations
dmccallum - 10.00
JackH - 25.00
snwcmpr - 10.00
Anonymous - 2.00
Anonymous - 5.00
dmccallum - 10.00
JackH - 25.00
snwcmpr - 10.00
Anonymous - 2.00
Anonymous - 5.00
Users Online
Guests Online: 7
Members Online: 0
Total Members: 8,393
Newest Member: Bill grubbe
Members Online: 0
Total Members: 8,393
Newest Member: Bill grubbe
View Thread
Who is here? 1 guest(s)
 air roaster
|
|
| dja |
Posted on 01/02/2011 10:26 PM
|
 1 1/2 Pounder  Posts: 701 Joined: November 07, 2008 |
thats the game plan chad stick em in some stainless steel tubes block everything off around them and put all the air up the tubes should cool em down so that they will stop burning out. after that its fixing the passthru for the electrical conncetion, but I have that one figured out. just have to wait and see what happens in the next few days while I gather up materials and make parts. I pour Iron and roast Coffee Beans
 If life seems normal your not going fast enough Mario Andrette |
|
|
|
| dja |
Posted on 01/10/2011 8:40 PM
|
|
1 1/2 Pounder Posts: 701 Joined: November 07, 2008 |
I got back to work on the roaster yesterday, got all the parts made for the new coil arrangement, have to get them tack welded together but thats not gonna happen till the weather warms up a mite, or I can talk someone with a tig into letting me use it to do it with. I also have to unstring the one element that hasn't burned, and restring it with one of the ones that burned both of the neturals are going to be on one end and the Hot legs on the other so there will be no hidden NiChrome to overheat, Hope to have a picture up in the next day of so, got too many irons in the fire at the moment to drag the camera out. David. I pour Iron and roast Coffee Beans
If life seems normal your not going fast enough Mario Andrette |
|
|
|
| dja |
Posted on 01/11/2011 9:33 PM
|
|
1 1/2 Pounder Posts: 701 Joined: November 07, 2008 |
here's the new coil holder, only name I could think of. as can be seen from the photo I still have to get it welded together so that things will stay in place, and get the coils mounted in it, the small tube is so I can run the L2 lines from the coils back down to the bottom where all connections to the controls will be made. In between the plates will be filled with high temp insulation to help with cooling the outside jacket. hopefully with this design the coils will not burn up as they have been and the jacket will run a lot cooler. If jacket temp drops significately, I hope to be able to either use an Aluminum Jacket or a much thinner Steel Jacket. Comments welcome.
dja attached the following image:
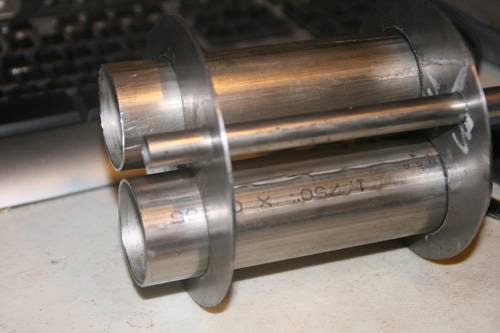
Edited by dja on 01/11/2011 9:35 PM I pour Iron and roast Coffee Beans
If life seems normal your not going fast enough Mario Andrette |
|
|
|
| JETROASTER |
Posted on 01/12/2011 6:28 AM
|
 Administrator Posts: 1780 Joined: March 06, 2010 |
Gorgeous! ! That will fly! Did you use a knock-out to make the pipe holes in the plates? - Scott |
|
|
|
| dja |
Posted on 01/12/2011 7:48 AM
|
|
1 1/2 Pounder Posts: 701 Joined: November 07, 2008 |
bored em on the milling machine, closer fit. But I still got one hole just a tad loose, the closer the tolerances are the smaller and prettier the welds will be. Now who do I know that has a TIG welder, UUUUM, awe yes the Lil'Dave. I still have to cross drill the two large tubes the right distance apart for supporting the coils inside the tubes and I need to figure out some way to hold it in the 5" tube but thats the easy part. I have some 14 AWG 250 degree C insulated wire that will run back down the small tube. I am going to restring the two burned out coils for use with this, no sense in taking a chance on messing up another new coil. David I pour Iron and roast Coffee Beans
If life seems normal your not going fast enough Mario Andrette |
|
|
|
| dja |
Posted on 01/14/2011 8:25 PM
|
|
1 1/2 Pounder Posts: 701 Joined: November 07, 2008 |
finally got a chance to do a little something on the roaster, got the parts all tacked welded together not pretty but were out to roast beans not win beauty contest, besides its all on the inside so no one will ever know. Sorry I don't have the coils mounted yet, I been trying to get some irons out of the fire you might say, maybe later tonight or tomorrow I will get the coils mounted and wired so I can try it out. One things for sure the air only has three ways to get to the beans and one of em is pretty dang small. so the coils should stay cool and there will be no hidden NiChrome the way I plant to wire them. Now were did I put that coil that I took off the insulator. David
dja attached the following image:

Edited by dja on 01/14/2011 8:27 PM I pour Iron and roast Coffee Beans
If life seems normal your not going fast enough Mario Andrette |
|
|
|
| dja |
Posted on 01/14/2011 8:36 PM
|
|
1 1/2 Pounder Posts: 701 Joined: November 07, 2008 |
Forgot to mention that the space around the tube will be filled with high temp ceramic fiber insulation, reason for the ceramic fiber, cause I have a whole roll of the stuff thats 2 inches thick. I am also going to use high temp wire with 250 Celcius insulation inside of high temp sleaves. David I pour Iron and roast Coffee Beans
If life seems normal your not going fast enough Mario Andrette |
|
|
|
| seedlings |
Posted on 01/14/2011 8:42 PM
|
 1 1/2 Pounder Posts: 4226 Joined: June 27, 2007 |
Nice welding! CHAD Roaster: CoffeeAir II 2# DIY air roaster
Grinder: Vintage Grindmaster 500 Brewers: Vintage Cory DCU DCL, Aeropress, Press, Osaka Titanium pourover |
|
|
|
| dja |
Posted on 01/15/2011 7:41 AM
|
|
1 1/2 Pounder Posts: 701 Joined: November 07, 2008 |
I wouldn't call it nice maybe sufficent for the job, but not nice and pretty. but I used what I had available at the moment which was my old Craftsman Arc Welder and some 3/32 309 stainless rod which will take to the mild steel real easy. I was hoping for a lot smaller welds which I could of achived using a TIG welder but then Homeroaster Builders use what they have righ, or can beg, or borrow. I had hoped to have the coils in it today I was able to get the one that hadn't burned out mounted lastnight, but I am worried about it because the insulator is broken. The one that burned into also has a broken insulator, but the end of the coil isn't long enought for me to connect to it, I'm hoping that the other one that burned into has a longer end on it, otherwise its wait till next week when I get back from tulsa unless I can get one at Grainger there before I can continue with this. P. s. Problem area for someone else that trys this route, make the tube no longer than an inch longer than the coils, otherwise its a B*&ch getting in there to tighten up the nuts on the coils to hold them centered. And you also have to make all your electical connections before installing the coils. I should of made the tubes and inch and a half shorter would of put the mountings and wire connections just at the ends of the tubes. David I pour Iron and roast Coffee Beans
If life seems normal your not going fast enough Mario Andrette |
|
|
|
| dja |
Posted on 01/15/2011 12:17 PM
|
|
1 1/2 Pounder Posts: 701 Joined: November 07, 2008 |
been busy got the coils in place heres a picture for those interested, one thing I should of thought of was, I should have procured some small stainless tubing to make spacers between the coil and the tube that they are mounted in. anyway heres the picture
dja attached the following image:
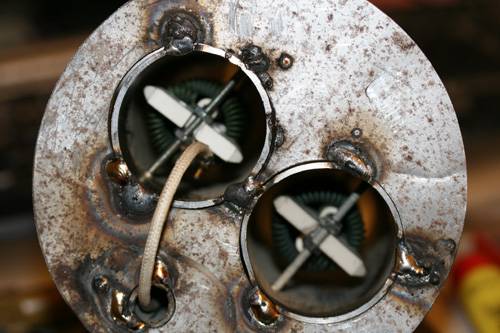
Edited by dja on 01/15/2011 12:18 PM I pour Iron and roast Coffee Beans
If life seems normal your not going fast enough Mario Andrette |
|
|
|
| allenb |
Posted on 01/15/2011 4:28 PM
|
 Administrator Posts: 3869 Joined: February 23, 2010 |
It's looking like a well built heating section! What are the maximum amps you will be putting through one of the elements and at what voltage? Will you be able to measure the amps while it's running? Allen 1/2 lb and 1 lb drum, Siemens Sirocco fluidbed, presspot, chemex, cajun biggin brewer from the backwoods of Louisiana
|
|
|
|
| dja |
Posted on 01/15/2011 7:27 PM
|
|
1 1/2 Pounder Posts: 701 Joined: November 07, 2008 |
the coils are the same ones that Chad used, I have them hooked up serial so each coil gets 110 volts. I filled in between the jacket and the coil holder, oh yea I did three back to back roast tonight testing and that wire you see in the picture still has its high temp insulation after the last roast hit 610 degrees air temp going into the beans, that was with 1 pound in it. One pound is really hard to control the air, to keep the beans moving but not bouncing. The only controls that I have on it at the moment is a H/F router speed control for the V/C, motor. I will be able to measure the amps by pulling the duplxe box apart, so I can get to the wires. Thats for tomorrow, if I can find my AMP Clamp, been awhile since I needed it. I will also do another roast with some test beans that Chad so kindly loaned me, THANK YOU CHAD, I will also video the roast and hopefully get the fuji to cooporate and log the temp, we'll have to see on that one because at the moment I can't remember which LapTop has the program on it. Now here's a picture of the last two roast that I did tonight one was done outside under adverse conditions (I had to hold the roaster together I hadn't bolted the top of the heat chamber down at that point), and the smaller batch in the collender was done in the house (don't do that again with this roaster unless you have a really good vent hood) with the top bolted on so I had a lot better air control. Oh yea I'm not going to try to control the coils, if I do it will be with a PID and I will hook them up 220, the one variac that I have that will control one of the coils weighs like 25 lbs. I get this thing so its not burning coils all the time I am going to redo the complete bottom section and make it one peice with the coil section sliding in as it is now and the motor installed first. And if the thing works like it is now I am going to build a larger diameter bean section. I have the air for a bunch more beans and I think the heat is there. if not I can get larger coils, but first I am going to say trial time till spring, lets play with it and see what it will do right now. But Yes the Beast Lives again.
dja attached the following image:
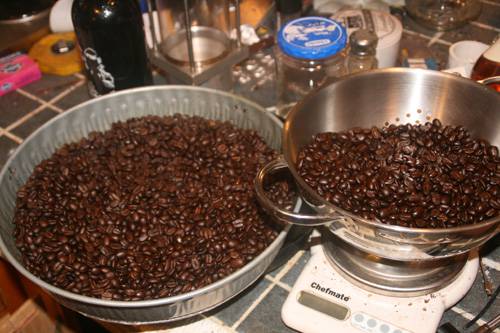
Edited by dja on 01/15/2011 7:31 PM I pour Iron and roast Coffee Beans
If life seems normal your not going fast enough Mario Andrette |
|
|
|
| JETROASTER |
Posted on 01/15/2011 8:30 PM
|
|
Administrator Posts: 1780 Joined: March 06, 2010 |
You da Man! Looking forward to some video in the am. -Scott |
|
|
|
| dja |
Posted on 01/16/2011 1:21 PM
|
|
1 1/2 Pounder Posts: 701 Joined: November 07, 2008 |
here's the new video, roast took around 11 minutes, Allenb, I was able to check the current draw, I checked on leg of the 220 with both coils on that one side was pulling 14.5 amps, should be what the manufacture designed them to draw. Anyway heres the video in all its unproffessional glory, I am sorry that I didn't get a better shot of the beans after I emptied the roast chamber, and the fluxuations in my household current caused bean circulation problems. [video]http://www.youtube.com/watch?v=xQ94WRy1uOw[/video] I pour Iron and roast Coffee Beans
If life seems normal your not going fast enough Mario Andrette |
|
|
|
| dja |
Posted on 01/16/2011 1:29 PM
|
|
1 1/2 Pounder Posts: 701 Joined: November 07, 2008 |
I see U/Tube is playing its usual games, guess their gonna take a bit to get the vid saved
I pour Iron and roast Coffee Beans
If life seems normal your not going fast enough Mario Andrette |
|
|
|
| seedlings |
Posted on 01/16/2011 3:05 PM
|
|
1 1/2 Pounder Posts: 4226 Joined: June 27, 2007 |
Grrrr: Youtube! You have a very pro-looking roaster, David! CHAD Roaster: CoffeeAir II 2# DIY air roaster
Grinder: Vintage Grindmaster 500 Brewers: Vintage Cory DCU DCL, Aeropress, Press, Osaka Titanium pourover |
|
|
|
| dja |
Posted on 01/16/2011 3:31 PM
|
|
1 1/2 Pounder Posts: 701 Joined: November 07, 2008 |
Youtube says its still processing the video, I don't know where I could put it that would be faster its 79 meg and about 13 minutes long. guess we will just have to wait. thanks for the compliment, I do hope to make it look more proffesional by cleaning it up some I also want to make the bottom one peice, shorter, and out of thinner material. The top is also to small in diameter for the amount of beans that the heat and fan will handle. So I plan in the near future to make a larger diameter top to hopefully handle two pounds and stop the bouncing, plus give more room for the beans to swell in. I just hope the coils will stay with me this time, I used crimp on connectors on all of my connections to them, but I did pull the plastic off of them. The one wire connected to the top of the one coil is still in good shape on the insulation even thou its directly in the path of the hot air coming off the coil. I plan on in the next few days to get me a double duplex light switch and wire each side of it into one of the coils so I can turn them on and off, till I can get a 220 volt SSR to hook to the PID, things get to happening a little bit fash when the air temp is running over 600 degrees. David I pour Iron and roast Coffee Beans
If life seems normal your not going fast enough Mario Andrette |
|
|
|
| Unta |
Posted on 01/16/2011 8:05 PM
|
 1 1/2 Pounder Posts: 788 Joined: January 26, 2010 |
DAvid, congrats on the restart. Im hoping for ya on that coil life. Im going to owe you big if it works because there is a TON of info on these 8 pages. Thanks for all the posts and all the details...and the lessons learned of course . Awesome roaster and an awesome thread. good luck. Sean Sean Harrington
educate. |
|
|
|
| JETROASTER |
Posted on 01/16/2011 9:44 PM
|
|
Administrator Posts: 1780 Joined: March 06, 2010 |
Ditto! Your pain has been our gain. Thanks for a great thread. -Scott |
|
|
|
| dja |
Posted on 01/20/2011 6:10 PM
|
|
1 1/2 Pounder Posts: 701 Joined: November 07, 2008 |
Well I been playing with the roaster some, did two back to back roast with it 30 degrees outside, now this ain't real redneck roasting weather. Roaster handled the 30 degree weather with no problems, I have a pid hooked up controlling the temperature, this thing really soaks up the heat and holds so that the coils have some rest time. I also found out the hard way (needed Video camer for this one) that the top damper needs latches, when the air comes on full on, with the damper choked with chaff it will come off, emptying the roast chamber faster then superman. I plan tomorrow on starting to round up materials to start a rebuild on the bottom half, along with a larger diameter roast chamber to see if I can get better bean action and larger roast, by spreading the bean load out over a larger diameter tube, with the same funnel shaped bottom should allow considerable more beans to be roasted. Fan control (H/F router control) is hardly turned on with 1.5 pounds of beans in present roast chamber. sorry was too cold to mess with video. maybe next roast. David I pour Iron and roast Coffee Beans
If life seems normal your not going fast enough Mario Andrette |
|
|
|
| dja |
Posted on 02/03/2011 1:32 PM
|
|
1 1/2 Pounder Posts: 701 Joined: November 07, 2008 |
I dragged the roaster outside today, was a pretty nice day for roasting, sun was shining sky had only an occasional cloud, and the temperature was well below freezing due to the Siberian Express (as weather men like to call it). I did two roast back to back with no problems, the first roast was 1 pound of ethiopian it only took about ten minutes I started the roast at around 15 minutes after 12:00 and had the second roast in at 12:00. I didn't plug in the PID's cause I was having some reservations about if the roaster would handle the cold weather without some added help. We can forget about the added help being needed. the second roast was 1.5 pounds of Brazilian and it was done in less then 12 minutes I ended up taking it futher that I wanted cause I could not get the roast chamber unlatched fast enough, have to fix that so with one hand I can squeeze the latch and have the top ready to lift off for dumping. I took some video but it wasn't very good so I didn't post it. I am still looking for a larger pyrex cylinder to make a roast chamber with a larger diameter to give the beans more room for circulation. hopefully in the next few days I will get to roast again which I will set the camera up and maybe get a decent video. so long for now and happy roasting it the cold!!!! I pour Iron and roast Coffee Beans
If life seems normal your not going fast enough Mario Andrette |
|
|
|
| seedlings |
Posted on 02/03/2011 2:20 PM
|
|
1 1/2 Pounder Posts: 4226 Joined: June 27, 2007 |
Quote dja wrote: I am still looking for a larger pyrex cylinder to make a roast chamber with a larger diameter to give the beans more room for circulation. Square. If you go square, then with your welding skills you can make it any size you like. Get a chunk of pyrex glass to glue to the front for viewing. Works well for me. CHAD Roaster: CoffeeAir II 2# DIY air roaster
Grinder: Vintage Grindmaster 500 Brewers: Vintage Cory DCU DCL, Aeropress, Press, Osaka Titanium pourover |
|
|
|
| JETROASTER |
Posted on 02/03/2011 2:46 PM
|
|
Administrator Posts: 1780 Joined: March 06, 2010 |
Hi David, I'll drop another email to the glass guy. -Scott |
|
|
|
| Ringo |
Posted on 02/04/2011 10:53 AM
|
 Pounder  Posts: 474 Joined: January 14, 2010 |
http://www.cacheb...lepart.htm This is a place to get large glass tubes, they supply parts to fix barber poles. I do not know how it would hold up to heat, but would think it would be OK. Edited by seedlings on 02/04/2011 11:14 AM All you need in life is ignorance and confidence, and then success is sure. Mark Twain
|
|
|
|
| JETROASTER |
Posted on 02/04/2011 11:09 AM
|
|
Administrator Posts: 1780 Joined: March 06, 2010 |
http://www.cacheb...lepart.htm Tried to edit that...no go...this should work |
|
|
|

| Jump to Forum: |
Powered by PHP-Fusion Copyright © 2024 PHP-Fusion Inc
Released as free software without warranties under GNU Affero GPL v3
Designed with ♥ by NetriXHosted by skpacman