
Login

Shoutbox
You must login to post a message.
renatoa
07/26/2024 3:49 PM
Bill grubbe and Jk, 
allenb
07/26/2024 5:15 AM
Spiderkw Welcome to HRO!

renatoa
07/24/2024 8:31 AM
ramiroflores and John123,

 ?
?
?renatoa
07/21/2024 1:18 AM
 , Luislobo
renatoa
07/19/2024 11:28 AM
Koepea,
Forum Threads
Newest Threads
Skywalker roaster modsBackground Roast Iss...
Hello from Arkansas
TC4ESP
Green coffee reviews
Hottest Threads
| Skywalker roaster... | [375] |
| TC4ESP | [115] |
| War on Farmers by... | [47] |
| Adventures in flu... | [26] |
| Hello! (soon) Roa... | [17] |
In Memory Of Ginny

Donations
Latest Donations
dmccallum - 10.00
JackH - 25.00
snwcmpr - 10.00
Anonymous - 2.00
Anonymous - 5.00
dmccallum - 10.00
JackH - 25.00
snwcmpr - 10.00
Anonymous - 2.00
Anonymous - 5.00
Users Online
Guests Online: 5
Members Online: 0
Total Members: 8,393
Newest Member: Bill grubbe
Members Online: 0
Total Members: 8,393
Newest Member: Bill grubbe
View Thread
Who is here? 1 guest(s)
 air roaster
|
|
| dja |
Posted on 03/11/2011 11:15 PM
|
 1 1/2 Pounder  Posts: 701 Joined: November 07, 2008 |
well thanks to some one flipping cig butts out the window and pyromanic's running around trying to burn the darn state down, it looks like they got us locked down with burn bans all over the place so casting the part I need to install the new 6" tube is off till maybe next weekend. Or maybe oneday during the week if the time change every come around. I'm sorry guy's no new video for a few more days. DAvid I pour Iron and roast Coffee Beans
 If life seems normal your not going fast enough Mario Andrette |
|
|
|
| JETROASTER |
Posted on 03/12/2011 8:28 AM
|
 Administrator Posts: 1780 Joined: March 06, 2010 |
:| My popcorn is gettin' cold! (kidding...no pressure) Is aluminum easier to cast than some other options? -Scott
Edited by JETROASTER on 03/12/2011 8:29 AM |
|
|
|
| dja |
Posted on 03/12/2011 4:17 PM
|
|
1 1/2 Pounder Posts: 701 Joined: November 07, 2008 |
Aluminum is pretty easy to cast, you don't have to get it as hot as other metals like say brass which melts around 2100 degrees. Big problem with aluminum is getting rid of the gas, it has an affinity for oxygen which it sucks up llike a kid with a slurpy, and the H2O is pretty easy to deal with don't have it around the furnace, its when it gets sucked into the molten metal and it splits into Hydrogen and O2 you have a problem the O2 burns off the Hydrogen stays with the molten metal till it starts to cool then it wants to try to come back out of the molten metal and causes gas bubbles, which means you got metal that won't machine bright and shiny cause of all the little tiny some microscopic holes. my problem right now is that cause of all the fires I'm scared the neibghors will call the fire dept if I fire up so I haven't been working on the roaster, but been changing the spindle bearings in my 12" lathe. sorry bout the popcorn getting stale, give it to the birds and I'll send you a new deal of jiffy pop, G@#D#E$% pyromanics. I pour Iron and roast Coffee Beans
If life seems normal your not going fast enough Mario Andrette |
|
|
|
| dja |
Posted on 03/17/2011 12:33 PM
|
|
1 1/2 Pounder Posts: 701 Joined: November 07, 2008 |
Sorry for not posting but things have been kinda crazy what with people trying to burn the state off guess they don't like to mow grass. I have the pattern just about ready to cast, after rebuilding the head on my lathe and burning a bearing out, belive me you don't burn up to many 65.00 bearings before it starts to hit the pocket book. But God and Mother Nature willing I'll get the bottom part ot the new roast chamber poured this weekend. hopefully this will happen tomorrow since I don't work on Fridays and I will have Sat, Sunday to fit it and maybe do a trial roast. We'll see. DJA I pour Iron and roast Coffee Beans
If life seems normal your not going fast enough Mario Andrette |
|
|
|
| dja |
Posted on 03/19/2011 7:47 PM
|
|
1 1/2 Pounder Posts: 701 Joined: November 07, 2008 |
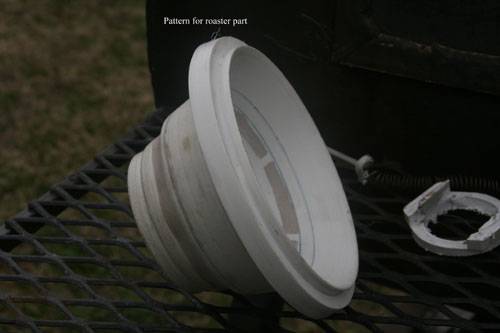
got some work done, had hoped to pour this today but had to stop due it getting to late in the afternoon to fire up the furnace, but heres some picture of whats been going on. the first picture is of the pattern
dja attached the following image:
Edited by dja on 03/19/2011 7:49 PM I pour Iron and roast Coffee Beans
If life seems normal your not going fast enough Mario Andrette |
|
|
|
| dja |
Posted on 03/19/2011 7:49 PM
|
|
1 1/2 Pounder Posts: 701 Joined: November 07, 2008 |
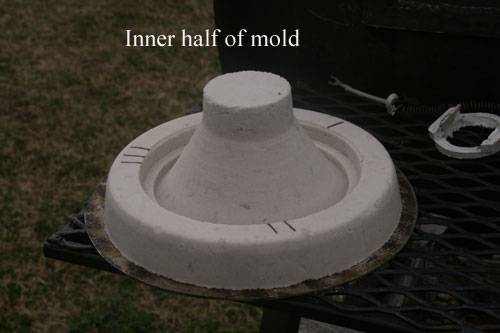
this second photo is of the inner part of the mold
dja attached the following image:
Edited by dja on 03/19/2011 7:50 PM I pour Iron and roast Coffee Beans
If life seems normal your not going fast enough Mario Andrette |
|
|
|
| dja |
Posted on 03/19/2011 7:51 PM
|
|
1 1/2 Pounder Posts: 701 Joined: November 07, 2008 |
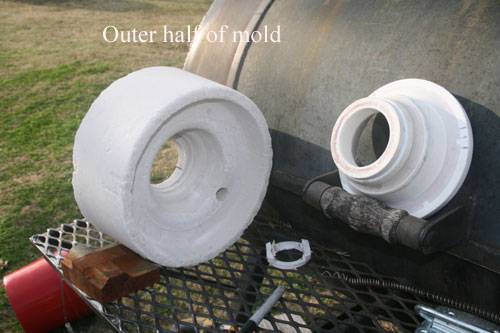
this third photo is of the outside half of the mold, for those that don't know I plan on pouring this full of molten aluminum, the molten metal will be poured don't the small hole that you see in the lower right hand corner of the top half of the mold, this is a one shot deal which means if I mess it up I get to start all over from the part in the first picture which is the only part that will be saved.
dja attached the following image:
Edited by dja on 03/19/2011 7:56 PM I pour Iron and roast Coffee Beans
If life seems normal your not going fast enough Mario Andrette |
|
|
|
| dja |
Posted on 03/19/2011 8:00 PM
|
|
1 1/2 Pounder Posts: 701 Joined: November 07, 2008 |
I'm not sure but that it wouldn't be cheaper to just go buy a piece of 6" aluminum round bar. But that wouldn't be as much fun now would it, to just stand there and make little chips our of a big hunk of aluminum spinning around. DAvid I pour Iron and roast Coffee Beans
If life seems normal your not going fast enough Mario Andrette |
|
|
|
| seedlings |
Posted on 03/21/2011 1:49 PM
|
 1 1/2 Pounder Posts: 4226 Joined: June 27, 2007 |
Is the mold concrete? CHAD Roaster: CoffeeAir II 2# DIY air roaster
Grinder: Vintage Grindmaster 500 Brewers: Vintage Cory DCU DCL, Aeropress, Press, Osaka Titanium pourover |
|
|
|
| dja |
Posted on 03/21/2011 4:27 PM
|
|
1 1/2 Pounder Posts: 701 Joined: November 07, 2008 |
Silica Sand mixed with about 4% sodium silicate, packed around the pattern then shot with CO2 which makes the Sodium Silicate harden immideately, once you pour the molten metal into it and it hardens, you throw the hunks of sand into the driveway and spray em with water and they will crumble to nothing. The thing that scares me is that I have a lot of work in this mold, now with the chance of rain and the wind won't quit blowing 90 MPH, if the mold draws too much moisture I may crumble on my. You can use basicly sand with just portland power say five pounds portland to 100 lbs of sand with 1 to 2 percent of moisture to do this with but you have to wait till all the moisture or almost all of its gone before you can pour. Too much moisture in the sand it will blow on you from steam generation. I hope to video the pour but things get kinda fast when its time to pull the crucible from the furnace, lots of things to take care of. I pour Iron and roast Coffee Beans
If life seems normal your not going fast enough Mario Andrette |
|
|
|
| dja |
Posted on 03/23/2011 8:02 PM
|
|
1 1/2 Pounder Posts: 701 Joined: November 07, 2008 |
figured I better stick an update on here, I was able to make the pour this evening but was unable to get any pictures of the actual pour itself due to me being the only one here. I will take some pictures of the part tomorrow before I start maching it. With this major deal out of the way I should be able to make a roast this weekend in the new tube. will just have to wait and see what the weather does. David. I pour Iron and roast Coffee Beans
If life seems normal your not going fast enough Mario Andrette |
|
|
|
| dja |
Posted on 03/27/2011 12:40 PM
|
|
1 1/2 Pounder Posts: 701 Joined: November 07, 2008 |
the wind finally gave me a break and I was able to get the part I been working on casted and into the Lathe. Sorry no Video I made the pour with no help and I just didn't have time to get the video camera out, things went pretty fast it only took from start to finishe about 35 minutes to melt a half gallon of aluminum and get it into the mold. Its not the greatest cast that I have done, but at least its good enough that I don't have to re do it either. I did get some pictures heres what it looks like on the outside
dja attached the following image:

Edited by dja on 03/27/2011 12:41 PM I pour Iron and roast Coffee Beans
If life seems normal your not going fast enough Mario Andrette |
|
|
|
| dja |
Posted on 03/27/2011 12:47 PM
|
|
1 1/2 Pounder Posts: 701 Joined: November 07, 2008 |
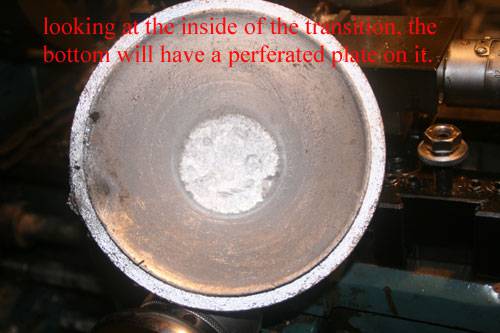
and one of the inside, I have the machine work done, still have to make a perf plate to fit the opening into the transistion, all of this would of been done but I had to run to texas on Thursday and didn't get back till yesterday afternoon, The weather turned cold and I have to go back to texas in the morning. So hopefully in a couple of days. I also still have to figure out how I am going to hold this one together, I have a couple of ideas floating around in the belfry but we'll just have to see what works out to be the easiest and nicest of the thoughts. Here's a shot of the inside of the Transition. I did have one small sand inclusion in the casting but nothing to keep me from using it, If I was making this for someone else it would go back into the furnace adn be repoured and a Better mold would be made so that it would not be so rough.
dja attached the following image:
Edited by dja on 03/27/2011 12:48 PM I pour Iron and roast Coffee Beans
If life seems normal your not going fast enough Mario Andrette |
|
|
|
| JETROASTER |
Posted on 03/27/2011 1:59 PM
|
|
Administrator Posts: 1780 Joined: March 06, 2010 |
Looks great! I can see the flange for the glass to rest on. I keep picturing the hardware from my friends drum kit. It secured the drumheads,and was threaded to allow for tuning. Looking forward to the milled version! -Scott |
|
|
|
| dja |
Posted on 03/27/2011 5:55 PM
|
|
1 1/2 Pounder Posts: 701 Joined: November 07, 2008 |
been thinking along the lines of something like that to hold all this together. I got a perf plate sorta knocked out and stuck everything together with some bunjee cords to hold the tube to the bottom transition, the bean flow is awesome in this thing and I actually think that I could put way more than 3 pounds in it which I have had pretty close to that with 2.13 pounds. the heat is a little on the slow side, little who am I kidding way on the slow side, don't have time today to let it cool off and redo the perf plate as i put a lot of holes in it. I actually figure I will get ahold of a 220 volt coil and pair it with one of the 110 coils that are in it now. I got to 380 and it sorta hung right there, with the same 2.13 lbs of beans that I first started doing air flow checks with. I have a little video which i will post later. have to get ready to run back to texas in the morning. But it does feel good to be moving towards a finish on this roaster. David I pour Iron and roast Coffee Beans
If life seems normal your not going fast enough Mario Andrette |
|
|
|
| dja |
Posted on 03/27/2011 8:26 PM
|
|
1 1/2 Pounder Posts: 701 Joined: November 07, 2008 |
you will have to forgive the getto look of the roaster at the point in time that this video was shot. heres a little video that shows the roaster in action, there is a small problem with the heat, I don't know if its just that I have to many air holes in the perf plate or if I need to install a higher wattage heating coil, we'll see in a few days as I make changes to the roaster and get some time in the yard with it, anyway here it is [video]http://www.youtube.com/watch?v=tswyrR_1mec[/video] David I pour Iron and roast Coffee Beans
If life seems normal your not going fast enough Mario Andrette |
|
|
|
| dja |
Posted on 03/27/2011 8:59 PM
|
|
1 1/2 Pounder Posts: 701 Joined: November 07, 2008 |
heres the second video that I shot today sorry about the poor quality, guess I'm just not a one handed video shooter. [video]http://www.youtube.com/watch?v=nEk4_NGEr08[/video] I am starting to think that the tube may not have to be as tall as it is with the way that the beans flow inside the 6 inch tube to get good circulation I don't have to have the beans spraying all over the place and it doesn't take lots of air after they start lightening up as the moisture is released from them. I do belive that I tube half as long would of worked just as easy as the 16 inch one, and from a build stance it would be about half the cost if it could be purchased that short, I also think that my first thoughts of using 5 inch tube were correct. sorry for being so long winded, comments welcome DAvid Edited by dja on 03/27/2011 9:05 PM I pour Iron and roast Coffee Beans
If life seems normal your not going fast enough Mario Andrette |
|
|
|
| greencardigan |
Posted on 03/28/2011 3:29 AM
|
 1 1/2 Pounder Posts: 1185 Joined: November 21, 2010 |
Interesting. Mine is about 19" from the perf plate to the top of my chimney and I'm still blowing beans out at the end of the roast. I prob need at least another 6". |
|
|
|
| seedlings |
Posted on 03/28/2011 9:51 AM
|
|
1 1/2 Pounder Posts: 4226 Joined: June 27, 2007 |
How were the results David? The flow looks very nice! CHAD Roaster: CoffeeAir II 2# DIY air roaster
Grinder: Vintage Grindmaster 500 Brewers: Vintage Cory DCU DCL, Aeropress, Press, Osaka Titanium pourover |
|
|
|
| dja |
Posted on 03/29/2011 10:31 AM
|
|
1 1/2 Pounder Posts: 701 Joined: November 07, 2008 |
Chad; Your right the flow in this tube is fantastic, the heats another story, where in the 4 inch tube I had heat to throw away in this tube it struggles to reach 390 degrees F. I am thinking that with all that open tube above the beans, that the heat escapes before it can raise the temperature in the beans. I really wish that I had of been able to aquire a 5 inch tube. I don't think that I would be seeing this problem in a tube woth an inside diameter of say 4.625 verses the 5.89 that I have, original tube inside diameter was 3.750 inches. So you can see that I made a really large change in the size of things. sure wish I had a 5 inch tube to compare too these two (you know stick it in the middle and fire up a roast, bet the temp would jump right up there where it needs to be. I plan on rounding up a plate that I can hang down in the tube at differant heights to see if I can raise the temperature enough to roast with. I can't say that it was the weather because I roasted with the original tube in 17 degree weather, this is just one of those roadblocks that you go thru in project developement, I made a major differant change in design and now have to figure out how to get back to roasting. The flow pattern is geneerated by the fact that the opening where the air comes in at is without the preferated plate installed is 2.608 inches in diameter, I drilled a bunch of holes in the plate enough that they total over 1.00 Square Inch of opening, this is one reason that i can run the fan as low as I am and still have circulation, if I could draw it up almost looks like flux rings around a Throiad Transformer, even when the beans aren't spraying up in the air you can see a them trying to circulate. Nie Clear Roast chambers really let you see whats going on. So the game plan is to change the perf plate, to one with less holes, to shorten the length of the roast tube with a blocking plate to see if we can get the temp up. If that doesn't work then its change the coil to one with a higher temp rating. Masters makes one for the 220 volt floor model heat gun that they have that will go to 1000 degrees I belive. Oh yea, how did they taste; haven't tried them they were in the heat for over an hour all total, while I was testing the roaster. and if you think you got chaff problems turn this thing loose in the kitchen and take the strainer off the top.... But man three pounds of Beans makes for one heck of a collender full. David. Stay tuned; more to come in the days ahead. Edited by dja on 03/29/2011 10:35 AM I pour Iron and roast Coffee Beans
If life seems normal your not going fast enough Mario Andrette |
|
|
|
| allenb |
Posted on 03/29/2011 7:21 PM
|
 Administrator Posts: 3869 Joined: February 23, 2010 |
David, are you using the same heating element as in the smaller RC version? You stated you're using less blower capacity? Haven't increased charge weight? If this is the case I don't think the problem has anything to do with the larger RC. From the looks of the spout pattern, you should be getting a very efficient heat transfer. A low plume height spout is going to transfer more btu's than was possible with your other RC. I would leave the RC as is and look for other possible problems causing the lack of heat. Allen 1/2 lb and 1 lb drum, Siemens Sirocco fluidbed, presspot, chemex, cajun biggin brewer from the backwoods of Louisiana
|
|
|
|
| dja |
Posted on 03/29/2011 9:15 PM
|
|
1 1/2 Pounder Posts: 701 Joined: November 07, 2008 |
it is taking less air now then it did when I first got the new tube, but that was with the pref plate and funnel section that was used on the 4 inch tube, I am now using a pref plate that is almost twice the size of the one in the four inch tube with about twice the holes, some of these have already been plugged, if you will notice in the two short videos that I posted the bean circulation is fine except for a few beans hanging on the side (minor machining fix). The smaller roast chamber had a damper fitted to the top, which I could open or close as deemed nessecary. I do not plan on cutting this tube untill I know for a fact that it is too tall. Yes the heating elements are the same ones used with the 4 inch tube. Two major changes have been made Roast Chamber diameter, bean weight, in the old chamber I was able to roast 1.5 pounds with no problems, the amount of beans in the video is almost 3 pounds. I think that the amount of open space in the roast chamber is causing problems with the heat building in the bean mass, maybe I'm wrong, maybe I'm right, theres only one way to find out and that is to TEST it. I plan to cut a plate that I can hold at any height that I want and see if I can build the heat that I need. Who knows it may just be a matter of adding another pound of beans to the Roaster to get the temp up, It could also be something with the heating element. almost forgot the heating elements are runing at almost max with the 4 inch tube. I do belive from watching Chads Videos he's amost at max on his also. Might be wrong if I am well I'm wrong. DJA I pour Iron and roast Coffee Beans
If life seems normal your not going fast enough Mario Andrette |
|
|
|
| seedlings |
Posted on 03/30/2011 8:29 AM
|
|
1 1/2 Pounder Posts: 4226 Joined: June 27, 2007 |
I run 100% heat until after first crack.... well, it's been winter for a long time. Maybe if 65F shows up someday the roaster won't need as much heat. David, do you have a chunk of 5" metal tubing to try out for fun? CHAD Edited by seedlings on 03/30/2011 8:30 AM Roaster: CoffeeAir II 2# DIY air roaster
Grinder: Vintage Grindmaster 500 Brewers: Vintage Cory DCU DCL, Aeropress, Press, Osaka Titanium pourover |
|
|
|
| Unta |
Posted on 03/30/2011 10:32 AM
|
 1 1/2 Pounder Posts: 788 Joined: January 26, 2010 |
I bet your trouble with heat will comedown to pressure, which may be remedied by a baffle or some change in the RC. The way that the air flowed in the narrow tube was far more restricted then it is now. Can you put another perf with less holes in the bottom, see if you can get a bit more pressure built up in the Furnace section? Would a restriction before the heat elements be helpful? that i really dont know. Sean Sean Harrington
educate. |
|
|
|
| endlesscycles |
Posted on 03/30/2011 11:01 AM
|
 Pounder  Posts: 420 Joined: April 11, 2009 |
Nah, it's a bean bed depth problem. Going wider diameter for a given mass reduces efficiency, so you have to add more heat power.
-Marshall Hance
Asheville, NC |
|
|
|

| Jump to Forum: |
Powered by PHP-Fusion Copyright © 2024 PHP-Fusion Inc
Released as free software without warranties under GNU Affero GPL v3
Designed with ♥ by NetriXHosted by skpacman