
Login

Shoutbox
You must login to post a message.
renatoa
07/26/2024 3:49 PM
Bill grubbe and Jk, 
allenb
07/26/2024 5:15 AM
Spiderkw Welcome to HRO!

renatoa
07/24/2024 8:31 AM
ramiroflores and John123,

 ?
?
?renatoa
07/21/2024 1:18 AM
 , Luislobo
renatoa
07/19/2024 11:28 AM
Koepea,
Forum Threads
Newest Threads
Background Roast Iss...Skywalker roaster mods
Hello from Arkansas
TC4ESP
Green coffee reviews
Hottest Threads
| Skywalker roaster... | [374] |
| TC4ESP | [115] |
| War on Farmers by... | [47] |
| Adventures in flu... | [26] |
| Hello! (soon) Roa... | [17] |
In Memory Of Ginny

Donations
Latest Donations
dmccallum - 10.00
JackH - 25.00
snwcmpr - 10.00
Anonymous - 2.00
Anonymous - 5.00
dmccallum - 10.00
JackH - 25.00
snwcmpr - 10.00
Anonymous - 2.00
Anonymous - 5.00
Users Online
Guests Online: 4
Members Online: 0
Total Members: 8,393
Newest Member: Bill grubbe
Members Online: 0
Total Members: 8,393
Newest Member: Bill grubbe
View Thread
Who is here? 1 guest(s)
 air roaster
|
|
| SteveN |
Posted on 10/08/2010 8:26 AM
|
 1/4 Pounder  Posts: 127 Joined: March 16, 2010 |
Where did you get a pyrex tube? I looked all over the place and instead settled on regular glass (even then I had to cut the bottom off a vase). |
|
|
|
| dja |
Posted on 10/08/2010 7:37 PM
|
 1 1/2 Pounder  Posts: 701 Joined: November 07, 2008 |
I found the first one at a thrift store close to where I live. The second one I foiund on EBay, I did a search for pyrex tubes and found the same baking tube that I had originally found at the thrift store, and was luckly enough to find one that had a Buy Now price so I bought it incase I break the one that I have. I would love to find a tube in the 5" OD range with a .250" wall for the strength. Anyway it makes for and interesting show when the beans are circulating in it. You will have to post a video of your roaster when you get to where you can. I pour Iron and roast Coffee Beans
 If life seems normal your not going fast enough Mario Andrette |
|
|
|
| Dan |
Posted on 10/11/2010 12:30 PM
|
|
1 1/2 Pounder Posts: 1662 Joined: October 24, 2005 |
McMaster-Carr has borosilicate glass (Pyrex is a trade name) shapes including tubes. |
|
|
|
| Unta |
Posted on 10/11/2010 2:56 PM
|
 1 1/2 Pounder Posts: 788 Joined: January 26, 2010 |
5 and 6 inch boro tube is pricey. As long as things are properly gasketed and the glass is used in the RC. I dont think that boro/Pyrex is necessary. You can get wide diameter vases @ michaels craft stores, for 25 bucks. pretty easily cut on a wet tile saw with a diamond blade.
Unta attached the following image:
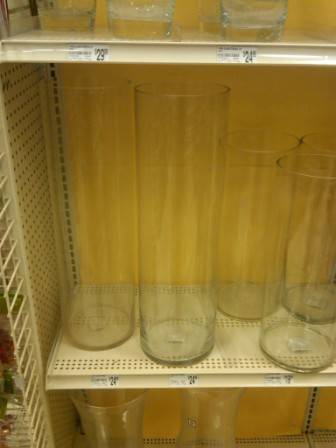
Edited by Unta on 10/11/2010 2:57 PM Sean Harrington
educate. |
|
|
|
| seedlings |
Posted on 10/11/2010 3:01 PM
|
 1 1/2 Pounder Posts: 4226 Joined: June 27, 2007 |
Michaels also has glass 'tubes' you won't have to cut. Last I looked they were $8.99. CHAD Roaster: CoffeeAir II 2# DIY air roaster
Grinder: Vintage Grindmaster 500 Brewers: Vintage Cory DCU DCL, Aeropress, Press, Osaka Titanium pourover |
|
|
|
| dja |
Posted on 10/11/2010 5:21 PM
|
|
1 1/2 Pounder Posts: 701 Joined: November 07, 2008 |
now Michaels just might be a source for a roast chamber of larger diameter. if they have glass tubes / Vases on the shelve ready for my to chop up and make into something totally differant then what they were originally designed for. But I was lucky enough to find a buy now auction on Evil Bay for the same tube that I had, Pyrex Baking tube in original box 27.00 shipping included. Now if I coulde just get my hindend out of florida so I could work on my roaster and other toys I'd be  . .I could use a 6" coleman lantern globe which is pyrex, the larger diameter would give me a larger roast chamber which means I could shorten it up dramaticly and use a larger air inlet if the setup I have doesn't work. Options thats what we all need, lots of options when building one of these endless pits. I pour Iron and roast Coffee Beans
If life seems normal your not going fast enough Mario Andrette |
|
|
|
| dja |
Posted on 10/11/2010 5:23 PM
|
|
1 1/2 Pounder Posts: 701 Joined: November 07, 2008 |
wonder what the temp rating is on them vases, ya think they will take 500 degrees, hate like he"" to loose a load of the really good stuff to a broken tube. Thanks for the information. Edited by dja on 10/11/2010 5:25 PM I pour Iron and roast Coffee Beans
If life seems normal your not going fast enough Mario Andrette |
|
|
|
| Unta |
Posted on 10/11/2010 5:56 PM
|
|
1 1/2 Pounder Posts: 788 Joined: January 26, 2010 |
you wont have a problem, my expirence on my machine has been with a walmart cookie jar that i cut the bottom off, that i use on the top of my RC. typically in contact wiht beans 40 percent of the time,12lb loads typically, so its quite a thermal mass rolling around in there. Just make sure you gasket it well and dont torque it down to much. I used some 1/2" braided woodstove gasket with mine and havent had a problem, with excption to some clumseyness. sean Edited by seedlings on 10/11/2010 7:25 PM Sean Harrington
educate. |
|
|
|
| dja |
Posted on 10/11/2010 7:33 PM
|
|
1 1/2 Pounder Posts: 701 Joined: November 07, 2008 |
I would think that the cookie jar would be a tad thicker then one of the vases sold at Micheals, but I will try it if what I have doesn't make the roast so to speak. Anyway I think that I have found a source for quartz glass tube in the 150 mm range, at a reasonable price of thirty bucks for a 59" long peice, but am going to have to see how that works out. Also I'm not building this as a prototype of a roaster to sell, I started with a pyrex tube that I picked up at a thrift store a few years ago and has been knocking around the house ever since. I have run how to build this thing thru my head many times trying to figure out how to build it. It wasn't untill I got off into the hobby machinist gig and bought several machines was I able to make the parts to put this thing together. It still has a ways to go, but seeing as how I am in florida at the moment the project will have to wait. Edited by dja on 10/11/2010 7:35 PM I pour Iron and roast Coffee Beans
If life seems normal your not going fast enough Mario Andrette |
|
|
|
| SteveN |
Posted on 10/12/2010 12:21 PM
|
|
1/4 Pounder Posts: 127 Joined: March 16, 2010 |
The glass vase I got at walmart was quite thick (thicker than a cookie jar that I had bought a month ago). I haven't measured but I would guess that it's maybe 6 or 7mm. edit: it was $12... Edited by SteveN on 10/12/2010 12:22 PM |
|
|
|
| Unta |
Posted on 10/12/2010 12:47 PM
|
|
1 1/2 Pounder Posts: 788 Joined: January 26, 2010 |
i'm thinking the same thing SteveN, the cookie jar was very uneven, thicker at the top then at the bottom.From what I remember those vases in the pic were pretty thick also. sean Sean Harrington
educate. |
|
|
|
| dja |
Posted on 10/13/2010 7:05 PM
|
|
1 1/2 Pounder Posts: 701 Joined: November 07, 2008 |
well I'm finally home, now if I can just stay here long enough to do some damage on the roaster. Plans are to get paper work done and turned in tomorrow so I will have till next week before I have to leave again. Next order of business is to get the V.C. Motor that santa so kindly provided mounted in the lower part of the roaster and see about getting some juice hooked up to the beast and see if it will actually move beans around without blowing them out all over me, and the yard. So hopefully there will be another video without the sudden bean eruption. Which is just wrong to waste beans like that unless their some realllly cheap $3.00 stuff that you can afford to waste. Also gonna do what everyone is saying and stop at Garden Ridge in the morning and see about them 6" glass cylinders peeps was talking about beign at Micheals, G.R. handles the same stuff and a hell of a lot cheaper then P.B. which handles the same stuff. Oh yea one point I forgot about was that if the 4" tube I have works, and I already got one spare somewhere in Uncle Sams care and pyrex being really tough then I really shouldn't need another spare, which I can probably snag off of Evil Bay if I do for 5 to 20 bucks. happy cupping to all.;) I pour Iron and roast Coffee Beans
If life seems normal your not going fast enough Mario Andrette |
|
|
|
| dja |
Posted on 10/14/2010 7:05 PM
|
|
1 1/2 Pounder Posts: 701 Joined: November 07, 2008 |
Ok, checked at garden ridge, no glass tube or vase that would work, did manage to pick up the pyrex bake around that I had purchased ( undamaged thank someone), so now I have a spare, ran by the metal supplier and pickup a peice to make a new transition peice for between the Heat and Blower Chambers, so we might actually get something done on the roaster in the next couple of days. gonna work on the coil hookup tonight see if I can't get it knocked out so I can put some power on the coil. more later at 10:00 o-clock. Also roaster a pound of the Nica Java that I got from Chad awhile back. Also gotta see about checking at Michael's for source of glass tube tomorrow Edited by dja on 10/14/2010 7:07 PM I pour Iron and roast Coffee Beans
If life seems normal your not going fast enough Mario Andrette |
|
|
|
| dja |
Posted on 10/17/2010 3:42 PM
|
|
1 1/2 Pounder Posts: 701 Joined: November 07, 2008 |
After lots of thought and tearing apart a Westbend Hot Plate to see how they connected the heating element to the prongs that cord pluged onto, I had my idea of how to get electricity to the heating element. In the picture below you will see how its going to happen, same as Westbend, only a little thicker and mines made out of steel instead of Aluminum, just gotta get some gas for the torch before I can make it a done deal. Oh by the way that hole the plug is sitting in was where the air was going to enter the roaster. Live long and roast often
dja attached the following image:
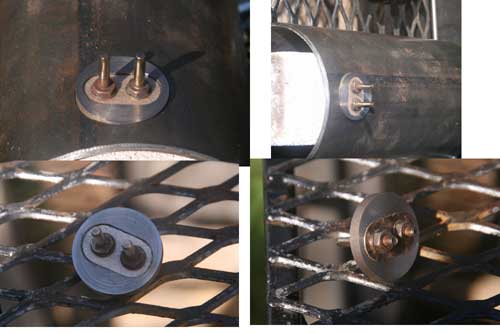
Edited by dja on 10/17/2010 3:45 PM I pour Iron and roast Coffee Beans
If life seems normal your not going fast enough Mario Andrette |
|
|
|
| seedlings |
Posted on 10/17/2010 6:53 PM
|
|
1 1/2 Pounder Posts: 4226 Joined: June 27, 2007 |
WOW, David! What a beast. Pictures are great! CHAD Roaster: CoffeeAir II 2# DIY air roaster
Grinder: Vintage Grindmaster 500 Brewers: Vintage Cory DCU DCL, Aeropress, Press, Osaka Titanium pourover |
|
|
|
| dja |
Posted on 10/17/2010 9:36 PM
|
|
1 1/2 Pounder Posts: 701 Joined: November 07, 2008 |
Chad; Since you liked the picture so much I posted another one for you. This one shows the plate by itself, this one will be used for the VC Motor so that I can plug it in, by doing it this way I can use ready made plugs the only thing that I will have to change is the wall plug on the one for the heating coil since its going to be 220. Enjoy,
dja attached the following image:
Edited by dja on 10/17/2010 9:36 PM I pour Iron and roast Coffee Beans
If life seems normal your not going fast enough Mario Andrette |
|
|
|
| dja |
Posted on 10/23/2010 2:25 PM
|
|
1 1/2 Pounder Posts: 701 Joined: November 07, 2008 |
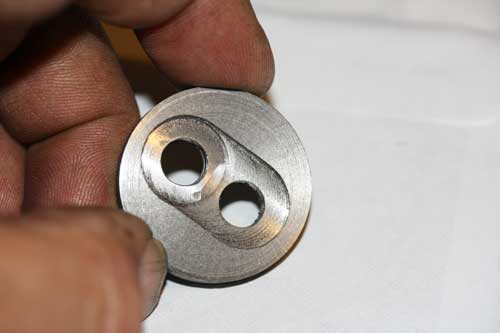
Been doing a little cutting and chopping on the ole Roaster the last couple of days. Gonna fire up the ole'Torch and weld in the two half dollar size peices that the power is going to flow through. And last night I finished the adapter plate that goes in between the two sections of the Heat and Air part of this roaster, (I better watch out or people will start calling it a HVAC Unit instead of a Roaster) anyway here is a picture of the part still in the milling machine that the heating coil is going to mount on. I have two differant size sections of tubing that will house the Heater and the VC Motor, (had not planed on there being an internal blower motor when I started this build). If I build another one of these I will use the same size tube for both section. Anyway I had to have holes in the plate for the air to flow thru, so I put holes in it, I know its heavy looking and clunky but when in the roaster all you will see is the edge, and the bottom half doesn't have to be picked up once you put it in place to roast.
dja attached the following image:

Edited by dja on 10/23/2010 2:25 PM I pour Iron and roast Coffee Beans
If life seems normal your not going fast enough Mario Andrette |
|
|
|
| dja |
Posted on 10/28/2010 11:26 PM
|
|
1 1/2 Pounder Posts: 701 Joined: November 07, 2008 |
Another day another post of the build, been working on the motor mount some, actually have it just about finished. Here's a pic of the motor with the mount on it.
dja attached the following image:

Edited by dja on 10/28/2010 11:27 PM I pour Iron and roast Coffee Beans
If life seems normal your not going fast enough Mario Andrette |
|
|
|
| dja |
Posted on 10/28/2010 11:39 PM
|
|
1 1/2 Pounder Posts: 701 Joined: November 07, 2008 |
Scott the above picture is for you, I still have to shove that steel ring down into the tube and its a tight fit and weld it into place then I can stack the rest of the roaster up on top and see it the thing will float some beans without any heat. Here's a picture of the plug were the power for the heater coil will plug onto the roaster. I borrowed this idea from West Bend(hope they don't mine)Actually used their parts also. still have a few little things to take care of, bottom plate, stainless steel rods to hold the lower section together, chaff catcher top with air damper, temp probe ports, control panel, and I'm sure I'll think of something else.
dja attached the following image:
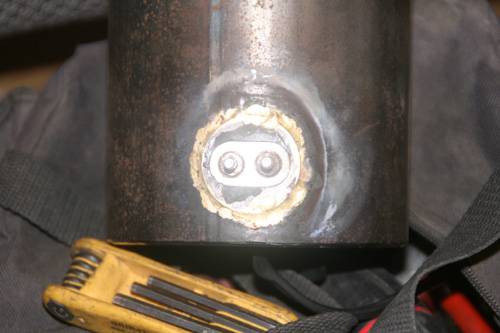
Edited by dja on 10/28/2010 11:48 PM I pour Iron and roast Coffee Beans
If life seems normal your not going fast enough Mario Andrette |
|
|
|
| JETROASTER |
Posted on 10/29/2010 5:54 AM
|
 Administrator Posts: 1780 Joined: March 06, 2010 |
That's a nice tidy fit! It looks great! Thanks for all the pics .-Scott |
|
|
|
| dja |
Posted on 10/29/2010 9:24 AM
|
|
1 1/2 Pounder Posts: 701 Joined: November 07, 2008 |
Well truth be told, I was able to find a section of 5" OD standard tubing that the motor would just slide into. The rest was just carefull machining and dumb luck on my part that I stopped cutting on the OD of the mount before I ended up with a mount that would be useless in centering the motor in the tube, my one concern is the space between the motor and the mounting ring. Is it going to be large enough to allow the amount of air thru that will be needed to flow 1.5 to 2 Lbs of green beans. If I find that will not flow the beans I will have to give more clearance between the ring and the motor, and I don't have an endmill long enough to reach in where that ring has to mount. One way that has just accured to me is to mount the ring on tabs welded ubside the tube then mount the motor, That way everything is removable!. Sorry about the crappy pic of the electrical hookup for the heater, will grab a better one outside and snap an inside view at the sametime later today, have to go watch some yokels pour hot melted cast iron into blocks of sand. I am hoping to have the roaster all stacked up this weekend sometime and do some testing with some green. I have a router speed control that should control the VC Motor speed which in turn controls the amount of Air that will be directed at the beans. I have the heater coil all mounted and untested still haven't gathered up the courage to cut the coil,(actually have been too lazy) so that I can get more more heat out of it. But that little trip is about to happen if I am to roast coffee in this thing or just look at it blowing some clipping from my shreder with flashing colored LED's in the heater chamber. Hope I can brign it all together in this last mad dash to the roaster finish line. 
I pour Iron and roast Coffee Beans
If life seems normal your not going fast enough Mario Andrette |
|
|
|
| dja |
Posted on 10/29/2010 9:28 AM
|
|
1 1/2 Pounder Posts: 701 Joined: November 07, 2008 |
How was Steven able to post multiple photos on one message post in his thread on his air roaster?
I pour Iron and roast Coffee Beans
If life seems normal your not going fast enough Mario Andrette |
|
|
|
| SteveN |
Posted on 10/29/2010 9:36 AM
|
|
1/4 Pounder Posts: 127 Joined: March 16, 2010 |
I uploaded them to tinypics and linked the url with img tags. You should be able to do as many as you want. |
|
|
|
| RoasterRob |
Posted on 10/29/2010 3:14 PM
|
 1/2 Pounder  Posts: 330 Joined: March 03, 2007 |
Quote dja wrote: ... Is it going to be large enough to allow the amount of air thru that will be needed to flow 1.5 to 2 Lbs of green beans. ... Hi DJA JMO but it should be enough space to blow thru enough air. 2lbs of green would only have the VC going at about 50%. So you can go to 100% to force the air thru. The VC blowers i use have only a 35mm (1 3/8" ) diameter intake hole. Have managed to move more than 3kg green. I mounted my blower at the at the bottom of a 150NB pipe with a bracket and 2 long bolts - can be seen in the thread Chad started about my roasters. Rob vL NZ VBM Minimax 2gp, 1gp Reneka Techno, 2 gp la Pavoni Pub, la Cimbali M28, SJ Maz, FB 6kg HM roaster and other stuff
|
|
|
|
| dja |
Posted on 10/29/2010 8:03 PM
|
|
1 1/2 Pounder Posts: 701 Joined: November 07, 2008 |
well one thing for sure is that if it don't work I can always pull the motor stick the thing in the lathe and bore the hole out bigger. or just cut some biggo hunks of the mount ring out. I want the ring whole for now so that I can get it welded into the tube with the mounting holes for the motor in the correct place and level across the tube from one mount to the other as there is no sideways movement with the Motor, inside of tube is 4.75 outside of motor is 4.72 inches. I can if needed put the whole thing in the lathe and bore the ring out bigger on the inside to allow more run for air to pass thru. will just have to see.
I pour Iron and roast Coffee Beans
If life seems normal your not going fast enough Mario Andrette |
|
|
|

| Jump to Forum: |
Powered by PHP-Fusion Copyright © 2024 PHP-Fusion Inc
Released as free software without warranties under GNU Affero GPL v3
Designed with ♥ by NetriXHosted by skpacman