
Login

Shoutbox
You must login to post a message.
renatoa
07/26/2024 3:49 PM
Bill grubbe and Jk, 
allenb
07/26/2024 5:15 AM
Spiderkw Welcome to HRO!

renatoa
07/24/2024 8:31 AM
ramiroflores and John123,

 ?
?
?renatoa
07/21/2024 1:18 AM
 , Luislobo
renatoa
07/19/2024 11:28 AM
Koepea,
Forum Threads
Newest Threads
Skywalker roaster modsBackground Roast Iss...
Hello from Arkansas
TC4ESP
Green coffee reviews
Hottest Threads
| Skywalker roaster... | [375] |
| TC4ESP | [115] |
| War on Farmers by... | [47] |
| Adventures in flu... | [26] |
| Hello! (soon) Roa... | [17] |
In Memory Of Ginny

Donations
Latest Donations
dmccallum - 10.00
JackH - 25.00
snwcmpr - 10.00
Anonymous - 2.00
Anonymous - 5.00
dmccallum - 10.00
JackH - 25.00
snwcmpr - 10.00
Anonymous - 2.00
Anonymous - 5.00
Users Online
Guests Online: 6
Members Online: 0
Total Members: 8,393
Newest Member: Bill grubbe
Members Online: 0
Total Members: 8,393
Newest Member: Bill grubbe
View Thread
Who is here? 1 guest(s)
 My 1kg Electric Air Roaster build
|
|
| dja |
Posted on 04/30/2011 3:51 PM
|
 1 1/2 Pounder  Posts: 701 Joined: November 07, 2008 |
I have changed the tube on my roaster to one that is 6" in diameter and like 16" tall with out the bottom transition piece, which is another 4" tall. I have been having some of the same problems that you have been experiancing with your roaster. You really need to be able to control the air at the exit of the tube, if nothing else just use a flat plate with a weight on top of it so that you can block the top off so you don't loose all the heat that you have pumped in to the beans. I tried several pref plates one had 27 3MM holes in it, it would not hold the air back enough for it to heat up the one that looks like it is going to work had 13 less holes in the number. This plate appears to be holding the air back enough that it will heat up to bean roating temperatures, and allow enough air pressure to circulate the beans with. the top plate which I should be workig on now has a 3 by 1.5 door opening that I need to make a door for and then make a damper tube approximately 2" in diameter to vent the tube and release chaff out the top. I have slowed my bean flow down to where the beans were hardly moving without having any problem with the coils. (off the shelf replacement parts for a commercial heat gun) if pictures will help or video let me know and I will post some thing actaully if you will check my thread you will find a photo of the last two changes to the pref plate. the large drop in number of holes and diameter of holes really made a differance to the way the roaster was working, wish I had some junk beans that I could just roast and toss for testing. oh yea before I forget, my coils are on full time with the pid setpoint set at 725 degrees. I pour Iron and roast Coffee Beans
 If life seems normal your not going fast enough Mario Andrette |
|
|
|
| greencardigan |
Posted on 04/30/2011 11:18 PM
|
 1 1/2 Pounder Posts: 1185 Joined: November 21, 2010 |
Yep, I'll definitely try blocking part of the top off next time to retain some heat. Wow, you only have 13 x 1/8" holes! I have 53 x 1/8" holes currently!  |
|
|
|
| tra757 |
Posted on 05/01/2011 11:35 AM
|
 Newbie  Posts: 29 Joined: April 30, 2011 |
What is your current draw? |
|
|
|
| greencardigan |
Posted on 05/01/2011 5:33 PM
|
|
1 1/2 Pounder Posts: 1185 Joined: November 21, 2010 |
About 20A at 240V |
|
|
|
| greencardigan |
Posted on 05/07/2011 12:51 AM
|
|
1 1/2 Pounder Posts: 1185 Joined: November 21, 2010 |
Here's the log from another roast this morning. This time I lowered the blower speed further and blocked off most of the roast chamber top. This seemed to help a little bit. I was able to speed up the roast a bit between FC and SC. I had about 5 minutes from start of FC to start of SC. ET didn't get very high. Not sure if the readings are correct or if my thermocouple is bad. This roast was with 1.1 kg green.  |
|
|
|
| allenb |
Posted on 05/07/2011 9:26 AM
|
 Administrator Posts: 3869 Joined: February 23, 2010 |
Did the changes result in a less aggressive spouting? Allen 1/2 lb and 1 lb drum, Siemens Sirocco fluidbed, presspot, chemex, cajun biggin brewer from the backwoods of Louisiana
|
|
|
|
| greencardigan |
Posted on 05/07/2011 5:06 PM
|
|
1 1/2 Pounder Posts: 1185 Joined: November 21, 2010 |
Maybe a little bit less aggressive. But I was still getting beans reaching the top of the RC. And I'm not sure if I can turn the fan down much more as the bean circulation was slowing down considerably. |
|
|
|
| allenb |
Posted on 05/07/2011 9:03 PM
|
|
Administrator Posts: 3869 Joined: February 23, 2010 |
Quote greencardigan wrote: Maybe a little bit less aggressive. But I was still getting beans reaching the top of the RC. And I'm not sure if I can turn the fan down much more as the bean circulation was slowing down considerably. Would it be possible to add a secondary, steeper sloped bottom plate that stopped short of the perf area? Allen 1/2 lb and 1 lb drum, Siemens Sirocco fluidbed, presspot, chemex, cajun biggin brewer from the backwoods of Louisiana
|
|
|
|
| greencardigan |
Posted on 05/08/2011 12:33 AM
|
|
1 1/2 Pounder Posts: 1185 Joined: November 21, 2010 |
I've been considering that option, but unfortunately I can't go much steeper before the slope would have to start up in the glass tube section. I might look at building another RC out of 4" aluminium SHS with an easily replaceable perf plate as per my original intentions. |
|
|
|
| greencardigan |
Posted on 05/21/2011 12:58 AM
|
|
1 1/2 Pounder Posts: 1185 Joined: November 21, 2010 |
Roast 6 I was able to do 750g in under 15 minutes this time. I can speed up the first stage of the roast but not sure if that is a good idea? I havent made any changes to the RC. Just blocked of the top with some cement board and kept the blower speed low.  The Artisan roast logger software describs the first section as "OK/Leathery 28.9 deg/min". What's the leathery mean? Brad |
|
|
|
| greencardigan |
Posted on 06/18/2011 2:44 AM
|
|
1 1/2 Pounder Posts: 1185 Joined: November 21, 2010 |
THE END This roaster has gone to the roaster graveyard after 6 roasts! I tried a roast today but couldn't reach 1st crack. After dumping the beans I found one of my four elements was open circuit. After removing the faulty element I found that two adjacent loops had touched and fused together effectively halving the length of the nichrome wire and resulting in a melt down. I removed the other three elements and found they were also on the way out. They were all hanging loosly on the cement board supports. I suspect my nichrome wire was a bit thin. It was 0.5mm (0.19 inch). Not sure what gauge that is. Anyhow, I have salvaged all the bits I could and chucked the rest. A bit depressing. Also, I had a closer look at the cement board from inside the heat chamber. The cement board that the nichrome was wrapped around was very brittle. The cement board divider was also brittle (see video). Something to be mindfull of if you're planning to use cement board. [video]http://www.youtube.com/watch?v=A-V9EBuyz3Y[/video] Watch out for a new build thread sometime soon! |
|
|
|
| dja |
Posted on 06/18/2011 5:14 AM
|
|
1 1/2 Pounder Posts: 701 Joined: November 07, 2008 |
Man I can feel your agony, I remember how I felt the first time I lost the coil in my Roaster, If you can't find something like a coil from a dryer or out of a home HVAC unit. just hollar and I'll see what I can dig up here, although the postage on it would probably kill. I actually have some coils for in a kiln that I was starting ot look at using. Your saying that the NiChrome that you were using was .19 thats pretty big wire, you must be thinking more like .019 which is pretty small stuff that would burn out pretty easy. you next roaster I would try to only use two tube so that you can force as much air across the coils as possible, this will help to keep them cool. even though the cement board got hot, it should of taken the temperature cement has a pretty high refactory rating by itself alone. McMasters and Carr carry Mica board in their catalog but i don't know if they do business in Aus. Anyway as they say keep your chin up, it only took me a nearly a year to build mine, If you knew anyone with some machine tools I could pour you up a lower section and you could have it finished there. David. I pour Iron and roast Coffee Beans
If life seems normal your not going fast enough Mario Andrette |
|
|
|
| greencardigan |
Posted on 06/18/2011 5:46 AM
|
|
1 1/2 Pounder Posts: 1185 Joined: November 21, 2010 |
Quote dja wrote: Your saying that the NiChrome that you were using was .19 thats pretty big wire, you must be thinking more like .019 which is pretty small stuff that would burn out pretty easy. you next roaster I would try to only use two tube so that you can force as much air across the coils as possible, this will help to keep them cool. yep you're right. 0.019" Four parallel elements was definitely a bad design but that's the only elements I had to work with. I will look around for 2 x 2400W elements. I don't think I want to wind my own elements next time. There's a few heatgun elements on ebay US that I might be able to use. Actually, I'm wondering if I should try gas next time. |
|
|
|
| Dan |
Posted on 06/18/2011 6:19 AM
|
|
1 1/2 Pounder Posts: 1662 Joined: October 24, 2005 |
.019 wire is pretty close to 24 gauge (1.67 ohms/ft). I'm using 19 gauge (0.52 ohms/ft) on my sample roaster. I don't buy straight wire, but coiled. That way all I have to do is measure, cut, stretch the coil, and install. |
|
|
|
| JETROASTER |
Posted on 06/18/2011 8:15 AM
|
 Administrator Posts: 1780 Joined: March 06, 2010 |
Well, I think it was a fantastic first build. Are you thinking rebuild, or are you in the mood for a whole new animal? -Scott |
|
|
|
| greencardigan |
Posted on 06/18/2011 6:50 PM
|
|
1 1/2 Pounder Posts: 1185 Joined: November 21, 2010 |
Not sure. I will spend time getting the heating elements and heat chamber better this time and go from there. I've decided I want to try electric again before I turn to gas. Brad |
|
|
|
| Will2 |
Posted on 11/10/2017 5:58 AM
|
 1/4 Pounder  Posts: 154 Joined: March 24, 2015 |
Quote Will2 wrote: Quote greencardigan wrote: ... I am seriously considering scrapping the BM and building another 3/4 kg (1.5 pound) electric air roaster. Many advantages but a few disadvantages. More controllable, better mixing, easy cooling, lees chaff mess with chaff collector, no need handle hot parts with gloves. Downsides are less efficient (will need approx 3.5 - 4 KW of heating) and more expensive. You probably write exactly about this:  If the shipping costs were not so high, I would have sent it to you. And if you have a weak electricity supply then I have a friend of an electrician in Woollahra. Viliam
|
|
|
|
| Will2 |
Posted on 11/10/2017 5:59 AM
|
|
1/4 Pounder Posts: 154 Joined: March 24, 2015 |
Quote greencardigan wrote: That looks fantastic! Here's my lame version. And yes, I would have to get a 15A 240V circuit installed sometime.  Viliam
|
|
|
|
| Will2 |
Posted on 11/11/2017 2:36 PM
|
|
1/4 Pounder Posts: 154 Joined: March 24, 2015 |
On youtube I posted some of my videos. Many of you have already seen them. I focused mainly on showing the deficiencies of some of my constructions, I have corrected these shortcomings later. Their sense was not to show how well it works, but what needs to be improved. I hope it was so understood because I added a short explanation to the video. My philosophy is a bit different than the OGH roaster, I think we have the same opinion with Brad. That's why I do not even create my own thread. Now it's 5 years since I bought my first TC4 and thanks to Brad I use aArtisanQ_PID. Previously, I used manual control and Artisan on PC. I have not enough patience to write extensive contributions, not the ability to write in this language. But I think it will not be a big problem to fix Brad's lame roaster, I'd like to help and try it out beforehand. And perhaps also make further bigger. Edited by Will2 on 11/11/2017 2:44 PM Viliam
|
|
|
|
| Will2 |
Posted on 11/13/2017 11:21 AM
|
|
1/4 Pounder Posts: 154 Joined: March 24, 2015 |
Nothing is resistant to improper handling. To TC4 I connected a smaller roaster 80/70mm, electric cord to the heating I forgot to replace. There is not much to guess what happened. Now I can take pictures of how to make a new heater 240V/4kW.
Will2 attached the following image:

Viliam
|
|
|
|
| Will2 |
Posted on 12/03/2017 10:54 AM
|
|
1/4 Pounder Posts: 154 Joined: March 24, 2015 |
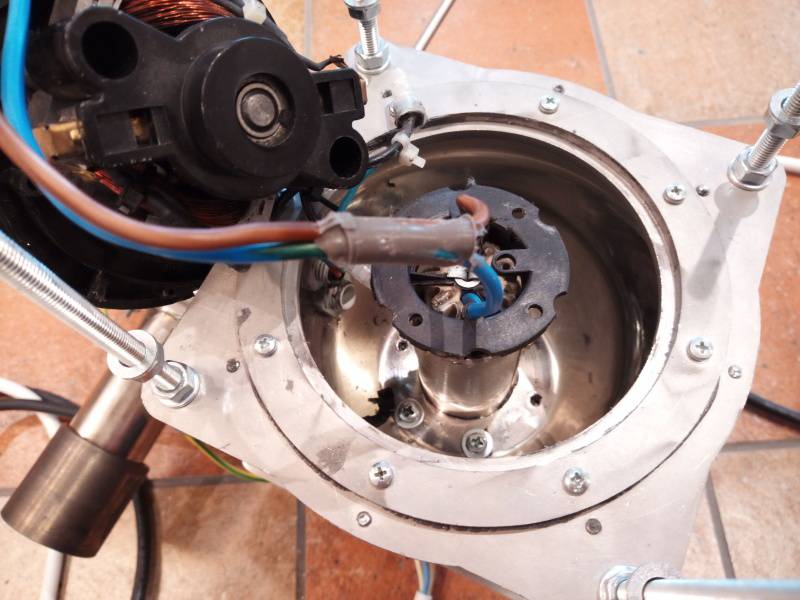
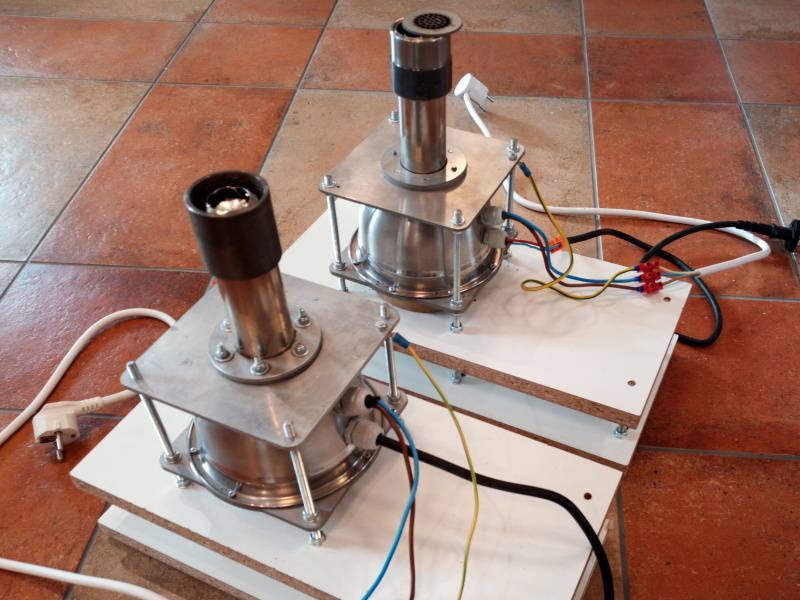
I had some time, so I changed the heaters in both roasters. There are more photos, so I'll continue step by step. In both roasters were used 4kw / 240V heaters, vacuum cleaner engines are 500 and 700W. Can you imagine how I roasted 150g of coffee with 4kw heat element? Photos as the heaters were removed from roasters:
Will2 attached the following images:


Viliam
|
|
|
|
| Will2 |
Posted on 12/03/2017 12:58 PM
|
|
1/4 Pounder Posts: 154 Joined: March 24, 2015 |
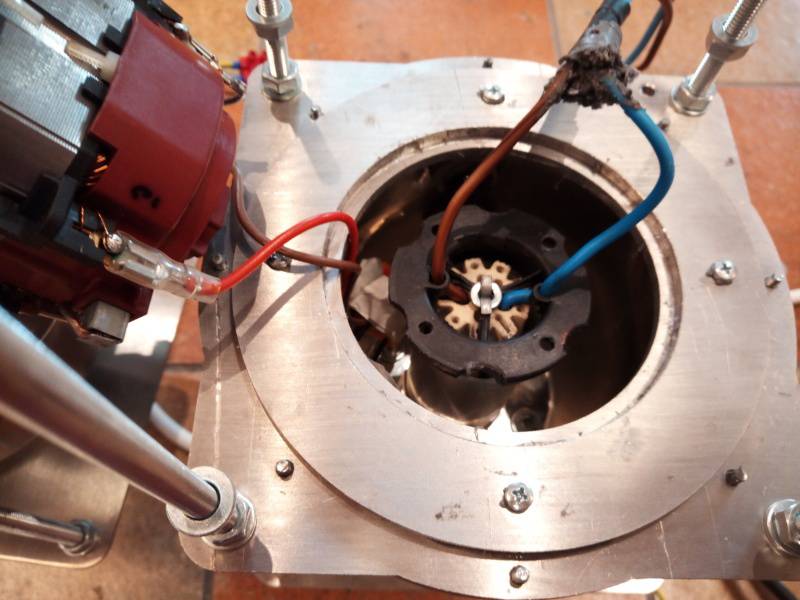
It is useful to find a heat gun with a suitable ceramic heating element for the reconstruction. We analyze the element and remove the original wire 0.5mm. P.S. pictures are always displayed in the reverse order.
Will2 attached the following images:


Viliam
|
|
|
|
| Will2 |
Posted on 12/03/2017 1:22 PM
|
|
1/4 Pounder Posts: 154 Joined: March 24, 2015 |
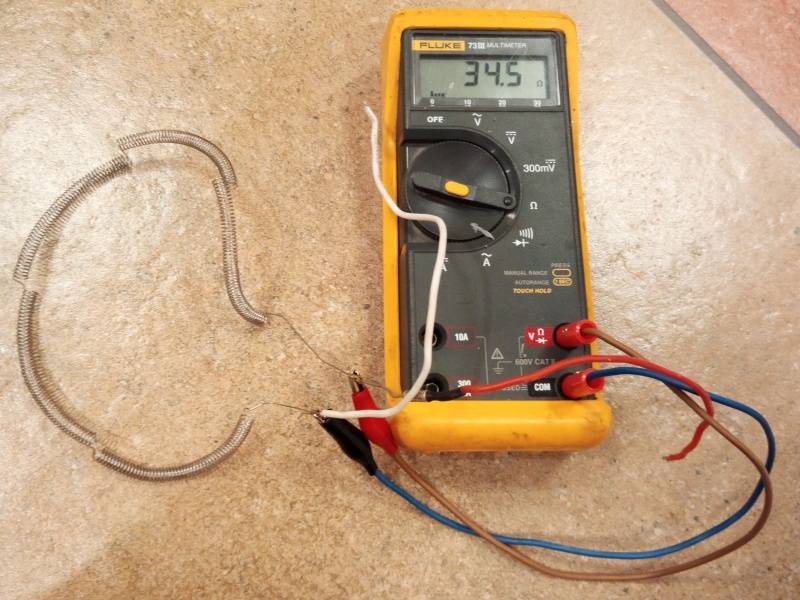
After removing the original coils we will make new coils of Kanthal wire 0.7mm.
Edited by Will2 on 12/03/2017 1:31 PM Viliam
|
|
|
|
| Will2 |
Posted on 12/03/2017 1:40 PM
|
|
1/4 Pounder Posts: 154 Joined: March 24, 2015 |
P: S: I have uploaded 10 photos, none can be seen.
Viliam
|
|
|
|
| Will2 |
Posted on 12/03/2017 1:40 PM
|
|
1/4 Pounder Posts: 154 Joined: March 24, 2015 |
P: S: now one by one, order mixed.
Will2 attached the following images:


Edited by Will2 on 12/03/2017 1:54 PM Viliam
|
|
|
|

| Jump to Forum: |
Powered by PHP-Fusion Copyright © 2024 PHP-Fusion Inc
Released as free software without warranties under GNU Affero GPL v3
Designed with ♥ by NetriXHosted by skpacman