
Login

Shoutbox
You must login to post a message.
renatoa
07/26/2024 3:49 PM
Bill grubbe and Jk, 
allenb
07/26/2024 5:15 AM
Spiderkw Welcome to HRO!

renatoa
07/24/2024 8:31 AM
ramiroflores and John123,

 ?
?
?renatoa
07/21/2024 1:18 AM
 , Luislobo
renatoa
07/19/2024 11:28 AM
Koepea,
Forum Threads
Newest Threads
Skywalker roaster modsBackground Roast Iss...
Hello from Arkansas
TC4ESP
Green coffee reviews
Hottest Threads
| Skywalker roaster... | [375] |
| TC4ESP | [115] |
| War on Farmers by... | [47] |
| Adventures in flu... | [26] |
| Hello! (soon) Roa... | [17] |
In Memory Of Ginny

Donations
Latest Donations
dmccallum - 10.00
JackH - 25.00
snwcmpr - 10.00
Anonymous - 2.00
Anonymous - 5.00
dmccallum - 10.00
JackH - 25.00
snwcmpr - 10.00
Anonymous - 2.00
Anonymous - 5.00
Users Online
Guests Online: 5
Members Online: 0
Total Members: 8,394
Newest Member: Bill grubbe
Members Online: 0
Total Members: 8,394
Newest Member: Bill grubbe
View Thread
Who is here? 1 guest(s)
 Turbo Crazy build and first roast
|
|
| JackH |
Posted on 05/23/2011 11:38 AM
|
 Administrator Posts: 1809 Joined: May 10, 2011 |
Hello! I recently built a Turbo Crazy roaster using the instructions and tips here and at other sites. I used the Sunpentown SO 2000 turbo oven and the West Bend stir Crazy popper. I went right to using the all metal motor shaft, removed the plastic one and added the metal spacer with the Woz chaff extractor port. First roast was last week out in the yard with my 15 year old son. I used 1 pound of Mexican Cristal beans. Unfortunately, I fumbled about and forgot to set my timer so my time for the first crack is an estimate about 10 to 11 minutes. I waited a bit after the crack was done (I guess about City+) Dumped the beans in my cooler (5 gal bucket with stainless Steel mixing bowl with holes on top and shop vac attached). This really cooled them down fast. I put them in a canning jar with the lid loose for 12 hours then tightened the lid. I tried a cup (French Press) after about 48 hours and it seemed to have a bit of a funny after taste, slightly bitter but not bad. After 4 days it seems the taste is much better and the bitterness is gone. I am happy with the results and will be more careful to set the timer and watch the temps more carefully. My son was fascinated with the whole process and I think we may have a future roaster here. Thanks to all who posted tips and help using this roaster. --Jack Edited by JackH on 05/23/2011 11:40 AM |
|
|
|
| randytsuch |
Posted on 05/23/2011 1:08 PM
|
 1/2 Pounder  Posts: 394 Joined: June 20, 2009 |
Welcome to home roasting If you can, we love to see pics here. I was also wondering how you made your Woz chaff extractor, and what you used to make it from? I am starting to build a TC, and need to figure that out. Randy |
|
|
|
| JackH |
Posted on 05/23/2011 2:34 PM
|
|
Administrator Posts: 1809 Joined: May 10, 2011 |
Hi Randy, I used the instructions here: http://turbocrazy...roject.htm I guess the fan circulation is counter-clockwise for the Sunpentown TO and the opening in the spacer allows 90% of the chaff to exit into a bucket or whatever container you have. It does work but the spacer construction was a bit tricky. There are also instructions on modifying the motor shaft to metal. I guess the original plastic shaft can melt after a while. I would also like to add a thermometer to monitor the oven temperature. I will post some photos soon. --Jack |
|
|
|
| seedlings |
Posted on 05/23/2011 2:39 PM
|
 1 1/2 Pounder  Posts: 4226 Joined: June 27, 2007 |
 Well done! +1 on pictures and I'll request a VIDEO too. When you say 'bitterness' can you describe that flavor in more detail? Welcome to the community! CHAD Roaster: CoffeeAir II 2# DIY air roaster
Grinder: Vintage Grindmaster 500 Brewers: Vintage Cory DCU DCL, Aeropress, Press, Osaka Titanium pourover |
|
|
|
| dja |
Posted on 05/23/2011 2:55 PM
|
 1 1/2 Pounder Posts: 701 Joined: November 07, 2008 |
I roasted for years in a SC/CO rig, and yes the nylon shaft will melt. if you need let me know I have shaft design that will outlast all of us in the SC all metall guarenteed not ot melt down and is height adjustable. I found that if you take the cover plate off that is over the heating element that you can get the heat to the beans quicker. I didn't use the WOZ Chaff deflector I used a dog food pan that was purchased at walmart for like two bucks. cut the bottom out added like three tabs around the top to hold the convection oven in place and a few other things to many to coment on all of them. But its a darn good way to roast a decent size batch of green. I split mine so that the heater was on one cord and the fan on another that way with a variac I had unlimited control of the heater. Go Roast some green man David I pour Iron and roast Coffee Beans
If life seems normal your not going fast enough Mario Andrette |
|
|
|
| JackH |
Posted on 05/23/2011 3:45 PM
|
|
Administrator Posts: 1809 Joined: May 10, 2011 |
Hi Chad, I guess bitterness was not the correct description, it seemed like an unexpected flavor - unsweetened chocolate like bakers cocoa. After 4 days it has a chocolate flavor but much sweeter. I am new to this and not too good at these descriptions. I guess it just needed to rest more. Hi David, Removing the heater cover plate seems a good idea I will try it. I did at first try the shaft mods with the 1/2 socket and found it too loose, causing the blades to reverse direction. I found a site that has machined a replacement shaft out of aluminum. It was at: http://uroastem.c... The shaft is not listed on the site so I called and the owner was a big help and knew about the Turbo Crazy. I guess he was selling modded SC/COs. The shaft was $21 and uses the original teflon washer and spring from the old plastic shaft. It is very stable and worth it. I also bought some beans to start and he suggested the Mexican Cristal beans to try as something more forgiving of my beginner attempts. I would like to see your mods with the chaff collector and the heater control. Where are you placing the thermocouple for your temperature control? --Jack Edited by JackH on 05/23/2011 3:46 PM |
|
|
|
| Koffee Kosmo |
Posted on 05/23/2011 6:21 PM
|
 Administrator Posts: 1621 Joined: December 31, 2008 |
Welcome Jack Resting beans to degas is just as important as the roast itself my normal rest time is 5 days post roast and this changes with the beans African beans are best at around 10 days post roast Monsooned Malabar at approx 14 days But your own personal taste will determine your best rest time Roast depth is an indicator for your brewing method After rolling first crack you can stop the roast when the colour is medium This roast depth is most suitable for drip, pour-over, syphon style coffees Roasting to second crack is more suitable for espresso Its also nice to see another Turbo Roaster I have a similar design roaster taken to the extreme I am proud of the chaff removal The chaff is first separated and removed and finally collected in a different chamber from the roasting beans but still contained within the roaster You will find the info in the HR home roaster build section http://forum.home...ad_id=1142 KK Edited by Koffee Kosmo on 05/23/2011 6:32 PM I home roast and I like it. Designer of the KKTO
Roaster Build information https://homeroast...ad_id=1142 https://docs.goog...lide=id.i0 Blog - http://koffeekosm...gspot.com/ Bezzera Strega, Mazzer Robur Grinder, Pullman Tamper Convex, (KKTO) Turbo Oven Home Roaster. |
|
|
|
| randytsuch |
Posted on 05/23/2011 6:27 PM
|
|
1/2 Pounder Posts: 394 Joined: June 20, 2009 |
Quote Thanks for the info I have seen those instructions, but have not found a source for the 1/16" thick Al that he used. Where did you find it? Randy |
|
|
|
| JackH |
Posted on 05/23/2011 7:17 PM
|
|
Administrator Posts: 1809 Joined: May 10, 2011 |
Quote randytsuch wrote: Thanks for the info I have seen those instructions, but have not found a source for the 1/16" thick Al that he used. Where did you find it? Randy Randy, Lowe's was the only place that had the 1/16in X1.5in aluminum in 4 ft lengths. Home Depot had only thicker stuff. Had to go to several places before I found it. --Jack |
|
|
|
| JackH |
Posted on 05/23/2011 7:45 PM
|
|
Administrator Posts: 1809 Joined: May 10, 2011 |
Hello KK and thanks for the information. I enjoyed putting this roaster together and seeing it finally work. I did see your design while I was researching the turbo and was amazed at the quality of the work and the design. It looks like it could handle anything. --Jack |
|
|
|
| dja |
Posted on 05/23/2011 8:40 PM
|
|
1 1/2 Pounder Posts: 701 Joined: November 07, 2008 |
I didn't mess with chaff removal, the chaff was blowed out into the back yard when I cooled the beans down using a small fan under a seive that I created by cutting the bottom out of an extra pan that I had which was the same as the one that I used to raise the C/O up two inches above the S/C. When I would use a thremal couple I used one that has a stainless steel braided cover on it and let it lay in the beans. Temperature control was more my right hand on the knob on the variac to raise and lower the voltage to the heating elements. Sounds like the dude is making some money off the shaft deal, sounds like he has about three dollars tied up in parts and material. I won't say my version is better but I can say it doesn't take 15 dollars worth of stuff to make. And doesn't have the heat transfer problems that may occur with and all aluminum unit, and is a direct drop in for the plastic one with the height adjustable for the stirring wire. I had my C/O apart one day and when I put it back together I forgot to put the plate back in that covers the heating element and after finding out that really didn't cause any problems I just left it out and actually found out that the radiant heat from the element worked in conjuction with the hot air to give a little better roast anyway thats was my thoughts but they may be worth a flip. If you look under that plate you should find three sillicone rubber plugs pluging off screw holes that bolt the cover onto the metal part that the motor is mounted on, these melted out of my oven, I was able to find snap in metal plugs at ACE hardware in the drawers, they have sevral sizes. The motors in the Stir Crazy poppers are designed to auto rotate if they start to get into a bind, this is normal for them. so if you see your stiring vane turning one direction then switch its normal. Keeping the glass clean is a real bear, I used a green scrub pad and Simple Green, somepeople act like its the devils cleaner, its biodegradeable, anyway I'm still walking and no one complaines about me glowing in the dark. I would at times take the C/O apart and do a good scrub on the Glass it does help if you can see the beans. Also the way I had and have mine rigged I found that I by picking up the whole theing and shaking it, it mixed the beans up better. USE OVEN MITTS IF YOU TRY THIS OR YOU WILL LOOSE ALL THE SKIN OFF YOUR PALMS you have been warned. I found some woven cloth gloves at a welders supply that are good for about 500 degrees, I use then in my roasting. You will also find that you can at time raise the lid and let heat out if you think the roast is going too fast (called burping) some also stir with a spoon when they do this. if you need to know anything else just PM me and I'll be glad to help. Oh yea I also packed the Stir Crazy with high temp ceramich insulation, this is a big help in the winter when roasting outside. The pan that I used for an entender I found at walmart in the pet section its a dog food pan or something, it measures exactly 12 inches in diameter across the rim and is about a quarter inch smaller in diameter then the top of the Stir Crazy. I used a majic marker helt in my hand and drawed a line about 1/4 inch in from the edge of the bottom and cut it out with some snips. Riveted on some tabs to center the oven and cut a small slit in the side with a dremal tool and bent it in towards the inside this let a lot of the chaff out. David I pour Iron and roast Coffee Beans
If life seems normal your not going fast enough Mario Andrette |
|
|
|
| Koffee Kosmo |
Posted on 05/24/2011 6:22 PM
|
|
Administrator Posts: 1621 Joined: December 31, 2008 |
Jack That design on the link It looks like you would loose some heat unless the outer edge of the Crazy Popper is coupled to the TO KK I home roast and I like it. Designer of the KKTO
Roaster Build information https://homeroast...ad_id=1142 https://docs.goog...lide=id.i0 Blog - http://koffeekosm...gspot.com/ Bezzera Strega, Mazzer Robur Grinder, Pullman Tamper Convex, (KKTO) Turbo Oven Home Roaster. |
|
|
|
| JackH |
Posted on 05/24/2011 6:59 PM
|
|
Administrator Posts: 1809 Joined: May 10, 2011 |
Quote Koffee Kosmo wrote: Jack That design on the link It looks like you would loose some heat unless the outer edge of the Crazy Popper is coupled to the TO KK Yes, the port would cause some loss of heat. I had set the temperature to about 400 on the dial and pretty much left it there. No thermostat so I could not tell what temp I was really getting. I saw another design using a metal drain pipe 90 degree bend attached to the side spacer. I would not think it would grab much chaff unless it is angled to the air flow or had some sort of vac attached to it. Edited by JackH on 05/24/2011 6:59 PM |
|
|
|
| Koffee Kosmo |
Posted on 05/24/2011 11:36 PM
|
|
Administrator Posts: 1621 Joined: December 31, 2008 |
Its preferable to have all available heat for roasting If there is a way of raising the sides of the Crazy Popper with the Suppled standard Turbo oven extender ring, then thats what I would do Make sure that the total volume withing the roasting chamber is no larger than 9 liters in total KK I home roast and I like it. Designer of the KKTO
Roaster Build information https://homeroast...ad_id=1142 https://docs.goog...lide=id.i0 Blog - http://koffeekosm...gspot.com/ Bezzera Strega, Mazzer Robur Grinder, Pullman Tamper Convex, (KKTO) Turbo Oven Home Roaster. |
|
|
|
| JackH |
Posted on 05/26/2011 5:40 PM
|
|
Administrator Posts: 1809 Joined: May 10, 2011 |
Well, here are some photos of my setup. My outdoor roasting center:
JackH attached the following image:
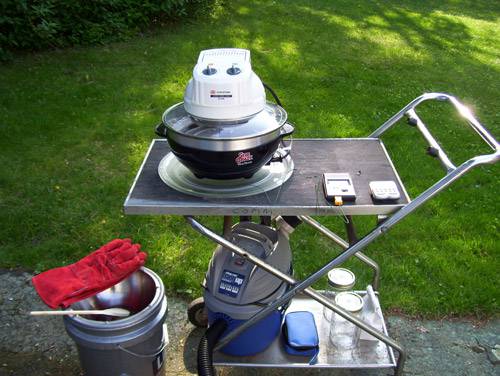
Edited by JackH on 05/26/2011 6:19 PM ---Jack
KKTO Roaster. |
|
|
|
| JackH |
Posted on 05/26/2011 6:21 PM
|
|
Administrator Posts: 1809 Joined: May 10, 2011 |
My cooling setup with a shop vac and a 5 gallon bucket. It works very well:
JackH attached the following image:
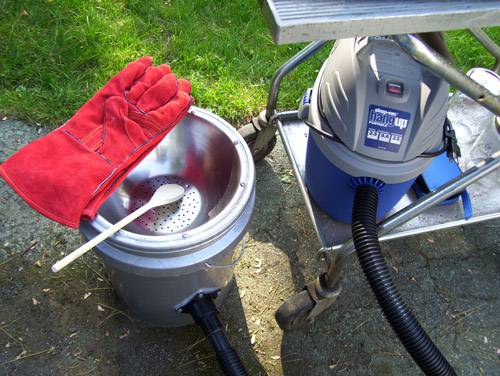
---Jack
KKTO Roaster. |
|
|
|
| JackH |
Posted on 05/26/2011 6:26 PM
|
|
Administrator Posts: 1809 Joined: May 10, 2011 |
A closeup of the stirring arm. I added some 1 inch long, 3/8 inch copper pipe flattened on the bench vise. I do get some reversing at first but it goes away as the roast progresses. The two screws in the plate are to repair the awful aluminum threaded standoffs that broke on me in the stir crazy:
JackH attached the following image:

Edited by JackH on 05/26/2011 6:28 PM ---Jack
KKTO Roaster. |
|
|
|
| JackH |
Posted on 05/26/2011 6:30 PM
|
|
Administrator Posts: 1809 Joined: May 10, 2011 |
A look at the TurboCrazy itself with the 1.5 inch spacer ring. I need to add something to keep the turbo oven from shifting around on the ring. The plate it is resting on is an old microwave oven plate:
JackH attached the following image:

Edited by JackH on 05/26/2011 6:31 PM ---Jack
KKTO Roaster. |
|
|
|
| JackH |
Posted on 05/26/2011 6:39 PM
|
|
Administrator Posts: 1809 Joined: May 10, 2011 |
I did a roast today and this is the result. Costa Rica La Magnolia beans from the Atomic Cafe here in Massachusetts. I waited for the FC to finish and then a bit more. I do not like dark roast very much so I keep it as I like it. I did remember to start the timer this time and did a 4 minute dry at 300 deg. Then brought it up to 400 deg on the dial. First crack at about 10 min 30 sec. I started hearing dull pops and stopped the process and dumped/cooled. The first cracks were snaps and very sharp sounding. There did not seem to be a lull after FC then I heard the dull cracks right away. Maybe too hot? It does not seem that dark.
JackH attached the following image:
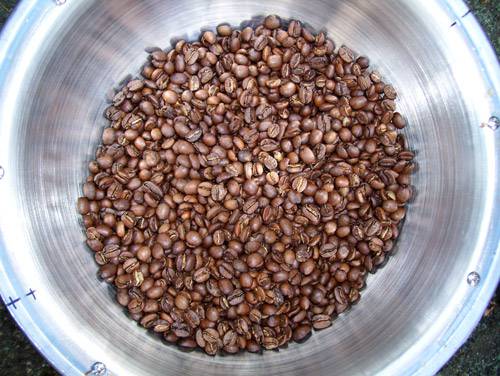
---Jack
KKTO Roaster. |
|
|
|
| bvwelch |
Posted on 05/26/2011 6:51 PM
|
 1 1/2 Pounder Posts: 1064 Joined: December 27, 2007 |
Quote JHan816 wrote: I need to add something to keep the turbo oven from shifting around on the ring. Some folks make a homemade gasket for this, using high-temp RTV which is supposedly food-safe after curing (be careful to read the fine print on the tube you purchase to be sure): http://forum.home...ead_id=363 Edited by bvwelch on 05/26/2011 6:52 PM |
|
|
|
| randytsuch |
Posted on 05/26/2011 7:13 PM
|
|
1/2 Pounder Posts: 394 Joined: June 20, 2009 |
Quote bvwelch wrote: Quote JHan816 wrote: I need to add something to keep the turbo oven from shifting around on the ring. Some folks make a homemade gasket for this, using high-temp RTV which is supposedly food-safe after curing (be careful to read the fine print on the tube you purchase to be sure): http://forum.home...ead_id=363 You can buy food grade, high temp RTV, I have a big tube of the stuff. It is actually labled food grade, or food safe. Randy |
|
|
|
| Koffee Kosmo |
Posted on 05/26/2011 9:44 PM
|
|
Administrator Posts: 1621 Joined: December 31, 2008 |
Quote JHan816 wrote: A look at the TurboCrazy itself with the 1.5 inch spacer ring. I need to add something to keep the turbo oven from shifting around on the ring. The plate it is resting on is an old microwave oven plate: The simplest and best method is high temp silicone tubing For the ring Slit the tube down the centre and position a full circle of tubing on the ring This will seal and also allow for full dismantling if the need arises Can also be used as legs/feet for the Turbo Crazy base so you can reduce motor noise and vibration and protect a tabletop You can use 3 or so 4" pieces Just slit them and position them on the Turbo Crazy rim base Its the same system I use on my roaster KK I home roast and I like it. Designer of the KKTO
Roaster Build information https://homeroast...ad_id=1142 https://docs.goog...lide=id.i0 Blog - http://koffeekosm...gspot.com/ Bezzera Strega, Mazzer Robur Grinder, Pullman Tamper Convex, (KKTO) Turbo Oven Home Roaster. |
|
|
|
| JackH |
Posted on 05/28/2011 4:16 AM
|
|
Administrator Posts: 1809 Joined: May 10, 2011 |
Thanks for the suggestions. Is the High temp silicon tubing something that might be available locally at a hardware store?
---Jack
KKTO Roaster. |
|
|
|
| Koffee Kosmo |
Posted on 05/28/2011 5:58 AM
|
|
Administrator Posts: 1621 Joined: December 31, 2008 |
Quote JHan816 wrote: Thanks for the suggestions. Is the High temp silicon tubing something that might be available locally at a hardware store? Possibly In Australia I get mine from an auto parts supermarket or on the internet And it also comes in black  KK Edited by Koffee Kosmo on 05/28/2011 6:03 AM I home roast and I like it. Designer of the KKTO
Roaster Build information https://homeroast...ad_id=1142 https://docs.goog...lide=id.i0 Blog - http://koffeekosm...gspot.com/ Bezzera Strega, Mazzer Robur Grinder, Pullman Tamper Convex, (KKTO) Turbo Oven Home Roaster. |
|
|
|
| jammin |
Posted on 05/28/2011 11:52 PM
|
|
Newbie  Posts: 25 Joined: April 15, 2011 |
Quote JHan816 wrote:I waited for the FC to finish and then a bit more. I do not like dark roast very much so I keep it as I like it. I did remember to start the timer this time and did a 4 minute dry at 300 deg. Then brought it up to 400 deg on the dial. First crack at about 10 min 30 sec. I started hearing dull pops and stopped the process and dumped/cooled. The first cracks were snaps and very sharp sounding. There did not seem to be a lull after FC then I heard the dull cracks right away. Maybe too hot? It does not seem that dark. Congrats on the putting the new kit together. It looks really clean. Very nice bean cooler as well. I checked out your attached roast pic and noticed some tipping to the beans. This could be a sign that your enviro temps in the roaster are a bit high, especially during the finish. You might try giving the beans a bit more heat during the ramp to 1C and turning it down a bit once you get there. This should help prevent scorching/tipping and help develop more sweetness to your roast. cheers, ~j |
|
|
|

| Jump to Forum: |
Powered by PHP-Fusion Copyright © 2024 PHP-Fusion Inc
Released as free software without warranties under GNU Affero GPL v3
Designed with ♥ by NetriXHosted by skpacman