
Login

Shoutbox
You must login to post a message.
renatoa
07/26/2024 3:49 PM
Bill grubbe and Jk, 
allenb
07/26/2024 5:15 AM
Spiderkw Welcome to HRO!

renatoa
07/24/2024 8:31 AM
ramiroflores and John123,

 ?
?
?renatoa
07/21/2024 1:18 AM
 , Luislobo
renatoa
07/19/2024 11:28 AM
Koepea,
Forum Threads
Newest Threads
Skywalker roaster modsBackground Roast Iss...
Hello from Arkansas
TC4ESP
Green coffee reviews
Hottest Threads
| Skywalker roaster... | [375] |
| TC4ESP | [115] |
| War on Farmers by... | [47] |
| Adventures in flu... | [26] |
| Hello! (soon) Roa... | [17] |
In Memory Of Ginny

Donations
Latest Donations
dmccallum - 10.00
JackH - 25.00
snwcmpr - 10.00
Anonymous - 2.00
Anonymous - 5.00
dmccallum - 10.00
JackH - 25.00
snwcmpr - 10.00
Anonymous - 2.00
Anonymous - 5.00
Users Online
Guests Online: 6
Members Online: 0
Total Members: 8,393
Newest Member: Bill grubbe
Members Online: 0
Total Members: 8,393
Newest Member: Bill grubbe
View Thread
Who is here? 1 guest(s)
 Turbo Crazy build and first roast
|
|
| JackH |
Posted on 05/29/2011 8:36 AM
|
 Administrator Posts: 1809 Joined: May 10, 2011 |
Quote jammin wrote: Quote JHan816 wrote:I waited for the FC to finish and then a bit more. I do not like dark roast very much so I keep it as I like it. I did remember to start the timer this time and did a 4 minute dry at 300 deg. Then brought it up to 400 deg on the dial. First crack at about 10 min 30 sec. I started hearing dull pops and stopped the process and dumped/cooled. The first cracks were snaps and very sharp sounding. There did not seem to be a lull after FC then I heard the dull cracks right away. Maybe too hot? It does not seem that dark. Congrats on the putting the new kit together. It looks really clean. Very nice bean cooler as well. I checked out your attached roast pic and noticed some tipping to the beans. This could be a sign that your enviro temps in the roaster are a bit high, especially during the finish. You might try giving the beans a bit more heat during the ramp to 1C and turning it down a bit once you get there. This should help prevent scorching/tipping and help develop more sweetness to your roast. cheers, ~j Thanks for the comments and information. The temperature does seem to swing up and down because of the cheap thermostat in the TO. I am looking into using a Variac on the heating element only and controling the temperature. The heating element in the Stir Crazy is disabled. I am not too thrilled with the final taste of the beans after four days they seem flat, almost like a can of maxwell house. I did detect some gassing, but not much. Opening the sealed jars only had a bit of gas escape. My procedure is to cool then put them in a canning jar with a loose lid for 12 hours, then tightly cap. I may have dumped them too early. I heard sharp cracks then immediately dull pops with some smoke but not much. I guess I have a lot to learn. ---Jack
KKTO Roaster. |
|
|
|
| randytsuch |
Posted on 05/29/2011 10:13 AM
|
 1/2 Pounder  Posts: 394 Joined: June 20, 2009 |
Quote JHan816 wrote: I may have dumped them too early. I heard sharp cracks then immediately dull pops with some smoke but not much. I guess I have a lot to learn. I think it's easy to want to stop too soon, I used to do it ALL the time, and still do it once in a while. One thing that I remember helping was to run a throw away roast. I roasted a batch MUCH darker then I wanted, and noted changes in sound, color and smell as the roast progressed. It takes a lot of practice. Also, I think it really helps to get a tc into the beans, so you can monitor temps. Randy |
|
|
|
| jammin |
Posted on 05/29/2011 11:13 AM
|
|
Newbie  Posts: 25 Joined: April 15, 2011 |
Great post Randy! I've been through the same growing pains as well. Can't count how many roasts I pulled too early. I drank a lot of sour coffee for a while until I just said "screw it" and decided I'd rather live with a dark roast! Which leads me to - Quote JHan816 wrote:guess I have a lot to learn. That's the beauty of this great hobby, it continues to challenge us all, no matter what skill or experience level we are at. Enjoy the ride and don't be afraid to try something totally different - it's the best way to learn! cheers, ~j |
|
|
|
| Koffee Kosmo |
Posted on 05/29/2011 6:02 PM
|
 Administrator Posts: 1621 Joined: December 31, 2008 |
I my testing and building phase of the final roaster The 2 things that gave me better control was 1] Volume of the roast chamber to heat ratio 2] Complete and thorough agitation Eventually I will get to organising a specialist to design a user controllable TO. But I dont want to mortgage the house to do it B) KK Edited by Koffee Kosmo on 05/29/2011 6:03 PM I home roast and I like it. Designer of the KKTO
Roaster Build information https://homeroast...ad_id=1142 https://docs.goog...lide=id.i0 Blog - http://koffeekosm...gspot.com/ Bezzera Strega, Mazzer Robur Grinder, Pullman Tamper Convex, (KKTO) Turbo Oven Home Roaster. |
|
|
|
| JackH |
Posted on 06/01/2011 7:31 PM
|
|
Administrator Posts: 1809 Joined: May 10, 2011 |
Proper agitation is a problem for the SC and it's light duty motor. I think I may be using too large a volume of beans. I will try 340g next time. I did some work separating the fan AC from the heater with on/off switches and AC cables for both. I know that the the fan must be kept running with the heater on so it can cool the entire unit properly. I have a Variac (superior Electric 10A) and can now control the heat level. I have also added a bead thermocouple in the base below the stirring arms to measure bean temp. I hope the bead does not get beat up too much with the beans brushing against it. I will do a test soon and keep the beans in longer after the 1st crack. I keep panicking and dumping the beans too early with the 1st crack not finished, possibly a reaction to the smoke.... and the fear of a Starbucks roast. Edited by JackH on 06/01/2011 7:47 PM ---Jack
KKTO Roaster. |
|
|
|
| Koffee Kosmo |
Posted on 06/02/2011 2:27 AM
|
|
Administrator Posts: 1621 Joined: December 31, 2008 |
Dont stress to much I will give you a tip After rolling first crack (not those pseudo cracks) You have 6 to 8 minutes before second crack Time enough to have a refreshing drink KK I home roast and I like it. Designer of the KKTO
Roaster Build information https://homeroast...ad_id=1142 https://docs.goog...lide=id.i0 Blog - http://koffeekosm...gspot.com/ Bezzera Strega, Mazzer Robur Grinder, Pullman Tamper Convex, (KKTO) Turbo Oven Home Roaster. |
|
|
|
| seedlings |
Posted on 06/02/2011 7:51 AM
|
 1 1/2 Pounder  Posts: 4226 Joined: June 27, 2007 |
KK - what's a general time from start of roast to start of second crack on your roaster? CHAD Roaster: CoffeeAir II 2# DIY air roaster
Grinder: Vintage Grindmaster 500 Brewers: Vintage Cory DCU DCL, Aeropress, Press, Osaka Titanium pourover |
|
|
|
| Koffee Kosmo |
Posted on 06/02/2011 9:09 AM
|
|
Administrator Posts: 1621 Joined: December 31, 2008 |
Quote seedlings wrote: KK - what's a general time from start of roast to start of second crack on your roaster? CHAD Depending on the bean & weight I am roasting 1st crack is generally between 9 min to 13 min 2nd crack I aim for 6 min after As an example a couple of days ago I did another roast on the KKTO 700 grams of Colombia Andes Santa Rita 1st crack was @ 11min 30 seconds 2nd crack followed @ 17 min Drop in temp was 220 Celsius KK I home roast and I like it. Designer of the KKTO
Roaster Build information https://homeroast...ad_id=1142 https://docs.goog...lide=id.i0 Blog - http://koffeekosm...gspot.com/ Bezzera Strega, Mazzer Robur Grinder, Pullman Tamper Convex, (KKTO) Turbo Oven Home Roaster. |
|
|
|
| farmroast |
Posted on 06/02/2011 9:05 PM
|
|
1/2 Pounder Posts: 295 Joined: December 20, 2006 |
Quote Koffee Kosmo wrote: 2nd crack I aim for 6 min after Why so long? I'll go 5mins to tame when needed for espresso. But 3-4 for brewed. Longer seems to pick away at the edges Ed B.
DreamRoast 1kg roaster, Levers, Hand Mills http://coffee-roa...gspot.com/ |
|
|
|
| Koffee Kosmo |
Posted on 06/03/2011 12:11 AM
|
|
Administrator Posts: 1621 Joined: December 31, 2008 |
Quote farmroast wrote: Quote Koffee Kosmo wrote: 2nd crack I aim for 6 min after Why so long? I'll go 5mins to tame when needed for espresso. But 3-4 for brewed. Longer seems to pick away at the edges Hi Ed I usually have espresso 99% of the time and like to have a chocolate caramel flavour This takes the roast into second crack about 30/40 seconds Having said that I do stop roasts short form time to time @ just before second crack And that coincides with your times Its purely a personal preference KK I home roast and I like it. Designer of the KKTO
Roaster Build information https://homeroast...ad_id=1142 https://docs.goog...lide=id.i0 Blog - http://koffeekosm...gspot.com/ Bezzera Strega, Mazzer Robur Grinder, Pullman Tamper Convex, (KKTO) Turbo Oven Home Roaster. |
|
|
|
| JackH |
Posted on 06/07/2011 6:30 PM
|
|
Administrator Posts: 1809 Joined: May 10, 2011 |
I added some high temperature silicon tubing from US Plastics to the expander ring (3/16"ID X 5/16"OD). The TO now sits very stable and has a good seal. Thanks to KK for the suggestion. A test at full power resulted in 500F in about 7 minutes. Outside temperature was about 72F. It would probably go a bit higher but I let it go at that. I plan on insulating the TC bottom between the pan and the bakelite case with ceramic sheet insulation to help during the cold season as dja recommends. The wimpy SC motor will be changed and I have a good candidate to try. It is not a direct fit and there will be some modification but that is part of the fun. It looks like I am hooked, hope I am not boring everyone. ---Jack
KKTO Roaster. |
|
|
|
| JETROASTER |
Posted on 06/07/2011 8:12 PM
|
 Administrator Posts: 1780 Joined: March 06, 2010 |
Boring? No way! I enjoy watching people as they step into the quicksand. I trust you'll post the mods? -Scott |
|
|
|
| jammin |
Posted on 06/08/2011 4:15 AM
|
|
Newbie Posts: 25 Joined: April 15, 2011 |
Quote JHan816 wrote: It looks like I am hooked. Good stuff! oh, and not boring at all. I love reading/sharing about home roasting! Don't spare the details man  cheers, ~j |
|
|
|
| Koffee Kosmo |
Posted on 06/08/2011 8:01 AM
|
|
Administrator Posts: 1621 Joined: December 31, 2008 |
I am waiting for more photos Call it withdrawal symptoms KK I home roast and I like it. Designer of the KKTO
Roaster Build information https://homeroast...ad_id=1142 https://docs.goog...lide=id.i0 Blog - http://koffeekosm...gspot.com/ Bezzera Strega, Mazzer Robur Grinder, Pullman Tamper Convex, (KKTO) Turbo Oven Home Roaster. |
|
|
|
| JackH |
Posted on 06/08/2011 6:39 PM
|
|
Administrator Posts: 1809 Joined: May 10, 2011 |
Here is a photo of the modified Sunpentown TO with on/off switches for the fan and heater. I got the idea from Farmroast's modified GG ovens. I used the original heavy AC cable for the heater and added a lighter duty cable for the fan. I removed the thermostat, timer/switch and shutoff latch switch. If you look carefully you can see a reflection of the mad experimenter in the glass of the oven (bottom)...
JackH attached the following image:
---Jack
KKTO Roaster. |
|
|
|
| JackH |
Posted on 06/08/2011 6:49 PM
|
|
Administrator Posts: 1809 Joined: May 10, 2011 |
I added the second AC cable for the fan in the rear with some thermal wrap to protect the cable. You can also see the high temp silicon tubing on the top of the spacer ring.
JackH attached the following image:

---Jack
KKTO Roaster. |
|
|
|
| JackH |
Posted on 06/08/2011 6:58 PM
|
|
Administrator Posts: 1809 Joined: May 10, 2011 |
This is the Variac, my old Superior Electronics 10 Amp. It works good with the lower powered Sunpentown oven. I also use a digital temp meter connected to a bead thermocouple in the bottom of the SC pan. I drilled a hole in a 8-32 pan head screw lengthwise for the thermocouple wire to enter and secured the wire with JB weld. The bead just peeks out, is well under the stirring arms, and is very secure.
JackH attached the following image:

---Jack
KKTO Roaster. |
|
|
|
| JackH |
Posted on 06/08/2011 7:07 PM
|
|
Administrator Posts: 1809 Joined: May 10, 2011 |
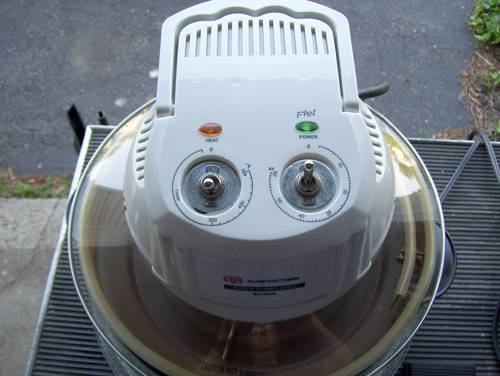
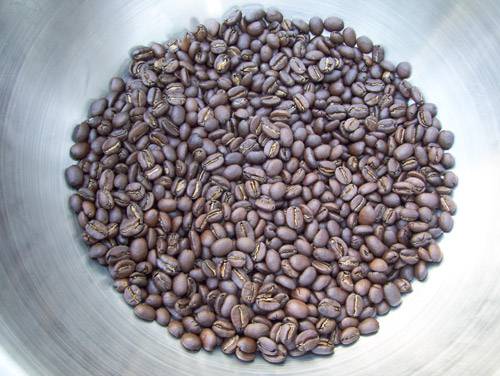
I had a good roast today, 300g of Burundi Kayanza Bwayi. I learned a lot here and other sites about some roasting basics. I have been letting the beans get to the yellow drying stage slowly then ramping up to the first crack, then coasting with reduced heat. This batch had just started the first few snaps of 2nd when I dumped and cooled. I don't have a ET probe yet I am just monitoring BT for now. I disabled the flash and used natural light.
JackH attached the following image:
---Jack
KKTO Roaster. |
|
|
|
| Koffee Kosmo |
Posted on 06/08/2011 7:43 PM
|
|
Administrator Posts: 1621 Joined: December 31, 2008 |
Yes a better and more even roast Congrats on the results  KK I home roast and I like it. Designer of the KKTO
Roaster Build information https://homeroast...ad_id=1142 https://docs.goog...lide=id.i0 Blog - http://koffeekosm...gspot.com/ Bezzera Strega, Mazzer Robur Grinder, Pullman Tamper Convex, (KKTO) Turbo Oven Home Roaster. |
|
|
|
| farmroast |
Posted on 06/10/2011 10:57 AM
|
|
1/2 Pounder Posts: 295 Joined: December 20, 2006 |
Nice job on the top mod.! I like the toggle switch placements.:Clap:
Ed B.
DreamRoast 1kg roaster, Levers, Hand Mills http://coffee-roa...gspot.com/ |
|
|
|
| seedlings |
Posted on 06/10/2011 11:04 AM
|
|
1 1/2 Pounder Posts: 4226 Joined: June 27, 2007 |
Great roaster! Burundi Bwayi was fantastic last I had some. CHAD Roaster: CoffeeAir II 2# DIY air roaster
Grinder: Vintage Grindmaster 500 Brewers: Vintage Cory DCU DCL, Aeropress, Press, Osaka Titanium pourover |
|
|
|
| JackH |
Posted on 06/10/2011 6:27 PM
|
|
Administrator Posts: 1809 Joined: May 10, 2011 |
Ed, Thanks for your comment, I really tossed out almost everything in the TO. The power/timer knob broke off in my hand and that got things going. I saw your recent datalogging setup with the TC4 and I think that is the way to go. I am curious about the "juice Box" circuit, searched everywhere for it. Do you have a schematic handy? Looks like you use a transformer and have the filtered DC drop with change in line voltage. The Kill a Watt dies when the AC drops below 50V.... to be expected. Chad and KK, those African beans roasted up very easy for me. Much easier than the Costa Rica beans. Either I am getting a bit better or they are just simple to roast. After reading how important drying time was, I made sure to keep them at 300F for a while before going to 1st crack. Having the Variac is also a plus. Thanks for your interest. --Jack Edited by JackH on 06/10/2011 6:27 PM ---Jack
KKTO Roaster. |
|
|
|
| bvwelch |
Posted on 06/10/2011 8:33 PM
|
 1 1/2 Pounder Posts: 1064 Joined: December 27, 2007 |
Quote JHan816 wrote: I saw your recent datalogging setup with the TC4 and I think that is the way to go. I am curious about the "juice Box" circuit, searched everywhere for it. Do you have a schematic handy? Looks like you use a transformer and have the filtered DC drop with change in line voltage. The Kill a Watt dies when the AC drops below 50V.... to be expected. --Jack Greetings,, You can find the schematic for the "juice box" here. It is pretty much as you described. Ignore (don't build) the bottom circuit -- it won't work for low settings of the Variac. http://code.googl...onitor.jpg -bill |
|
|
|
| JackH |
Posted on 06/11/2011 4:19 AM
|
|
Administrator Posts: 1809 Joined: May 10, 2011 |
Quote bvwelch wrote: Greetings,, You can find the schematic for the "juice box" here. It is pretty much as you described. Ignore (don't build) the bottom circuit -- it won't work for low settings of the Variac. http://code.googl...onitor.jpg -bill Thanks Bill, just what I was looking for. I didn't think to look in the TC4 pages. --Jack ---Jack
KKTO Roaster. |
|
|
|
| JackH |
Posted on 06/14/2011 5:09 PM
|
|
Administrator Posts: 1809 Joined: May 10, 2011 |
I am adding some details about the thermocouple on the SC. A 6-32 screw was drilled lengthwise as this diagram shows. This is not my diagram and I can't remember where I got it:
JackH attached the following image:

---Jack
KKTO Roaster. |
|
|
|

| Jump to Forum: |
Powered by PHP-Fusion Copyright © 2024 PHP-Fusion Inc
Released as free software without warranties under GNU Affero GPL v3
Designed with ♥ by NetriXHosted by skpacman