
Login

Shoutbox
You must login to post a message.
renatoa
07/26/2024 3:49 PM
Bill grubbe and Jk, 
allenb
07/26/2024 5:15 AM
Spiderkw Welcome to HRO!

renatoa
07/24/2024 8:31 AM
ramiroflores and John123,

 ?
?
?renatoa
07/21/2024 1:18 AM
 , Luislobo
renatoa
07/19/2024 11:28 AM
Koepea,
Forum Threads
Newest Threads
Skywalker roaster modsBackground Roast Iss...
Hello from Arkansas
TC4ESP
Green coffee reviews
Hottest Threads
| Skywalker roaster... | [376] |
| TC4ESP | [115] |
| War on Farmers by... | [47] |
| Adventures in flu... | [26] |
| Hello! (soon) Roa... | [17] |
In Memory Of Ginny

Donations
Latest Donations
dmccallum - 10.00
JackH - 25.00
snwcmpr - 10.00
Anonymous - 2.00
Anonymous - 5.00
dmccallum - 10.00
JackH - 25.00
snwcmpr - 10.00
Anonymous - 2.00
Anonymous - 5.00
Users Online
Guests Online: 2
Members Online: 0
Total Members: 8,394
Newest Member: Bill grubbe
Members Online: 0
Total Members: 8,394
Newest Member: Bill grubbe
View Thread
Who is here? 1 guest(s)
 Turbo Crazy build and first roast
|
|
| JackH |
Posted on 06/08/2011 6:49 PM
|
 Administrator Posts: 1809 Joined: May 10, 2011 |
I added the second AC cable for the fan in the rear with some thermal wrap to protect the cable. You can also see the high temp silicon tubing on the top of the spacer ring.
JackH attached the following image:

---Jack
KKTO Roaster. |
|
|
|
| JackH |
Posted on 06/08/2011 6:58 PM
|
|
Administrator Posts: 1809 Joined: May 10, 2011 |
This is the Variac, my old Superior Electronics 10 Amp. It works good with the lower powered Sunpentown oven. I also use a digital temp meter connected to a bead thermocouple in the bottom of the SC pan. I drilled a hole in a 8-32 pan head screw lengthwise for the thermocouple wire to enter and secured the wire with JB weld. The bead just peeks out, is well under the stirring arms, and is very secure.
JackH attached the following image:

---Jack
KKTO Roaster. |
|
|
|
| JackH |
Posted on 06/08/2011 7:07 PM
|
|
Administrator Posts: 1809 Joined: May 10, 2011 |
I had a good roast today, 300g of Burundi Kayanza Bwayi. I learned a lot here and other sites about some roasting basics. I have been letting the beans get to the yellow drying stage slowly then ramping up to the first crack, then coasting with reduced heat. This batch had just started the first few snaps of 2nd when I dumped and cooled. I don't have a ET probe yet I am just monitoring BT for now. I disabled the flash and used natural light.
JackH attached the following image:
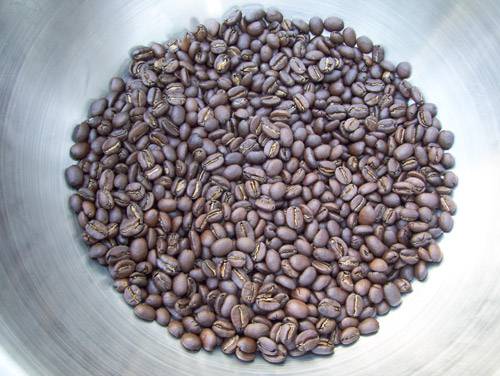
---Jack
KKTO Roaster. |
|
|
|
| Koffee Kosmo |
Posted on 06/08/2011 7:43 PM
|
 Administrator Posts: 1621 Joined: December 31, 2008 |
Yes a better and more even roast Congrats on the results  KK I home roast and I like it. Designer of the KKTO
Roaster Build information https://homeroast...ad_id=1142 https://docs.goog...lide=id.i0 Blog - http://koffeekosm...gspot.com/ Bezzera Strega, Mazzer Robur Grinder, Pullman Tamper Convex, (KKTO) Turbo Oven Home Roaster. |
|
|
|
| farmroast |
Posted on 06/10/2011 10:57 AM
|
|
1/2 Pounder  Posts: 295 Joined: December 20, 2006 |
Nice job on the top mod.! I like the toggle switch placements.:Clap:
Ed B.
DreamRoast 1kg roaster, Levers, Hand Mills http://coffee-roa...gspot.com/ |
|
|
|
| seedlings |
Posted on 06/10/2011 11:04 AM
|
 1 1/2 Pounder  Posts: 4226 Joined: June 27, 2007 |
Great roaster! Burundi Bwayi was fantastic last I had some. CHAD Roaster: CoffeeAir II 2# DIY air roaster
Grinder: Vintage Grindmaster 500 Brewers: Vintage Cory DCU DCL, Aeropress, Press, Osaka Titanium pourover |
|
|
|
| JackH |
Posted on 06/10/2011 6:27 PM
|
|
Administrator Posts: 1809 Joined: May 10, 2011 |
Ed, Thanks for your comment, I really tossed out almost everything in the TO. The power/timer knob broke off in my hand and that got things going. I saw your recent datalogging setup with the TC4 and I think that is the way to go. I am curious about the "juice Box" circuit, searched everywhere for it. Do you have a schematic handy? Looks like you use a transformer and have the filtered DC drop with change in line voltage. The Kill a Watt dies when the AC drops below 50V.... to be expected. Chad and KK, those African beans roasted up very easy for me. Much easier than the Costa Rica beans. Either I am getting a bit better or they are just simple to roast. After reading how important drying time was, I made sure to keep them at 300F for a while before going to 1st crack. Having the Variac is also a plus. Thanks for your interest. --Jack Edited by JackH on 06/10/2011 6:27 PM ---Jack
KKTO Roaster. |
|
|
|
| bvwelch |
Posted on 06/10/2011 8:33 PM
|
 1 1/2 Pounder Posts: 1064 Joined: December 27, 2007 |
Quote JHan816 wrote: I saw your recent datalogging setup with the TC4 and I think that is the way to go. I am curious about the "juice Box" circuit, searched everywhere for it. Do you have a schematic handy? Looks like you use a transformer and have the filtered DC drop with change in line voltage. The Kill a Watt dies when the AC drops below 50V.... to be expected. --Jack Greetings,, You can find the schematic for the "juice box" here. It is pretty much as you described. Ignore (don't build) the bottom circuit -- it won't work for low settings of the Variac. http://code.googl...onitor.jpg -bill |
|
|
|
| JackH |
Posted on 06/11/2011 4:19 AM
|
|
Administrator Posts: 1809 Joined: May 10, 2011 |
Quote bvwelch wrote: Greetings,, You can find the schematic for the "juice box" here. It is pretty much as you described. Ignore (don't build) the bottom circuit -- it won't work for low settings of the Variac. http://code.googl...onitor.jpg -bill Thanks Bill, just what I was looking for. I didn't think to look in the TC4 pages. --Jack ---Jack
KKTO Roaster. |
|
|
|
| JackH |
Posted on 06/14/2011 5:09 PM
|
|
Administrator Posts: 1809 Joined: May 10, 2011 |
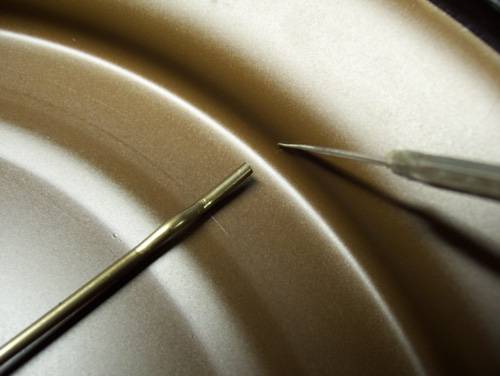
I am adding some details about the thermocouple on the SC. A 6-32 screw was drilled lengthwise as this diagram shows. This is not my diagram and I can't remember where I got it:
JackH attached the following image:

---Jack
KKTO Roaster. |
|
|
|
| JackH |
Posted on 06/14/2011 5:10 PM
|
|
Administrator Posts: 1809 Joined: May 10, 2011 |
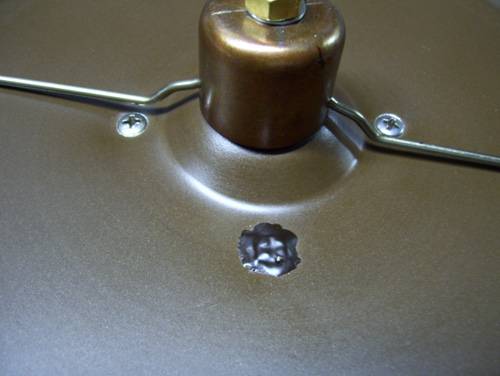
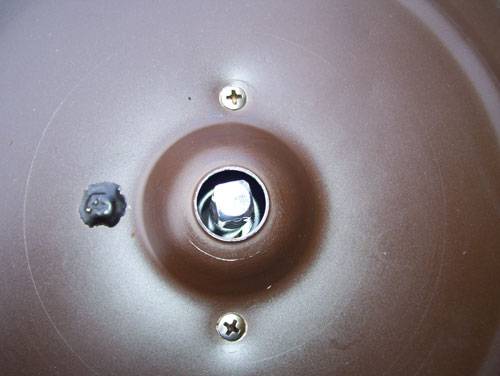
I added mine where the original thermostat was in the SC. Used JB Weld to hold it in place. Seems to be holding very well.
JackH attached the following image:
---Jack
KKTO Roaster. |
|
|
|
| JackH |
Posted on 06/14/2011 5:12 PM
|
|
Administrator Posts: 1809 Joined: May 10, 2011 |
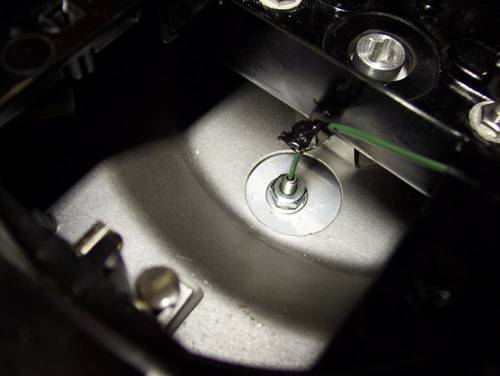
A view inside the SC base. You can see the 6-32 screw with a nut installed and the probe wire going in. I used the metal that held the original thermostat as a strain relief with a bit of high temp silicon.
JackH attached the following image:
---Jack
KKTO Roaster. |
|
|
|
| JackH |
Posted on 06/14/2011 5:13 PM
|
|
Administrator Posts: 1809 Joined: May 10, 2011 |
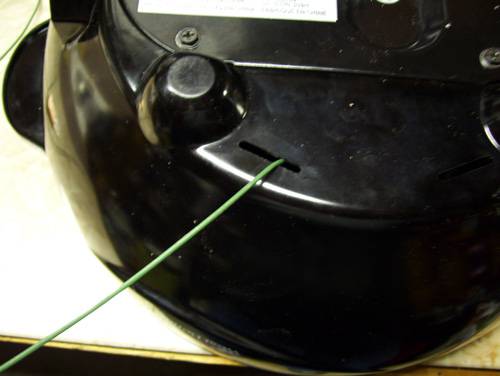
I just let the thermocouple cable exit out the existing slot in the SC bottom.
JackH attached the following image:
---Jack
KKTO Roaster. |
|
|
|
| JackH |
Posted on 06/14/2011 5:15 PM
|
|
Administrator Posts: 1809 Joined: May 10, 2011 |
I do get beans getting caught between the bead tip and the stirring arm once in a while. I am thinking of moving the thermocouple to a new location at the side of the pan, out of reach of the stirring arm. Going through the side wall horizontally.
JackH attached the following image:
Edited by JackH on 06/14/2011 5:17 PM ---Jack
KKTO Roaster. |
|
|
|
| JackH |
Posted on 06/14/2011 5:27 PM
|
|
Administrator Posts: 1809 Joined: May 10, 2011 |
I am almost done adding a much stronger motor to the SC. The current motor seems to be good for 300 - 350g of beans before it bogs down too much. This motor should handle more. I would like to be able to go to 1 to 1 1/2 pounds for my needs. It does mean adding a base to house the motor so it is not the portable unit it once was. Also looking at adding small paddles to the stirrer. I will post more when it is done. --Jack ---Jack
KKTO Roaster. |
|
|
|
| Koffee Kosmo |
Posted on 06/14/2011 6:24 PM
|
|
Administrator Posts: 1621 Joined: December 31, 2008 |
Keep up the good work I went through the same processes as you in my minds eye and came up with the present KKTO design Try my solution for the agitator jambing Use a spring over the wire KK I home roast and I like it. Designer of the KKTO
Roaster Build information https://homeroast...ad_id=1142 https://docs.goog...lide=id.i0 Blog - http://koffeekosm...gspot.com/ Bezzera Strega, Mazzer Robur Grinder, Pullman Tamper Convex, (KKTO) Turbo Oven Home Roaster. |
|
|
|
| JackH |
Posted on 06/14/2011 7:49 PM
|
|
Administrator Posts: 1809 Joined: May 10, 2011 |
Quote Koffee Kosmo wrote: Try my solution for the agitator jambing Use a spring over the wire KK KK,your current stirrer design? That looks like a great idea! Now I will be looking for springs at the hardware store. ---Jack
KKTO Roaster. |
|
|
|
| JackH |
Posted on 07/13/2011 6:08 PM
|
|
Administrator Posts: 1809 Joined: May 10, 2011 |
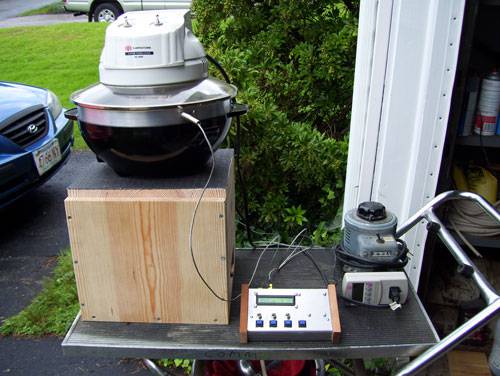
Update...I have been working on the turbo roaster. First is the new setup with a wooden motor base housing a stronger motor connected to the original stir crazy base. Maybe I went too far with this....
JackH attached the following image:
Edited by JackH on 07/13/2011 6:12 PM ---Jack
KKTO Roaster. |
|
|
|
| JackH |
Posted on 07/13/2011 6:31 PM
|
|
Administrator Posts: 1809 Joined: May 10, 2011 |
I came up with this design based on KK's agitator plus a few of my ideas for the stiring arms. It uses stainless steel welding rod with SS springs attached to a 3/8' to 1/4" socket. I also used 4 copper wire connectors to hold the wires and attach them together. I find that they are adjustable and swing up and down to allow the arms to tilt. If I keep the leading arm flush and the one behind it up a bit, it creates a tilt which seems to help with the stiring. I tried other designs but they seemed to move the whole 1 pound as a mass. This seems to stir it and I see the beans shuffle better.
JackH attached the following image:

---Jack
KKTO Roaster. |
|
|
|
| JackH |
Posted on 07/13/2011 6:32 PM
|
|
Administrator Posts: 1809 Joined: May 10, 2011 |
The motor shaft is a 3/8" socket extension which goes down to the motor case.
JackH attached the following image:
---Jack
KKTO Roaster. |
|
|
|
| JackH |
Posted on 07/13/2011 6:33 PM
|
|
Administrator Posts: 1809 Joined: May 10, 2011 |
A view with the case top removed. The new motor is about 18 RPM with plenty of power.
JackH attached the following image:

---Jack
KKTO Roaster. |
|
|
|
| JackH |
Posted on 07/13/2011 6:36 PM
|
|
Administrator Posts: 1809 Joined: May 10, 2011 |
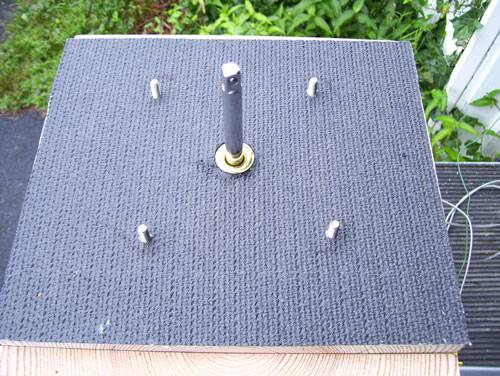
The stir crazy base sits on top of the motor case and has 4 screws that go into holes I drilled in the SC base. This acts as a guide and keeps things stable.
JackH attached the following image:
---Jack
KKTO Roaster. |
|
|
|
| JackH |
Posted on 07/13/2011 6:43 PM
|
|
Administrator Posts: 1809 Joined: May 10, 2011 |
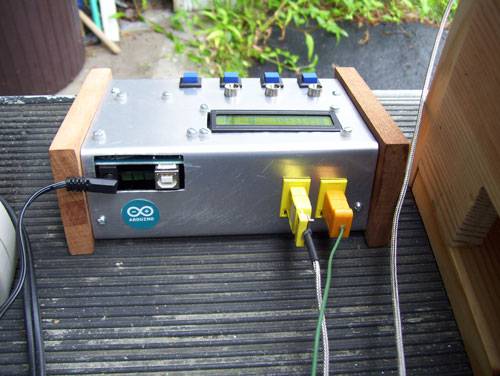
I also added insulation to the SC base and the plate between the heating element and the wiring at the top of the turbo oven. The SC base still gets hot, but a lot cooler than it was. I also added a TC4/arduino/LCDAPTER to monitor temperatures and log roasts. I built the case by hand and added some cherry side panels.
JackH attached the following image:

---Jack
KKTO Roaster. |
|
|
|
| JackH |
Posted on 07/13/2011 6:45 PM
|
|
Administrator Posts: 1809 Joined: May 10, 2011 |
A rear view of the case. I am not too happy with the panel mount K connectors, they are too loose. You can see the arduino usb and power connectors peeking out.
JackH attached the following image:
---Jack
KKTO Roaster. |
|
|
|
| JackH |
Posted on 07/13/2011 6:58 PM
|
|
Administrator Posts: 1809 Joined: May 10, 2011 |
This was a interesting project. I put a lot of thought and effort into it and it was worth it. I learned a lot. So far it does a nice job roasting, we will see.. I do plan on building a different roaster sometime but this one will do for now.... Thanks to all who helped me with this! --Jack ---Jack
KKTO Roaster. |
|
|
|

| Jump to Forum: |
Powered by PHP-Fusion Copyright © 2024 PHP-Fusion Inc
Released as free software without warranties under GNU Affero GPL v3
Designed with ♥ by NetriXHosted by skpacman