
Login

Shoutbox
You must login to post a message.
renatoa
07/26/2024 3:49 PM
Bill grubbe and Jk, 
allenb
07/26/2024 5:15 AM
Spiderkw Welcome to HRO!

renatoa
07/24/2024 8:31 AM
ramiroflores and John123,

 ?
?
?renatoa
07/21/2024 1:18 AM
 , Luislobo
renatoa
07/19/2024 11:28 AM
Koepea,
Forum Threads
Newest Threads
Skywalker roaster modsBackground Roast Iss...
Hello from Arkansas
TC4ESP
Green coffee reviews
Hottest Threads
| Skywalker roaster... | [375] |
| TC4ESP | [115] |
| War on Farmers by... | [47] |
| Adventures in flu... | [26] |
| Hello! (soon) Roa... | [17] |
In Memory Of Ginny

Donations
Latest Donations
dmccallum - 10.00
JackH - 25.00
snwcmpr - 10.00
Anonymous - 2.00
Anonymous - 5.00
dmccallum - 10.00
JackH - 25.00
snwcmpr - 10.00
Anonymous - 2.00
Anonymous - 5.00
Users Online
Guests Online: 5
Members Online: 0
Total Members: 8,393
Newest Member: Bill grubbe
Members Online: 0
Total Members: 8,393
Newest Member: Bill grubbe
View Thread
Who is here? 1 guest(s)
 First build failure..
|
|
| jedovaty |
Posted on 10/31/2011 4:51 PM
|
 1/2 Pounder  Posts: 225 Joined: October 31, 2011 |
Hi there, I started home roasting with a popcorn popper, but results are inconsistent for me given wide, ambient temperature changes in my area, so I haven't really learned a thing (I understand the theories but not making progress). Long story short, research led me to a kkto-like setup with the multi-pot configuration with a deni 1300w TO. First disclaimer: my heart's in the right place, but I'm seriously lousy at DIY. I press forward because I really want to get better. This was also an excuse to buy tools I haven't had before and always wanted (e.g. vice, dremel, etc). I'm hoping someone has a moment to help me come up with a better, less complex way to attach the stirring rod while allowing easy removal of the beans. Here's a summary of the setup and my mistakes to give you an idea where I'm at: - using a windshield wiper motor that has a threaded nubby, M8x1.25 - the motor is screwed from the bottom into a rather large piece of plywood on casters (first mistake: didn't get swivel casters, doh!) - the plywood is large because I want to add a home despot bucket used to cool the beans, all on one platform for my garage - I'm trying to stick with all stainless steel or aluminum hardware - the threaded nubby connects to a SS barrel nut (aka coupling nut), which then connects to another threaded SS rod (also M8x1.x25). - center hole in the outside pot is square center, but the hole in the colander is somewhat off. I tried to enlarge the hole a bit, and was successful. - I notched the end of the rod with a proxxon/dremel, with the idea I'd press the rod in from an old stir-crazy into the notch, and it'd pop out when I pull the colander to cool the beans -- this is the first mistake, when the motor runs, the rod works for a few turns, then it pops out :( - the handles on the colander stick up and prevent the TO from sitting on the pot, creating a large gap. I grabbed my rubber mallet and pounded on the handles to flatten them. Doing so caused the bottom of the colander to warp something awful, so now when the motor runs, the rod immediately gets knocked out, or a washer gets stuck against the colander and brings the turning to a halt. Looking at a number of builds results in possible solutions where people use sockets for quick release. But SS sockets are ridiculously expensive (I found one source, ~$60USD). Is there another way to couple a stirring rod to the shaft? Maybe a different design? I just want to be able to get the beans out easily, and the top down way is turning out to be impossible for me. And how do I fix the big hole and warp in the colander? Funny thing, I've spent so much on tools now, that I could've easily bought a dedicated roaster, saved the time building, and be happy. However, I had enjoyed the process of DIY, until this recent failure. Thank you for your input and help! |
|
|
|
| dja |
Posted on 10/31/2011 10:33 PM
|
 1 1/2 Pounder  Posts: 701 Joined: November 07, 2008 |
in situation like this pictures help a lot so others can see what you are trying to accomplish, and any chrome plated socket will work as good as a stainless steel one and a whole lot cheap as long as its not full of axle grease. your problems can be solved without a lot of expense I would think if you can show us what they are. I pour Iron and roast Coffee Beans
 If life seems normal your not going fast enough Mario Andrette |
|
|
|
| Beaner |
Posted on 10/31/2011 10:47 PM
|
 1/4 Pounder  Posts: 143 Joined: July 22, 2009 |
I agree with David, it's highly possible that from reading your descriptions the images in my head may not coincide with what you actually have. Especially the way my brain works. Would like to see some pics if you can. |
|
|
|
| Koffee Kosmo |
Posted on 11/01/2011 4:15 AM
|
 Administrator Posts: 1621 Joined: December 31, 2008 |
Hi and welcome Jedo Have you seen the build pictorial of the original roaster https://docs.goog...&pli=1 A lot of these things have simple solutions you just need a few more sets of eyes and probing minds to sort it out for you Pictures & drawings will help Always here to help in anyway I can KK I home roast and I like it. Designer of the KKTO
Roaster Build information https://homeroast...ad_id=1142 https://docs.goog...lide=id.i0 Blog - http://koffeekosm...gspot.com/ Bezzera Strega, Mazzer Robur Grinder, Pullman Tamper Convex, (KKTO) Turbo Oven Home Roaster. |
|
|
|
| seedlings |
Posted on 11/01/2011 8:37 AM
|
 1 1/2 Pounder Posts: 4226 Joined: June 27, 2007 |
Welcome to Homeroasting, jedovaty! I will first say that it gets better as you go along, so get too down- the very best way to learn is to do it 'wrong' a few times first. Anyway, aside from pictures, it sounds like your problem is the SS bowl and handles. Is there a different but similar bowl you can find without handles, or that you can cut the handles off so that the bottom is not bent and the TO can fit nicely on top? That is where I'd start. CHAD Roaster: CoffeeAir II 2# DIY air roaster
Grinder: Vintage Grindmaster 500 Brewers: Vintage Cory DCU DCL, Aeropress, Press, Osaka Titanium pourover |
|
|
|
| JackH |
Posted on 11/01/2011 10:48 AM
|
 Administrator Posts: 1809 Joined: May 10, 2011 |
Depending on the pasta pot manufacturer, I can see where the handles will get in the way. I am also putting together a KKTO type setup. The pasta pot handles do interfere with seating the turbo oven. I think adding the high temperature gasket seal around the top of the pot as shown in the KKTO plans, will help lift it up and clear the handles. When I built my turbo crazy, I used a socket adapter to attach the stirring arms and found that the cheapest sockets were the best for drilling. I don't think there is any need to use SS sockets. As the others say, if you could attach some photos of what you have, it will be easier. There are plenty of people here to help. ---Jack
KKTO Roaster. |
|
|
|
| jedovaty |
Posted on 11/01/2011 2:09 PM
|
|
1/2 Pounder Posts: 225 Joined: October 31, 2011 |
Hi again, and thank you for both the welcome and responses. My problems will mostly be resolved by using the socket adapters, for some reason I thought they may have zinc or lead in them. I'm not concerned, it's just that I'm being somewhat unpragmatic and stubborn and decided I wanted to try to overcome a problem and do this with only SS or Al. Though this is now resolved, I'm still curious, is there another way to do this with SS/Al only, and have a way to remove the pot, colander, or stirring rod easily? Fortunately, the pot set came with a second colander, the smaller one, which I haven't destroyed yet. I had originally planned to use this for cooling, with the larger one for roasting (my target is ~400-500g, don't need any more at this time). While taking pictures this morning, I could probably just use the second colander. Pictures are here: http://jano.porta...oasterpics #1 -- the handles were bent up, and I hammered them down to what you see #2 -- inside of the collander, it's hard to photo the warping and buckling on the bottom, but you see my lousy hole (embarrassing!) #3 -- the barrel nut which connects to the shaft from the motor #4 -- the shaft; the notch at the top was where I had the original stirring rod mushed in, however, it kept popping out. Because I wanted to roast that night, I squished the rod between washers, which works well, but then the whole unit becomes stuck together until the shaft is unscrewed -- which would be quite difficult to do when the pot is hot!  Furthermore, the warping on the bottom of the colander prevented the rod from turning properly, and the largish-hole lost beans. Failure. Furthermore, the warping on the bottom of the colander prevented the rod from turning properly, and the largish-hole lost beans. Failure.#5 -- picture of it all, and now I realize the particle board is HUGE (I wanted room for the cooling bucket on the same platform), and now would likely prefer a small bottom. The stirring rod came from the stir crazy, and you can see the pan there on the bottom left (I tried sanding it to remove the teflon coating but didn't get far, thus ending up going the kkto route) #6 -- the small colander As you can see, I am so close! Any suggestions / recommendations? Edited by jedovaty on 11/01/2011 2:10 PM |
|
|
|
| seedlings |
Posted on 11/01/2011 2:39 PM
|
|
1 1/2 Pounder Posts: 4226 Joined: June 27, 2007 |
I can't see anything wrong in those pictures. Looks nice. How about an assembled pic? CHAD Roaster: CoffeeAir II 2# DIY air roaster
Grinder: Vintage Grindmaster 500 Brewers: Vintage Cory DCU DCL, Aeropress, Press, Osaka Titanium pourover |
|
|
|
| jedovaty |
Posted on 11/01/2011 3:23 PM
|
|
1/2 Pounder Posts: 225 Joined: October 31, 2011 |
Thank you Chad. I will try to be short, just noticed how wordy I was. The major issue: the larger colander has a warped bottom that prevents the stirring rod from turning (hard to see in the picture). If I make the rod higher up, or shape it to allow for the warp, pockets develop and the beans will get stuck; secondarily, the hole in the colander for the shaft is way big, even a washer doesn't cover it. I tried putting tinfoil there, but it did came loose. Finally, just for practice of problem solving that I enjoy and out of stubborness, how could this be done without sockets? |
|
|
|
| jkoll42 |
Posted on 11/01/2011 3:44 PM
|
 1 1/2 Pounder Posts: 860 Joined: February 14, 2011 |
First, I don't think you are allowed call yourself "seriously lousy at DIY". Some problems w/ the build, yes. Lousy, No. As for the colander: I can see the buckling and you probably have 2 options. You could try to hammer down the high spots or just get a new colander. Like you said, trying to raise the stirring rod is a waste of time and will only lead to eventual cursing. The modern art inspired hole just needs a patch over it. Get some unpainted aluminum flashing (or other flat thin metal you might have laying around) cut it large enough to cover the hole, use a drill for a proper sized hole and then affix it with a thin bead of red RTV silicone. Just make sure to scuff the colander so it sticks to it. You could also use pop rivets but they may stick out too much. Never built this type of roaster so I am not sure what the tolerances are. I personally like the stirring rod connection system, but as said above chrome sockets should be fine. Black oxide may be as well but some metal person might be able to say better. Just stay away from anything galvanized/zinc in a high heat area. Don't need any fume fever. -Jon
Honey badger 1k, Bunn LPG-2E, Technivorm, Cimbali Max Hybrid, Vibiemme Double Domo V3 |
|
|
|
| Koffee Kosmo |
Posted on 11/01/2011 4:38 PM
|
|
Administrator Posts: 1621 Joined: December 31, 2008 |
Hey Jano 1) Using normal steel sockets is just fine Stainless Steel is overkill and expensive 2) Fixing the warped bottom is easy by adding a thin plate You can also use a large donut washer (something from a truck ) on the underside This can be secured with screws or welded if you have access to a welder Take note that the bottom should remain flat so if using screws then counter sink them Once that is done you can panel-beat the bottom of the colander to be flat Now if you are using a large washer from underneath countersink the washer section The bottom of the colander will mold into it by force when tightened thus keeping the bottom flat The way I have resolved the shaft to the motor union is by incorporating the shaft and agitator blade to the colander section The shaft then couples directly into the motor This also prevents the agitator from falling in to the beans because its not loose Photo attached Regards KK
Koffee Kosmo attached the following image:

Edited by Koffee Kosmo on 11/01/2011 4:44 PM I home roast and I like it. Designer of the KKTO
Roaster Build information https://homeroast...ad_id=1142 https://docs.goog...lide=id.i0 Blog - http://koffeekosm...gspot.com/ Bezzera Strega, Mazzer Robur Grinder, Pullman Tamper Convex, (KKTO) Turbo Oven Home Roaster. |
|
|
|
| Koffee Kosmo |
Posted on 11/01/2011 4:44 PM
|
|
Administrator Posts: 1621 Joined: December 31, 2008 |
Here is a photo of the shaft section KK
Koffee Kosmo attached the following image:

I home roast and I like it. Designer of the KKTO
Roaster Build information https://homeroast...ad_id=1142 https://docs.goog...lide=id.i0 Blog - http://koffeekosm...gspot.com/ Bezzera Strega, Mazzer Robur Grinder, Pullman Tamper Convex, (KKTO) Turbo Oven Home Roaster. |
|
|
|
| Koffee Kosmo |
Posted on 11/01/2011 4:54 PM
|
|
Administrator Posts: 1621 Joined: December 31, 2008 |
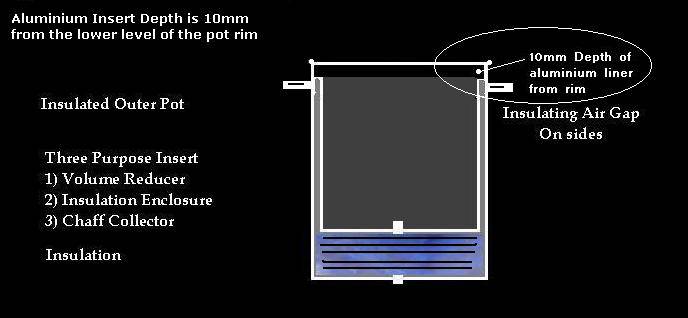
Jano You will also need a false floor & insulation sandwiched underneath Keep the volume in the range of 7 to 9 liters The volume with on the standard pot to much for the available heat generated by the Turbo Oven Will it work without a false floor - the answer is yes but the beans you will be able to roast in one go will be less The drawing shows how I do it with a manufactured insert But as I wrote above a false floor is also good KK
Koffee Kosmo attached the following image:
I home roast and I like it. Designer of the KKTO
Roaster Build information https://homeroast...ad_id=1142 https://docs.goog...lide=id.i0 Blog - http://koffeekosm...gspot.com/ Bezzera Strega, Mazzer Robur Grinder, Pullman Tamper Convex, (KKTO) Turbo Oven Home Roaster. |
|
|
|
| jedovaty |
Posted on 11/01/2011 5:44 PM
|
|
1/2 Pounder Posts: 225 Joined: October 31, 2011 |
All right. I like the idea proposed by both of you on the shaft, and attach it to the motor, cool, easy to do. Paul: volume of the whole pot is 8qt, which is approximately 7.5L -- do I still need the false bottom? This is what you mean by countersink, right? http://en.wikiped...ountersink Is there any reason not to use the smaller colander? I need to measure distance from the heating element to the base of the colander, but other than maybe being too close, it's deep enough to actually accommodate 400-500g easy. Ideally I'd get a new colander, but this came as a set and the store didn't have any replacements from what I saw. Edit by mod to make link click-able Edited by Koffee Kosmo on 11/01/2011 6:13 PM |
|
|
|
| jedovaty |
Posted on 11/01/2011 5:51 PM
|
|
1/2 Pounder Posts: 225 Joined: October 31, 2011 |
By the way - any drawbacks to using the glass bowl, other than challenges faced with drilling glass? I found a how-to by some person I assume the glass would function similar to a cast iron, where it takes a while to heat up, however, it will hold a more stable temperature. Which, based on some posts I've read on various forums, is something desired, but on the other hand, in the thread here by the guy building the cast-iron version, it was suggested varying the temp is more difficult and therefore not desired. A mixture of opinions! |
|
|
|
| Koffee Kosmo |
Posted on 11/01/2011 6:18 PM
|
|
Administrator Posts: 1621 Joined: December 31, 2008 |
Quote This is what you mean by countersink, right? http://en.wikiped...ountersink Yes that is what a countersunk hole is Quote volume of the whole pot is 8qt, which is approximately 7.5L -- do I still need the false bottom? Yes, because you also need to calculate the extra space taken above by the perforated insert & the Turbo Oven itself Quote By the way - any drawbacks to using the glass bowl, other than challenges faced with drilling glass? I found a how-to by some person No drawbacks apply You can do it but the same rules apply to volume / insulation etc KK Edited by Koffee Kosmo on 11/01/2011 6:20 PM I home roast and I like it. Designer of the KKTO
Roaster Build information https://homeroast...ad_id=1142 https://docs.goog...lide=id.i0 Blog - http://koffeekosm...gspot.com/ Bezzera Strega, Mazzer Robur Grinder, Pullman Tamper Convex, (KKTO) Turbo Oven Home Roaster. |
|
|
|
| jedovaty |
Posted on 11/06/2011 9:39 PM
|
|
1/2 Pounder Posts: 225 Joined: October 31, 2011 |
Nevermind!! I just deleted my whining response here, I got it!! Finally figgered it out! No need for jb weld, etc. I use the coupling/barrel nut on the motor, then put a deep socket onto the shaft and use a jam nut on either side. Stable and removable! I'm going to try grinding out the inside of a standard socket to see if I can get in a little deeper, this deep socket is a bit tall and will go inside my base pot. Test is here: http://jano.porta...rnturn.mov (4.5MB file) Now to tackle the "false bottom" and the warped colander  I think I'm going to bypass the warped colander and use the smaller one - it's higher up, still deep enough, and will let me have that bottom... I think I'm going to bypass the warped colander and use the smaller one - it's higher up, still deep enough, and will let me have that bottom...Edit by mod - made link clickable - Edited by Koffee Kosmo on 11/07/2011 3:39 PM |
|
|
|
| Koffee Kosmo |
Posted on 11/07/2011 3:43 PM
|
|
Administrator Posts: 1621 Joined: December 31, 2008 |
Excellent progress jedo Keep us in the loop KK I home roast and I like it. Designer of the KKTO
Roaster Build information https://homeroast...ad_id=1142 https://docs.goog...lide=id.i0 Blog - http://koffeekosm...gspot.com/ Bezzera Strega, Mazzer Robur Grinder, Pullman Tamper Convex, (KKTO) Turbo Oven Home Roaster. |
|
|
|
| jedovaty |
Posted on 11/11/2011 7:46 PM
|
|
1/2 Pounder Posts: 225 Joined: October 31, 2011 |
Another stumbling block :( I was excited last week when I figured out how to use the sockets to drive the stirring shaft, and thought it'd be easy. Now here's the problem: it doesn't fit! I need to either: 1. make the hole in the primary pot larger to accommodate the width of the socket 2. raise the pot up on feet I thought I could use a standard socket; I ground out a 1/4" drive 13mm socket so I could run the 8mm threaded rod through, that was fun. But this was very wobbly on the coupler nut, so back to the deep 3/8 drive socket you see in the movie above. The local hardware store doesn't have a drill bit wide enough to allow the socket to fit through the bottom of the bot, not sure how to enlarge the hole that much (I tried taking my dremel to it with metal grinding bit, but that's going to take a few hours, I don't have the patience for that). Therefore, I tried to make some feet -- all I needed was three inches. Had some spare wood, took out my saw, made the marks, and went to town. I guess my eyes must be crooked because the wooden feet are all slightly off so the pot doesn't sit on them studily; soon as I started the motor, the pot rolled right off. I really want this to work because of the potential size of the batches! Any more ideas? *sniff* |
|
|
|
| Koffee Kosmo |
Posted on 11/11/2011 10:56 PM
|
|
Administrator Posts: 1621 Joined: December 31, 2008 |
Post some photos and I will figure something out for you KK I home roast and I like it. Designer of the KKTO
Roaster Build information https://homeroast...ad_id=1142 https://docs.goog...lide=id.i0 Blog - http://koffeekosm...gspot.com/ Bezzera Strega, Mazzer Robur Grinder, Pullman Tamper Convex, (KKTO) Turbo Oven Home Roaster. |
|
|
|
| jedovaty |
Posted on 11/12/2011 3:03 PM
|
|
1/2 Pounder Posts: 225 Joined: October 31, 2011 |
Methinks I got it and killed two birds with one stone! Took apart the two stir crazy aluminum pieces -- flipped the concave one (brown piece) upside down and set the pot atop that. With two little holes drilled into my pot to accommodate the stir-crazy nubbies, it creates stability, and gives me enough height to clear the socket! Then I use the part that covers the heating element as the "fake bottom", fits right into the pot. Woohoo! Last few things left: put a few more holes into the smaller colander, slits on the side for chaff, and figure out the stirring rod. I ran a test as is with beans and no heat, lots of beans piling up around the center. I think I'll get a few large diameter washers, should help. Getting the beans out was easy, the whole assembly came right off and I could pour the beans out -- definitely will need some gloves for this. But.. putting it back onto the motor was really annoying. Hmmm. Sooooo close! |
|
|
|
| seedlings |
Posted on 11/12/2011 8:01 PM
|
|
1 1/2 Pounder Posts: 4226 Joined: June 27, 2007 |
Your persistence and resourcefulness are paying off! Well done! CHAD Roaster: CoffeeAir II 2# DIY air roaster
Grinder: Vintage Grindmaster 500 Brewers: Vintage Cory DCU DCL, Aeropress, Press, Osaka Titanium pourover |
|
|
|
| jkoll42 |
Posted on 11/12/2011 8:46 PM
|
|
1 1/2 Pounder Posts: 860 Joined: February 14, 2011 |
I'ma say it again - stop saying you are bad at DIY. You run into a problem....... and you fix it. Good work! ROAST ROAST ROAST
Edited by jkoll42 on 11/12/2011 8:46 PM -Jon
Honey badger 1k, Bunn LPG-2E, Technivorm, Cimbali Max Hybrid, Vibiemme Double Domo V3 |
|
|
|
| dja |
Posted on 11/12/2011 10:39 PM
|
|
1 1/2 Pounder Posts: 701 Joined: November 07, 2008 |
this stuff ain't rocket science,
I pour Iron and roast Coffee Beans
If life seems normal your not going fast enough Mario Andrette |
|
|
|
| jedovaty |
Posted on 11/12/2011 11:49 PM
|
|
1/2 Pounder Posts: 225 Joined: October 31, 2011 |
Thanks for the vote of confidence. I got it running.. sort of I put springs onto the stiring rod, but turns out they are too fat I think, so the roast ended uneven (more pushing than tumbling). Or maybe the uneveness could be because the beans are about 3-5" away from the heating element? Too close? Finally, the slits I put into the colander didn't work - chaff stayed inside the chamber, got stuck on the heating-element-protector, and kinda burned stuck to it. 8'29" to get to very first pop. Rolling first at 10'30", and then I pulled the plug at 11'30" because the chaff was starting to light up and I forgot my fire extinguisher upstairs. AMbient temp was mid 60s F. Started with 400g, ended up with 339g. It's Guatalama Candelaria Caturra, bought from local bean distributor (really nice guy in so cal, bodhi leaf trading). Picks and video here (above images and pictures moved to the "old" subdirectory): http://jano.porta...asterpics/ In the photo, the beans look pretty uniform, but they are not, low night lighting made for tough photo with iphone. By the way - what's with the weird empty, open beans (1605) ? There were many of these. Edited by jedovaty on 11/12/2011 11:58 PM |
|
|
|

| Jump to Forum: |
Powered by PHP-Fusion Copyright © 2024 PHP-Fusion Inc
Released as free software without warranties under GNU Affero GPL v3
Designed with ♥ by NetriXHosted by skpacman