
Login

Shoutbox
You must login to post a message.
renatoa
07/26/2024 3:49 PM
Bill grubbe and Jk, 
allenb
07/26/2024 5:15 AM
Spiderkw Welcome to HRO!

renatoa
07/24/2024 8:31 AM
ramiroflores and John123,

 ?
?
?renatoa
07/21/2024 1:18 AM
 , Luislobo
renatoa
07/19/2024 11:28 AM
Koepea,
Forum Threads
Newest Threads
Skywalker roaster modsBackground Roast Iss...
Hello from Arkansas
TC4ESP
Green coffee reviews
Hottest Threads
| Skywalker roaster... | [375] |
| TC4ESP | [115] |
| War on Farmers by... | [47] |
| Adventures in flu... | [26] |
| Hello! (soon) Roa... | [17] |
In Memory Of Ginny

Donations
Latest Donations
dmccallum - 10.00
JackH - 25.00
snwcmpr - 10.00
Anonymous - 2.00
Anonymous - 5.00
dmccallum - 10.00
JackH - 25.00
snwcmpr - 10.00
Anonymous - 2.00
Anonymous - 5.00
Users Online
Guests Online: 7
Members Online: 0
Total Members: 8,394
Newest Member: Bill grubbe
Members Online: 0
Total Members: 8,394
Newest Member: Bill grubbe
View Thread
Who is here? 1 guest(s)
 First build failure..
|
|
| Koffee Kosmo |
Posted on 11/13/2011 2:17 AM
|
 Administrator Posts: 1621 Joined: December 31, 2008 |
Quote I put springs onto the stiring rod, but turns out they are too fat I think, so the roast ended uneven (more pushing than tumbling) The agitator action looks to be very smooth on the video Try bending the agitator blade if possible, as that will mix rather than push the beans Quote The slits I put into the colander didn't work - chaff stayed inside the chamber, got stuck on the heating-element-protector, and kinda burned stuck to it. For the chaff - Looking at the normal colander insert, it has many holes up the side of the total circumference Dont be afraid to add as many slits as is required to do the job Quote By the way - what's with the weird empty, open beans (1605) ? There were many of these. It could be to much heat or the beans themselves is a little soft Quote Quote the unevenness could be because the beans are about 3-5" away from the heating element? Too close? This is something you need to learn or be familiar with your roaster The beauty of the roaster is that one can remove the TO at the discretion of the operator Let the beans agitate with there residual heat while watching for colour change Remove to cool when you are happy with the depth of the colour KK I home roast and I like it. Designer of the KKTO
Roaster Build information https://homeroast...ad_id=1142 https://docs.goog...lide=id.i0 Blog - http://koffeekosm...gspot.com/ Bezzera Strega, Mazzer Robur Grinder, Pullman Tamper Convex, (KKTO) Turbo Oven Home Roaster. |
|
|
|
| jedovaty |
Posted on 11/13/2011 3:01 PM
|
 1/2 Pounder  Posts: 225 Joined: October 31, 2011 |
Thanks for the tips on roasting. I've only done a few air-popcorn popper roasts, so this is really my first try - the idea is to experiment and learn the roaster! The agitator is already curved, but I'll try doing it a bit more. I'm not sure what kind of springs I have there, either, whether SS, nickel coated, or galvanized. I took my butane torch against one, and the color didn't burn any different from standard butane (it would be green if galvanized or zinc, right?). I took my dremel and made slits along the smaller colander, you can barely see them in the video , either my slits are too narrow or I don't have enough of them? At 400g, the beans do go about halfway up the slits. I started to make keyhole-style slits, but became distracted. Maybe I should fix the larger colander and get it working... ah, but then I'm concerned it's too low and won't be able to get it up higher without some major modifications. Here's a picture of the small colander with slits and the agitator; I'll bend more: http://jano.porta...G_1606.jpg I tried it out this morning, doing the reverse of a french press - instead of pressing down, I set grind atop the plunger, then add water, and after desired brew time, pull the plunger out. From what I can tell, it's similar to cupping; I've not cupped before. Ater 12 hours rest, the coffee tasted, well, like coffee, but a bit more beany than normal. It'll be curious to see how the uneven roast tastes later this week. Off to a biz trip, so can't test until next weekend. Boo. Jano Edited by jedovaty on 11/13/2011 3:07 PM |
|
|
|
| JackH |
Posted on 11/13/2011 5:36 PM
|
 Administrator Posts: 1809 Joined: May 10, 2011 |
Nice work on the spring arms. I altered mine with springs a while back and it works very well. You have good mixing with the arms, it should work great. I think as Paul says, adding more holes/slits along the sides should work better since the convection fan swirls at the sides too. The open beans I have seen a few from time to time in my roasts. Should be OK as long as they all aren't like that. --Jack ---Jack
KKTO Roaster. |
|
|
|
| Koffee Kosmo |
Posted on 11/13/2011 6:38 PM
|
|
Administrator Posts: 1621 Joined: December 31, 2008 |
Regarding the slits You can also fashion those slits into something like shark gills so the swirling chaff is caught and directed to the outer chamber  KK I home roast and I like it. Designer of the KKTO
Roaster Build information https://homeroast...ad_id=1142 https://docs.goog...lide=id.i0 Blog - http://koffeekosm...gspot.com/ Bezzera Strega, Mazzer Robur Grinder, Pullman Tamper Convex, (KKTO) Turbo Oven Home Roaster. |
|
|
|
| jedovaty |
Posted on 11/13/2011 8:22 PM
|
|
1/2 Pounder Posts: 225 Joined: October 31, 2011 |
Jack - thanks! I had wanted to actually put together something similar to your stir crazy setup, but I couldn't find a lightweight cart and I tried nearly a dozen hardware stores and was unable to find a ring (I saw the note on dog bowls by dja, but by then I had already taken apart the SC and couldn't figure out how to put it back together). Near the end of your build and first roast thread, you mention you had picked up stainless steel springs. Where did you find them? I'm still not sure what mine are made of; I'll be calling one more hardware store tomorrow, and if they don't have any, I'll end up ordering something online instead. Paul, that's a great idea. Need to find out what direction the air spins, shouldn't be hard. I hope it's opposite the current agitation direction. If not, I'll swap the agitation leads to spin the motor in the other direction, so beans don't accidentally get stuck or cracked on the gills. Given I'm an absolute beginner, how should the next roast proceed? Should I try to repeat results of this first roast to verify consistency, or change one or more variables? These are the variables I'm considering: - easy: lower heat (first roast I pre-heated at max temp for 10 minutes, put the beans in, and left the deni's 1300W at max through the roast) - easy: change bean amount (more or less?) - easy: roast longer to see what happens (assumes I figure out how to get chaff out before burning down the house) - harder: increase distance between beans and heating element Thanks again to your help and support! Jano Edited by jedovaty on 11/13/2011 8:25 PM |
|
|
|
| Koffee Kosmo |
Posted on 11/13/2011 9:52 PM
|
|
Administrator Posts: 1621 Joined: December 31, 2008 |
Koffee Kosmo Method roasting Several methods are employed with the KK roaster and all tested to work Coffee Roasting Method 1 Roast from cold start Start the roasters agitator Add green beans to cold roaster Fit the Turbo Oven on Turn temperature on to 250 deg Celsius Note: For all roasts. Depending on the green weight and source of the beans first crack should be noticed from 9 minutes to 14 minutes Only reduce heat after a rolling first crack and to facilitate a longer time to second crack Aim to reach second crack in the range of 6 to 8 minutes after first crack Coffee Roasting Method 2 Roast from hot start A Digital Multi Meter can be used for accuracy if a specific drop in temperature is wanted Pre heat the roaster at 200 deg Celsius for 5 minutes or until all surfaces of the roaster are hot Start the roasters agitator Add green beans to hot roaster or a pre determined temperature Roast in set increments of temperature settings Start at 200 deg Celsius on the dial for up to 2 minutes Increase heat to 220 deg Celsius up to 6 minutes Increase heat to 250 deg Celsius to first crack Only reduce heat after a rolling first crack and to facilitate a longer time to second crack Aim to reach second crack in the range of 6 to 8 minutes after first crack Coffee Roasting Method 3 Stabilising Pre Roast Start the roasters agitator Add green beans to cold roaster Place on the Turbo oven and turn heat on to Thaw setting or approx 75 deg Celsius at the half way point from Thaw and 125 Deg on the dial for 5 minutes Time of roast proper is now Zero Roast in set increments of temperature settings Start at 200 deg Celsius on the dial for up to 2 minutes Increase heat to 220 deg Celsius up to 6 minutes Increase heat to 250 deg Celsius to first crack Only reduce heat after a rolling first crack and to facilitate a longer time to second crack Aim to reach second crack in the range of 6 to 8 minutes after first crack Note ? Summer & Winter ambient temperatures may increase or decrease times to first crack External insulation will help greatly, stabilizing and preventing heat loss We recommended external insulation for all roasting I home roast and I like it. Designer of the KKTO
Roaster Build information https://homeroast...ad_id=1142 https://docs.goog...lide=id.i0 Blog - http://koffeekosm...gspot.com/ Bezzera Strega, Mazzer Robur Grinder, Pullman Tamper Convex, (KKTO) Turbo Oven Home Roaster. |
|
|
|
| JackH |
Posted on 11/14/2011 3:47 AM
|
|
Administrator Posts: 1809 Joined: May 10, 2011 |
Jano, Here is a link to the springs I ordered. They are 1/4" outside diameter, 20 inches long and stainless steel. I also used SS welding rod for the arms. You can get different sizes from the site if you want to go bigger. http://www.mcmast...85/=exenwy --Jack Edited by JackH on 11/14/2011 3:49 AM ---Jack
KKTO Roaster. |
|
|
|
| jedovaty |
Posted on 11/18/2011 11:33 AM
|
|
1/2 Pounder Posts: 225 Joined: October 31, 2011 |
Finally got my feet on the ground after some travel for work. I took apart my roaster to give it a good cleaning, and when I pulled off the colander, there was a surprisingly large amount of chaff underneath! The slits worked, I just need a lot more to catch the rest; or maybe the colander needs to sit lower. I'm afraid of the thing catching fire, there was a lot of chaff floating around that was both stray and lit up, and at the end of that first roast as you may have seen the the picture, a lot collected on the heating-element's protector. Is this normal? In a stroke of luck or blind genius, my stiring rod goes opposite the TO's fan, so the gills will be easy to setup  |
|
|
|
| Koffee Kosmo |
Posted on 11/18/2011 5:56 PM
|
|
Administrator Posts: 1621 Joined: December 31, 2008 |
With regards to chaff on the TO grill - the answer is yes it sometimes accumulates there BUT only when the beans are very chaffy More slits and gill guide will help immensely KK I home roast and I like it. Designer of the KKTO
Roaster Build information https://homeroast...ad_id=1142 https://docs.goog...lide=id.i0 Blog - http://koffeekosm...gspot.com/ Bezzera Strega, Mazzer Robur Grinder, Pullman Tamper Convex, (KKTO) Turbo Oven Home Roaster. |
|
|
|
| jedovaty |
Posted on 12/02/2011 7:07 PM
|
|
1/2 Pounder Posts: 225 Joined: October 31, 2011 |
Quick question - the bottom of the smaller colander is 3.5 in or 8.89cm away from the heat source. Is this too close for a 400-500g roast? The larger colander is 7in or 17.75cm away. I'd rather use the small one because then I don't have to worry about fixing the warped bottom. I've got a new design idea this weekend. Wish me luck and that I don't lose my fingers!! |
|
|
|
| jedovaty |
Posted on 12/05/2011 1:06 AM
|
|
1/2 Pounder Posts: 225 Joined: October 31, 2011 |
Success!! I scrapped the platform on coasters idea, and found an old speaker around the house. Unlike before, spent an hour measuring with a ruler, protractor, compass, and my new caliper. What a difference! Every thing aligned on my first try (I know this may not seem like much to many of you, but you really don't know my history). You will see I added a whole bunch more slits, and even "gilled" them like Paul suggested above. Here's a video of it. Sorry if it is sideways. First roast went well I think? Same bean as before (guatemalan), but my stiring rod came loose about 2min in, had to stop (reset clock to 0 too), retighten, and then start again. Rolling first crack around 9'30", and I pulled it at 13 min when I thought I heard a second crack. I'll try to remember to take photos of the resulting beans in the morning (too low light now) Biggest problem: Chaff. Despite all the new slits and gilling, I could see the chaff spinning around and around all near the brim of the heating element guard. 400g beans go about half-way over the slits, so that probably doesn't help. I think I need to fix the bigger colander, but it's such a pain :( After cooling the beans down, they continued to release chaff, and I was able to get rid of about 80% by just shaking the beans in the cooling sieve. Thank you everyone for your help and support. This is awesome  My first successful DIY project that I did "on my own"! My first successful DIY project that I did "on my own"! |
|
|
|
| Koffee Kosmo |
Posted on 12/05/2011 2:51 AM
|
|
Administrator Posts: 1621 Joined: December 31, 2008 |
Excellent work  As its a little sallower than the original design and looking at it in a mechanical engineers eye Nothing is stopping you from adding slit's on the bottom And larger holes (round or elongated) on the top section for easy chaff escape - Use this idea only if the beans don't reach that high - What I mean is that any opening is suitable above the maximum roasted bean height Having said that - The koffee kosmo design is a 2 pot system Lets rename them - Roast Chamber & Outer Chamber The roast chamber is perforated Chaff is forced to the outer chamber for safe collection by 3 forces 1) Gravity (2) Push from the agitation (3) Fan forced from the Turbo oven So you need to make it work on your design with the few tweaks I mentioned above 95% to 98% of chaff is collected in the outer chamber KK I home roast and I like it. Designer of the KKTO
Roaster Build information https://homeroast...ad_id=1142 https://docs.goog...lide=id.i0 Blog - http://koffeekosm...gspot.com/ Bezzera Strega, Mazzer Robur Grinder, Pullman Tamper Convex, (KKTO) Turbo Oven Home Roaster. |
|
|
|
| jedovaty |
Posted on 12/05/2011 2:27 PM
|
|
1/2 Pounder Posts: 225 Joined: October 31, 2011 |
Thank you - I will then work on either fixing the larger colander or finding a suitable replacement. I don't think more slits will help, the chaff was circling around the very top, where I cannot put slits without the chaff then being ejected outside (I saw pictures where people put nice jars and stuff, but I don't want to do that). Here is the resulting roast from last night. It looks way more even in the photo than in person. Close up shows a lot of "mottling" on the beans, but I think because it's still a very early roast. Will try taking it up to 2nd crack next time. 
Edited by jedovaty on 12/05/2011 2:28 PM |
|
|
|
| seedlings |
Posted on 12/05/2011 3:30 PM
|
 1 1/2 Pounder  Posts: 4226 Joined: June 27, 2007 |
That looks like a fantastic roast! Mottling is characteristic of beans grown at higher elevations, so its not a problem. CHAD Roaster: CoffeeAir II 2# DIY air roaster
Grinder: Vintage Grindmaster 500 Brewers: Vintage Cory DCU DCL, Aeropress, Press, Osaka Titanium pourover |
|
|
|
| jedovaty |
Posted on 12/15/2011 10:19 AM
|
|
1/2 Pounder Posts: 225 Joined: October 31, 2011 |
Hey! Long story short: I got my hands on a new large colander, and despite still having trouble drilling the hole (the metal is very thin, soft, cheap, so it was difficult to get a clean hole without a drill press and vice), the contraption fit together and I've since roasted several batches. Since the hole is slightly off, I lose 4-5 beans during roasting. Visually the results are much, much better (very even). In the cup, can't really say, only did a handful of roasts with the smaller and it was a learning period. Ran out of the Guatemalan I've been using, and am on to Ethiopian Yirgacheffe. I've never had/drunk this bean before, and have so far completed two roasts earlier this week with the new setup. Both 400g batches consistently arrived at first crack between 11'30" and 11'45", so I'm very happy to see consistency. The first batch was pulled at 14', and has rested 5 days, tried it this morning, tasted like.. surprise.. good coffee I am pleased.Then I read up on Yirg, and on various forumses, it appears people are split with light vs dark roasts. Last night I did a second batch, and pulled the roast just after the first stray 2nd crack. It smells amazing this morning - brown sugar and a hint of berry?! Tried to cup for the first time after 12 hours.. the grounds breaking smelled flat, boring, dull. Sipping as it cooled started with burnt and ashy, then brought a baker's chocolate flavor that moved towards bittersweet. I hope as it rests, it'll change to taste the way it smells. Keep in mind, this was my first time cupping, so I guess experience will make this experience more interesting. Here's a pic of the second roast. Slight tipping, I think. My TCs are on the way, hopefully that will help eliminate the issue. Thank you everyone for your help! 
Edited by jedovaty on 12/15/2011 10:23 AM |
|
|
|
| seedlings |
Posted on 12/15/2011 10:57 AM
|
|
1 1/2 Pounder Posts: 4226 Joined: June 27, 2007 |
Yirg, roast it light for me, and maybe give it a couple of days rest. Great work on the roaster with great results buddy! CHAD Roaster: CoffeeAir II 2# DIY air roaster
Grinder: Vintage Grindmaster 500 Brewers: Vintage Cory DCU DCL, Aeropress, Press, Osaka Titanium pourover |
|
|
|
| jedovaty |
Posted on 12/15/2011 11:57 AM
|
|
1/2 Pounder Posts: 225 Joined: October 31, 2011 |
Thanks. Not bad for a sales guy, non-engineer, and someone's who's been given a restraining order from 100ft of power tools I know for some of you this DIY stuff isn't that hard, but it is for others. Chad, that first batch was lighter (no picture), and it tasted great, it'll be interesting to see how the darker one tastes. Question. After roasting, I vacuum out the chaff from the outer pot. When I remove the "false bottom", there is a lot of condensation built up under it. This would actually explain the bubbling sound I have heard with every roast.. the false bottom is an aluminum piece from the orginal stir-crazy, under the top plate that housed the heating element. It fit, so why not?! The question, then, is there a chance the steam may be bad, or is this okay. |
|
|
|
| Koffee Kosmo |
Posted on 12/15/2011 10:09 PM
|
|
Administrator Posts: 1621 Joined: December 31, 2008 |
Lovely roast results there mate Had no doubt that you would get it done eventually So now you can relax and enjoy the fruits of your labours Quote I have heard with every roast.. the false bottom is an aluminum piece from the original stir-crazy, under the top plate that housed the heating element. It fit, so why not?! The question, then, is there a chance the steam may be bad, or is this okay. Can you place some insulation in the void that's in between the bottom of the pot and the false bottom? KK I home roast and I like it. Designer of the KKTO
Roaster Build information https://homeroast...ad_id=1142 https://docs.goog...lide=id.i0 Blog - http://koffeekosm...gspot.com/ Bezzera Strega, Mazzer Robur Grinder, Pullman Tamper Convex, (KKTO) Turbo Oven Home Roaster. |
|
|
|
| jedovaty |
Posted on 12/25/2011 4:57 PM
|
|
1/2 Pounder Posts: 225 Joined: October 31, 2011 |
Paul, I will try to put some kind of insulation there; however, I noticed there's a lot of condensation occurring between the pot and the speaker, too, so I think I'll need to put one of those silicon mats or raise the pot up a bit. Yesterday, my bro brought over his blu tooth arduino, and I hooked up the tc4 shield with Bourbon, and two bead thermocouples from Omega. Right now it's a mess, but I couldn't wait for the stores to open so I ran a couple test roasts just to watch the temps. Both roasts I set to "thaw" for 5 minutes, then cranked the heat up. In the pictures, the "B" is when I upped the heat, as if "starting" the roast. First roast was ethiopian yirga cheffe. Look how the bean temp dropped at first crack... I did not try any profile, just went right at it.  Second roast was Guatemalan Hunapu; the bean vendor suggested I go to just before second crack. Here, I tried a little what I read, slow down the roast between 300 and 350, and again at first crack (I cut the heat for a minute, then cranked it up).  I will cup tomorrow and take pictures of the beans tomorrow, too, and report back.. thank you everyone again
Edited by jedovaty on 12/25/2011 4:58 PM |
|
|
|
| farmroast |
Posted on 12/25/2011 8:54 PM
|
|
1/2 Pounder Posts: 295 Joined: December 20, 2006 |
Your drying time is way too long. Aim to get to 300 BT in more like 4-6 mins. Preheat before you add the beans. Get your ET to 300-350f during drying.The lower temp being for softer beans, sumatras, brazils, island coffees etc.
Ed B.
DreamRoast 1kg roaster, Levers, Hand Mills http://coffee-roa...gspot.com/ |
|
|
|
| jedovaty |
Posted on 12/25/2011 10:16 PM
|
|
1/2 Pounder Posts: 225 Joined: October 31, 2011 |
Thank you, Ed, I will try that on my next roast. The "drying time" as I understood it is actually around 6min in mine above, as per KK's instructions above on post 31, I am doing the stabilization part for 5 minutes then reseting the time (the B is where I marked the reset, from B to 300 takes 6 minutes). I have done this for the last few roasts before the thermocouples, all have tasted ashy, perhaps preheating chamber instead of everything at once might fix this. Can't wait |
|
|
|
| farmroast |
Posted on 12/25/2011 11:25 PM
|
|
1/2 Pounder Posts: 295 Joined: December 20, 2006 |
I'm seeing your hitting 300f bean temp at 11min. I shoot for 4-6min. to hit 300 BT
farmroast attached the following image:
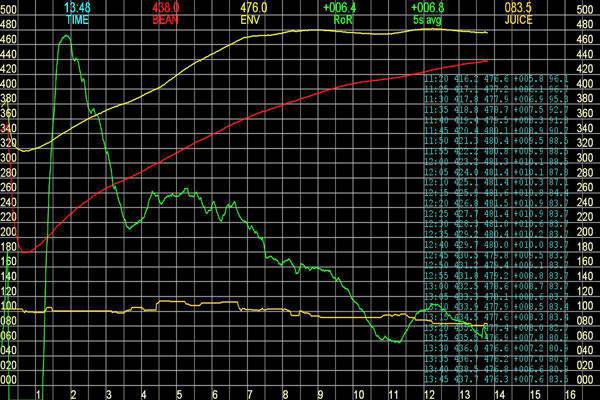
Edited by farmroast on 12/25/2011 11:39 PM Ed B.
DreamRoast 1kg roaster, Levers, Hand Mills http://coffee-roa...gspot.com/ |
|
|
|
| jedovaty |
Posted on 01/05/2012 11:57 PM
|
|
1/2 Pounder Posts: 225 Joined: October 31, 2011 |
Back in business, another roast with a guatemalan hunapu from bodhi leaf trading, and now I've got more questions. The other day I rewired my TO to separate the heating element and fan, and plugged the heating element into the router speed control unit from harbor freight (it was on sale for $17, and I had a 20%). My goal with this new roast was to get to just second crack and try to do it without the ashy flavor of last time. Attached picture of the roast. I preheated to about 300F, then dumped the beans in. Took 6 minutes to get to first crack (the "B" is where I put the beans in...). Next time I'll preheat a bit more. This is where it gets weird. I had some pm's with Ed who suggested that perhaps I was getting the ashiness from having an ET over 475.. so... I tried to keep the ET just around 475. As you can see, the BT started to level out into first crack and just kind of stayed there... it took a long time to get to FC, and by about 17 minutes in I got impatient and cranked the heat up all the way. This took me right to second crack, but my ET broke 475. I will cup this over the next few days, but based on everything I've read here, this roast was too long at just about 20 minutes (400g batch). However, the beans are possible the most even achieved, and haven't found any tipping. How could I speed this up a little without breaking ET of 475? Add another heating element? Move the beans closer? Both of these solutions aren't easily doable for me, unfortunately :(  EDIT -- maybe I should try insulating the pot? I guess the main question is, why did it take so long? Edited by jedovaty on 01/06/2012 12:56 PM |
|
|
|
| jedovaty |
Posted on 01/07/2012 12:47 PM
|
|
1/2 Pounder Posts: 225 Joined: October 31, 2011 |
Hey, sorry to keep bugging, but I'm lost. I just tried another roast, this time I insulated the pot with a silicone mat and a couple towels which had no affect. It appears my roast stalls at FC. Why? The only way I can get the temp to rise at that point is to get the ET over 500F. Which is seriously weird considering with the unmodified TO, max temp was limited to 500F and the heat would shut off until the ET dropped, then come back on again. I have changed no other variables except separating the fan and the heating element, and putting the element on a router speed control. Ambient temps today are mid 60F. The stalled roast from a couple days ago tastes like toasted oats. It's really weird! Edited by jedovaty on 01/07/2012 12:48 PM |
|
|
|
| allenb |
Posted on 01/07/2012 1:29 PM
|
 Administrator Posts: 3869 Joined: February 23, 2010 |
Many including myself have always experienced quite a demand for power just prior to and during the first seconds of 1C. There's a whole lot going on at this stage of the roast that causes this to happen. In regards to what ET you'll need to provide during this and throughout the end of the roast? Regardless of preferred max ET's you are going to have to apply enough power to move the beans along at optimum rates of rise. The coffee will tell you what temperature it needs to get the job done regardless of whether it seems to be on the high side or not. Another option in order to keep ET's as low as possible is to experiment with smaller batch sizes which will allow somewhat lower ET's during 1C an onward. OTOH, there is a practical limit to how low in ET you can go with any batch size. One more thing to remember is the large variation in temperature measuring we get depending on TC placement, TC type etc. My 450 F may be your 510 F. Allen 1/2 lb and 1 lb drum, Siemens Sirocco fluidbed, presspot, chemex, cajun biggin brewer from the backwoods of Louisiana
|
|
|
|

| Jump to Forum: |
Powered by PHP-Fusion Copyright © 2024 PHP-Fusion Inc
Released as free software without warranties under GNU Affero GPL v3
Designed with ♥ by NetriXHosted by skpacman