
Login

Shoutbox
You must login to post a message.
renatoa
07/26/2024 3:49 PM
Bill grubbe and Jk, 
allenb
07/26/2024 5:15 AM
Spiderkw Welcome to HRO!

renatoa
07/24/2024 8:31 AM
ramiroflores and John123,

 ?
?
?renatoa
07/21/2024 1:18 AM
 , Luislobo
renatoa
07/19/2024 11:28 AM
Koepea,
Forum Threads
Newest Threads
Skywalker roaster modsBackground Roast Iss...
Hello from Arkansas
TC4ESP
Green coffee reviews
Hottest Threads
| Skywalker roaster... | [375] |
| TC4ESP | [115] |
| War on Farmers by... | [47] |
| Adventures in flu... | [26] |
| Hello! (soon) Roa... | [17] |
In Memory Of Ginny

Donations
Latest Donations
dmccallum - 10.00
JackH - 25.00
snwcmpr - 10.00
Anonymous - 2.00
Anonymous - 5.00
dmccallum - 10.00
JackH - 25.00
snwcmpr - 10.00
Anonymous - 2.00
Anonymous - 5.00
Users Online
Guests Online: 7
Members Online: 0
Total Members: 8,393
Newest Member: Bill grubbe
Members Online: 0
Total Members: 8,393
Newest Member: Bill grubbe
View Thread
Who is here? 1 guest(s)
 First build failure..
|
|
| seedlings |
Posted on 12/15/2011 10:57 AM
|
 1 1/2 Pounder  Posts: 4226 Joined: June 27, 2007 |
Yirg, roast it light for me, and maybe give it a couple of days rest. Great work on the roaster with great results buddy! CHAD Roaster: CoffeeAir II 2# DIY air roaster
Grinder: Vintage Grindmaster 500 Brewers: Vintage Cory DCU DCL, Aeropress, Press, Osaka Titanium pourover |
|
|
|
| jedovaty |
Posted on 12/15/2011 11:57 AM
|
 1/2 Pounder  Posts: 225 Joined: October 31, 2011 |
Thanks. Not bad for a sales guy, non-engineer, and someone's who's been given a restraining order from 100ft of power tools  I know for some of you this DIY stuff isn't that hard, but it is for others. Chad, that first batch was lighter (no picture), and it tasted great, it'll be interesting to see how the darker one tastes. I know for some of you this DIY stuff isn't that hard, but it is for others. Chad, that first batch was lighter (no picture), and it tasted great, it'll be interesting to see how the darker one tastes.Question. After roasting, I vacuum out the chaff from the outer pot. When I remove the "false bottom", there is a lot of condensation built up under it. This would actually explain the bubbling sound I have heard with every roast.. the false bottom is an aluminum piece from the orginal stir-crazy, under the top plate that housed the heating element. It fit, so why not?! The question, then, is there a chance the steam may be bad, or is this okay. |
|
|
|
| Koffee Kosmo |
Posted on 12/15/2011 10:09 PM
|
 Administrator Posts: 1621 Joined: December 31, 2008 |
Lovely roast results there mate Had no doubt that you would get it done eventually  So now you can relax and enjoy the fruits of your labours Quote I have heard with every roast.. the false bottom is an aluminum piece from the original stir-crazy, under the top plate that housed the heating element. It fit, so why not?! The question, then, is there a chance the steam may be bad, or is this okay. Can you place some insulation in the void that's in between the bottom of the pot and the false bottom? KK I home roast and I like it. Designer of the KKTO
Roaster Build information https://homeroast...ad_id=1142 https://docs.goog...lide=id.i0 Blog - http://koffeekosm...gspot.com/ Bezzera Strega, Mazzer Robur Grinder, Pullman Tamper Convex, (KKTO) Turbo Oven Home Roaster. |
|
|
|
| jedovaty |
Posted on 12/25/2011 4:57 PM
|
|
1/2 Pounder Posts: 225 Joined: October 31, 2011 |
Paul, I will try to put some kind of insulation there; however, I noticed there's a lot of condensation occurring between the pot and the speaker, too, so I think I'll need to put one of those silicon mats or raise the pot up a bit. Yesterday, my bro brought over his blu tooth arduino, and I hooked up the tc4 shield with Bourbon, and two bead thermocouples from Omega. Right now it's a mess, but I couldn't wait for the stores to open so I ran a couple test roasts just to watch the temps. Both roasts I set to "thaw" for 5 minutes, then cranked the heat up. In the pictures, the "B" is when I upped the heat, as if "starting" the roast. First roast was ethiopian yirga cheffe. Look how the bean temp dropped at first crack... I did not try any profile, just went right at it.  Second roast was Guatemalan Hunapu; the bean vendor suggested I go to just before second crack. Here, I tried a little what I read, slow down the roast between 300 and 350, and again at first crack (I cut the heat for a minute, then cranked it up).  I will cup tomorrow and take pictures of the beans tomorrow, too, and report back.. thank you everyone again 
Edited by jedovaty on 12/25/2011 4:58 PM |
|
|
|
| farmroast |
Posted on 12/25/2011 8:54 PM
|
|
1/2 Pounder Posts: 295 Joined: December 20, 2006 |
Your drying time is way too long. Aim to get to 300 BT in more like 4-6 mins. Preheat before you add the beans. Get your ET to 300-350f during drying.The lower temp being for softer beans, sumatras, brazils, island coffees etc.
Ed B.
DreamRoast 1kg roaster, Levers, Hand Mills http://coffee-roa...gspot.com/ |
|
|
|
| jedovaty |
Posted on 12/25/2011 10:16 PM
|
|
1/2 Pounder Posts: 225 Joined: October 31, 2011 |
Thank you, Ed, I will try that on my next roast. The "drying time" as I understood it is actually around 6min in mine above, as per KK's instructions above on post 31, I am doing the stabilization part for 5 minutes then reseting the time (the B is where I marked the reset, from B to 300 takes 6 minutes). I have done this for the last few roasts before the thermocouples, all have tasted ashy, perhaps preheating chamber instead of everything at once might fix this. Can't wait |
|
|
|
| farmroast |
Posted on 12/25/2011 11:25 PM
|
|
1/2 Pounder Posts: 295 Joined: December 20, 2006 |
I'm seeing your hitting 300f bean temp at 11min. I shoot for 4-6min. to hit 300 BT
farmroast attached the following image:
Edited by farmroast on 12/25/2011 11:39 PM Ed B.
DreamRoast 1kg roaster, Levers, Hand Mills http://coffee-roa...gspot.com/ |
|
|
|
| jedovaty |
Posted on 01/05/2012 11:57 PM
|
|
1/2 Pounder Posts: 225 Joined: October 31, 2011 |
Back in business, another roast with a guatemalan hunapu from bodhi leaf trading, and now I've got more questions. The other day I rewired my TO to separate the heating element and fan, and plugged the heating element into the router speed control unit from harbor freight (it was on sale for $17, and I had a 20%). My goal with this new roast was to get to just second crack and try to do it without the ashy flavor of last time. Attached picture of the roast. I preheated to about 300F, then dumped the beans in. Took 6 minutes to get to first crack (the "B" is where I put the beans in...). Next time I'll preheat a bit more. This is where it gets weird. I had some pm's with Ed who suggested that perhaps I was getting the ashiness from having an ET over 475.. so... I tried to keep the ET just around 475. As you can see, the BT started to level out into first crack and just kind of stayed there... it took a long time to get to FC, and by about 17 minutes in I got impatient and cranked the heat up all the way. This took me right to second crack, but my ET broke 475. I will cup this over the next few days, but based on everything I've read here, this roast was too long at just about 20 minutes (400g batch). However, the beans are possible the most even achieved, and haven't found any tipping. How could I speed this up a little without breaking ET of 475? Add another heating element? Move the beans closer? Both of these solutions aren't easily doable for me, unfortunately :(  EDIT -- maybe I should try insulating the pot? I guess the main question is, why did it take so long? Edited by jedovaty on 01/06/2012 12:56 PM |
|
|
|
| jedovaty |
Posted on 01/07/2012 12:47 PM
|
|
1/2 Pounder Posts: 225 Joined: October 31, 2011 |
Hey, sorry to keep bugging, but I'm lost. I just tried another roast, this time I insulated the pot with a silicone mat and a couple towels which had no affect. It appears my roast stalls at FC. Why? The only way I can get the temp to rise at that point is to get the ET over 500F. Which is seriously weird considering with the unmodified TO, max temp was limited to 500F and the heat would shut off until the ET dropped, then come back on again. I have changed no other variables except separating the fan and the heating element, and putting the element on a router speed control. Ambient temps today are mid 60F. The stalled roast from a couple days ago tastes like toasted oats. It's really weird! Edited by jedovaty on 01/07/2012 12:48 PM |
|
|
|
| allenb |
Posted on 01/07/2012 1:29 PM
|
 Administrator Posts: 3869 Joined: February 23, 2010 |
Many including myself have always experienced quite a demand for power just prior to and during the first seconds of 1C. There's a whole lot going on at this stage of the roast that causes this to happen. In regards to what ET you'll need to provide during this and throughout the end of the roast? Regardless of preferred max ET's you are going to have to apply enough power to move the beans along at optimum rates of rise. The coffee will tell you what temperature it needs to get the job done regardless of whether it seems to be on the high side or not. Another option in order to keep ET's as low as possible is to experiment with smaller batch sizes which will allow somewhat lower ET's during 1C an onward. OTOH, there is a practical limit to how low in ET you can go with any batch size. One more thing to remember is the large variation in temperature measuring we get depending on TC placement, TC type etc. My 450 F may be your 510 F. Allen 1/2 lb and 1 lb drum, Siemens Sirocco fluidbed, presspot, chemex, cajun biggin brewer from the backwoods of Louisiana
|
|
|
|
| jedovaty |
Posted on 01/07/2012 3:54 PM
|
|
1/2 Pounder Posts: 225 Joined: October 31, 2011 |
Thank you, Allen. The "demand for power" makes sense, but.. doesn't? If it needs more power, wouldn't ET drop as it sucks up the heat? Perhaps the issue is with the router speed control? If I understand correctly how it works, both voltage and current are reduced.. maybe the heating element doesn't like the drop in current, so it's not as effective or.. eh.. hmmm. I guess where I'm confused is why are my roasts behaving differently now with the fan and heater split. Even when at max, I'm getting this leveling out into 1st crack, whereas with the unmodifed one, it'd go on a more straight line increase. Your note on the differences in ET makes sense, however, after comparing a few graphs with other people, I don't think it's as much as 60F; my FC seems to occur at similar ET and BT temps as others. That said, maybe it will make sense to move the environment thermocouple closer to the bean mass, so it's right above it and see how the temps look then, as there's nearly a 35F difference before adding beans in just 3.5" space (BT vs ET). What's even weirder, this time I momentarily turned off the fan early in the roast just to see what happened -- ET started to spike, but BT began to drop. Huh. I'll keep playing. What is certain in this toasted-oats roast, no ashiness at all. It's kind of bland, but without tipping and scorching, it's better than before. That's why I'm trying to stay below 475F. Edited by jedovaty on 01/07/2012 3:55 PM |
|
|
|
| allenb |
Posted on 01/07/2012 5:11 PM
|
|
Administrator Posts: 3869 Joined: February 23, 2010 |
A couple questions, I'm assuming your fan isn't the type that has the DC motor fed from a very fine coil of nichrome within the area of the main heating coil as in some of the popcorn poppers of today? Or is it an AC universal motor? Have you tried going direct to the heating element bypassing the router speed control. If losses through the speed control is the issue then you'll find out by this test. Also, when you stated you momentarily turned off the fan did you still have the heater on? Allen Edited by allenb on 01/07/2012 5:13 PM 1/2 lb and 1 lb drum, Siemens Sirocco fluidbed, presspot, chemex, cajun biggin brewer from the backwoods of Louisiana
|
|
|
|
| JackH |
Posted on 01/07/2012 8:04 PM
|
 Administrator Posts: 1809 Joined: May 10, 2011 |
I remember a thread here about the Harbor Freight router controllers and that the maximum setting using the dial is not at full power. I believe it was Chad's thread about the bread machine roaster. The fan speed of the heat gun was slower with the dial at maximum and when you flip the switch on the router controller to Full, the heat gun's fan increased it's speed/power. Your graph shows a slow decrease (stall) in BT after FC where it should be a steady and slower RoR increase of about 7-8 deg/min. I think the turbo oven fan should not be switched off too long as it also provides air flow to the upper case to prevent overheating. Edited by JackH on 01/07/2012 8:12 PM |
|
|
|
| BenGeldreich |
Posted on 01/07/2012 11:43 PM
|
|
1/4 Pounder  Posts: 76 Joined: January 20, 2011 |
Quote Your graph shows a slow decrease (stall) in BT after FC where it should be a steady and slower RoR increase of about 7-8 deg/min. I think the turbo oven fan should not be switched off too long as it also provides air flow to the upper case to prevent overheating. I was going to comment earlier about the stall on the graph and glad someone mentioned it. I remember having a similar issue when roasting with my Poppery 1. The beans wanted more heat right at FC but the problem was I had no way to give it to them. I ended up letting it roast for another 7 minutes or so and gave up trying to reach 2nd crack. The coffee looked good but tasted like brown wheat water. My second attempt I put a plate on the top of the roaster's chimney at FC to try and keep the heat in and bingo I got to second crack three minutes or so after first. That coffee tasted like ash. IMHO the most important temperature reading is the BT. FC tends to happen around 400?F and one can use that as a constant. As Allen mentioned ET can vary depending on many factors. If I were in your shoes I may try and move the ET to right above the bean mass to see what reading it gives during FC Like Jack, I also wouldn't suggest turning the fan off on a TO. A convectional oven uses the fan to spread the heat out evenly. IF you turn the fan off then you are left with an element producing heat straight down onto the beans. That is why your ET when off the charts, The coffee would most likely be tipped and taste like ash. All that being said you've made great progress since starting this thread so keep at it! Ben --------
Ben Turbo Oven Roaster w/ Variac, TC4Cw/ Bourbon | Bezzera Strega | Baratza Vario Grinder | Yama 5 Cup Syphon | Aeropress |
|
|
|
| jedovaty |
Posted on 01/08/2012 12:40 AM
|
|
1/2 Pounder Posts: 225 Joined: October 31, 2011 |
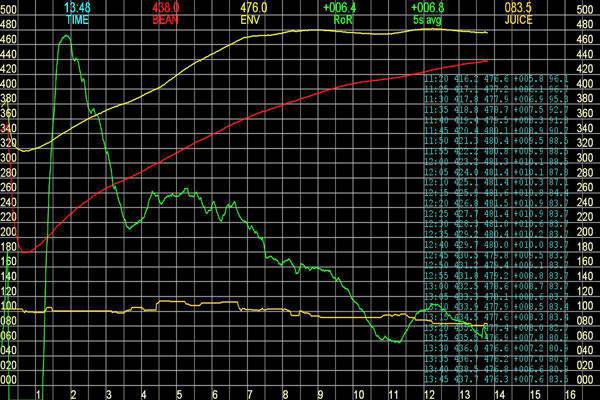
Hey guys, thanks for the responses. I think my own posts are too wordy, and it's getting you all confused. It's hard not to write so much though sorry :( Couple notes: 1. I only turned off the fan once for about 2 seconds in a roast I did today to see what happens (so doesn't show up on the past images). The fan in the TO is AC type, and it is on a toggle switch, not connected to the HF control unit. 2. I didn't mention this part previously: with the HF router control, I keep it on "full", then switch to "var" when the ET gets to about 465-470. It might be easier to demonstrate what's going on in a single post with graphs here to compare... all beans guatemalan hunapu, 400g. Roast 1: This shows the roast before I modified the TO and no pot insulation. I "pre-heated" the beans at the low "thaw" setting on the TO. At the "B", I put heat on full and just waited the roast out. All the spikes and dips you see is the TO doing things on its own (except the one around 300-350, I fiddled with it but then set to max again). The ET TC was about 1" away from the beans. Slight stall around first crack. ET temps were around 500F max a few times, and there was ashiness. Again, TO was set to max. Every bean has tipping. Color is also pretty dark, expected at 2nd roast. Roast 2: This one is the modified TO, and also insulated the pot with silicone pad and towel. I preheated the chamber, then dropped in the beans. A little after the 9' mark, you see that blip? That's where I turned off the fan, saw the dip in BT, then turned it back on. The router control was set to "full" until I got to around 470F, then switched to "Var", and as you can see, the FC clearly stalled. At the end, I put the router control back to Full, and once ET broke 500F, the BT began to rise and I hit SC. ET TC same position as roast #1. Lots of neat little flaming chaffs flying around. Cupped this evening, tasted nutty, like toasted oatmeal. Thought I hit second crack, they look like they barely hit first crack. Roast 3: Same as Roast 2, but I preheated slightly more and I put the ET TC so it was just touching the beans. When ET hit 470F, I switched to var, and tried to maintain ET around that temp. Once FC, I immediately switched back to Full on the router control. Beans began to rise as I hit 500F again, then I backed off as I'm kind of afraid of going over 500F with those flaming chaffs. Still a little nutty, but not as much as #2, and there's some minor tipping. This one came out a bit uneven, and also seemed lighter than it should be. Allen suggested I try a smaller batch. May try doing that. Any other thoughts? Roast 1:  Roast 2:  Roast 3: 
Edited by jedovaty on 01/08/2012 12:44 AM |
|
|
|
| allenb |
Posted on 01/08/2012 11:08 AM
|
|
Administrator Posts: 3869 Joined: February 23, 2010 |
If possible please shoot us a photo of your TO's heating element. I mistakenly thought they had a nichrome coiled element. Are you using a master switch arrangement (fan being master)? What were the batch weights of the last roasts you graphed? If tipping continues to be an issue I would definitely reduce batch size. Keep plugging away, you'll be roasting great coffee in no time! Allen 1/2 lb and 1 lb drum, Siemens Sirocco fluidbed, presspot, chemex, cajun biggin brewer from the backwoods of Louisiana
|
|
|
|
| jedovaty |
Posted on 01/09/2012 1:39 AM
|
|
1/2 Pounder Posts: 225 Joined: October 31, 2011 |
Allen, 400g batches all around. Before the mods a few weeks ago, I tried smaller and larger batches (300 and 500), both ended up atrociously uneven, seems like 400 is about right. Image of the heater bottom at end of this post. It's a deni, 1300W unit. I split the heating element and fan completely apart, and added a second AC plug to the back of the deni housing (made a little hole.. heheheh): AC1->switch->fan+light AC2->switch->heater+light The toggle switches are beefy enough to handle the current, though I forget the specs. I plug the fan into a power strip, the heater into the router control, then the router control directly into the wall. The vacuum and roaster motor also go onto the power strip. The circuit these items are on is a 20A one, just double checked it. When ready to roast, I toggle the fan to on, then the heater, then switch the router control from off to Full. This stalling kind of reminds me of high school physics, when the teacher put a flame under a paper cup filled with water... what would happen if I wired in the coil from the stir crazy right next to this one? I still have the ceramic holders and things... What really confuses me is when I see other roasts, like Ed's here, the ET doesn't go any higher than the 475 yet his BT continues to rise. Why? His ROR graph is similar to mine, though. I understand our ET's may not be the same, but I... I'm having trouble believing that. 
Edited by jedovaty on 01/09/2012 1:43 AM |
|
|
|
| JackH |
Posted on 01/09/2012 6:13 AM
|
|
Administrator Posts: 1809 Joined: May 10, 2011 |
The thing I see in all your plots is the RoR falling to 0 at the FC marker each time. (Almost like it does if I lift my turbo oven top). Ed's plot RoR drops but maintains the RoR at about 8-10 degrees per second. If you switch from Full to Var at FC with the dial all the way up, these harbor freight units cut back. I would hook up a kill-a-watt to your heater AC and see what the current is at full on the switch and then in Var with the dial all the way up. You might have a bad router controller. |
|
|
|
| jedovaty |
Posted on 01/09/2012 9:45 AM
|
|
1/2 Pounder Posts: 225 Joined: October 31, 2011 |
You are correct, the ROR drops - I guess that's what we need to find out is why. I understand when going from Full to Var, they cut back -- but they don't cut back that much (at least, not mine). I actually do dial mine down a little, and you can see in Roast 2 and Roast 3 of post 55 above, the bit of wavering between 460 and 490, that's me using the dial. If I left the dial at max, ET temp would keep rising. Note that roast 1 didn't have the router control, and it, too, dropped -- one could argue it was because FC occured during its cycling off.. and it's curious the BT began to rise though I was under 500F. Perhaps it's not a bad router control, but maybe the heating element needs to be at it's hottest to get a rise in the beans, and the only way I can accomplish that is to have the ET drop that much? Oh, this is confusing. Settled then - next roast I'll remove the router control and just try flipping the heater's switch on and off manually, per Allen's suggestion earlier. If I can maintain a positive ROR after first crack, I'll return the router control and just get a stupid variac :p Thanks for the help |
|
|
|
| JimG |
Posted on 01/09/2012 12:26 PM
|
|
1 1/2 Pounder Posts: 834 Joined: October 23, 2008 |
Quote jedovaty wrote:... I'll return the router control and just get a stupid variac :p Sorry to beat a dead horse, but it would be a lot less expensive for you to buy a potentiometer and SSR and use the aCataui application (since you already have the TC4 up and running). aCataui is identical to aBourbon, except that it also supports manual heater and fan control. You can control one, both, or neither as you choose. Jim |
|
|
|
| jedovaty |
Posted on 01/09/2012 12:40 PM
|
|
1/2 Pounder Posts: 225 Joined: October 31, 2011 |
Jim - if the full manual flip-on-off works, then I will consider this route as the benefit is that it'll reduce all the cables and weight and stuff to move around. It has many drawbacks for my situation, though: 1. I still don't understand it despite your time and efforts via pm 2. would have to take apart the roaster again 3. cost would be about the same, used variac will be $25-100 4. variac is just plug-n-play |
|
|
|
| JimG |
Posted on 01/09/2012 2:45 PM
|
|
1 1/2 Pounder Posts: 834 Joined: October 23, 2008 |
Gotcha. But just so you know, a potentiometer and SSR should cost less than $20. And if you use aCatuai you would also get a record of heater output levels in the log file and on the graph. Jim |
|
|
|
| jedovaty |
Posted on 01/10/2012 10:00 PM
|
|
1/2 Pounder Posts: 225 Joined: October 31, 2011 |
Just confirmed the router control unit is not faulty. Same guat hunapu 400g, with the heating element plugged directly into the wall and no router control, manually flipping on/off switch to keep ET temp around 475. It's not until I get over 480 that I can get the BT into increasing rate and out of the stall. I learned I wasn't hitting SC in a couple of the prior roasts, the noise was the sound of the chaff. I theorize any one or more of the following will help, in order of simplicity: 1. become convinced it's okay to let ET go up to 500F 2. smaller batch 3. move beans closer to heat source 4. add another heat source (deni not strong enough at 1300W) #1: well, input? I have read conflicting info #2: tough, as it leads to an uneven roast for me #3: it'll be a minor pain but can be accomplished #4: fun idea, but a little dangerous. I have that nichrome element from the stir crazy, just wire it in by the TO's element, but then I may be drawing more amps than my circuit can handle... yikes!  The results look clean, no tipping. A bit darker than I like. *shrug* |
|
|
|
| farmroast |
Posted on 01/11/2012 9:03 AM
|
|
1/2 Pounder Posts: 295 Joined: December 20, 2006 |
If you look at the traditional BT graph line it looks quite good during first crack. Having BT RoR puts it under the magnifying glass. It really shows the moisture exhaustion during the strongest part of the cracking. This release adds a cooler temp surrounding the beans as the temp inside will always lag by a few degree behind the surface reading. My theory on the level of drop in RoR has mostly to do with agitation. Getting the cooler moisture/air recirculated. The reason I say "agitation is important like grinder". I have variable speed on my agitation. If I slow the agitation during this part of 1st crack I get a more dramatic change than if I adjust the temp. If you look inside a commercial drum roaster the beans are flying around like a stirred up bee hive. All this being said I don't think the drop in RoR shown above is actually damaging the roast much if at all. Adding too much extra heat to over come this is more damaging IMO. Ed B.
DreamRoast 1kg roaster, Levers, Hand Mills http://coffee-roa...gspot.com/ |
|
|
|
| jedovaty |
Posted on 01/11/2012 10:34 AM
|
|
1/2 Pounder Posts: 225 Joined: October 31, 2011 |
Ed: Makes sense -- moisture being released is like the ice cube melting in a glass of water. The stall being experienced does lead to a very even roast. Why wouldn't it be damaging to the roast? Popular opinion seems to believe stalling is bad.. The dramatic change during first crack with a slower agitation -- dramatic in what direction, reduced or greater ROR? Would bringing the beans closer to the heat source be the same as adding more heat? Edited by jedovaty on 01/11/2012 10:36 AM |
|
|
|

| Jump to Forum: |
Powered by PHP-Fusion Copyright © 2024 PHP-Fusion Inc
Released as free software without warranties under GNU Affero GPL v3
Designed with ♥ by NetriXHosted by skpacman