
Login

Shoutbox
You must login to post a message.
renatoa
07/26/2024 3:49 PM
Bill grubbe and Jk, 
allenb
07/26/2024 5:15 AM
Spiderkw Welcome to HRO!

renatoa
07/24/2024 8:31 AM
ramiroflores and John123,

 ?
?
?renatoa
07/21/2024 1:18 AM
 , Luislobo
renatoa
07/19/2024 11:28 AM
Koepea,
Forum Threads
Newest Threads
Skywalker roaster modsBackground Roast Iss...
Hello from Arkansas
TC4ESP
Green coffee reviews
Hottest Threads
| Skywalker roaster... | [375] |
| TC4ESP | [115] |
| War on Farmers by... | [47] |
| Adventures in flu... | [26] |
| Hello! (soon) Roa... | [17] |
In Memory Of Ginny

Donations
Latest Donations
dmccallum - 10.00
JackH - 25.00
snwcmpr - 10.00
Anonymous - 2.00
Anonymous - 5.00
dmccallum - 10.00
JackH - 25.00
snwcmpr - 10.00
Anonymous - 2.00
Anonymous - 5.00
Users Online
Guests Online: 8
Members Online: 0
Total Members: 8,393
Newest Member: Bill grubbe
Members Online: 0
Total Members: 8,393
Newest Member: Bill grubbe
View Thread
Who is here? 1 guest(s)
 1 lb Easydrum Roaster
|
|
| allenb |
Posted on 02/06/2012 8:12 PM
|
 Administrator Posts: 3869 Joined: February 23, 2010 |
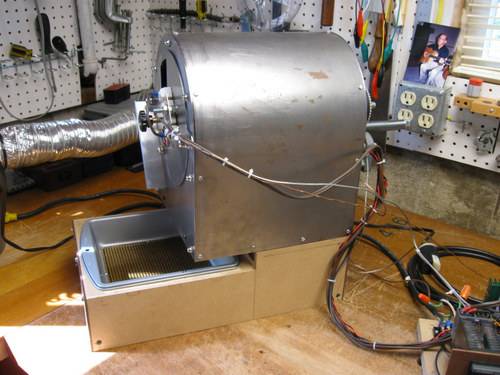
With Chad's request for photos I decided to do a new thread showing where the fire extinguisher easy drum ended up. I'll post photos after giving a brief description of the roaster. For a long time I had desired a drum roaster capable of doing a 1 lb batch but was also impressed with the results from experimentation with radiant to bean heat sources on smaller 1/4 lb capacity models. My desire was to have a under drum heat source for conventional drum heat along with plenty of radiant to bean heat within the drum. For the radiant heat I scavenged some quarts tube heaters from a broken down toaster at work. I had to have the glass tubes cut down to shorter lengths as well as modify the nichrome coils to fit the new length. My attempt at cutting the quartz with my dremel did not work out so had to enlist the local scientific glass shop. The original under drum heat was a heatgun setup which I overworked and failed after quite a few lbs. I have now replaced it with a 1000 watt 120 volt hot plate tubular element. The radiant is somewhere between 1200 and 1400 watts if on full. The design called for a sample roaster style tilting chassis as with Dan's 1 lbr but I wanted more of a conventional drum roaster front end so I came up with a sliding front plate attached to two 1/2" diameter rods that traveled within holes bored in the front and rear plates of the chassis. You'll see compression springs between a nut and the rear plate which provides closing force. To dump the beans you simply pull the center handle in the front plate to slide the front plate out then pull down to tilt the chassis down a few degrees dropping the coffee into a cooling tray. There's a piano hinge between the underside of the chassis and the base. By the time I got to the point of building the base I was fairly burnt out and did not want to hammer any more tin so I chose to make it out of pine and masonite which worked great. It was supposed to be temporary but you know how that goes. It's still temporary for a few more years or when it catches on fire and has to be replaced. There's a cake pan with perf metal for the cooling tray that sets into the base. There's a 3" aluminum flex hose going from the base to an exhaust/chaff collector fan. Up until now I've used another 3" flex to go from the base to the front plate opening for pulling exhaust/chaff and you have to swing it out of the way before dumping. I'm currently working on a loading funnel with exhaust duct port built in to bolt on to the front opening. The drum vanes are angled in to the center about 25 degrees to keep the beans moving slightly in from the drum ends. The drum is hung from the rear only via two pillow block bearings spaced an inch apart. To center the drum front with the opening you just loosen the rear most pillow block and tilt the drum and re-tighten. RPM is around 30 with just a slight waterfall action which is enough to drop off most of the chaff. Here's some photos:
allenb attached the following image:
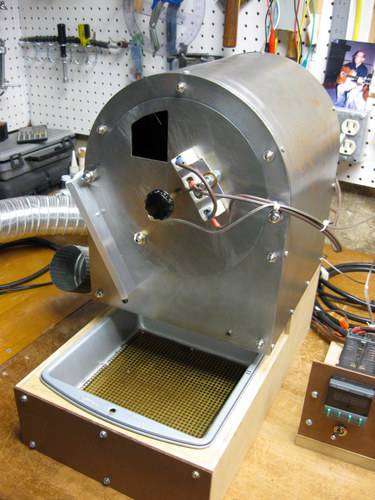
1/2 lb and 1 lb drum, Siemens Sirocco fluidbed, presspot, chemex, cajun biggin brewer from the backwoods of Louisiana
|
|
|
|
| allenb |
Posted on 02/06/2012 8:13 PM
|
|
Administrator Posts: 3869 Joined: February 23, 2010 |
More:
allenb attached the following image:

1/2 lb and 1 lb drum, Siemens Sirocco fluidbed, presspot, chemex, cajun biggin brewer from the backwoods of Louisiana
|
|
|
|
| allenb |
Posted on 02/06/2012 8:13 PM
|
|
Administrator Posts: 3869 Joined: February 23, 2010 |
More:
allenb attached the following image:

1/2 lb and 1 lb drum, Siemens Sirocco fluidbed, presspot, chemex, cajun biggin brewer from the backwoods of Louisiana
|
|
|
|
| allenb |
Posted on 02/06/2012 8:14 PM
|
|
Administrator Posts: 3869 Joined: February 23, 2010 |
More:
allenb attached the following image:
Edited by allenb on 02/06/2012 8:26 PM 1/2 lb and 1 lb drum, Siemens Sirocco fluidbed, presspot, chemex, cajun biggin brewer from the backwoods of Louisiana
|
|
|
|
| allenb |
Posted on 02/06/2012 8:15 PM
|
|
Administrator Posts: 3869 Joined: February 23, 2010 |
And More:
allenb attached the following image:
Edited by allenb on 02/06/2012 8:26 PM 1/2 lb and 1 lb drum, Siemens Sirocco fluidbed, presspot, chemex, cajun biggin brewer from the backwoods of Louisiana
|
|
|
|
| allenb |
Posted on 02/06/2012 8:16 PM
|
|
Administrator Posts: 3869 Joined: February 23, 2010 |
Another:
allenb attached the following image:

Edited by allenb on 02/06/2012 8:17 PM 1/2 lb and 1 lb drum, Siemens Sirocco fluidbed, presspot, chemex, cajun biggin brewer from the backwoods of Louisiana
|
|
|
|
| JETROASTER |
Posted on 02/07/2012 8:09 AM
|
 Administrator Posts: 1780 Joined: March 06, 2010 |
Very nice!! Looks like you're ready for heat? Good luck! -Scott |
|
|
|
| Dan |
Posted on 02/07/2012 8:29 AM
|
|
1 1/2 Pounder  Posts: 1662 Joined: October 24, 2005 |
That's shaping up fast! You'll be roasting by the weekend. Walk us through the control panel, would you? |
|
|
|
| seedlings |
Posted on 02/07/2012 9:57 AM
|
 1 1/2 Pounder Posts: 4226 Joined: June 27, 2007 |
THAT's what I'm talking about! :BowDown: Easydrum :Clap: CHAD Roaster: CoffeeAir II 2# DIY air roaster
Grinder: Vintage Grindmaster 500 Brewers: Vintage Cory DCU DCL, Aeropress, Press, Osaka Titanium pourover |
|
|
|
| upsidedown |
Posted on 02/07/2012 1:20 PM
|
|
Newbie  Posts: 9 Joined: December 17, 2011 |
Quote Dan wrote: That's shaping up fast! You'll be roasting by the weekend. Walk us through the control panel, would you? +1 on the controls. jealous of the equipment. if you are comfortable with it, could you throw a rough order of magnitude on the cost of a control set-up like that? thanks, Bradley |
|
|
|
| TheBlacksmith |
Posted on 02/07/2012 5:36 PM
|
 Newbie Posts: 16 Joined: May 23, 2010 |
Quote Dan wrote: ... Walk us through the control panel, would you? Yes please. Allen, that's looking plum awesome! Danny
Espresso: PID'd Isomac Venus (4sale) Drip: Technivorm MoccaMaster Grinder: Baratza Vario Roaster: Behmor |
|
|
|
| allenb |
Posted on 02/07/2012 8:07 PM
|
|
Administrator Posts: 3869 Joined: February 23, 2010 |
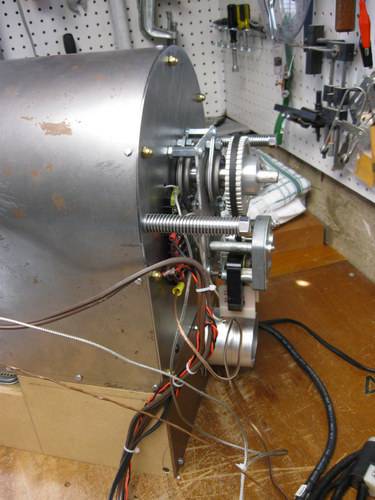
Thanks all for the compliments! I was a little hesitant to display my back-woods masonite control rack. I'll do a quick tour of the controls as requested. The PID controller on the left is a single setpoint Omega using a K-type TC for controlling under-drum ET. I usually maintain somewhere between 500 and 600 throughout the roast. The PID controller on the right is a PXR-4 ramp-soak controller using a K-type TC sensing BT for control of radiant elements. Control is good and steady up to 1C but a way is needed to vary output manually from there to finish. With having only one set of proportional and Integral settings possible it is only stable from start up to 1C then all goes to pot with wild output swings. SSR's are 25 amp general duty units with a small heat sink strapped to each. The 18 volts from the transformer fed the small variac which goes on to a 5 amp bridge rectifier for 0 to 18 VDC to the heatgun fan which I've abandoned after frying it. I'm now using a 1000 watt tubular under the drum and have no need for a fan. Air flow will be controlled via manual damper mounted in a small duct going from the front of the roaster to the exhaust/chaff collector system. The heatgun worked fine but would rather have a negative pressure via exhaust versus positive with heatgun which has a tendency to force chaff/debris down through the gap at the front of he drum into the area I can't get to for cleaning. As far as cost of the works? Fuji PXR-4 $250.00 Omega PID $60.00 (ebay) SSR's $22.00 ea variac $25.00 (surplus electronics) transformer (junk drawer) volts panel meter $100.00 switches, wire etc. $30.00 Now with all of my screwing around with controls for the last few years I've come to the realization that I'm not a big fan of automation of coffee roasters. I'm now equipping it with two dimmers and my trusty TC-4 rate of rise meter which will all be mounted within the roaster base. If I ever go into business in coffee and build a big roaster I'll definitely go back to automation but for now I don't like watching the numbers go by without user input through the roast. It gets boring. Allen
allenb attached the following image:

1/2 lb and 1 lb drum, Siemens Sirocco fluidbed, presspot, chemex, cajun biggin brewer from the backwoods of Louisiana
|
|
|
|
| Dan |
Posted on 02/07/2012 8:23 PM
|
|
1 1/2 Pounder Posts: 1662 Joined: October 24, 2005 |
And here I thought that the LCD was for the TC-4. The dial is for a variac. That makes sense now. Thanks for taking the time to do that. |
|
|
|
| JETROASTER |
Posted on 02/08/2012 9:47 AM
|
|
Administrator Posts: 1780 Joined: March 06, 2010 |
Let me know when you're ready to test. I'll reserve some of that Brazil for you. Maybe it can serve as a baseline? -Scott |
|
|
|
| yamhill |
Posted on 02/08/2012 3:00 PM
|
 1/4 Pounder  Posts: 111 Joined: December 18, 2009 |
Thanks for sharing your work. It looks really good. The metal work on the main roaster body is especially impressive. IIRC - Dan's 1# has internal halogen radiant heat of 1000w. You have more internal heat and also bottom heat. Why did you choose to have both internal and bottom heat as opposed to more of either one? From your controls it sounds like you planning to use both heat sources during the same roast. Does the radiant heat effectively act as subservient to the bottom heat? If the ramp is sufficient does the radiant control also tell the bottom heat to back off? I'm collecting pieces for an internal radiant heat drum and I'm full of questions as I think about options - especially about controls. John |
|
|
|
| allenb |
Posted on 02/08/2012 8:00 PM
|
|
Administrator Posts: 3869 Joined: February 23, 2010 |
Quote freshbeans wrote: Let me know when you're ready to test. I'll reserve some of that Brazil for you. Maybe it can serve as a baseline? -Scott Well, this I can't pass up. PM me on what it'll cost me. Allen 1/2 lb and 1 lb drum, Siemens Sirocco fluidbed, presspot, chemex, cajun biggin brewer from the backwoods of Louisiana
|
|
|
|
| allenb |
Posted on 02/08/2012 8:43 PM
|
|
Administrator Posts: 3869 Joined: February 23, 2010 |
Quote yamhill wrote: Thanks for sharing your work. It looks really good. The metal work on the main roaster body is especially impressive. IIRC - Dan's 1# has internal halogen radiant heat of 1000w. You have more internal heat and also bottom heat. Why did you choose to have both internal and bottom heat as opposed to more of either one? From your controls it sounds like you planning to use both heat sources during the same roast. Does the radiant heat effectively act as subservient to the bottom heat? If the ramp is sufficient does the radiant control also tell the bottom heat to back off? I'm collecting pieces for an internal radiant heat drum and I'm full of questions as I think about options - especially about controls. John Thanks John for the kind words on the metal work! Why I chose both heat sources? I've had excellent coffee from conventional under-drum heat only and from radiant only roasters but found there to be a noticeable difference between the two. The reason for both forms of heat in one roaster is to be able to do some experimentation as in: - Set radiant to a constant low wattage (300-500 watts) throughout roast while using drum heat for steering the roast. -Set drum heat to a constant wattage while using radiant for steering. Obviously, one would have to select a low enough output for the one being used at a constant level to allow achieving a low enough rate of rise after 1C. I'm not sure how good it would be to parallel both heat sources to the control output since the two have very different thermal inertias. My theory is that by using both sources at the same time you would end up with less heat intensity from either resulting in less stress on the beans exterior. I think it will be interesting to see what differences occur in the cup from roasts done with more of one source versus the other. Regarding controls, my suggestion is to go simple until the roaster is totally understood and you've got a lot of great tasting coffee rolling out of it. Router speed control, dimmer, old surplus variac... but, I wouldn't roast without a rate of rise meter. With a RoR meter you can have total control manually and follow profiles you come up with or copy others. My guess is you won't even want to go "auto" until you're setting up your roaster for production in a shop setting. Allen 1/2 lb and 1 lb drum, Siemens Sirocco fluidbed, presspot, chemex, cajun biggin brewer from the backwoods of Louisiana
|
|
|
|
| allenb |
Posted on 02/08/2012 9:13 PM
|
|
Administrator Posts: 3869 Joined: February 23, 2010 |
One thing that can drive us roaster builders nuts when pondering inside the drum heat is do I do a cone front (conventional sample roaster) but with rear of the drum open and running a few thousandths away from a stationary back plate (heat source mounts to the back plate). Or, conventional drum roaster layout with dump door on the front. A common problem with inside the drum heated roasters is deciding on vane configuration. You don't want the usual forward pushing vanes that pile coffee up at the front plate since you would have coffee too close to the elements and would lack an even layer of beans. There's not enough room to install forward and reverse vanes and fit an element in there unless you use an unusually large diameter drum. One of the main reasons I designed mine to tilt was to avoid needing vanes that push the coffee out during dump. Good luck with the design and shoot us any and all questions. We've got many talented builders here who've probably tried it and done it all. Allen 1/2 lb and 1 lb drum, Siemens Sirocco fluidbed, presspot, chemex, cajun biggin brewer from the backwoods of Louisiana
|
|
|
|
| Dan |
Posted on 02/08/2012 9:49 PM
|
|
1 1/2 Pounder Posts: 1662 Joined: October 24, 2005 |
Allen, A solution to the problem you implicated is to configure your vanes as on a concrete truck. Turning the drum one direction mixes like regular vanes do, while turning the drum the other direction turns the vanes into an Archimedes screw and the concrete is pumped out of the drum. |
|
|
|
| allenb |
Posted on 02/08/2012 10:06 PM
|
|
Administrator Posts: 3869 Joined: February 23, 2010 |
I'm assuming you're thinking that with the low pitch angle of the screw versus steeper conventional vanes that the amount of stacking could be tolerable? That might work and the only negative would be a slightly longer dump time. Great idea! 1/2 lb and 1 lb drum, Siemens Sirocco fluidbed, presspot, chemex, cajun biggin brewer from the backwoods of Louisiana
|
|
|
|
| allenb |
Posted on 02/08/2012 10:21 PM
|
|
Administrator Posts: 3869 Joined: February 23, 2010 |
Quote Dan wrote: Allen, A solution to the problem you implicated is to configure your vanes as on a concrete truck. Turning the drum one direction mixes like regular vanes do, while turning the drum the other direction turns the vanes into an Archimedes screw and the concrete is pumped out of the drum. Dan, I re-read your post and realized I didn't understand the part where you state "in one direction mixes like regular vanes" "other direction turns into an Archimedes screw" I understand how the concrete truck drum blends and reverses to empty via the screw but not understanding (in roaster drum) where one rotation creates a mixing action and the other empties the drum unless the drum is tilted? Are you thinking of a tilted drum or level drum? One other problem emerges. How to you get the beans to follow up the side of the drum and wash over in a "waterfall" action without the steeper angled vanes to carry them upward? The screw would mix/blend fine but the beans would stay at the bottom of the drum? Allen 1/2 lb and 1 lb drum, Siemens Sirocco fluidbed, presspot, chemex, cajun biggin brewer from the backwoods of Louisiana
|
|
|
|
| Dan |
Posted on 02/09/2012 10:25 AM
|
|
1 1/2 Pounder Posts: 1662 Joined: October 24, 2005 |
Allen, Recall that on a concrete truck the drum is tilted UP! and still he concrete flows out. So, that means that a horizontal drum, like yours, can empty itself if the vans are helical and the drum rotation reversed. Yes, the beans would tend to pile up at the back of the drum during roasting, but what if the vanes in that portion were almost parallel to the axis? In other words, make the vanes spiral (varying angle) instead of helical (constant angle, as in screw threads). Of course all of this is moot if you don't have a reversible motor! Those little synchronous gearmotors can't be reversed. Edited by Dan on 02/09/2012 10:26 AM |
|
|
|
| JETROASTER |
Posted on 02/09/2012 2:56 PM
|
|
Administrator Posts: 1780 Joined: March 06, 2010 |
It looks like the bottom heat is purely conductive, or does some heat enter thru the back screen? -Scott |
|
|
|
| allenb |
Posted on 02/09/2012 9:12 PM
|
|
Administrator Posts: 3869 Joined: February 23, 2010 |
Quote freshbeans wrote: It looks like the bottom heat is purely conductive, or does some heat enter thru the back screen? -Scott There will be exhaust pulling from the front plate fill funnel (to be constructed soon). The air flow path will be in through a hole in the bottom rear of the roaster, across the tubular element underneath the drum then around and back to the rear of the drum and in through the screen at the rear of the drum, across the beans and out. There will be just enough air flow to remove chaff and smoke and my guess is the air temp entering the rear of the drum will in the neighborhood of 450-500 F. So there will be three of the usual types of heat, conductive, radiant and convection. It has been found that the amount of conductive transfer in any drum roaster is almost nothing since the percentage of the beans surface contacting a heated surface is a tiny fraction of it's surface area and only hits the heated surface once out of several revolutions. The majority of heat transfer is occurring via long wavelength infrared from the drums surface and from convection. Convection can be forced air or just static air within the drum which is heated by the hot drum. In this roaster there will also be medium wavelength infrared by way of the nichrome infrared elements within the drum. I guess in reality the only thing this roaster will be doing differently than a conventional drum roaster is adding an additional source of infrared in a shorter wavelength. Allen 1/2 lb and 1 lb drum, Siemens Sirocco fluidbed, presspot, chemex, cajun biggin brewer from the backwoods of Louisiana
|
|
|
|
| yamhill |
Posted on 02/10/2012 2:08 PM
|
|
1/4 Pounder Posts: 111 Joined: December 18, 2009 |
Quote allenb wrote: ... It has been found that the amount of conductive transfer in any drum roaster is almost nothing since the percentage of the beans surface contacting a heated surface is a tiny fraction of it's surface area and only hits the heated surface once out of several revolutions. The majority of heat transfer is occurring via long wavelength infrared from the drums surface and from convection. Convection can be forced air or just static air within the drum which is heated by the hot drum. In this roaster there will also be medium wavelength infrared by way of the nichrome infrared elements within the drum. I guess in reality the only thing this roaster will be doing differently than a conventional drum roaster is adding an additional source of infrared in a shorter wavelength. This is an interesting take on things and a perplexing point for me in comparison to the difference in roast taste that you report between bottom and internal heat for the drum... This thread also leads me to think about options for mechanical control on the orientation of the internal radiant heat. The internal radiant heat could be directed toward the drum, the bean mass, or a combination. John |
|
|
|

| Jump to Forum: |
Powered by PHP-Fusion Copyright © 2024 PHP-Fusion Inc
Released as free software without warranties under GNU Affero GPL v3
Designed with ♥ by NetriXHosted by skpacman