
Login

Shoutbox
You must login to post a message.
renatoa
07/26/2024 3:49 PM
Bill grubbe and Jk, 
allenb
07/26/2024 5:15 AM
Spiderkw Welcome to HRO!

renatoa
07/24/2024 8:31 AM
ramiroflores and John123,

 ?
?
?renatoa
07/21/2024 1:18 AM
 , Luislobo
renatoa
07/19/2024 11:28 AM
Koepea,
Forum Threads
Newest Threads
Skywalker roaster modsBackground Roast Iss...
Hello from Arkansas
TC4ESP
Green coffee reviews
Hottest Threads
| Skywalker roaster... | [375] |
| TC4ESP | [115] |
| War on Farmers by... | [47] |
| Adventures in flu... | [26] |
| Hello! (soon) Roa... | [17] |
In Memory Of Ginny

Donations
Latest Donations
dmccallum - 10.00
JackH - 25.00
snwcmpr - 10.00
Anonymous - 2.00
Anonymous - 5.00
dmccallum - 10.00
JackH - 25.00
snwcmpr - 10.00
Anonymous - 2.00
Anonymous - 5.00
Users Online
Guests Online: 5
Members Online: 0
Total Members: 8,393
Newest Member: Bill grubbe
Members Online: 0
Total Members: 8,393
Newest Member: Bill grubbe
View Thread
Who is here? 1 guest(s)
 TC4 with RoastLogger
|
|
| JackH |
Posted on 01/21/2014 5:18 PM
|
 Administrator Posts: 1809 Joined: May 10, 2011 |
I don't know if you saw this page: http://roastlogge...r/pid.html It looks like you already figured it out. The RoastLogger PID function has been experimental since about V1.7. Edited by JackH on 06/11/2016 2:13 PM ---Jack
KKTO Roaster. |
|
|
|
| allenb |
Posted on 01/21/2014 9:01 PM
|
 Administrator Posts: 3869 Joined: February 23, 2010 |
I located an email from several months ago where Tom (Greenbean) had explained pretty well how the PID setup works and how to enter times/temps. I emailed you a copy of this. Let me know if it's of any value in better understanding the features and how to use it. If it helps, we can put it into a PDF or Excel doc and post it as an attachment for others to benefit from it. Allen Edited by JackH on 06/11/2016 2:13 PM 1/2 lb and 1 lb drum, Siemens Sirocco fluidbed, presspot, chemex, cajun biggin brewer from the backwoods of Louisiana
|
|
|
|
| Airhan |
Posted on 01/21/2014 10:07 PM
|
 1/2 Pounder  Posts: 228 Joined: September 29, 2013 |
I've fiddled with Roastlogger's PID and found it fairly straightforward. I've used it once to get a perfect roast, and other times have had problems with my roaster, but I know the PID works well. I autotuned it at 330F and 390F(durring FC) and averaged the results... it seems to work alright. Aaron
"Grind it like it did you some great injustice!"D.L.Clark |
|
|
|
| fg1972 |
Posted on 01/22/2014 2:17 PM
|
 Newbie  Posts: 48 Joined: November 02, 2013 |
Quote allenb wrote: I located an email from several months ago where Tom (Greenbean) had explained pretty well how the PID setup works and how to enter times/temps. I emailed you a copy of this. Let me know if it's of any value in better understanding the features and how to use it. If it helps, we can put it into a PDF or Excel doc and post it as an attachment for others to benefit from it. Allen Thanks Allen, The explanation you sent me is very clear, although I had already worked it out after lots of fiddling. I can definitely see value in putting it into a document as a reference for others wanting to use the PID features. The information which is on the internet via my previous link and Tom's (Greenbean) explanation says the setpoint table allows 30 segments (rows in table) but I'm only seeing 20. 30 segments would be nice to have as I tend to have a segment for each minute of the roast and just about using up all 20 at the moment. Some screenshots of my configuration as promised that may be useful to others.   
Edited by JackH on 06/11/2016 2:14 PM Its Espresso, not Short Black
|
|
|
|
| allenb |
Posted on 01/22/2014 8:56 PM
|
|
Administrator Posts: 3869 Joined: February 23, 2010 |
Thanks for the screen shots. I'll put the help text into a doc and post it here and in the downloads section. Allen 1/2 lb and 1 lb drum, Siemens Sirocco fluidbed, presspot, chemex, cajun biggin brewer from the backwoods of Louisiana
|
|
|
|
| allenb |
Posted on 01/22/2014 9:03 PM
|
|
Administrator Posts: 3869 Joined: February 23, 2010 |
Quote Airhan wrote: I've fiddled with Roastlogger's PID and found it fairly straightforward. I've used it once to get a perfect roast, and other times have had problems with my roaster, but I know the PID works well. I autotuned it at 330F and 390F(durring FC) and averaged the results... it seems to work alright. Aaron, Can you add detail as to how the autotune went? Did it go through the usual method of heating past setpoint and then spend time below setpoint like We've seen PID ramp soak controllers do? After autotuning, how did the roast go in holding to setpoint following a ramp segment? Allen 1/2 lb and 1 lb drum, Siemens Sirocco fluidbed, presspot, chemex, cajun biggin brewer from the backwoods of Louisiana
|
|
|
|
| Airhan |
Posted on 01/22/2014 10:24 PM
|
|
1/2 Pounder Posts: 228 Joined: September 29, 2013 |
Quote allenb wrote: Aaron, Can you add detail as to how the autotune went? Did it go through the usual method of heating past setpoint and then spend time below setpoint like We've seen PID ramp soak controllers do? After autotuning, how did the roast go in holding to setpoint following a ramp segment? Allen Allen, I haven't used a PID in this manner before so I didn't due any testing, I will do that ASAP and get some screenshots. Aaron
"Grind it like it did you some great injustice!"D.L.Clark |
|
|
|
| allenb |
Posted on 01/22/2014 10:40 PM
|
|
Administrator Posts: 3869 Joined: February 23, 2010 |
Hey, no rush. I was just curious how the autotune did on a non-manufactured control. This is exciting stuff! Look forward to your results. Allen 1/2 lb and 1 lb drum, Siemens Sirocco fluidbed, presspot, chemex, cajun biggin brewer from the backwoods of Louisiana
|
|
|
|
| tamarian |
Posted on 01/23/2014 1:12 AM
|
|
1/2 Pounder Posts: 320 Joined: January 21, 2012 |
Quote allenb wrote: I was just curious how the autotune did on a non-manufactured control. This is exciting stuff! Look forward to your results. Absolutely exciting! While satisfied with my Fuji, I can see a lot of options and advantages of having access to tinker with a PID, or even build it from scratch (Arduino). Things I'd like to do include different PID settings for each roast stage, setting rules to enforce no overshoot, setting a button for each desired roast profile ramp/soak sequence. Not to mention to cost savings in hardware! Wa'il. 1 Kg PID'ed gas-fired fluid bed roaster, GS/3MPS, K10F
|
|
|
|
| allenb |
Posted on 01/24/2014 8:58 AM
|
|
Administrator Posts: 3869 Joined: February 23, 2010 |
I just received a reply from Tom (Greenbean) with permission to publish the tips/how to he emailed me several months ago for the Roastlogger PID ramp segments. He also mentioned that he would appreciate it if any of us came up with additions to add to the instructions on using the PID to shoot them to him since he is now considering making the PID operation a permanent part of Roastlogger and not just "experimental". I think he'll be assembling a full set of instructions for it not too far down the road. I'll put the tips he gave me into a PDF and post it this weekend. Allen Edited by allenb on 01/26/2014 7:49 PM 1/2 lb and 1 lb drum, Siemens Sirocco fluidbed, presspot, chemex, cajun biggin brewer from the backwoods of Louisiana
|
|
|
|
| greencardigan |
Posted on 01/25/2014 7:31 AM
|
 1 1/2 Pounder  Posts: 1185 Joined: November 21, 2010 |
Quote allenb wrote: I hadn't ever really examined Acataui for what it was capable of doing. I'm glad you mentioned it and that it can accept rotary pots for adjusting heater and fan output levels. Something very useful to me is it's set up for phase angle output for controlling an ac fan since I've got a dayton shaded pole fan motor. It might be much simpler for me just to switch from Roastlogger to Acataui which would take care of all my issues especially since I'm going to be manually controlling my gas fired drum roaster. One thing that was a little confusing was in newer rev's of Acataui Jim describes the control of the heater as "integral cycle control" which is also commonly called burst fire control. The previous versions described the heater output as pwm with a 1 second time base but it appears that when the TC4 outputs a duty cycle output to an SSR it is in reality doing the same thing as what a integral cycle controller is doing. Thanks for showing a work around for the timer reset button issue in Roastlogger! Allen I'm thinking about modifying my aArtisanQ_PID code so it is compatible with Roastlogger. I'm interested in trying out the PID functionality but want to retain my phase control of my blower and ICC control of the heater. I think I just need to add the Roastlogger commands to the command interpreter and send the data back in the right format. Shouldn't be too much work. Then I'll be able to do PID controlled roasts with Roastlogger as well as with Artisan, my android app and standalone using the the PID in my aArtisanQ_PID code.  |
|
|
|
| greencardigan |
Posted on 01/26/2014 8:43 AM
|
|
1 1/2 Pounder Posts: 1185 Joined: November 21, 2010 |
I have added Roastlogger support to my aArtisanQ_PID code. You can download it here if you want to try it (Uses phase control for fan and ICC control for the heater). https://drive.goo...sp=sharing And the other features of my code are found here. http://forum.home...;pid=48810 The PID functionality in Roastlogger seems to work well although I haven't roasted with it yet. I think I can use my usual PID settings as Roastlogger is using the same PID algorithms I think. The two things I didn't like was the 5% increments for the Fan and Heater settings and the minimum 5 second logging interval. |
|
|
|
| allenb |
Posted on 01/26/2014 6:17 PM
|
|
Administrator Posts: 3869 Joined: February 23, 2010 |
Quote allenb wrote: I just received a reply from Tom (Greenbean) with permission to publish the tips/how to he emailed me several months ago for the Roastlogger PID ramp segments. He also mentioned that he would appreciate it if any of us came up with additions to add to the instructions on using the PID to shoot them to him since he is now considering making the PID operation a permanent part of Roastlogger and not just "experimental". I think he'll be assembling a full set of instructions for it not too far down the road. I'll put the tips he gave me into a PDF and post it this weekend. Allen Please see Notes on purpose and use of the experimental PID and Autotuner http://homepage.n...r/pid.html Here's Toms reply via pdf doc.
allenb attached the following file:
Edited by allenb on 01/26/2014 7:41 PM 1/2 lb and 1 lb drum, Siemens Sirocco fluidbed, presspot, chemex, cajun biggin brewer from the backwoods of Louisiana
|
|
|
|
| fg1972 |
Posted on 02/23/2014 2:23 PM
|
|
Newbie Posts: 48 Joined: November 02, 2013 |
Iv'e been roasting weekly with RoastLogger/TC4 using the PID functions for the last couple of months with great results. Each week I do 3 or 4 roasts back to back and just having a small annoying issue that seems to occur at least once each week where the TC4 seems to completely freeze RoastLogger towards the end of a roast. If I unplug the TC4 from the USB port, then RoastLogger starts to respond allowing me to save the roast. To get it all working again, I need to restart RoastLogger and the TC4. I thought it may be heat related so I roasted with the TC4 enclose open blowing cool air from a fan directly onto it but it still froze. Anyone else experienced this? Its Espresso, not Short Black
|
|
|
|
| greencardigan |
Posted on 02/23/2014 4:36 PM
|
|
1 1/2 Pounder Posts: 1185 Joined: November 21, 2010 |
Does the TC4 keep working even though Roastlogger has frozen? |
|
|
|
| fg1972 |
Posted on 02/23/2014 5:37 PM
|
|
Newbie Posts: 48 Joined: November 02, 2013 |
The TC4 keeps driving the outputs when it freezes although I or the software can no longer control them. The temps and timer displayed in the software also freeze.
Its Espresso, not Short Black
|
|
|
|
| JimG |
Posted on 02/23/2014 8:19 PM
|
|
1 1/2 Pounder Posts: 834 Joined: October 23, 2008 |
PWM outputs are kinda hardware controlled. So if the operating Arduino code locks up then the timers will happily continue to send the PWM signals to the outputs. Similar thing is true for the ICC and phase angle outputs in ArtisanQ_PID. What firmware is running on the Arduino? How is your roaster wired to the TC4? Jim |
|
|
|
| fg1972 |
Posted on 02/25/2014 5:18 AM
|
|
Newbie Posts: 48 Joined: November 02, 2013 |
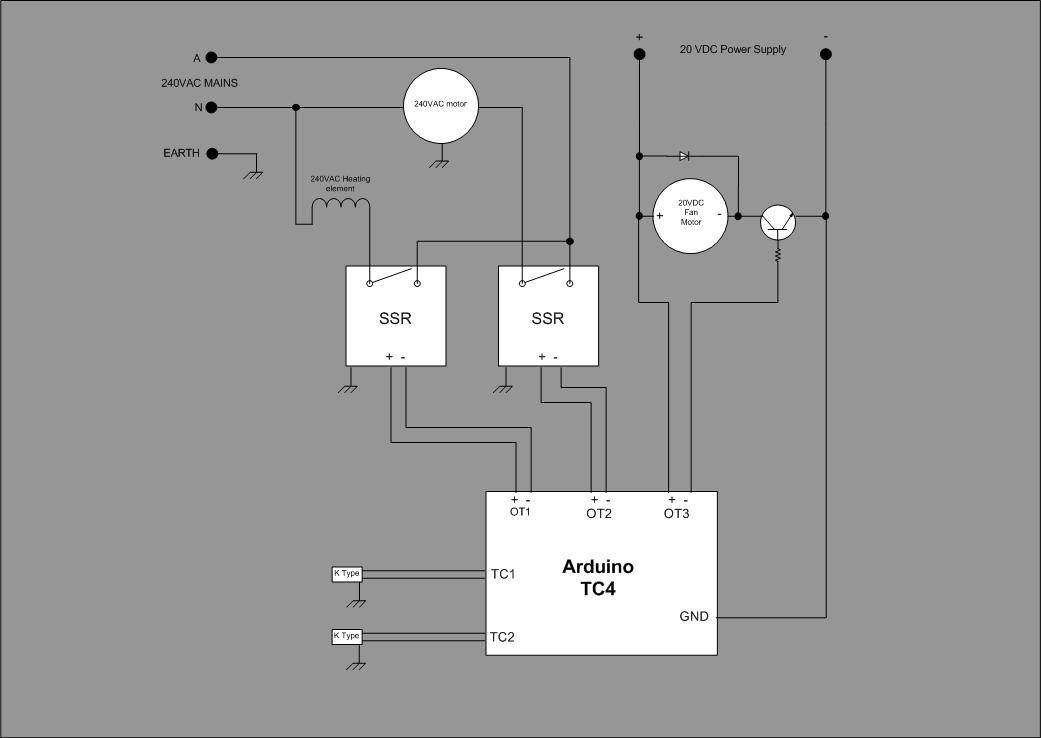
Hi Jim, Arduino firmware is RoastLoggerTC4 version 2.0 10 July 2012 Wiring
fg1972 attached the following image:
Its Espresso, not Short Black
|
|
|
|
| JimG |
Posted on 02/25/2014 2:49 PM
|
|
1 1/2 Pounder Posts: 834 Joined: October 23, 2008 |
The wiring for OT3 (actually labeled IO3 on the TC4) looks problematic. If connected as shown in your original sketch, you would be presenting 20VDC on an Arduino pin that is rated at nominally 5V. That could explain the processor locking up. A more conventional hookup would be as shown on the revised sketch I've (hopefully) attached here. Jim
JimG attached the following image:

Edited by JimG on 02/25/2014 4:16 PM |
|
|
|
| fg1972 |
Posted on 02/26/2014 3:21 AM
|
|
Newbie Posts: 48 Joined: November 02, 2013 |
Hello Jim, I'm measuring a maximum of 4.8VDC between IO3 + and GND with the fan slider in RoastLogger is at 100% so I don't think its seeing the full 20VDC at all. I tried your suggestion anyway and found the fan does not work as I suspect the transistor base is expecting a negative potential not positive one. Please let me know if you think of anything else. Cheers Fiorello Its Espresso, not Short Black
|
|
|
|
| JimG |
Posted on 02/26/2014 4:33 AM
|
|
1 1/2 Pounder Posts: 834 Joined: October 23, 2008 |
Hi, Fiorello Perhaps then you are not using NPN transistor as shown? I do not understand your fan circuit, but still feel it is a likely suspect in finding the source of the freeze ups. Motors are noisy, and the AVR chip is not rated for a direct connect to 20VDC. Using an optoisolator between the TC4 and the fan drive would be a good idea. Jim |
|
|
|
| fg1972 |
Posted on 02/26/2014 5:40 AM
|
|
Newbie Posts: 48 Joined: November 02, 2013 |
Hi Jim, The transistor is a TIP122G which should be NPN. I got the circuit from the article below http://www.robotr.../PWM5.html Fiorello Edited by JackH on 02/26/2014 7:37 AM Its Espresso, not Short Black
|
|
|
|
| JimG |
Posted on 02/26/2014 8:20 AM
|
|
1 1/2 Pounder Posts: 834 Joined: October 23, 2008 |
The Robot Room schematic you referenced looks good, but it is different from what you show in your sketch. The TIP122G is NPN, so it needs positive base-emitter voltage (Vbe) and a few milliamps of base current (Ib) to switch fully on. (Note also that the flyback diode in your sketch is backwards, but I am confident that you have it wired correctly in your project since the fan is operating). Referring to the Robot Room schematic, the positive lead from IO3 would be the PWM signal they have shown connecting to the 1K base resistor on the left. That arrangement is what I showed in the revised sketch. If you have it wired as shown in the Robot Room schematic, then my next suggestion would be to put an optoisolator into the system to minimize the effects of the motor on your AVR chip. You might also consider placing your electronics inside an aluminum project box to shield things a bit from the badness coming from the motor(s). I think greencardigan had some success solving a similar problem this way? Jim |
|
|
|
| fg1972 |
Posted on 02/27/2014 2:36 PM
|
|
Newbie Posts: 48 Joined: November 02, 2013 |
Hi Jim, The schematic I posted is incorrect as I had drawn it a few days after wiring everything up. I've had another look at my configuration and redrawn it correctly which is pretty much as per your suggestion. The I03 pin never sees 20VDC. So it looks like motor noise or interference may be causing the issue. Funny thing is that it always seems to occur towards the end of a roast at ~18:00 to 20:00 minutes. I'm not familiar with optoisolator's, would you mind briefly explaining where this would fit into the circuit please? Anyhow, this is the correct schematic. Thanks.
fg1972 attached the following image:

Its Espresso, not Short Black
|
|
|
|
| greencardigan |
Posted on 02/27/2014 3:44 PM
|
|
1 1/2 Pounder Posts: 1185 Joined: November 21, 2010 |
Quote JimG wrote: You might also consider placing your electronics inside an aluminum project box to shield things a bit from the badness coming from the motor(s). I think greencardigan had some success solving a similar problem this way? Jim I think my resetting/freezing issue was solved when I switched my arduino power supply from using my laptop USB to a 7V DC supply. My project box is plastic and I didn't try any shielding. |
|
|
|

| Jump to Forum: |
Powered by PHP-Fusion Copyright © 2024 PHP-Fusion Inc
Released as free software without warranties under GNU Affero GPL v3
Designed with ♥ by NetriXHosted by skpacman