
Login

Shoutbox
You must login to post a message.
allenb
04/26/2024 11:19 AM
Mongke

renatoa
04/26/2024 7:26 AM
 , bmartin1000
renatoa
04/25/2024 2:03 AM
AGZ and Intercolcoffee

allenb
04/23/2024 7:01 PM
Paul Kalb
renatoa
04/23/2024 4:34 AM
Coffee_Rabbit_Hole
and Michaelion,
and Michaelion,
Forum Threads
Newest Threads
Skywalker roaster modsHello from Montreal ...
War on Farmers by Su...
Kaleido Roaster PID ...
Rainfrog's Roastmast...
Hottest Threads
| Skywalker roaster... | [303] |
| Skywalker, the AL... | [214] |
| Skywalker Roasts | [94] |
| Rainfrog's Roastm... | [54] |
| War on Farmers by... | [40] |
In Memory Of Ginny

Donations
Latest Donations
dmccallum - 10.00
JackH - 25.00
snwcmpr - 10.00
Anonymous - 2.00
Anonymous - 5.00
dmccallum - 10.00
JackH - 25.00
snwcmpr - 10.00
Anonymous - 2.00
Anonymous - 5.00
Users Online
Guests Online: 2
Members Online: 0
Total Members: 8,229
Newest Member: Mongke
Members Online: 0
Total Members: 8,229
Newest Member: Mongke
View Thread
Who is here? 1 guest(s)
Page 1 of 2: 12
|
 Enhancing My HotTop (2 of 5)-Monitoring Bean Mass Temperature
|
|
| ciel-007 |
Posted on 06/27/2012 10:24 PM
|
 1 1/2 Pounder  Posts: 651 Joined: April 03, 2012 |
Enhancing My HotTop (2 of 5) - Monitoring Bean Mass Temperature In an earlier post, I listed 4 categories of annoyances with my HotTop roaster. [url]http://homeroasters.org/php/forum/viewthread.php?thread_id=2759&pid=37257#post_37257 [/url] This follow-up focuses on what is perhaps the most critical annoyance of all - the HotTop doesn?t ship with a factory installed Bean Mass Temperature probe. Although the HotTop shows the temperature in the roasting chamber, it provides no clue about the actual temperature of the roasting beans themselves. Without such vital information, it is difficult to achieve excellent and consistent roasts. A BMT probe provides the accurate information needed for fine and precise roast control. This is especially important during the critical final stages of the roast, and when roasting different batch sizes. In contrast to most other home roasters, it is relatively easy to install a BMT probe on a HotTop. The HotTop owner has two options: installing either a Temporary BMT Probe, or a Permanent BMT Probe. Since getting my HotTop, I have experimented with both types with success. Ciel... seeking Heaven in my cup with ................................................................................................................. EXPOBAR Brewtus II - MAZZER Mini E - MAHLK?NIG Vario - GeneCafe - RAF-1 Extreme (Modified B-2 HOTTOP) - BellaTaiwan XJ-101
|
|
|
|
| ciel-007 |
Posted on 06/27/2012 10:26 PM
|
|
1 1/2 Pounder Posts: 651 Joined: April 03, 2012 |
Temporary BMT Probe The easiest way to add a BMT probe to my HotTop was through the bean chute of the roaster. Here is a photo showing what this type of BMT probe looks like from inside the roasting chamber.
ciel-007 attached the following image:

Ciel... seeking Heaven in my cup with ................................................................................................................. EXPOBAR Brewtus II - MAZZER Mini E - MAHLK?NIG Vario - GeneCafe - RAF-1 Extreme (Modified B-2 HOTTOP) - BellaTaiwan XJ-101
|
|
|
|
| ciel-007 |
Posted on 06/27/2012 10:28 PM
|
|
1 1/2 Pounder Posts: 651 Joined: April 03, 2012 |
Temporary BMT Probe This wonderful modification was first proposed by Randy Glass a few years ago; here is a photo showing how Randy modified the bean chute cover from his HotTop. Also, here is a link outlining the steps that Randy took to install this BMT probe: [url]http://www.frcndigital.com/coffee/HowToHottopTemp.html [/url]
ciel-007 attached the following image:

Ciel... seeking Heaven in my cup with ................................................................................................................. EXPOBAR Brewtus II - MAZZER Mini E - MAHLK?NIG Vario - GeneCafe - RAF-1 Extreme (Modified B-2 HOTTOP) - BellaTaiwan XJ-101
|
|
|
|
| ciel-007 |
Posted on 06/27/2012 10:29 PM
|
|
1 1/2 Pounder Posts: 651 Joined: April 03, 2012 |
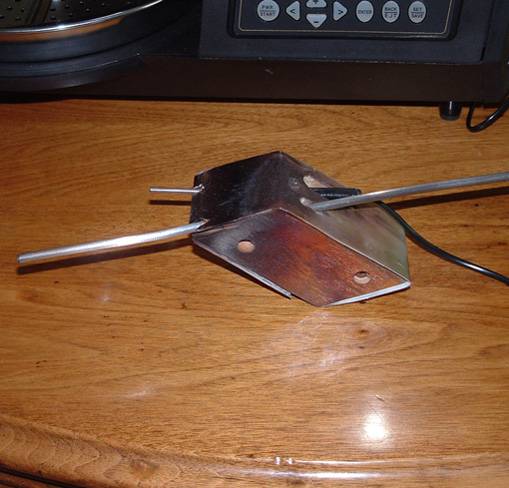
Temporary BMT Probe Since I did not wish to damage my bean chute cover, I opted to make my own probe holder out of materials I had lying around the house. My temporary probe holder is not as pretty as Randy?s, but it does work well. I used a piece of hardwood (maple) and bored holes for two thermocouples: one BMT probe, and one environmental temperature probe. Each end of the wood block was cut on an angle of 50 degrees to match the slope inside the chute; also, the block was cut to a width of 2 inches to fit snuggly inside the HotTop opening. To shield the block from potential heat damage, I wrapped a thin sheet of scrap aluminum around the wood. I used this simple setup successfully for several dozen roasts. Not to worry - the stains on the block in the photo were not caused by spontaneous combustion; they are merely deposits caused by the smoke escaping from the roaster. As it turns out, the spontaneous combustion of hardwood occurs at a higher temperature than that needed to roast coffee beans.
ciel-007 attached the following image:
Ciel... seeking Heaven in my cup with ................................................................................................................. EXPOBAR Brewtus II - MAZZER Mini E - MAHLK?NIG Vario - GeneCafe - RAF-1 Extreme (Modified B-2 HOTTOP) - BellaTaiwan XJ-101
|
|
|
|
| ciel-007 |
Posted on 06/27/2012 10:30 PM
|
|
1 1/2 Pounder Posts: 651 Joined: April 03, 2012 |
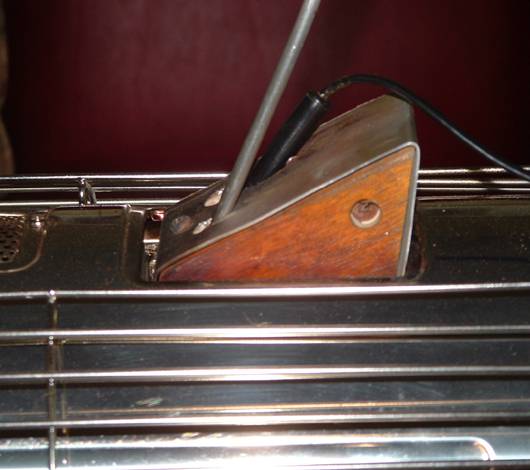
Temporary BMT Probe I found this type of BMT probe modification great for occasional use. Should you decide to make your own temporary BMT probe holder from scratch, I suggest that you consider using metal (instead of wood) for more safety. To avoid burning your fingers, consider removing the handle from the HotTop?s bean chute cover, and attaching it to your new probe holder. I know of one HRO member (snwcmpr) who has done this modification; I would invite Ken to post photos illustrating how he did it. If you expect to use a BMT probe on every roast you conduct, then I suggest you consider installing a more permanent BMT probe, as discussed below.
ciel-007 attached the following image:
Ciel... seeking Heaven in my cup with ................................................................................................................. EXPOBAR Brewtus II - MAZZER Mini E - MAHLK?NIG Vario - GeneCafe - RAF-1 Extreme (Modified B-2 HOTTOP) - BellaTaiwan XJ-101
|
|
|
|
| ciel-007 |
Posted on 06/27/2012 10:32 PM
|
|
1 1/2 Pounder Posts: 651 Joined: April 03, 2012 |
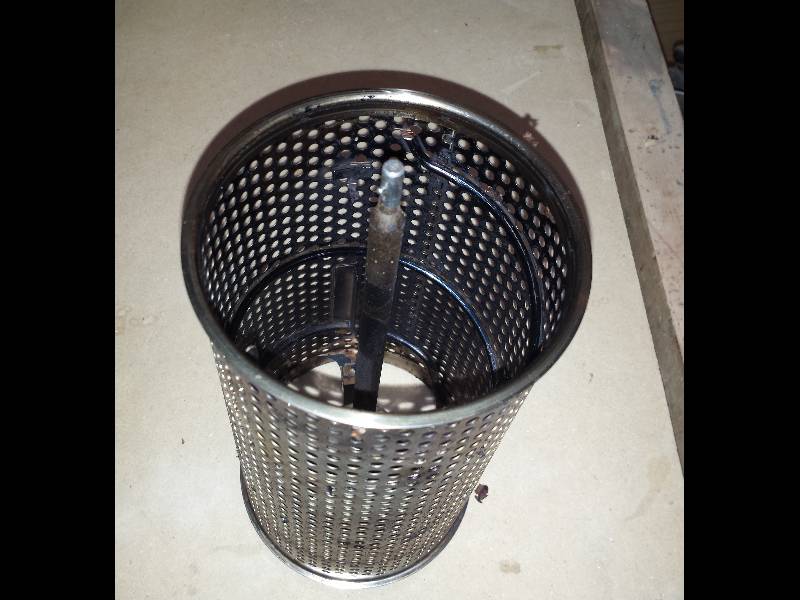
Permanent BMT Probe I was so impressed with the roasting results achieved with the temporary BMT probe above, that I decided to pursue a more permanent fix. With a bit more work, I was able to install a BMT probe through the back wall of the roasting chamber of my HotTop. This allows convenient monitoring without hindering ready access to the bean chute, and without the unsightly wires. I am not the first HRO member to attempt this modification. Cfsheridan posted the results of his work earlier: [url]http://homeroasters.org/php/forum/viewthread.php?thread_id=1180 [/url] Here is one of his photos showing the bean mass probe (red arrow), and the environmental temperature probe (blue arrow) as seen from inside his HotTop?s roasting chamber.
ciel-007 attached the following image:

Ciel... seeking Heaven in my cup with ................................................................................................................. EXPOBAR Brewtus II - MAZZER Mini E - MAHLK?NIG Vario - GeneCafe - RAF-1 Extreme (Modified B-2 HOTTOP) - BellaTaiwan XJ-101
|
|
|
|
| ciel-007 |
Posted on 06/27/2012 10:34 PM
|
|
1 1/2 Pounder Posts: 651 Joined: April 03, 2012 |
Permanent BMT Probe One of the best guides I found to explain the steps involved in installing a permanent BMT probe was prepared by Michael and posted at the following link: [url]http://www.fourpointsroastery.com/installing-et-and-bt-probes-in-your-hottop-roaster/ [/url] Based on his advice, I installed much the same Omega parts that I ordered online: Namely : -one K probe (model # XCIB-K-1-5-3 $37.00) -one mini panel jack (model # MPJ-K-F $2.50) -one retractable sensor cable (model # RSCM-K-1-4-4 $37.00) Most of the installations I have seen used a high temperature compound (like JB Weld), to permanently secure the K probe to the back wall of the roaster. Instead, I opted to use a small clamp to fix the probe to the metal structure inside the roaster.
ciel-007 attached the following image:

Ciel... seeking Heaven in my cup with ................................................................................................................. EXPOBAR Brewtus II - MAZZER Mini E - MAHLK?NIG Vario - GeneCafe - RAF-1 Extreme (Modified B-2 HOTTOP) - BellaTaiwan XJ-101
|
|
|
|
| ciel-007 |
Posted on 06/27/2012 10:36 PM
|
|
1 1/2 Pounder Posts: 651 Joined: April 03, 2012 |
Permanent BMT Probe Using a metal clamp (instead of epoxy) has the advantage of allowing me to easily re-adjust (or replace) the probe should it be required. After testing, I found that the thermocouple yielded the most accurate temperature readings when the tip protruded into the chamber one inch from the back wall. The other end of the probe was attached to a mini K jack mounted on the back panel of my HotTop.
ciel-007 attached the following image:

Ciel... seeking Heaven in my cup with ................................................................................................................. EXPOBAR Brewtus II - MAZZER Mini E - MAHLK?NIG Vario - GeneCafe - RAF-1 Extreme (Modified B-2 HOTTOP) - BellaTaiwan XJ-101
|
|
|
|
| ciel-007 |
Posted on 06/27/2012 10:37 PM
|
|
1 1/2 Pounder Posts: 651 Joined: April 03, 2012 |
Permanent BMT Probe Before re-assembling the roaster, I tucked the excess length of the K probe around the main motor. Once the installation is complete, the only evidence that a modification has been made can be seen is on the back of the roaster ? a yellow mini K jack, waiting to be connected to the thermometer via a retractable sensor cable.
ciel-007 attached the following image:

Ciel... seeking Heaven in my cup with ................................................................................................................. EXPOBAR Brewtus II - MAZZER Mini E - MAHLK?NIG Vario - GeneCafe - RAF-1 Extreme (Modified B-2 HOTTOP) - BellaTaiwan XJ-101
|
|
|
|
| ciel-007 |
Posted on 06/27/2012 10:43 PM
|
|
1 1/2 Pounder Posts: 651 Joined: April 03, 2012 |
Permanent BMT Probe I use this permanently mounted BMT probe on every single roast I perform - and I love it. It?s hard to imagine ever going back to roasting without this modification ? roasting has never been easier. They say that ?anticipating with pleasure ? and ?savoring the moment? are key elements in a happy experience. Well, I think that describes my renewed venture into roasting. With this simple modification, it is now possible for me: - to couple critical readings from the Probe with subtle sounds from the roast - to anticipate the color of the beans? moments before I decide to peak - to savor the fragrance of the roast? even before I elect to inhale If you asked me to put into words what I am experiencing with my modified HotTop, I would have to say: ?it?s the JOY of roasting?. Ciel... seeking Heaven in my cup with ................................................................................................................. EXPOBAR Brewtus II - MAZZER Mini E - MAHLK?NIG Vario - GeneCafe - RAF-1 Extreme (Modified B-2 HOTTOP) - BellaTaiwan XJ-101
|
|
|
|
| ciel-007 |
Posted on 07/15/2012 10:01 PM
|
|
1 1/2 Pounder Posts: 651 Joined: April 03, 2012 |
A Helpful link: Just in case some of you may be thinking about installing a temperature probe inside your roaster, here is a link to a helpful article: http://www.ambexr...robes.html Among other things, Davis and Ribich identify the types of probes that are suited for coffee roasting, and provide advice for the correct placement of the probe in the chamber. The article has lots of practicle advice. For example, your temperature probe should: - be mounted on the side of the drum that is rotating the beans in an upward direction - be completely submerged in the bean mass at all times - extend into the bean mass at a depth that is equal to 10 times the diameter of the probe - etc? The authors feel that: ? no tool has had as profound an effect on the advancement and growth in coffee roasting as temperature probes?. Ciel... seeking Heaven in my cup with ................................................................................................................. EXPOBAR Brewtus II - MAZZER Mini E - MAHLK?NIG Vario - GeneCafe - RAF-1 Extreme (Modified B-2 HOTTOP) - BellaTaiwan XJ-101
|
|
|
|
| smico |
Posted on 07/16/2012 6:03 AM
|
 1/2 Pounder  Posts: 262 Joined: December 17, 2011 |
Quote ciel-007 wrote: - extend into the bean mass at a depth that is equal to 10 times the diameter of For me, real solution is to add thermal insulation between metal parts of the roaster and the probe. I temporarily rolled back to RandyG's chute solution for ET measurement, but with teflon tape insulated probe. My ET readings are perfect now. No delays like when the probe touches metal parts. I heard that fumes from the teflon tape in this application are not healthy, so once I get food grade silicon, I will use it to insulate back wall probes. Miroslav |
|
|
|
| ciel-007 |
Posted on 07/16/2012 11:01 AM
|
|
1 1/2 Pounder Posts: 651 Joined: April 03, 2012 |
Quote smico wrote: I think that main reason for 10 times diameter is to minimise impact of the thermal inertia of the back plate, or roaster itself. For me, real solution is to add thermal insulation between metal parts of the roaster and the probe... Miroslav, that?s an interesting hypothesis, and one that I did not think of testing at the time I installed the probe in my roaster. However, here is a brief description of what I did test for: At the time I installed the probe in my roaster, I was not aware of the above ?10 to 1? guideline. So, I conducted a series of tests to determine the optimal extension of the probe into various environments in order to get the most accurate temperature readings possible. My tests revealed that the probe was most accurate when inserted to a depth of one inch in the various environments I measured; they included ice (32F), boiling water (212F), and the nozzle of a precision heat gun set to 400F (Steinel HL2010e IntelliTemp having a claimed maximum error of 5F). In all cases my probe was most accurate when extended into these media at a length of one inch. Consequently, I mounted the probe horizontally through the backwall of the roaster so that it would extend one inch inside the bean mass. In retrospect, my tests yielded a result that was rather close to the above mentioned 10 to 1 guideline. Given that I have a 1/8? diameter probe, if I had followed the above guideline, that would have meant installing the probe with an extention of 1.25 inches into the roasting chamber. Given that my probe is simply clamped in place (rather than fixed with JB Weld), I may simply prolongue the extension by another ?? at some future date to test if my bean mass temperature readings do change or not. Ciel... seeking Heaven in my cup with ................................................................................................................. EXPOBAR Brewtus II - MAZZER Mini E - MAHLK?NIG Vario - GeneCafe - RAF-1 Extreme (Modified B-2 HOTTOP) - BellaTaiwan XJ-101
|
|
|
|
| smico |
Posted on 07/16/2012 3:30 PM
|
|
1/2 Pounder Posts: 262 Joined: December 17, 2011 |
Oh boy, Ciel, you back up all your claims scientifically. My intuition tells me the furter away from the back wall the better, but things are not that simple obviously. I know from my ET probe that with insulation I have no delays in reading. My plan is to replace current 1/8 with 1/16 probe. I will apply silicone layer inside over the 1/8 hole, let it cure, use some of the tricks that you presented in the front window gasket article - thank you for that. Probe will be touching beans, and it will be supported by silicone and plastic. I think it will make a good proxy for surface bean temperature. Cheers, Miroslav |
|
|
|
| ciel-007 |
Posted on 07/31/2012 2:18 PM
|
|
1 1/2 Pounder Posts: 651 Joined: April 03, 2012 |
Miroslav, I hope that you will post photos of your mods upon completion.
Ciel... seeking Heaven in my cup with ................................................................................................................. EXPOBAR Brewtus II - MAZZER Mini E - MAHLK?NIG Vario - GeneCafe - RAF-1 Extreme (Modified B-2 HOTTOP) - BellaTaiwan XJ-101
|
|
|
|
| smico |
Posted on 08/13/2012 11:33 AM
|
|
1/2 Pounder Posts: 262 Joined: December 17, 2011 |
I hope to finish it within next few days and I will certainly add the pictures. |
|
|
|
| smico |
Posted on 09/18/2012 10:52 PM
|
|
1/2 Pounder Posts: 262 Joined: December 17, 2011 |
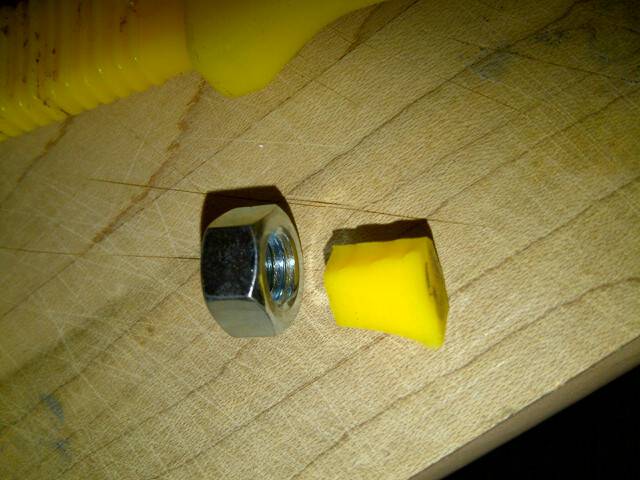
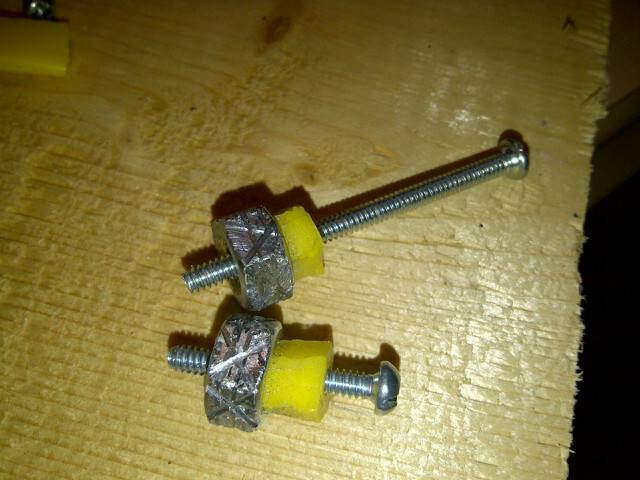
I decided to use piece of silicon cut from kitchen spatula, screw it in big nut, glue the nut to the back wall with JB Weld, and push the thermocouple through the silicone. I tested silicon with temperature controlled Weller soldier, and it started to burn at around 400C, which is more than enough for our application. 1. Cut piece of silicon a bit bigger than the nut 2. Screw the silicone in and drill a hole in center 3. Cut surface of the nut to make sure that JB Weld will have something to hold on. This is very important as my first attempt ended up lasting just one roast. 4. Drill two holes in the HT back wall 5. Fasten the nut to the wall with longer temporary screw 6. Apply JB Weld generously, up to the top of the nut and allow JB Weld to dry overnight. Make sure to cut the surface of the nuts and apply JB Weld on the whole surface. Picture shows my first attempt that was not successful. 7. Take the temporary screws out and push the thermocouples through. Pictures will tell more
smico attached the following images:


Edited by smico on 09/18/2012 11:00 PM Hottop B2 + HTC, Cremina 83, OE Pharos, Brewtus IIIR, Baratza Vario
|
|
|
|
| JimG |
Posted on 09/19/2012 8:16 AM
|
|
1 1/2 Pounder Posts: 834 Joined: October 23, 2008 |
Brilliant! Using the silicon plugs is a great idea. Jim |
|
|
|
| ciel-007 |
Posted on 09/23/2012 12:38 PM
|
|
1 1/2 Pounder Posts: 651 Joined: April 03, 2012 |
Miroslav, congratulations on a very informative and detailed post. I like the ingenious idea of using silicone from a spatula. I?m now looking forward to see you reporting your cracking temperatures in the First Crack? Second Crack thread.
Ciel... seeking Heaven in my cup with ................................................................................................................. EXPOBAR Brewtus II - MAZZER Mini E - MAHLK?NIG Vario - GeneCafe - RAF-1 Extreme (Modified B-2 HOTTOP) - BellaTaiwan XJ-101
|
|
|
|
| century |
Posted on 10/29/2012 2:41 PM
|
|
Newbie  Posts: 3 Joined: October 28, 2012 |
Does the permanent and temporary achieve the same accuracy in temp readings? Im not handy with this stuff but can work out the temp. version easily enough (with Randy's template), so its a better option. But would like to know if there is a difference in readings and/or accuracy. |
|
|
|
| ciel-007 |
Posted on 10/29/2012 4:34 PM
|
|
1 1/2 Pounder Posts: 651 Joined: April 03, 2012 |
Quote With either mod, the BMT probe ends up in approximately the same location in the chamber, and approximately the same depth in the bean mass; so that should not affect accuracy significantly. Perhaps the most important factor in accuracy is the quality of the probe itself. I opted for Omega primarily because of their reputation for precision instrumentation. However, other HRO members may be able to recommend other good brands that cost less. Ciel... seeking Heaven in my cup with ................................................................................................................. EXPOBAR Brewtus II - MAZZER Mini E - MAHLK?NIG Vario - GeneCafe - RAF-1 Extreme (Modified B-2 HOTTOP) - BellaTaiwan XJ-101
|
|
|
|
| smico |
Posted on 12/25/2012 11:03 AM
|
|
1/2 Pounder Posts: 262 Joined: December 17, 2011 |
Quote century wrote: Does the permanent and temporary achieve the same accuracy in temp readings? Im not handy with this stuff but can work out the temp. version easily enough (with Randy's template), so its a better option. But would like to know if there is a difference in readings and/or accuracy. My first installation was based on Randy's template. As probes ended up at the same hight, readings were very close. I would say the thermal insulation for ET probe is important whether you use Randy's template or backwall. ET temperature is leading indicator for BT, and you want to see the change as soon as possible. And lastly, Randy himself installed thermocouples on the backwall as permanent solution. Cheers, Miroslav Hottop B2 + HTC, Cremina 83, OE Pharos, Brewtus IIIR, Baratza Vario
|
|
|
|
| MarkJames |
Posted on 02/01/2014 10:19 PM
|
|
Newbie Posts: 13 Joined: February 01, 2014 |
I know I'm a little late to this party but I just got here :) I thought I'd put in my two bits. I installed a K-style probe in my HotTop a few months ago but took a different approach. I read all the articles that you referenced in this very thorough post and then decided that I wanted a thermocouple that was completely immersed in beans. To that end I purchased a 4inch K-style grounded thermocouple. It's impossible to mount this to the roaster back without cutting the cross braces of the drum as the drum would otherwise break the thermocouple immediately. So I removed the cross braces. That caused the drum to wobble when turning. In for a penny and all that jazz I then added two ball bearings to the back of the roaster that rest against the inside surface of the drum. With those in place the drum spins true (actually it spins better than it did new) and my thermocouple lives happily in pretty much half the drum's worth of bean mass. I don't have anythiing to compare it to other than the HT thermocouple (which is useless on mine) but I get very consistent results from it. I've yet to install an ET probe and I'm not really sure I will but if I do I think I'll get a K-style probe like the ones in the new HT roasters and mount it near the top out of the bean mass. There's a picture of the bearings and the 4" thermocouple in my post about a HT bean dumper. Lots of ways to skin a cat! Mark |
|
|
|
| smico |
Posted on 02/02/2014 7:05 AM
|
|
1/2 Pounder Posts: 262 Joined: December 17, 2011 |
Hi again Mark. Ciel's series became reference for HT modifications and it would be great if you can repost the picture here. Your original approach is quite unique. As for the ET probe, I would highly recommend thermal insulation from the hot backwall. I forgot to ask, are the bearings inside or outside the drum. Inside I guess, but just to be sure. Hottop B2 + HTC, Cremina 83, OE Pharos, Brewtus IIIR, Baratza Vario
|
|
|
|
| MarkJames |
Posted on 02/02/2014 1:39 PM
|
|
Newbie Posts: 13 Joined: February 01, 2014 |
No problem at all. I took a few more photos to help out. Sorry that my HT is so nasty looking inside. I've had it since 2004 or so and it's done thousands of roasts since. I've long ago stopped being too fussy about cleaning it. I think you can see in the photo the cut ends where the crossbrace was removed from the drum. I wasn't planning on documenting this so I don't have a picture of the drum with crossbrace in place. Perhaps someone who does could post one for a contrast or send it to me and I'll edit this post with it. The back wall photos I think you can see the bearings mounted against the back wall with cap head screws secured on the other side with nylocks. I carefully marked these with them on the end of a magnet with the drum in place and then drilled the holes and mounted them. Several problems arose once they were in. The first was that the spiral bean agitator wire on the drum extended too close to the back edge and was hitting the bearings so I had to grind that back with a dremel tool. The next problem was that the drum itself turned out not to be a perfect circle so as it spun it got to narrower and wider portions. This put stress on the motor that made me unhappy. It turned out that the solution to this was quite simple - just leave the nut holding the bearings to the back wall a little loose so they can wobble a couple of mm. That solved the problem instantly and there have been no issues since. As it rotates you occasionally hear a bean get squeezed between the drum and bearing but it just pops back out immediately and doesn't seem to cause any trouble. I've done about 30 roasts with it like this so far and can't see any issues. You can see how long the thermocouple is in the chamber. I don' t know if this is a good thing or bad thing but my gut said that 'bigger is better' Mark
MarkJames attached the following images:


|
|
|
|

Page 1 of 2: 12
| Jump to Forum: |
Powered by PHP-Fusion Copyright © 2024 PHP-Fusion Inc
Released as free software without warranties under GNU Affero GPL v3
Designed with ♥ by NetriXHosted by skpacman