
Login

Shoutbox
You must login to post a message.
renatoa
07/26/2024 3:49 PM
Bill grubbe and Jk, 
allenb
07/26/2024 5:15 AM
Spiderkw Welcome to HRO!

renatoa
07/24/2024 8:31 AM
ramiroflores and John123,

 ?
?
?renatoa
07/21/2024 1:18 AM
 , Luislobo
renatoa
07/19/2024 11:28 AM
Koepea,
Forum Threads
Newest Threads
Skywalker roaster modsBackground Roast Iss...
Hello from Arkansas
TC4ESP
Green coffee reviews
Hottest Threads
| Skywalker roaster... | [375] |
| TC4ESP | [115] |
| War on Farmers by... | [47] |
| Adventures in flu... | [26] |
| Hello! (soon) Roa... | [17] |
In Memory Of Ginny

Donations
Latest Donations
dmccallum - 10.00
JackH - 25.00
snwcmpr - 10.00
Anonymous - 2.00
Anonymous - 5.00
dmccallum - 10.00
JackH - 25.00
snwcmpr - 10.00
Anonymous - 2.00
Anonymous - 5.00
Users Online
Guests Online: 5
Members Online: 0
Total Members: 8,393
Newest Member: Bill grubbe
Members Online: 0
Total Members: 8,393
Newest Member: Bill grubbe
View Thread
Who is here? 1 guest(s)
 Enhancing My HotTop (5 of 5) ? Advanced Modifications
|
|
| ciel-007 |
Posted on 11/11/2012 11:04 PM
|
 1 1/2 Pounder  Posts: 651 Joined: April 03, 2012 |
Enhancing My HotTop (5 of 5) ? Advanced Modifications This is the final post in a series about my HotTop. Earlier posts covered: 1- Potential HotTop annoyances: 2- Monitoring Beam Mass Temperature 3- Handling Chaff, and 4- Filtering, Smoking and Venting Issues In addition to the above, there are important annoyances that require attention. More specifically, when doing back-to-back roasting, the current design forces the user to wait for the HotTop to cool down before proceeding to the next roast; some users report delays of up to 20 minutes. The delay results from the fact that the HotTop is programmed to prevent re-starting before the temperature in the chamber has fallen to 165F. Another potential annoyance is the absence of a tryer function on the face of the roaster. The tryer has become an invaluable tool for professionals when roasting new beans, and/or when developing new profiles; the tryer allows the user to draw bean samples at various stages for the roast. Further, being able to dump small portions of the roast at different stages (ex. between First Crack and Second Crack) allows one to develop ?m?lange? roasts that tend to enhance cup flavor and complexity. Last but not least, wouldn?t it be wonderful if there was some way for the HotTop to automatically replicate roasts, back to back, with uncanny accuracy with the assistance of a computer? Addressing these issues requires peering deep inside the HotTop. As a result, the steps discussed below are more involved than those described in my earlier posts. However, the advanced modifications that follow will further enhance your HotTop roasting experience by providing: - Accelerated cool-downs - Cracking the ?165F Barrier? for the next roast - Full tryer function and ?m?lange? roast capabilities - Manual cooling tray bean agitation - Fast back to back roasting - Total computer control of the HotTop I have attached a photo of my HotTop?s Control Panel after some of those modifications were made. The modifications are experimental ones intended for hobbyists familiar with basic electronics principles. Also, the modifications may disable some safety features found in your factory HotTop, and may possibly void the original manufacturer?s warranty
ciel-007 attached the following image:
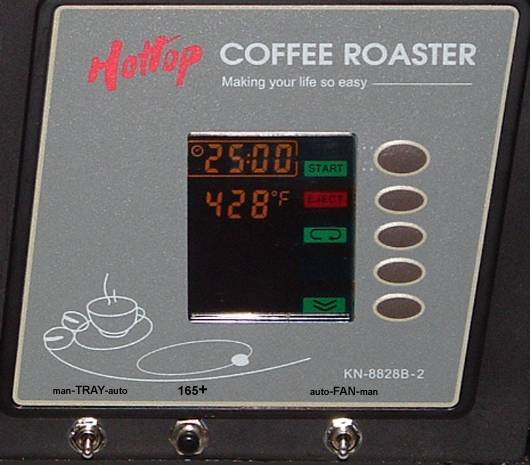
Ciel... seeking Heaven in my cup with ................................................................................................................. EXPOBAR Brewtus II - MAZZER Mini E - MAHLK?NIG Vario - GeneCafe - RAF-1 Extreme (Modified B-2 HOTTOP) - BellaTaiwan XJ-101
|
|
|
|
| ciel-007 |
Posted on 11/11/2012 11:06 PM
|
|
1 1/2 Pounder Posts: 651 Joined: April 03, 2012 |
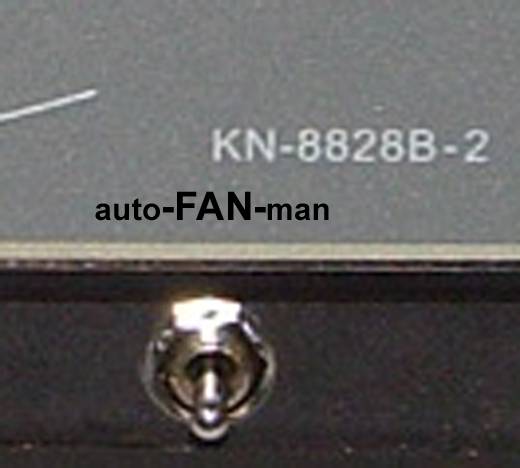
What About Those Connectors Behind the Control Panel? Before proceeding with the advanced modifications, we must first understand the electrical connections behind the Control Panel. The Control Panel can be removed by gently prying it loose from the roaster body with a flat blade screwdriver. The back of the Control Panel (HotTop models KN8828B, KN8828P, KN8828B-2 and KN8828P-2) has 3 connectors: - a large connector for the Main Control Cable (8 wires) - a smaller connector for the Chaff Tray Safety Switch Cable - an even smaller connector for the Thermal Sensor Cable (2 wires) The connectors and cables are shown in the attached photos - note the differences between the ?B? and ?P? Control Panels.
ciel-007 attached the following images:
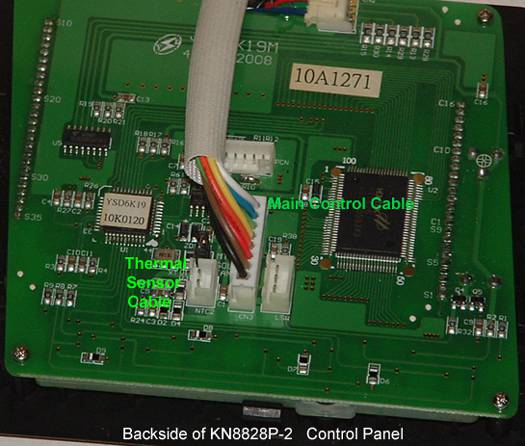
Ciel... seeking Heaven in my cup with ................................................................................................................. EXPOBAR Brewtus II - MAZZER Mini E - MAHLK?NIG Vario - GeneCafe - RAF-1 Extreme (Modified B-2 HOTTOP) - BellaTaiwan XJ-101
|
|
|
|
| ciel-007 |
Posted on 11/11/2012 11:09 PM
|
|
1 1/2 Pounder Posts: 651 Joined: April 03, 2012 |
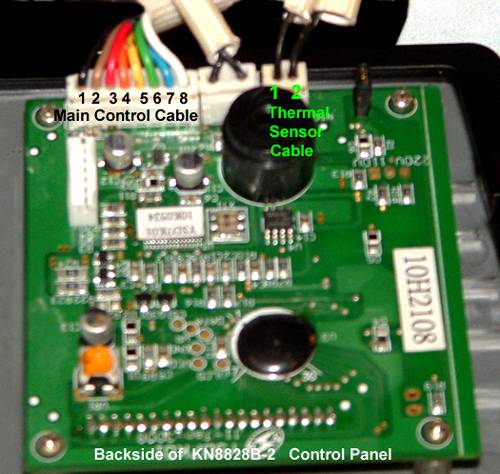
What Does Each Colored Wire Do? Before making any changes to the wires on the Main Control Cable of the HotTop (Models KN8828B, KN8828P, KN8828B-2 and KN8828P-2 ), let?s take a look at the function of each colored wire: 1 (Black), 0.0 VDC, Ground 2 (Brown), 5.2 VDC, 3 (Red) 1.6 VDC, Main Cooling Fan 4 (Orange), 1.6 VDC, Eject Solenoid 5 (Yellow), 2.1 VDC, Bean Agitator Arm Motor 6 (Green), 2.1 VDC, Roasting Drum Motor 7 (Blue), 2.1 VDC, Heating Element 8 (White), 3.2 VDC, Interrupt With the above information in hand, it is now possible to make simple modifications to the above wires, once the Main Control Cable has been unplugged from the Control Panel. To access a specific colored wire, the white heat shield surrounding the cable must first be pushed back. The individual wires may then be cut (or the insulation removed) in order to permit soldering of new connections.
ciel-007 attached the following image:

Ciel... seeking Heaven in my cup with ................................................................................................................. EXPOBAR Brewtus II - MAZZER Mini E - MAHLK?NIG Vario - GeneCafe - RAF-1 Extreme (Modified B-2 HOTTOP) - BellaTaiwan XJ-101
|
|
|
|
| ciel-007 |
Posted on 11/11/2012 11:12 PM
|
|
1 1/2 Pounder Posts: 651 Joined: April 03, 2012 |
Faster Cool Downs After Ejecting the Beans: When doing back to back roasting, the original design of the HotTop calls for mandatory cooling of the roaster down to 165F before beginning the next roast. Here are a couple of ways to shorten the cool down time. 1) Cooling Down a Factory HotTop: If you have an unmodified (factory) HotTop, here is a method for speeding up cooling of the roaster. As soon as the beans have ejected into the cooling tray, remove the chaff drawer, the bean chute cover, and the filter on the back; this will maximize the flow of cool air through the hot chamber. While the beans are still moving around in the cooling tray, I use my shop-vac to remove any remaining chaff in the roaster (see my earlier post - Part 3 of 5). Once the bean agitation arm has stopped, the power to the roaster will shut down, and the main cooling fan will stop. At this stage, the HotTop will still be too hot to launch into the next roast; trying to start the HotTop when its temperature is still above 165F, will automatically send the roaster into bean cooling mode for 30 seconds. Go ahead and do just that. You may repeat this process as often as needed, until the roaster has cooled down to 165F, at which point you will be able to begin the next roast. However, should this cooling method be too slow for your needs, then consider the modification described below. 2) Adding a Cooling Fan Switch: It is possible to speed up cooling by manually activating the main cooling fan when the HotTop has powered down. This involves cutting the red wire on the Main Control Cable and installing a Single Pole Double Throw (SPDT) switch in the circuit. The SPDT switch has two functions. On one hand, it allows the red wire to be kept in the default position so that the HotTop can automatically control the fan during roasting. On the other hand, it also allows you to take manual control of the cooling fan once the beans have ejected from the roaster. The modification is illustrated in the diagram below. The red wire of the HotTop has been cut and the ends soldered to poles 1 and 2 of the SPDT switch. The end of the red wire going to the Control Panel is connected to pole 2. Pole 3 of the switch is connected to the black wire on the Control Cable. (Note that the red and black wires that you see in the photo are extension wires added by me to facilitate connections; they are connected to the switch and to the Control Cable. The actual soldered connections to the control cable were made after the white heat shield surrounding the cable was pushed back out of the way.) Once installed, the SPDT switch must be left in the default position (continuity in the red wire - as seen in the diagram and the photo showing the numbered wires) when the HotTop is roasting; that?s because the HotTop?s main control board must communicate at all times with the cooling fan (to vary speed during roasting). The switch may be placed in cooling mode only after the HotTop has ejected the beans, or after the HotTop has powered down; the fan will remain on indefinitely until you flick the switch back to the default position. Once the HotTop has powered down, the Control Panel will be blank and you will no longer be able to see the temperature inside the HotTop. However, that will not be a problem if you have installed a BMT (as discussed in my earlier post - Part 2 of 5); you can monitor the declining temperature in the HotTop by glancing at the digital thermometer attached to the BMT probe inside the roaster. Once you have reached the desired cool down temperature, you must return the switch to its default position before beginning the next roast. 3) When Might Preventing Cool Downs be Useful? This modification can also allow you to prevent your HotTop from cooling down in the event that you wish to maintain a high temperature in the chamber for the next roast. One of the photos shows the switch mounted below the Control Panel of my HotTop. In that photo the switch is seen in the center (neutral) position, where the circuit is open and no power is flowing through the red wire. That neutral position can be used to stop the cooling fan at any time. I sometimes use the neutral switch position to meet special needs. For example, I might use the switch to stop the fan in order to: 1) lower the noise level so that I may better hear the earliest signs of First Crack (so that I may quickly change the roaster settings for certain bean profiles at this critical juncture), or 2) to prevent the HotTop from cooling down during back-to-back roasts (so that I may drop the beans in a chamber that is already heated to 350F or more; however, in order to do this you will need to make the modification shown below).
ciel-007 attached the following images:
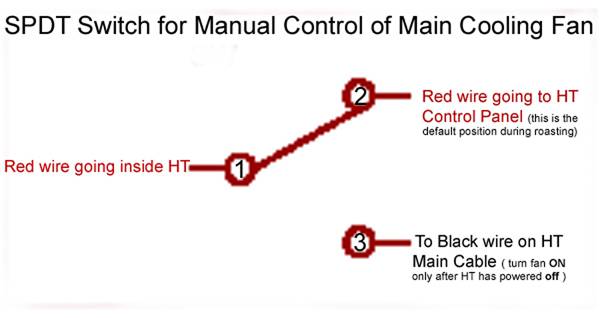

Ciel... seeking Heaven in my cup with ................................................................................................................. EXPOBAR Brewtus II - MAZZER Mini E - MAHLK?NIG Vario - GeneCafe - RAF-1 Extreme (Modified B-2 HOTTOP) - BellaTaiwan XJ-101
|
|
|
|
| ciel-007 |
Posted on 11/11/2012 11:17 PM
|
|
1 1/2 Pounder Posts: 651 Joined: April 03, 2012 |
Cracking the ?165F Barrier?: The HotTop is programmed to prevent another roast from starting until the chamber has cooled to 165F; it is an annoying ?barrier? standing in the way of your next roast. The delay caused by the ?165F Barrier? can be especially annoying for those wishing to drop green beans at much higher chamber temperatures. Cracking the ?165F Barrier? has enhanced my enjoyment by speeding up my back to back roasting considerably. ?Breaking the 165F Barrier? is one of my favorite mods for two reasons: 1) it allows me to launch the next roast as soon as the recently ejected beans have finished cooling, and 2) I find that dropping green beans in a roasting chamber that is already pre-heated to 350F can yield much more flavorful results in my cup. This modification involves disconnecting the Thermal Sensor (found inside the roasting chamber) from the Control Panel at the instant when the HotTop is being started. You can temporarily ?disconnect? the sensor by adding an ?On-Off? switch on either one of the two wires connected to the sensor. Since this switch requires being in the ?off? position for a very brief moment, I have used a momentary (normally closed) switch for this purpose. The diagram below shows how both ends of the cut wire have been soldered to the poles of the momentary switch. The photo shows two new wires (red wire extensions that I added) coming from the momentary switch and running underneath the protective heat shield to one of the black wires connected to the Thermal Sensor; the actual cutting of the black Thermal Sensor wire, and the connections to the red extension wires, were made after the white heat shield was pushed back out of the way. Once this modification has been made, you may re-start roasting when the HotTop is way above 165F by following these steps: 1) Enter your favorite roast settings using the Control Panel as usual but do not push ?START? just yet; 2) next, push the new Momentary Switch a split second before you to push the ?START? button on the Control Panel; 3) release both buttons right away. This will trick the Control Panel into thinking that the temperature in the HotTop roaster is actually below 165F at startup. With this modification, I have launched back to back roasts when the temperature showing on the Control Panel exceeded 400F. When Might Breaking the ?428F Ceiling? be Useful? Although I have not tried it, a variation on the above modification might theoretically allow you to continue roasting when the temperature inside the HotTop exceeds 428F; 428F is the ?ceiling? temperature at which the HotTop has been programmed to eject the beans automatically for security reasons. One of the photos shows the momentary switch mounted below the Control Panel on my HotTop. It should be possible to break the ?428F Ceiling? by replacing the momentary switch with a regular toggle switch. By flicking this toggle switch to the Open (Off) position, it may be possible to fool the emergency ejecting program, and thus allow the roasting process to continue beyond the ceiling temperature of 428F. Such a manual override of the 428F Ceiling might potentially be helpful to those users who are experiencing challenges in getting the HotTop to sustain temperatures that are high enough to achieve very dark levels such as a Spanish Roast. Should you elect to try this mod, you will need to carefully monitor BMT in order to minimize the risk of fire.
ciel-007 attached the following images:


Ciel... seeking Heaven in my cup with ................................................................................................................. EXPOBAR Brewtus II - MAZZER Mini E - MAHLK?NIG Vario - GeneCafe - RAF-1 Extreme (Modified B-2 HOTTOP) - BellaTaiwan XJ-101
|
|
|
|
| ciel-007 |
Posted on 11/11/2012 11:19 PM
|
|
1 1/2 Pounder Posts: 651 Joined: April 03, 2012 |
Tryer Function and Partial Bean Dumps During Roasting: If you happen to own one of the following HotTop models (KN8828B-2, KN8828P-2, KN8828B-2K and KN8828P-2K) you may have already discovered that it is possible to dump a portion of the beans during roasting without ejecting the entire load. This is accomplished by briefly pulling on the Emergency Eject Knob on the back of the HotTop. This handy function allows you to take samples from different roast levels (different bean mass temperatures) when trying out new beans to more easily find the ?sweet ? spot you are looking for. Further, this function also makes it possible to create a ?melange? roast with your favourite beans. I use this function all the time to create a melange of roasted beans that I dump at several different temperatures (typically between 1C and 2C for espresso) to enhance cup flavour and complexity. Older HotTop models (KN8828, KN8828D, KN8828B or KN-8828P) do not have an Emergency Eject Knob on the back. However, it is possible to add a similar tryer function if you wish. To do this, a small hole must be drilled through the Rear Cover of the HotTop; then a small metal rod (or wire) may be inserted through the hole, and attached to the ejection door arm in the vicinity of the Bean Ejection Solenoid. If you choose to do partial bean dumps in this manner, then you will likely want to consider the next modification below in order to begin cooling the hot beans as soon as they fall into the stationary cooling tray.
ciel-007 attached the following image:

Ciel... seeking Heaven in my cup with ................................................................................................................. EXPOBAR Brewtus II - MAZZER Mini E - MAHLK?NIG Vario - GeneCafe - RAF-1 Extreme (Modified B-2 HOTTOP) - BellaTaiwan XJ-101
|
|
|
|
| ciel-007 |
Posted on 11/11/2012 11:21 PM
|
|
1 1/2 Pounder Posts: 651 Joined: April 03, 2012 |
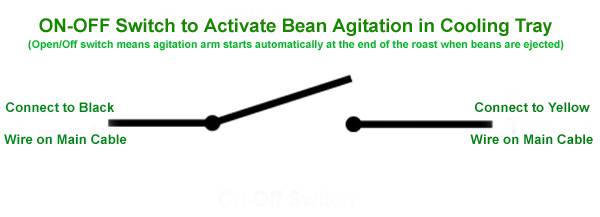
Manually Activating Bean Agitation in the Cooling Tray: The current design of the HotTop calls for the cooling tray to be activated automatically at the end of the roasting cycle when all of the smoldering beans are ejected from the roasting chamber. When using the above tryer (or m?lange roast) function, it is vital that the hot beans be cooled as soon as they fall from the roaster. By manually establishing a connection between the Yellow wire and the Black Wire on the Main Control Cable, it is possible to activate the bean agitation arm in the cooling tray at will. This modification is illustrated in the diagram and photo below. The modification does not require that the Yellow or Black Wires actually be severed; you may simply remove some protective insulation in order to solder the new connections. The default position for the switch is in the OFF (Open) position; this is the position where the bean agitation arm will be automatically activated at the end of the roast when all of the beans are being ejected into the cooling tray.
ciel-007 attached the following images:

Ciel... seeking Heaven in my cup with ................................................................................................................. EXPOBAR Brewtus II - MAZZER Mini E - MAHLK?NIG Vario - GeneCafe - RAF-1 Extreme (Modified B-2 HOTTOP) - BellaTaiwan XJ-101
|
|
|
|
| ciel-007 |
Posted on 11/11/2012 11:22 PM
|
|
1 1/2 Pounder Posts: 651 Joined: April 03, 2012 |
Instant Back to Back Roasting: Once the HotTop has been enhanced with the ?Cracking the 165F Barrier? modification, and the ?Manually Activating Bean Agitation in the Cooling Tray? modification, it becomes possible to conduct back to back roasts without delay. For example, I have tried this feature when roasting large quantities of almonds. Using this method, I was able to roast 3 lbs of almonds in about 40 minutes or so. The steps involved are as follows: 1) manually activate bean cooling agitation arm, 2) eject the first batch of roasted almonds into the cooling tray, 3) reset the chaff tray, 4) reset the HotTop roaster, and 5) launch the next almond roast using the ?cracking the 165F barrier? mod. With a bit of practice, the above steps can be performed very quickly. I have launched instant back to back roasts when the chamber temperature was still at 400F. Ciel... seeking Heaven in my cup with ................................................................................................................. EXPOBAR Brewtus II - MAZZER Mini E - MAHLK?NIG Vario - GeneCafe - RAF-1 Extreme (Modified B-2 HOTTOP) - BellaTaiwan XJ-101
|
|
|
|
| ciel-007 |
Posted on 11/11/2012 11:31 PM
|
|
1 1/2 Pounder Posts: 651 Joined: April 03, 2012 |
The Ultimate HotTop Enhancement - The HCT Interface Board: Perhaps the most significant HotTop enhancement of all time is the amazing HCT Interface Board. The HTC Interface Board allows the HotTop to be connected to a computer, and thus allow total control over all aspects of the complex roasting process. Further, the HCT modification allows anyone to replicate roasts, back to back, with accuracy. In order to accomplish the above, you will need the following: 1) a HotTop roaster, 2) a TC4C Temperature Controller Board (reads thermocouple sensors, converts the readings to digital values, sends them to a computer and then in return accepts instructions from the computer for controlling heater and fan settings), 3) an HTC Electronic Interface (installed between the TC4C and the HotTop which permits the computer to take control of the HotTop?s heater and fan as needed). (The TC4C and the HTC were developed by Bill Welch and Jim Galt, and offered by MLG Properties), http://www.mlgp-l...index.html 4) a USB connection to a computer with an Operating System such as Linux, Mac, or Windows, 5) the RoastLogger software (written by Tom Coxon) installed on the computer. The software monitors bean and environmental temperatures, and then adjusts the HotTop?s heat and fan settings. http://homepage.n...logger.htm 6) a copy of the great instruction manual prepared by Randy Glass http://www.mlgp-l...e-v100.pdf With the above advanced modification, your little HotTop home roaster may be enhanced to the point of rivaling the performance of one of those expensive commercial drum roasters. Here is a link to the HRO thread about this mod: http://homeroaste...post_38852 Here is a link to a thread with photos illustrating Ron?s conversion: http://homeroaste...post_39802 The following photo by Ron (Silron1 at TooMuchCoffee) shows a HotTop conversion to full computer (MacBookAir) control. Ron says: ?The control given and ease of use are unbelievably remarkable? Repeatability is uncanny, I found every minute of a previous roast followed exactly? In my opinion if you have a Hottop and do not do the conversion you are only using half its capabilities??
ciel-007 attached the following image:

Ciel... seeking Heaven in my cup with ................................................................................................................. EXPOBAR Brewtus II - MAZZER Mini E - MAHLK?NIG Vario - GeneCafe - RAF-1 Extreme (Modified B-2 HOTTOP) - BellaTaiwan XJ-101
|
|
|
|
| ronsil |
Posted on 11/12/2012 6:19 AM
|
 Newbie  Posts: 21 Joined: October 27, 2012 |
Great piece of information. You have put a lot of work into this, for sure. Regarding 'back to back' (or almost) roasting. I am a little concerned about the electronics heat up. Now I know the mother boards area in reality keeps reasonable cool but what about the electronics themselves. Do you not think they require a reasonable cool down period between roasts? Although I did the full conversion to computer control, & enjoying every minute of it, I am not really an 'electronics' man. So I am anxious about burning out any parts of the 3 mother boards I now have installed by making the parts work overtime without enough cool down. I would love to quickly, mechanically get back to my start, drop in, temp of 176C to restart the next roast but does this give enough cool down for the working electronics?. Maybe jimG who built two of the boards, would like to comment on this? Ron
|
|
|
|
| ciel-007 |
Posted on 11/18/2012 1:55 PM
|
|
1 1/2 Pounder Posts: 651 Joined: April 03, 2012 |
Quote ronsil wrote: Great piece of information. You have put a lot of work into this, for sure... Regarding 'back to back' (or almost) roasting. I am a little concerned about the electronics heat up... Thanks Ron. You raised excellent points concerning the possible impact of heat on delicate electronic components inside the HotTop. Before posting my modifications, I conducted over a hundred roasts in order to test them (except for the HCT Board mod). At no time did I notice an unusual amount of heat building up in the area of the roaster where the electonic components are housed. More specifically, during the trials, I periodically placed my hand on critical areas of the roaster housing (ex. the control panel, the lower back portion of the housing, etc?), but did not notice a significant increase in temperature. Ron, your question has piqued my curiosity; I am now planning to examine this potential problem in a more empirical manner. As soon as I can find time, I will undertake a series of back to back roasting trials at high chamber temperatures. I have an extra K probe, and intend to use it to monitor the range of thermal fluctuations over the main circuit board during roasting. I will document my findings and intend to post the results here. Should observed thermal levels turn out to present a threat to the electronic components inside my HotTop, I will see what cooling mods might conceivably be advanced to safeguard the delicate circuitry. Edited by ciel-007 on 11/18/2012 2:05 PM Ciel... seeking Heaven in my cup with ................................................................................................................. EXPOBAR Brewtus II - MAZZER Mini E - MAHLK?NIG Vario - GeneCafe - RAF-1 Extreme (Modified B-2 HOTTOP) - BellaTaiwan XJ-101
|
|
|
|
| snwcmpr |
Posted on 11/18/2012 4:21 PM
|
 1 1/2 Pounder Posts: 925 Joined: March 03, 2011 |
I wait to cool the roaster to room temp, or the roast program I use is off on the timing. But, like Ginny said, I have other things to do. I do remove the chaff drawer and cover. If I need to roast sooner, I run my Eureka Boss vacuum in reverse mode into the roast chamber. Ken in NC --------------
Backwoods Roaster "I wish I could taste as well as I wish I could roast." As Abraham Lincoln said "Do not trust everything you read on the internet". |
|
|
|
| ronsil |
Posted on 11/18/2012 10:30 PM
|
|
Newbie Posts: 21 Joined: October 27, 2012 |
Quote Should observed thermal levels turn out to present a threat to the electronic components inside my HotTop, I will see what cooling mods might conceivably be advanced to safeguard the delicate circuitry. Thank you for that Ron
|
|
|
|
| smico |
Posted on 11/19/2012 7:20 PM
|
 1/2 Pounder  Posts: 262 Joined: December 17, 2011 |
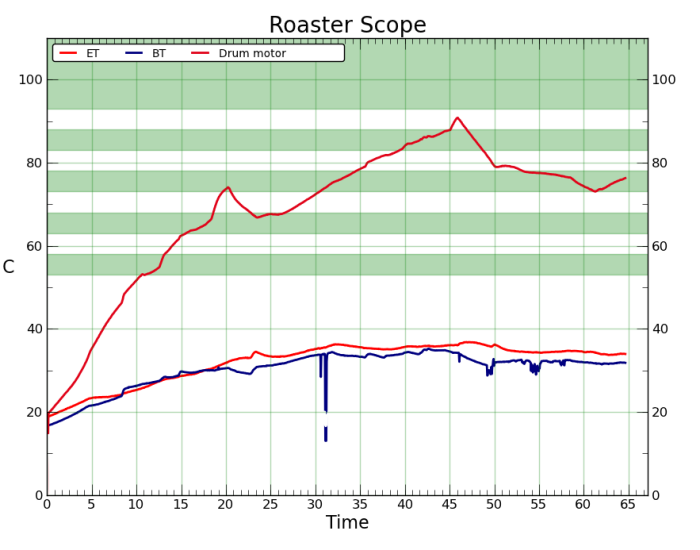
Quote ronsil wrote: Great piece of information. You have put a lot of work into this, for sure. Regarding 'back to back' (or almost) roasting. I am a little concerned about the electronics heat up. Now I know the mother boards area in reality keeps reasonable cool but what about the electronics themselves. Do you not think they require a reasonable cool down period between roasts? From my measurements there is nothing to worry about electronics area. I have two thermocouples in the electronics area (BT and ET), and temperatures are always lower than 40C. Temperature of the drum motor is somewhat worrisome. It builds up to 90C.
smico attached the following image:
Hottop B2 + HTC, Cremina 83, OE Pharos, Brewtus IIIR, Baratza Vario
|
|
|
|
| ciel-007 |
Posted on 11/24/2012 8:47 AM
|
|
1 1/2 Pounder Posts: 651 Joined: April 03, 2012 |
Quote Hi Ginny, and thank you for sharing your HotTop roasting experiences. Your words describe how I felt about ?back to back? roasting when I began using my HotTop. Those very words are why I started thinking about mods that might possibly help reduce the delay between successive roasts. Although this thread describes several experiments that I conducted with my HotTop, it did not make recommendations because of the caveats that I outlined at the beginning of the thread, and the concern that Ronsil raised. You asked about time, and I can provide an example for one modification that I frequently use. The HotTop?s cooling tray does a great job of chilling the hot beans discharged from the chamber (in contrast to my Gene Cafe), and I like using this HotTop feature on every roast. One of my favorite back to back techniques is to begin the next roast as soon as the bean agitation arm in the tray comes to a full stop. In other words, it takes about 4 minutes between the time when the hot beans are ejected from the chamber, and the time when I drop fresh green beans down the chute for the next roast. Roasting 300 grams of beans in this manner takes about 20 minutes. Expressed another way, that?s about one hour for 3 successive batches that provide me with nearly 2 lbs of roast. At the moment when I launch the follow-up roast the chamber is still quite hot (approximately 325F - 355F). Hence, starting the next roast at this high temperature requires a simple modification (?Cracking the 165F Barrier?) described earlier. http://homeroaste...post_40018 Ciel... seeking Heaven in my cup with ................................................................................................................. EXPOBAR Brewtus II - MAZZER Mini E - MAHLK?NIG Vario - GeneCafe - RAF-1 Extreme (Modified B-2 HOTTOP) - BellaTaiwan XJ-101
|
|
|
|
| ciel-007 |
Posted on 11/24/2012 11:17 PM
|
|
1 1/2 Pounder Posts: 651 Joined: April 03, 2012 |
Quote smico wrote: I just did two back to back roasts, and attached is temperature graph. From my measurements there is nothing to worry about electronics area... temperatures are always lower than 40C. Temperature of the drum motor... builds up to 90C. Miroslav, thank you for posting these valuable insights. Your results are encouraging for HotTop owners who might be considering some of the above mods, yet remain concerned about potential thermal harm to internal electronic components. The temperature curves you posted are especially revealing. Would it be possible to provide a few additional details about your findings? For example, can you tell us the time at which you ejected the beans of the first roast, and the times at which the second roast began and ended? Can you talk about the cooling fan speeds during each roast? Did you take any special steps (remove back filter, open chaff tray, etc?) to accelerate cooling the roaster between roasts? Also, can you say why the BT curve dipped as it did around 32 minutes? Finally, can you provide details (photos?) about the placement of the probes used to collect these data? Keep up the great work, Ciel Ciel... seeking Heaven in my cup with ................................................................................................................. EXPOBAR Brewtus II - MAZZER Mini E - MAHLK?NIG Vario - GeneCafe - RAF-1 Extreme (Modified B-2 HOTTOP) - BellaTaiwan XJ-101
|
|
|
|
| smico |
Posted on 11/25/2012 8:11 AM
|
|
1/2 Pounder Posts: 262 Joined: December 17, 2011 |
Ciel, I should learn to make proper presentations from you. Later on I will record another roasts, and record events. I took some pictures to show placements of temperature probes.
smico attached the following images:


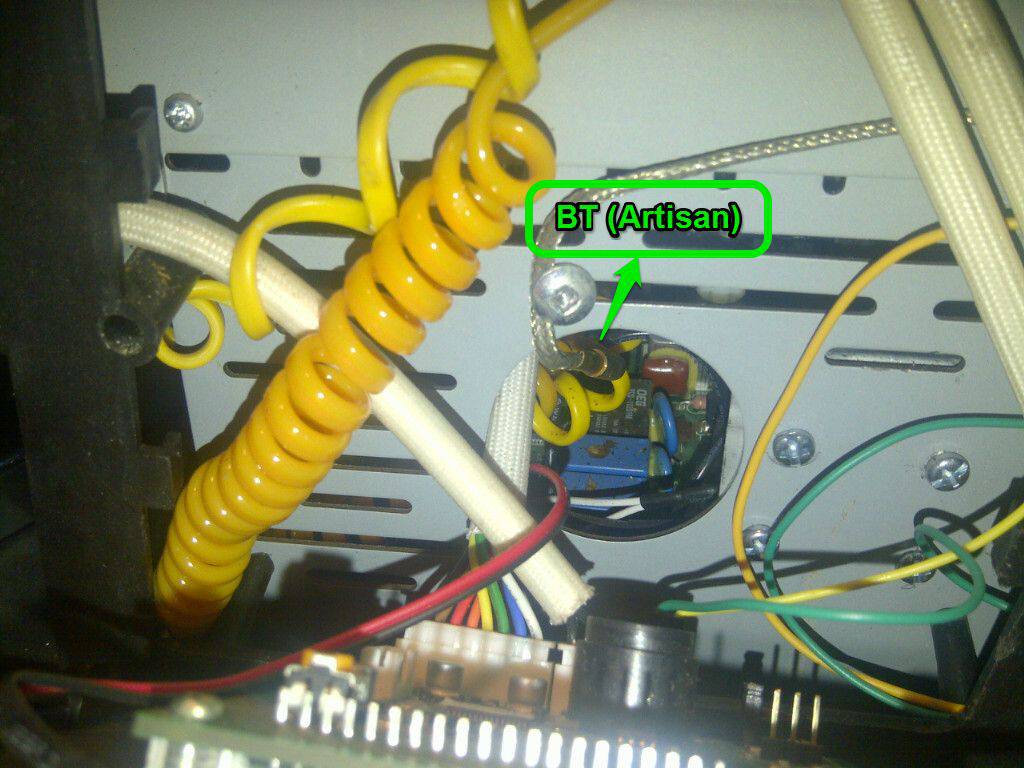

Hottop B2 + HTC, Cremina 83, OE Pharos, Brewtus IIIR, Baratza Vario
|
|
|
|
| smico |
Posted on 11/25/2012 8:19 AM
|
|
1/2 Pounder Posts: 262 Joined: December 17, 2011 |
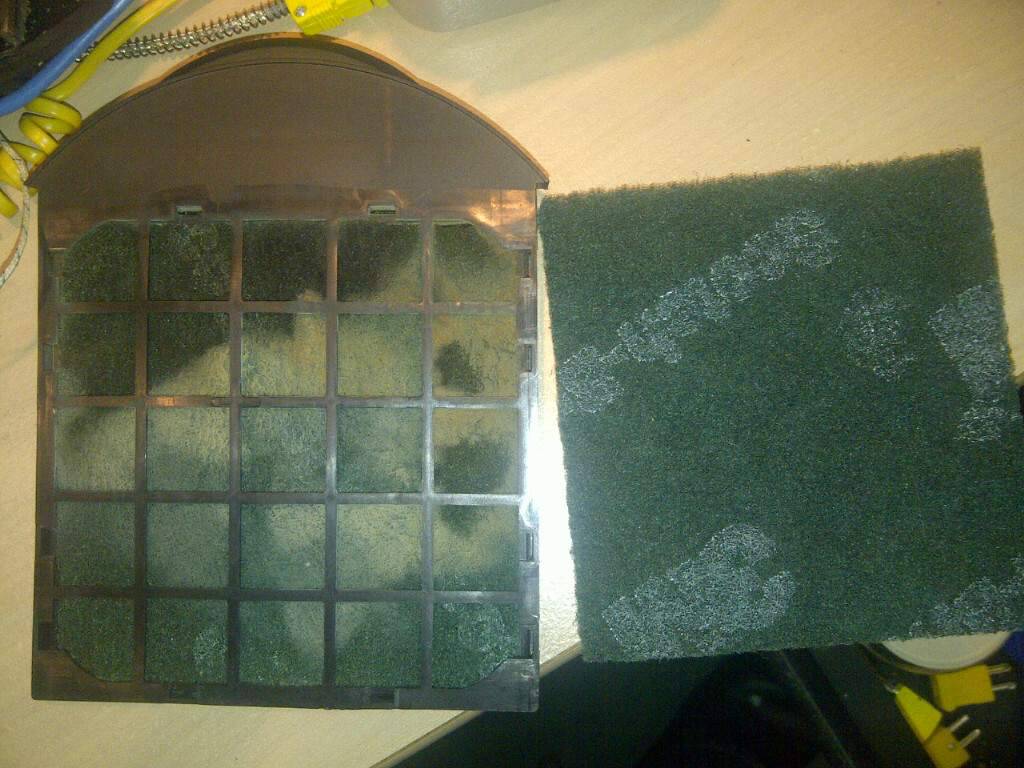
I use 3M Scotch-Brite Scour Pad as filter. I followed JimG advice, and it works very well for me. Resistence is relatively low.
smico attached the following image:
Hottop B2 + HTC, Cremina 83, OE Pharos, Brewtus IIIR, Baratza Vario
|
|
|
|
| smico |
Posted on 11/27/2012 6:48 AM
|
|
1/2 Pounder Posts: 262 Joined: December 17, 2011 |
Few obvious observations about drum motor temperature from the graphs: 1. Fan operation heats up the motor as it brings hot air from the drum. 2. This efect is increased with higher air resistence of the filter. And the most important conclusion is: Filter should be removed right after the beans are ejected. Once I figured this one out, temperature in electronics area became stable, and working temperature of the drum motor stepped up just 5C after each roast. Still, operating at close to 90C is not advisable, and motor should be cooled down to 60C. Next time I will also try to remove bean chute. This might be just enough. If not, I will add manual fan switch and run the fan few minutes longer.
smico attached the following images:
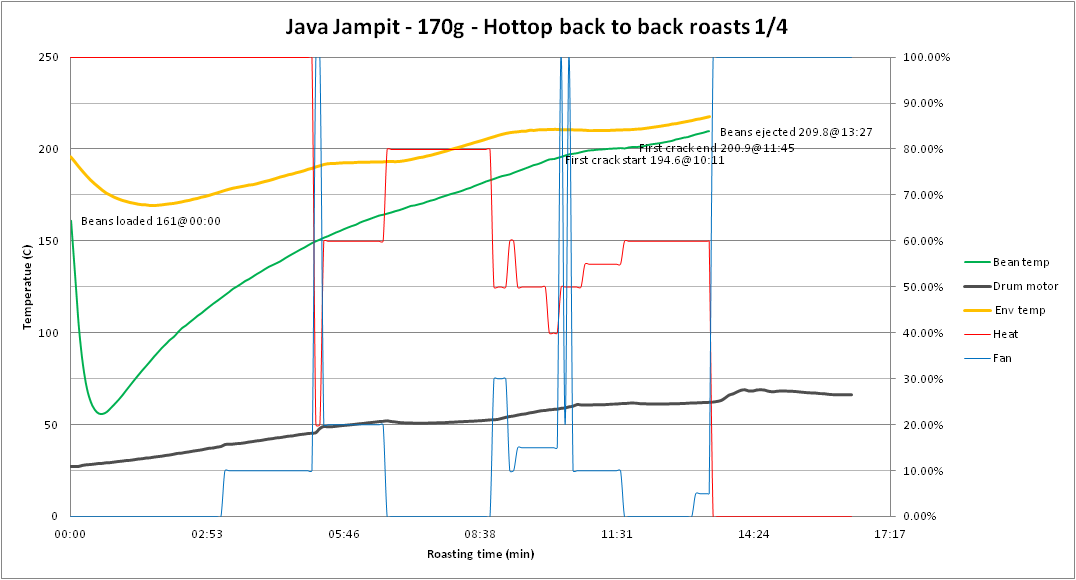


Edited by smico on 11/27/2012 6:53 AM Hottop B2 + HTC, Cremina 83, OE Pharos, Brewtus IIIR, Baratza Vario
|
|
|
|
| ronsil |
Posted on 11/27/2012 7:48 AM
|
|
Newbie Posts: 21 Joined: October 27, 2012 |
Very helpful & informative, thank you. I have always removed the filter & taken off the chute lid just as soon as the beans have ejected. I also remove the front half glass piece, chaff tray & the filter drawer as soon as the cooling motor stops. After transferring the beans to a colander I blow through all parts of the HT with a fast hairdryer running on maximum cool. Blows everything everywhere but no worries as I use the HT under a carport with gates throughout the year. I use the same dryer running slower to blow over the beans both whilst in the cooling tray & in the colander. Have always been surprised how much chaff is thus blown off. Ron
|
|
|
|
| smico |
Posted on 12/02/2012 4:31 PM
|
|
1/2 Pounder Posts: 262 Joined: December 17, 2011 |
I roasted 9 back to back roasts today, and I observed that the fastest cooling of the motor is if you: 1. Pull the filter up right after eject 2. Open beans chute right after eject 3. Run fan for at least 9 minutes Keep chaf tray closed, otherwise temp in electronics department will raise. Cheers, Miroslav
smico attached the following image:

Hottop B2 + HTC, Cremina 83, OE Pharos, Brewtus IIIR, Baratza Vario
|
|
|
|
| ronsil |
Posted on 12/02/2012 10:43 PM
|
|
Newbie Posts: 21 Joined: October 27, 2012 |
Quote Thank you Miroslav now that is really useful to know as I have always removed the chaff tray thinking it would help in the cooldown. I shall now change my tactics Ron
|
|
|
|
| snwcmpr |
Posted on 12/03/2012 6:30 AM
|
|
1 1/2 Pounder Posts: 925 Joined: March 03, 2011 |
Quote smico wrote: Keep chaf tray closed, otherwise temp in electronics department will raise. Miroslav, You have a probe measuring the temp near the electronics, don't you? That surprises me, I wouldn't have thought that. If i am going to roast again quickly, I pull up the filter, take off the glass cover, pull out the chafe tray as soon as the beans eject. Then I stick a vacuum hose, on reverse blow, into the bean chute. But, with this discussion, I am really considering some alterations. WHAT I REALLY WANT IS A BIGGER ROASTER. Thanks, Ken --------------
Backwoods Roaster "I wish I could taste as well as I wish I could roast." As Abraham Lincoln said "Do not trust everything you read on the internet". |
|
|
|
| ronsil |
Posted on 12/03/2012 7:03 AM
|
|
Newbie Posts: 21 Joined: October 27, 2012 |
The larger Hottop WHEN??? it arrives
Ron
|
|
|
|
| snwcmpr |
Posted on 12/03/2012 8:22 AM
|
|
1 1/2 Pounder Posts: 925 Joined: March 03, 2011 |
LOL, No, I want to roast more than 1/2 pound at a time. Ken --------------
Backwoods Roaster "I wish I could taste as well as I wish I could roast." As Abraham Lincoln said "Do not trust everything you read on the internet". |
|
|
|

| Jump to Forum: |
Powered by PHP-Fusion Copyright © 2024 PHP-Fusion Inc
Released as free software without warranties under GNU Affero GPL v3
Designed with ♥ by NetriXHosted by skpacman