
Login

Shoutbox
You must login to post a message.
renatoa
07/26/2024 3:49 PM
Bill grubbe and Jk, 
allenb
07/26/2024 5:15 AM
Spiderkw Welcome to HRO!

renatoa
07/24/2024 8:31 AM
ramiroflores and John123,

 ?
?
?renatoa
07/21/2024 1:18 AM
 , Luislobo
renatoa
07/19/2024 11:28 AM
Koepea,
Forum Threads
Newest Threads
Skywalker roaster modsBackground Roast Iss...
Hello from Arkansas
TC4ESP
Green coffee reviews
Hottest Threads
| Skywalker roaster... | [375] |
| TC4ESP | [115] |
| War on Farmers by... | [47] |
| Adventures in flu... | [26] |
| Hello! (soon) Roa... | [17] |
In Memory Of Ginny

Donations
Latest Donations
dmccallum - 10.00
JackH - 25.00
snwcmpr - 10.00
Anonymous - 2.00
Anonymous - 5.00
dmccallum - 10.00
JackH - 25.00
snwcmpr - 10.00
Anonymous - 2.00
Anonymous - 5.00
Users Online
Guests Online: 5
Members Online: 0
Total Members: 8,393
Newest Member: Bill grubbe
Members Online: 0
Total Members: 8,393
Newest Member: Bill grubbe
View Thread
Who is here? 1 guest(s)
 Enhancing My HotTop (5.1 of 5) ? Extreme Mods
|
|
| ciel-007 |
Posted on 01/23/2015 1:19 PM
|
 1 1/2 Pounder  Posts: 651 Joined: April 03, 2012 |
Quote okmed wrote: ... I offset it towards the back to move the pipe over and create just enough room so that the charging funnel still fits. As you can see I used copper pipe and fittings to get more offset... Milan, congratulations for your improvements to the initial RAF-1 design. I especially like your clever use of offset fittings on the Extraction Pipe, in order to further increase clearance for the bean charging funnel. Keep up the great work! Ciel Ciel... seeking Heaven in my cup with ................................................................................................................. EXPOBAR Brewtus II - MAZZER Mini E - MAHLK?NIG Vario - GeneCafe - RAF-1 Extreme (Modified B-2 HOTTOP) - BellaTaiwan XJ-101
|
|
|
|
| ciel-007 |
Posted on 09/29/2015 1:32 PM
|
|
1 1/2 Pounder Posts: 651 Joined: April 03, 2012 |
Here's a photo showing an alternate way of creating the RAF-1 mod. More photos and details are available at the following link. http://www.home-b...ml#p408655 Ciel
ciel-007 attached the following image:
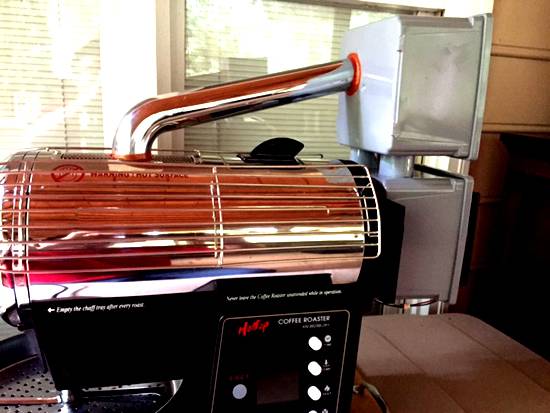
Ciel... seeking Heaven in my cup with ................................................................................................................. EXPOBAR Brewtus II - MAZZER Mini E - MAHLK?NIG Vario - GeneCafe - RAF-1 Extreme (Modified B-2 HOTTOP) - BellaTaiwan XJ-101
|
|
|
|
| jinx |
Posted on 10/04/2015 10:06 PM
|
|
Newbie  Posts: 25 Joined: February 29, 2012 |
I have been tinkering with my hottop this weekend and while things are drying, I wanted to note a few breakthroughs. First though- I'd like to pause and say thanks to those who came before me and pierced ahead, making the hottop better than it is in stock form. So, here's the first simple mod- I tricked the chaff tray switch. I didn't like the chaff tray switch, so I snipped a small piece of thin aluminum and bent it into a rough C shape. I slipped both ends into the slot where the switch sits and managed to keep the switch depressed all the time. I think I can figure out whether or not I have the chaff tray in, or if I cleaned it out. It was just bugging me. Next mod- I created bean cylinder fins that are taller than the stock helix wire. I used pop rivets to attach them, and folded over some sheet metal for the shapes. The fin near the glass is hooked to keep those window clinging beans on the move. Results to come. I really wanted to try the 165f barrier mod, but judging from what I read as an outsider, that mod is not really that reliable. JimG says a transistor would do the trick but there's no info beyond that. I generally use the cool down time to vac out the roaster anyway and, I use one vac to blow cool air in as another vacs out the chaff. It cuts the recovery time to just a few mins. Next mod - Flipping the fan. Way too much chaff and residue in the motor area caused me to take a close look at the raf mod. But, building a box and pulling air from the vent with the current fan is a long way around. One question I have is - why use exhausted roast gases being pulled up through the sink pipe, as the input into the motor area? I took apart the fan in the rear of the roaster, and cleaned it up as best I could. Then, I noticed that if you remove just the fan from the frame, you could simply flip it over and reverse the direction. This would now make the fan blow directly onto the motor and computer board, and then on into the roaster chamber. As a means of helping to control ET in the chamber at end roast levels, I might employ a sliding vent at the top of the hottop, where the small mesh smoke screen is. Opening that area to exhaust, even for 10 seconds, allows alot of the heat to escape. Modulating it with a slider door should be quite acceptable. If need be, I could pull the chaff tray open to allow cooler air to enter. The mod I am not doing tonight is the bean cooling tray. My thought is to raise the legs of the roaster by another inch. Then, remove the fan and screen in the cooling tray, and create a chute to land the hot beans in an external tray below. I always use an external bean cooler anyway, why not make it easier and faster. Maybe I can get away with diverting the beans to the front so I don't have to destroy the existing fan. I am about to setup my indoor winter roasting station, as I have been doing outdoor roasting all summer. I did this last year, but didn't write up a thread on it. Its basically a hood design, but I use an inverted, large sterlite plastic container as my hood. I have it up on a few blocks of wood at the corners, and on the top, I use a powerful wood stove squirrel cage fan to extract all of the fumes out of the upsidedown box. Out of the squirrel fan, I attached dryer vent tube at 6", and it goes about 4 feet into a sheet of plywood, that acts as a block for the window. The window has nice trim work around it and a custom screen insert, I simply matched that for size and put duct tape on the seam. The window opens fully with a crank arm in the casement, so the plywood is there until spring. There is zero incoming cold air. There is also zero smoke leakage from the hood, the fan, or the duct work. Does it look silly, yes. But sometime silly does the job. I have checked repeatedly on the safety of this, hot spots do not occur anywhere. There's too much cool air incoming around the roaster for any heat buildup. Its all sucked up by the fan and duct. The fan has a dimmer on it, and its fairly silent. I suppose that if I were to create a vertical exhaust pipe from the roaster's top screen, upwards to the squirrel fan, I could pull some pressure from the hottop, and cool it down if needed. More to come as I tinker late into the nights.... |
|
|
|
| jinx |
Posted on 10/05/2015 7:05 AM
|
|
Newbie Posts: 25 Joined: February 29, 2012 |
I woke up this morning with the realization that the chaff tray switch needs to be open for the computer brain to reset itself between roasts. So, it seems as though my little scrap of metal will have to be removed. Maybe if I can make a pull wire that hooks onto the arm of the switch, like a choke mechanism on a carb. Then I can hook the switch to being closed for most of the time, and release it so the computer resets itself. |
|
|
|
| turtle |
Posted on 10/05/2015 9:14 AM
|
 1 1/2 Pounder Posts: 652 Joined: November 06, 2013 |
Quote jinx wrote: I woke up this morning with the realization that the chaff tray switch needs to be open for the computer brain to reset itself between roasts. So, it seems as though my little scrap of metal will have to be removed. Maybe if I can make a pull wire that hooks onto the arm of the switch, like a choke mechanism on a carb. Then I can hook the switch to being closed for most of the time, and release it so the computer resets itself. What about a momentary contact no/nc switch? I put one in to "fool" the thermocouple into thinking the roaster is cold so it can restart without having to drop to the "safety" tempature. You will still want to empty the chaff tray after every roast as it fills up, at least mine does. Mick - "Drinking in life one cup at a time"
"I'd rather be roasting coffee" Roaster 1: San Franciscan SF-1 Roaster 2: Hottop B-2K+ Roaster 3: 2 kilo Chinese drum Grinders: Mazzer Major - Forte BG (x3) Pour over: Hario - Bee House - Chemex - Kalita - Bodum Drip: Bunn CWTF15-1 & CW15-TC (commercials) Espresso: Pasquini Livia 90 auto Vacuum: Cona - Bodum Press: Frieling - Bodum Colombia |
|
|
|
| jinx |
Posted on 10/13/2015 1:00 PM
|
|
Newbie Posts: 25 Joined: February 29, 2012 |
Update on my mods: I did 4 roasts of central american beans last night, each was 250g. What I learned is that the insulated hottop retains more heat so the ramp up from charge to 300f is now done near the 5 min mark. I also add a little effect of the new fins in the drum as a help to the faster roast times. First crack was in the initial third of the 9th minute, and roasts were dumped in the 12th minute to fall into 22-24% of the overall range of time. End roast temp was near 435. I had to back off the heat when then ET gets above 450, and I used the inward blowing fan to cool off the motor and the drum. I am also using a heat pad over the top filter, and altering the amount that is open to the air to release some hot exhaust during the later 2/3rds of the roast. Cool down is slightly slower, but I spend that time cleaning out the hottop with a long tube hose and vac. I turn right around and do another roast asap. I highly recommend the adjustments to the roaster, with that and the tc4c and thermocouples, controlling the roast process is fairly straightforward. I also use a dust deputy cyclone separator, these rock. I also use a variac to dial in 121v. I also use a stand alone bean cooler, as its quicker than the hottop's. I am sucking out all of the exhaust with a hood and fan. |
|
|
|
| ciel-007 |
Posted on 11/04/2015 8:26 AM
|
|
1 1/2 Pounder Posts: 651 Joined: April 03, 2012 |
Quote Jinx, how about posting a few photos of your mods? Ciel Ciel... seeking Heaven in my cup with ................................................................................................................. EXPOBAR Brewtus II - MAZZER Mini E - MAHLK?NIG Vario - GeneCafe - RAF-1 Extreme (Modified B-2 HOTTOP) - BellaTaiwan XJ-101
|
|
|
|
| barqy |
Posted on 08/14/2016 4:45 PM
|
|
Newbie Posts: 5 Joined: January 23, 2016 |
Quote ciel-007 wrote: Step Three - Mounting the Plenum Mounting the Plenum onto the roaster body is a relatively straight forward task (see Photos 5, 6, and 7). Four small screws are used for this purpose. Using the four existing holes located on the Back Cover of the Hottop greatly simplifies the work. Note that mounting the Plenum in this manner provides a space between the Plenum and the roaster body (see Photo 8). This space is a vital one; it allows fresh, cool, air to be aspirated through the back of the roaster. This air flow effectively shields sensitive internal components from overheating during roasting; this is especially important during non-stop, back-to-back, roasting using high bean-dropping temperatures. Once the Plenum has been attached to the roaster body, the Hottop exhaust fan can now be attached to the Plenum (using four small screws), and the Hottop's electrical harness can then be reconnected (see Photo 9). I could have mounted the exhaust fan higher on the back of plenum; however, that would have required me to modify (lengthen by cutting and splicing) the original Hottop electrical wires that provide power to the fan. HI great mod, wanting to try this on my hottop but a couple of quick questions Did you using the existing small screws to mount your plenum to the back or did you use different ones? My only concern is that if other screws are used, will they enlarge the existing (pre drilled holes) of the plastic, so if you wanted to reverse the mod, the holes would now be too big? (I guess a solution is to find screw heads small enough to fit into the slots in the first place?) Also is the fan blowing into the roaster chamber or out the back? The stock configuration is that the fan blows out the back, but I guess in this case it's suppose to blow in and towards the roaster chamber? sorry if the questions seem trivial cheers |
|
|
|
| jinx |
Posted on 08/14/2016 9:41 PM
|
|
Newbie Posts: 25 Joined: February 29, 2012 |
So sorry Ciel, I stopped visiting this site a while back to focus on just doing my own thing. Visually, my hottop is no different from the normal stock unit. One cannot tell the differences of my modifications. Yes, I added fins to the chamber's spiral wire, and yes, I flipped the direction of the fan, so it blows inward. I still use a silicone trivet to cover the vent on top, up to about 350f bean temperature, then I take it off. My roasts are usually 250-275 grams, but I have pushed that to 300. Normal 1st cracks are in the 9th minute, and the 300 gram batches get to 1c in the 12th minute. I have had really nice results, and no complaints. I use a vented indoor setup during the cooler months, and roast outside when weather permits. My only wish is that the roaster could turnaround without the 165f cool down limit. |
|
|
|
| BarryR |
Posted on 10/09/2016 3:54 PM
|
|
1/4 Pounder  Posts: 90 Joined: April 25, 2011 |
Quote jinx wrote: I really wanted to try the 165f barrier mod, but judging from what I read as an outsider, that mod is not really that reliable. JimG says a transistor would do the trick but there's no info beyond that. I generally use the cool down time to vac out the roaster anyway and, I use one vac to blow cool air in as another vacs out the chaff. It cuts the recovery time to just a few mins. This is a simple mod if you have the right connectors. I did in on my B-2K. I don't use it often. Usually I take off the front cover and if it's still hot when I'm ready to do the next roast then I grab the vacuum and suck some air out of the chute and it cools down fast that way. Occasionally though, it's close to 165 and I don't want to wait OR something happens and I screw up such as missing the time to charge the beans or occasionally accidentally ejecting the beans too early. With this switch, I can just press it and do my thing. I've found it to be 100% reliable. Barry
|
|
|
|

| Jump to Forum: |
Powered by PHP-Fusion Copyright © 2024 PHP-Fusion Inc
Released as free software without warranties under GNU Affero GPL v3
Designed with ♥ by NetriXHosted by skpacman