
Login

Shoutbox
You must login to post a message.
renatoa
07/26/2024 3:49 PM
Bill grubbe and Jk, 
allenb
07/26/2024 5:15 AM
Spiderkw Welcome to HRO!

renatoa
07/24/2024 8:31 AM
ramiroflores and John123,

 ?
?
?renatoa
07/21/2024 1:18 AM
 , Luislobo
renatoa
07/19/2024 11:28 AM
Koepea,
Forum Threads
Newest Threads
Skywalker roaster modsBackground Roast Iss...
Hello from Arkansas
TC4ESP
Green coffee reviews
Hottest Threads
| Skywalker roaster... | [375] |
| TC4ESP | [115] |
| War on Farmers by... | [47] |
| Adventures in flu... | [26] |
| Hello! (soon) Roa... | [17] |
In Memory Of Ginny

Donations
Latest Donations
dmccallum - 10.00
JackH - 25.00
snwcmpr - 10.00
Anonymous - 2.00
Anonymous - 5.00
dmccallum - 10.00
JackH - 25.00
snwcmpr - 10.00
Anonymous - 2.00
Anonymous - 5.00
Users Online
Guests Online: 8
Members Online: 0
Total Members: 8,393
Newest Member: Bill grubbe
Members Online: 0
Total Members: 8,393
Newest Member: Bill grubbe
View Thread
Who is here? 1 guest(s)
 Enhancing My HotTop (5.1 of 5) ? Extreme Mods
|
|
| Barrie |
Posted on 04/12/2013 4:51 PM
|
|
Pounder  Posts: 504 Joined: April 10, 2012 |
Quote Thank you and "Wow!" Barrie (San Diego, CA)
"So much to learn, so little time." Hottop 2K+., Artisan, Jura Capresso ENA 3 (i.e. espresso). |
|
|
|
| ginny |
Posted on 04/12/2013 6:10 PM
|
 Founder Posts: 3476 Joined: October 24, 2005 |
I always hit 410 plus depending on when I dump the beans into the Hot Top. Tomorrow I will test the new 8828 B 2K and be roasting the: Aged Sumatra Aceh Pwani - 2007 Vintage I got from Sweet Maria this week, I love the aged coffee and I always try it right away so I can see/taste it as it moves along... I try all of my coffee as SO espresso (as cafe crema) and some coffee does not make it past a few days before it's gone, baby gone... The thing some forget is that it is only personal taste that matters. I have friends who roast that think I am nuts for tasting roasted beans right away; too bad for them, they miss some great stuff. enjoy your coffee and roast it the way you want but try it over the edge for yourself since you may be surprised. ginny |
|
|
|
| snwcmpr |
Posted on 04/13/2013 8:04 AM
|
 1 1/2 Pounder  Posts: 925 Joined: March 03, 2011 |
I guess I would be surprised. The few times I did, I got better flavor after 4-5 days. Yemen especially needs that time. Thanks, Ken in NC --------------
Backwoods Roaster "I wish I could taste as well as I wish I could roast." As Abraham Lincoln said "Do not trust everything you read on the internet". |
|
|
|
| smico |
Posted on 05/11/2013 7:09 AM
|
 1/2 Pounder  Posts: 262 Joined: December 17, 2011 |
Ciel, Are you planning to reveal more technical details about this mod? I see that you had several versions, and it will be helpful to learn from your mistakes. Thank you in advance. Miroslav Hottop B2 + HTC, Cremina 83, OE Pharos, Brewtus IIIR, Baratza Vario
|
|
|
|
| Randy G |
Posted on 05/11/2013 9:44 AM
|
 1/2 Pounder Posts: 398 Joined: February 17, 2010 |
Quote I also have some information and photos in my review of the Boston SCAA exhibition here: http://www.frcndigital.com/coffee/Coffee136.html I got some hands-on time with it in the booth (I worked the Hottop booth as they are a clien, but I do not get income from sales), and so got to pull the drum and chaff collector and "run" the roaster a few times. I also helped design the control interface. Much of that was not done and some of the internal parts were not finalized, but overall, it looks promising. And big. And expensive. But, for its capacity, it is at the low end of commercial roasters of that capacity and it is smaller and weighs a lot less at about 42 pounds. It also operates o standard household current. |
|
|
|
| smico |
Posted on 05/11/2013 10:31 AM
|
|
1/2 Pounder Posts: 262 Joined: December 17, 2011 |
Thank you for the review Randy. Only good thing about their price is that it can go only down. One can wait a long wait though. Randy, have you tried to roast 1kg? Hottop B2 + HTC, Cremina 83, OE Pharos, Brewtus IIIR, Baratza Vario
|
|
|
|
| Randy G |
Posted on 05/11/2013 11:47 AM
|
|
1/2 Pounder Posts: 398 Joined: February 17, 2010 |
I do not yet have the roaster. The one at the show is a post-beat, pre-production one-off unit that was air freighted to Hottop USA at the last minute for the show. I have been told that the first one in the US comes to me as I will be creating the owners manual and website info for Hottop USA. It may be a few months before that happens, but as you can imagine, I am quite excited to get my hands on one. I can say that I tested a stand-alone prototype of the smoke ejection system that was made to test the effectiveness of it, and it works remarkably well. The machine will come with a hose that can be placed out a window or to a vent and it should pull ALL smoke out to enable the machine to easily be used indoors.
|
|
|
|
| ciel-007 |
Posted on 05/12/2013 2:47 PM
|
 1 1/2 Pounder Posts: 651 Joined: April 03, 2012 |
Quote smico wrote: Ciel, are you planning to reveal more technical details about this mod? I see that you had several versions, and it will be helpful to learn from your mistakes... Miroslav, yes I will. I am in the process of taking photos, and drafting additional explanations. I should be posting them in the near future. If you don't mind, I will likely spend a bit more time talking about what worked, rather than what didn't...LOL... Ciel Ciel... seeking Heaven in my cup with ................................................................................................................. EXPOBAR Brewtus II - MAZZER Mini E - MAHLK?NIG Vario - GeneCafe - RAF-1 Extreme (Modified B-2 HOTTOP) - BellaTaiwan XJ-101
|
|
|
|
| smico |
Posted on 05/12/2013 3:03 PM
|
|
1/2 Pounder Posts: 262 Joined: December 17, 2011 |
Ciel, I appreciate that. I am certainly more interested in mods that work  Thank you, Miroslav Hottop B2 + HTC, Cremina 83, OE Pharos, Brewtus IIIR, Baratza Vario
|
|
|
|
| RAG |
Posted on 09/29/2013 12:31 PM
|
 1/4 Pounder  Posts: 60 Joined: September 22, 2013 |
I was just made aware of this link. Awesome. Need to know more. I think this has potential to be the best mod for the Hottop by far. Longer life, safer operation, and better roasts, Inquiring minds need to know more. Help us out. Thanks for your work and contribution. |
|
|
|
| Randy G |
Posted on 10/02/2013 1:46 PM
|
|
1/2 Pounder Posts: 398 Joined: February 17, 2010 |
Ciel, I would like to see some more detailed photos: - chaff box construction - attachment of the smoke duct pipe on top of the roaster - internal design of the chaff box - etc. I have a second Hottop that is begging to be modified. |
|
|
|
| ciel-007 |
Posted on 10/03/2013 10:44 PM
|
|
1 1/2 Pounder Posts: 651 Joined: April 03, 2012 |
Quote RAG wrote: ... I think this has potential to be the best mod for the Hottop by far. Longer life, safer operation, and better roasts, Inquiring minds need to know more. Help us out. Thanks for your work and contribution. I have been testing this extreme mod for several months now, and am increasingly impressed with the enhanced performance of the roaster. Ciel Ciel... seeking Heaven in my cup with ................................................................................................................. EXPOBAR Brewtus II - MAZZER Mini E - MAHLK?NIG Vario - GeneCafe - RAF-1 Extreme (Modified B-2 HOTTOP) - BellaTaiwan XJ-101
|
|
|
|
| ciel-007 |
Posted on 10/03/2013 10:54 PM
|
|
1 1/2 Pounder Posts: 651 Joined: April 03, 2012 |
Quote Randy G wrote: Ciel, I would like to see some more detailed photos... I have a second Hottop that is begging to be modified. Randy, I am now finalizing some additional details that I will be posting shortly. I am also in the process of reformatting some new photos as per Ginny's recent helpful directives. Ciel Ciel... seeking Heaven in my cup with ................................................................................................................. EXPOBAR Brewtus II - MAZZER Mini E - MAHLK?NIG Vario - GeneCafe - RAF-1 Extreme (Modified B-2 HOTTOP) - BellaTaiwan XJ-101
|
|
|
|
| smico |
Posted on 10/03/2013 11:10 PM
|
|
1/2 Pounder Posts: 262 Joined: December 17, 2011 |
I can't wait.
Hottop B2 + HTC, Cremina 83, OE Pharos, Brewtus IIIR, Baratza Vario
|
|
|
|
| ciel-007 |
Posted on 10/04/2013 10:59 PM
|
|
1 1/2 Pounder Posts: 651 Joined: April 03, 2012 |
Here it comes...
Ciel... seeking Heaven in my cup with ................................................................................................................. EXPOBAR Brewtus II - MAZZER Mini E - MAHLK?NIG Vario - GeneCafe - RAF-1 Extreme (Modified B-2 HOTTOP) - BellaTaiwan XJ-101
|
|
|
|
| ciel-007 |
Posted on 10/04/2013 11:04 PM
|
|
1 1/2 Pounder Posts: 651 Joined: April 03, 2012 |
Five Steps for Transforming a Hottop into an "RAF-1 Extreme": Here are the 5 steps I followed to reverse the air flow in my Hottop. One of the great things about the Reversed-Air-Flow (RAF) modification is that it doesn't alter the roaster's main components (i.e. Control Panel, Main Circuit Board, Main Cooling Fan). After the RAF mod, those components continue to function as originally designed by Hottop... with one exception; the current RAF mod omits the filters that the manufacturer originally installed to reduce smoke, and to screen small particles. Consequently, if you're planning to roast indoors with an RAF modified Hottop, you'll have to do it near a good venting hood, or perhaps opt for the "Outside Venting" modification that I talked about in Part 4 of the series on "Enhancing My Hottop". http://homeroaste...post_39735 What follows, are notes and photos that explain how I reversed the air flow in my Hottop. This extreme mod hinges on two relatively simple, home-crafted, components; namely: a Plenum and an Extraction Pipe. To build the Plenum, I used scraps of wood from my workshop. For the Extraction Pipe, I visited the plumbing section at my local hardware store. The steps that follow apply to Hottop model KN8828B-2. It is possible that some minor tweaking might be required for other models. Ciel... seeking Heaven in my cup with ................................................................................................................. EXPOBAR Brewtus II - MAZZER Mini E - MAHLK?NIG Vario - GeneCafe - RAF-1 Extreme (Modified B-2 HOTTOP) - BellaTaiwan XJ-101
|
|
|
|
| ciel-007 |
Posted on 10/04/2013 11:07 PM
|
|
1 1/2 Pounder Posts: 651 Joined: April 03, 2012 |
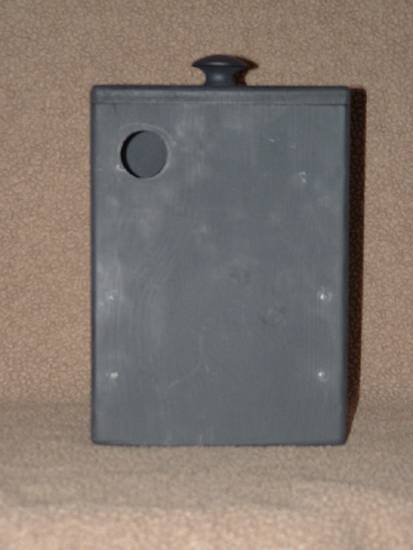
Step One - Making a Plenum: The Plenum was assembled from scraps of wood I had on hand. In this particular example, I used 1/2" plywood. The completed Plenum measures 9.5"H, 7"W, and 4"D. I added a removable top to facilitate periodic cleaning. The specific size or shape of the Plenum is not critical; however, to maximize backpressure efficiency, it is important that the plenum be made as air-tight as possible. On the front of the Plenum, there is a small intake hole in the top left corner (1.25" in diameter) to receive the Extraction Pipe. On the back of the Plenum, there is a larger exhaust port ( 4.25" in diameter) to accommodate the original Hottop exhaust fan.
ciel-007 attached the following images:

Ciel... seeking Heaven in my cup with ................................................................................................................. EXPOBAR Brewtus II - MAZZER Mini E - MAHLK?NIG Vario - GeneCafe - RAF-1 Extreme (Modified B-2 HOTTOP) - BellaTaiwan XJ-101
|
|
|
|
| ciel-007 |
Posted on 10/04/2013 11:10 PM
|
|
1 1/2 Pounder Posts: 651 Joined: April 03, 2012 |
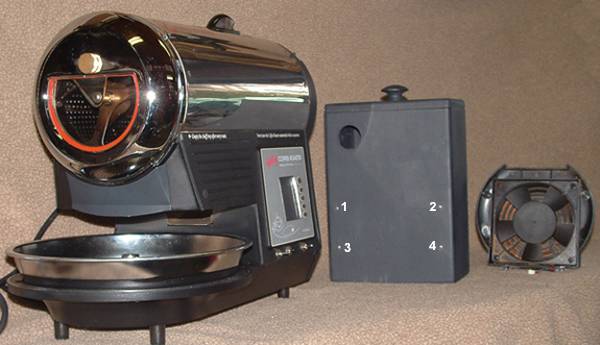
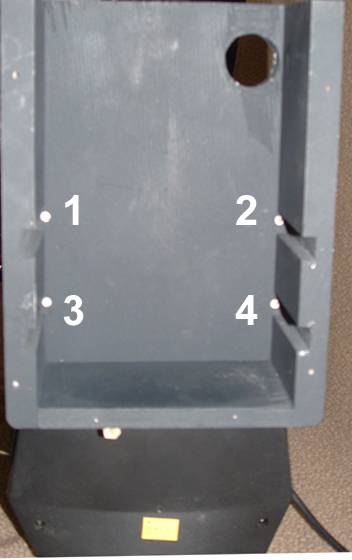
Step Two - Orienting the Plenum: Before the Plenum can be mounted onto the roaster body, the original exhaust fan must first be detached from the Hottop. Photos 3 and 4 show the general orientation of the Plenum in relation to the roaster body, and to the exhaust fan. Note that the Plenum will be attached to the plastic Rear Cover of the roaster. I have numbered the locations of the four holes (on both the Plenum and the roaster's Rear Cover) where small screws are used to attach the Plenum.
ciel-007 attached the following images:

Ciel... seeking Heaven in my cup with ................................................................................................................. EXPOBAR Brewtus II - MAZZER Mini E - MAHLK?NIG Vario - GeneCafe - RAF-1 Extreme (Modified B-2 HOTTOP) - BellaTaiwan XJ-101
|
|
|
|
| ciel-007 |
Posted on 10/04/2013 11:13 PM
|
|
1 1/2 Pounder Posts: 651 Joined: April 03, 2012 |
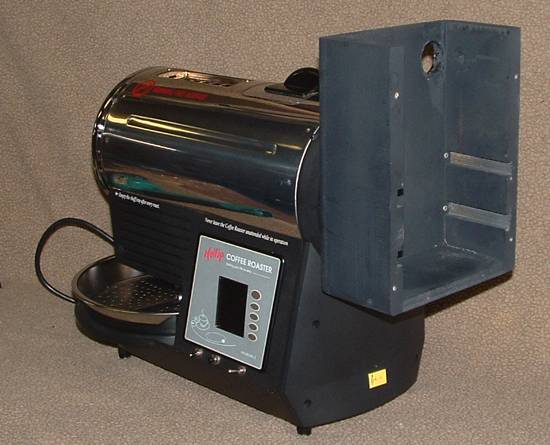
Step Three - Mounting the Plenum Mounting the Plenum onto the roaster body is a relatively straight forward task (see Photos 5, 6, and 7). Four small screws are used for this purpose. Using the four existing holes located on the Back Cover of the Hottop greatly simplifies the work. Note that mounting the Plenum in this manner provides a space between the Plenum and the roaster body (see Photo 8). This space is a vital one; it allows fresh, cool, air to be aspirated through the back of the roaster. This air flow effectively shields sensitive internal components from overheating during roasting; this is especially important during non-stop, back-to-back, roasting using high bean-dropping temperatures. Once the Plenum has been attached to the roaster body, the Hottop exhaust fan can now be attached to the Plenum (using four small screws), and the Hottop's electrical harness can then be reconnected (see Photo 9). I could have mounted the exhaust fan higher on the back of plenum; however, that would have required me to modify (lengthen by cutting and splicing) the original Hottop electrical wires that provide power to the fan.
ciel-007 attached the following images:


Ciel... seeking Heaven in my cup with ................................................................................................................. EXPOBAR Brewtus II - MAZZER Mini E - MAHLK?NIG Vario - GeneCafe - RAF-1 Extreme (Modified B-2 HOTTOP) - BellaTaiwan XJ-101
|
|
|
|
| ciel-007 |
Posted on 10/04/2013 11:20 PM
|
|
1 1/2 Pounder Posts: 651 Joined: April 03, 2012 |
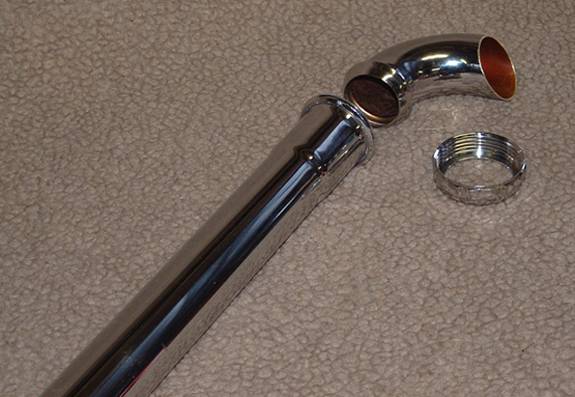
Step Four - Making the Extraction Pipe Assembly: In order to find a acceptable Extraction Pipe, I visited my local hardware store on several occasions. Picking a metal tube with a proper wall thickness, and a suitable diameter, required experimentation. That involved conducting roasting trials during which tubes of varying diameters (and thicknesses) were tested; my objective was to find an acceptable match for the heating element wattage, and for the extraction capacity of the Hottop exhaust fan. When the tube diameter was too large (and the wall thickness too great), then the ROR of the BMT (during the initial period when the exhaust fan was still turned OFF) was effectively too slow to reach FC(384F) within a reasonable amount of time. When the tube diameter was too small, then it was effectively impossible to slow down the scorching roasting process (when the fan was eventually turned ON) between FC(384F) and SC(428F). To date, the best match for the original Hottop components has turned out to be a metal extraction pipe (having a thin wall thickness) with a 1.25" diameter (see Photo 10). This 1.25" pipe diameter enables a rapid ROR of the BMT to FC(384F), while still allowing me to effectively slow down (and prolong) the roasting time to 4 minutes (or more) between FC and SC when the fan is turned ON. The Extraction Pipe consists of parts commonly found in the plumbing section of most local hardware stores. In this particular RAF conversion, the 1.25" pipe assembly consists of chrome plated tubular drain components. In other words, I used pieces of a standard drain pipe - a common pipe that has been used under the bathroom sinks of North America homes for decades. Note that one end of the metal elbow (far right in Photo 10) needs to be cut on an angle with a hacksaw.
ciel-007 attached the following image:
Ciel... seeking Heaven in my cup with ................................................................................................................. EXPOBAR Brewtus II - MAZZER Mini E - MAHLK?NIG Vario - GeneCafe - RAF-1 Extreme (Modified B-2 HOTTOP) - BellaTaiwan XJ-101
|
|
|
|
| ciel-007 |
Posted on 10/04/2013 11:24 PM
|
|
1 1/2 Pounder Posts: 651 Joined: April 03, 2012 |
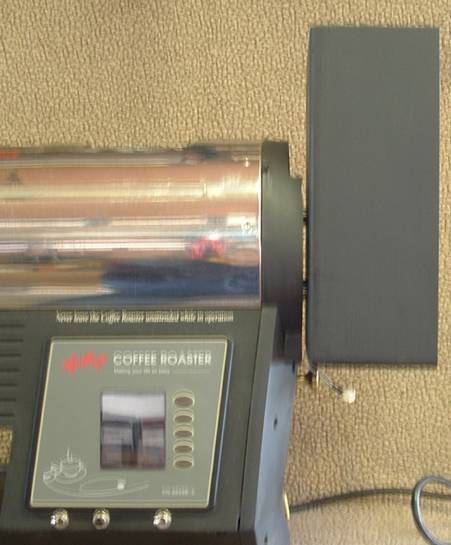
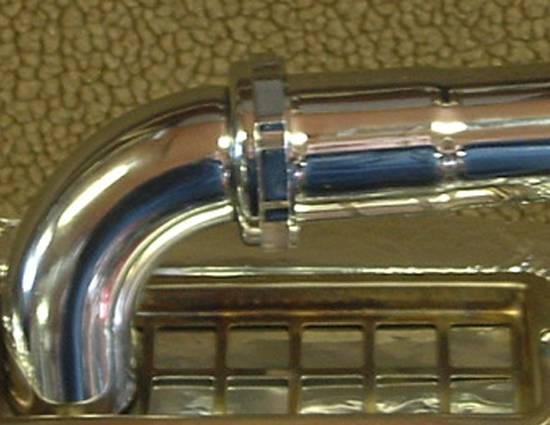
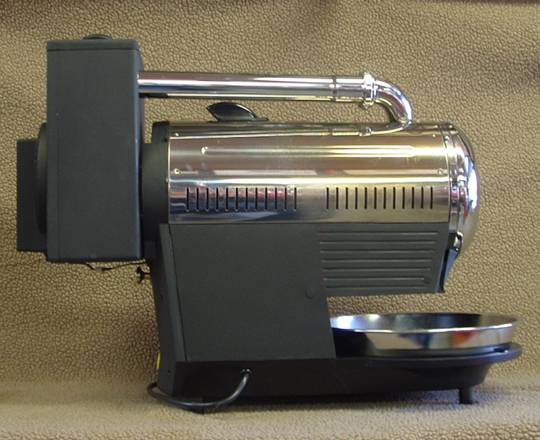
Step Five - Mounting the Extraction Pipe: The Extraction Pipe is the vital link between the Plenum and the roasting chamber. When the exhaust fan is turned ON, backpressure is created inside the Plenum, and the Extraction Pipe applies suction to the hot gases inside the roasting chamber - much like a tiny vacuum cleaner. Photo 11 shows the Extraction Pipe mounted on the Hottop. One end of the Pipe has been inserted into the Plenum, while the other end is simply resting on top of the roasting chamber. You will recall from Photo 10 that one end of the metal elbow had to be cut on an angle. You will note in Photo 11 that the hole in the plywood of the Plenum has been bored on an angle as well. Determining the correct angle at which to cut the elbow, and the correct angle at which to bore the Plenum hole, requires a bit of patience. However, taking the time necessary to obtain a good fit at both ends of the Pipe is important; a proper fit will minimize leakages and maximize extraction efficiency. The next two photos show how the Extraction Pipe is mounted above the roasting chamber. What you see in Photo 12 is a partially dismantled Top Filter, a large opening in the ceiling of the chamber, and a view of the roasting drum. As seen in Photo 13, the Extraction Pipe is simply allowed to rest on the metal grid (the only part I have kept after dismantling the Top Filter). Photo 14, shows that the balance of the large opening has been closed with a small piece of aluminum that was cut to size using hand scissors. You may have already noticed that the Extraction Pipe is not parallel to the roasting chamber (Photo 15). There is an upward inclination as the Pipe stretches from the roasting chamber towards the Plenum. That mild slope facilitates convection; namely, the natural transfer of hot gases from the roasting chamber to the Plenum, even when the exhaust fan is turned OFF. That convection plays an important role during the early stages of the roast; more specifically, it allows hot moist air to escape from the roasting chamber spontaneously, and permits the beans to dry without the need to power ON the fan. Convection plays another important role: as the hot gases naturally move up the Extraction Pipe, cool air is slowly drawn into the back of the Hottop; that's good news for the heat sensitive components that are housed in that location.
ciel-007 attached the following images:


Ciel... seeking Heaven in my cup with ................................................................................................................. EXPOBAR Brewtus II - MAZZER Mini E - MAHLK?NIG Vario - GeneCafe - RAF-1 Extreme (Modified B-2 HOTTOP) - BellaTaiwan XJ-101
|
|
|
|
| ciel-007 |
Posted on 10/04/2013 11:36 PM
|
|
1 1/2 Pounder Posts: 651 Joined: April 03, 2012 |
Does the Reverse-Air-Flow Mod Enhance my Roasting Experience? Yes it does. The RAF enhancement means that I can spend more time roasting or enjoying coffee, and less time dismantling or cleaning the machine. The RAF mod means that I can run the Hottop without interruption at high temperatures, use the exhaust fan less, and lower the risk of premature failure from heat. Maintaining higher temperatures allows me to roast more beans in less time. More importantly, roasting at higher temperatures has had a most favorable impact on the flavor of my espresso pulls. More specifically: (1) I start and run the RAF-1 Extreme at maximum power. (2) I don't drop the beans before the roasting chamber is at least 350F or more. (3) I typically drop 325 grams of green beans into the very hot drum. (4) I don't turn the fan ON (level 1) until the BMT reaches 384F(FC). (5) I don't turn the fan to maximum speed (level 4) until the BMT reaches 410F. (6) With a 1.25" Extraction Pipe, and the original Hottop fan, I have sufficient air flow to easily stretch my roasting time to four minutes (or more) between FC and SC. (7) I can launch the next, back-to-back, roast as soon as the hot, smoldering beans have dropped into the cooling tray. (8) The RAF enhancement allows me to roast over 3.5 lbs of great coffee in less than 90 minutes. Based on months of roasting experiences (almost 100 lbs of beans), the "RAF-1 Extreme" modification is proving to be a very exciting, and most promising, enhancement to my Hottop. With a bit of time and effort, I have been able to transform my excellent "Home Roaster" into a wonderful "Mini Commercial Roaster". I am hoping that the notes and photos presented in the above Steps may help others re-discover the "JOY of Roasting?. Ciel... seeking Heaven in my cup with ................................................................................................................. EXPOBAR Brewtus II - MAZZER Mini E - MAHLK?NIG Vario - GeneCafe - RAF-1 Extreme (Modified B-2 HOTTOP) - BellaTaiwan XJ-101
|
|
|
|
| Randy G |
Posted on 10/05/2013 1:09 AM
|
|
1/2 Pounder Posts: 398 Joined: February 17, 2010 |
Well thought out and well implemented. A point- In my personal experience, the only significantly stressed parts in the roaster from the heat are the main motor's gear box and the main fan. But keeping all the chaff, dust, humidity, condensation, and oils out of there is definitely a good thing. I may examine my Hottop next time I have some spare moments (in a year or two) when I take it apart. My thought is to reverse the main fan in its housing to provide positive pressure. This is easily controlled through my TC4C HTC boards. Then make a metal chaff collector to mount in place of the top filter assembly. Two perceived problems right off the bat with my idea: - The Hottop has plenty of places for smoke to escape if the chamber is placed under positive pressure during a roast. These will have to be sought out and dealt with. Finding them is fairly easy. Fixing, maybe not. - Creating an exhaust exit box (with baffle system?), or both to maintain the heat, as you found out, but to allow sufficient flow for profile control. You need to do a website on all this. |
|
|
|
| smico |
Posted on 10/05/2013 7:19 AM
|
|
1/2 Pounder Posts: 262 Joined: December 17, 2011 |
Not much to add to this except thank you Ciel. I will post my experience once I get to do this ultimate modification. Regards, Miroslav Hottop B2 + HTC, Cremina 83, OE Pharos, Brewtus IIIR, Baratza Vario
|
|
|
|
| Randy G |
Posted on 10/05/2013 9:23 AM
|
|
1/2 Pounder Posts: 398 Joined: February 17, 2010 |
Additional thoughts- I believe that it would be an easy matter to make a spacer to mount between the original fan housing and the plenum to allow use of the factory filter to lessen particulate emissions in the roasting area. For those not using computer control, one could wire a computer fan rheostat to the main fan to control its speed manually through a stepless range from 0 to 100%. This would be particularly handy for "P" users who could create a profile with fan speed set to 100% throughout the roast and then manually control the fan with the rheostat. As with any modification, the end user needs to be aware that it controverts the original design which could have unforeseen results. One possible example is that you have a wood box and the plastic fan receiving hot gasses and particulates that enter differently than the original design. In case of a chamber fire or flash-over event in the roast chamber, chaff in the wood box could be ignited. Another is that the rear wall of the roast chamber is now being cooled by cold air entering from the rear. This could affect the function of the thermal fuse in case of a chamber fire as well as possibly affecting the accuracy of the factory temperature sensor (more of a factor for models with the old-style button sensor). |
|
|
|

| Jump to Forum: |
Powered by PHP-Fusion Copyright © 2024 PHP-Fusion Inc
Released as free software without warranties under GNU Affero GPL v3
Designed with ♥ by NetriXHosted by skpacman