
Login

Shoutbox
You must login to post a message.
renatoa
07/26/2024 3:49 PM
Bill grubbe and Jk, 
allenb
07/26/2024 5:15 AM
Spiderkw Welcome to HRO!

renatoa
07/24/2024 8:31 AM
ramiroflores and John123,

 ?
?
?renatoa
07/21/2024 1:18 AM
 , Luislobo
renatoa
07/19/2024 11:28 AM
Koepea,
Forum Threads
Newest Threads
Skywalker roaster modsBackground Roast Iss...
Hello from Arkansas
TC4ESP
Green coffee reviews
Hottest Threads
| Skywalker roaster... | [375] |
| TC4ESP | [115] |
| War on Farmers by... | [47] |
| Adventures in flu... | [26] |
| Hello! (soon) Roa... | [17] |
In Memory Of Ginny

Donations
Latest Donations
dmccallum - 10.00
JackH - 25.00
snwcmpr - 10.00
Anonymous - 2.00
Anonymous - 5.00
dmccallum - 10.00
JackH - 25.00
snwcmpr - 10.00
Anonymous - 2.00
Anonymous - 5.00
Users Online
Guests Online: 5
Members Online: 0
Total Members: 8,393
Newest Member: Bill grubbe
Members Online: 0
Total Members: 8,393
Newest Member: Bill grubbe
View Thread
Who is here? 1 guest(s)
 Huky 500
|
|
| Airhan |
Posted on 11/26/2013 11:19 PM
|
 1/2 Pounder  Posts: 228 Joined: September 29, 2013 |
I/O just means input/output. Used here it means that a Phidget has no I/O or it cannot give you any control over heaters/fans motors/whatever. A TC4 or PID have I/O capabilities.
Aaron
"Grind it like it did you some great injustice!"D.L.Clark |
|
|
|
| boar_d_laze |
Posted on 11/27/2013 10:26 AM
|
|
1/4 Pounder  Posts: 181 Joined: May 28, 2013 |
Quote allenb wrote: I'm assuming that all of these require you to be plugged into your computer in order to view rate of rise and don't have the ability to view it via a small LCD on-board the datalogger. If this is the case then the TC4 is the way to view rate of rise and temps/time whether standalone or tethered to your pc. This obviously requires one to be able and have the desire to solder a board together. I'm not sure, but the REL mode on the 806AU and TMD 56 might be able to give you RoR. But it would require you to start pressing buttons while the beans are spinning. Too busy for me. Computer or no computer, like a lot of people, as long as I can see a temp and a clock, I keep a running calculation going in my head. Doing so with the roast going is something which comes with practice and/or the compulsion to calculate everything. Just like soldering a board, it's not going to be the right solution for everyone. I'm pretty sure that the combination of ways I keep track of the roast in real time -- which includes, an 806, a stand-alone timer, a computer running Artisan (for the present) AND detailed note taking in a lab book -- would be too clunky, distracting and awkward for just about everyone else. Sometimes it is for me too. I've been doing that or something like it for ever, but am still in dithering since switching roasters. More than anything, it's knowing where to look and what to touch at an given time. The hardest thing to integrate into the routine is the computer display. We tend to focus on a video screen and it can be hard to shift attention to whatever else needs to be done. Also part of the learning process is the need to rearrange where everything is relative to everything else to make the new setup work. I know you already know because you've been through it yourself, but... For someone just starting out roasting, or someone who's roasted before but is adding a lot of information equipment for the first time, the big take away should be that it takes time to get used to all this stuff and really start using it. The more practice and planning you do (plotting your ideal profile, with RoR calculated for each leg, etc., before starting the roast) the quicker you're going to learn. Even so, there's still a pretty steep learning curve involved in getting to the point where you're roasting a profile instead of letting events carry you along with them. BDL USRC 1lb Roaster, Chemex+Kone, Espro, Various FPs, Royal Siphon Vacuum, Yama Ice Drip Tower, Bunnzilla, La Cimbali M21 Casa, Ceado E92.
CookFoodGood |
|
|
|
| allenb |
Posted on 11/27/2013 8:58 PM
|
 Administrator Posts: 3869 Joined: February 23, 2010 |
Quote boar_d_laze wrote: Computer or no computer, like a lot of people, as long as I can see a temp and a clock, I keep a running calculation going in my head. Doing so with the roast going is something which comes with practice and/or the compulsion to calculate everything. Just like soldering a board, it's not going to be the right solution for everyone. BDL Well said and you're right that some are able to multitask and check in from time to time to do a mental calc and are in good enough control of their machine for it to not run away before the next calc but others, including myself, never really master it and it can be frustrating especially when other things distract like my dog dragging off a very important part I carelessly left on the floor nearby and, after retrieving the part, my mental calculation is gone and by the time I'm able to let enough degrees tic by to formulate the next calculation I find the roast is too far off to do a smooth recovery and so it gets over corrected with resulting yo-yo for a while. OTOH, with real time RoR displayed, I've only got to take a glance and immediately know how much of a micro tweak I need to make and I can concentrate on other areas of the roast. It's really too bad that real-time RoR is such a rare commodity. I decided to interrogate the staff at Omega today to see if they new of an off the shelf temperature meter that displayed rate of rise and all of them including the data logger experts said no dice and had never ever heard of one that could do this. They suggested I buy an expensive programmable logic controller (PLC) and develop a program to create the function. I said thanks for the advice but I'll pass on that one! Allen 1/2 lb and 1 lb drum, Siemens Sirocco fluidbed, presspot, chemex, cajun biggin brewer from the backwoods of Louisiana
|
|
|
|
| KCbean |
Posted on 12/06/2013 3:38 PM
|
 Newbie  Posts: 9 Joined: November 23, 2013 |
Hey guys, Ive got my roaster and Ive got my Phidget, Now I cant figure out how to correctly plug my roasters probes to the phidget and get artisan 7 to read it |
|
|
|
| marce |
Posted on 12/06/2013 4:00 PM
|
|
Newbie Posts: 17 Joined: October 26, 2013 |
On the Phidget connect your probes on the green strip. connect to your pc. In Artisan, Config, Device assignment, Meter. set to Phidget 1048 or 1046 what ever your Phidget is. Should work... you may need to download the drivers from Phidget http://www.phidge...em_Support |
|
|
|
| KCbean |
Posted on 12/08/2013 4:57 PM
|
|
Newbie Posts: 9 Joined: November 23, 2013 |
Artisan says that Phidget 1048 sensor is not attached and that error keeps flashing above the roasting graph. I think Ive downloaded all of the stuff, and my devices recognizes my phidget is attached, just not artisan. |
|
|
|
| marce |
Posted on 12/09/2013 12:19 AM
|
|
Newbie Posts: 17 Joined: October 26, 2013 |
I'll let someone else help you out as I have no issue with that combo... One thing I would try is to re-install Artisan and the 1048 drivers maybe? sorry I can't be of any help... Marce |
|
|
|
| KCbean |
Posted on 12/09/2013 11:05 AM
|
|
Newbie Posts: 9 Joined: November 23, 2013 |
Uninstalled it all and back in and Now ive got temps on Artisan Thanks Marce |
|
|
|
| marce |
Posted on 12/09/2013 11:02 PM
|
|
Newbie Posts: 17 Joined: October 26, 2013 |
glad it worked! |
|
|
|
| az erik |
Posted on 04/03/2014 11:35 AM
|
|
Newbie Posts: 43 Joined: January 25, 2013 |
I just ordered one as I can't take it anymore.  Setting up a permanent roasting spot in my garage. Wife's even on board with this one. Ginny once I have it set up you could come check it out if you like, well also goes for anyone that wants/can drive to Chandler AZ. |
|
|
|
| az erik |
Posted on 04/16/2014 1:39 PM
|
|
Newbie Posts: 43 Joined: January 25, 2013 |
After getting my start with a popper and different length extension cords I moved up to a Bemhor. Then from the Bemhor to a Hottop B. Then Hottop B with TC4C and Roastlogger. Now I have moved up to a solid drum 500g gas fired machine and um wow. I only got to run 4 pounds through it last night, I have a learning curve with the machine and Artisan, and with dealing with larger loads/smoke! The machine it's self is very simple. It's well built and has a few things I am really starting to enjoy, like the trier and gas. With the solid drum config and the 72 rpm motor it's pretty quiet and compact. Over all the machine is stunningly small. Just barely larger than the HT, but with tons more moving parts, fans, ducts, pipes, screens, etc. The move from electric to gas was a night and day eye opener. One thing for sure is airflow makes a big difference in the machine behavior. The gauge on the front of the machine is in C and is for the drum. It doesn't react as fast as I'd like and the conversion to c/f in my head is very slow. Though I do find myself using it to get a general understanding of where the drum temp is I do use a MET probe with the Center301 dual thermo running USB to my laptop -> Artisan. I had read a couple of other statements about MET 'ceilings' being around 500f before tipping occurred. I didn't witness this last night as I had accidentally run one roast well into 625f MET. I rocketed right into 2c on that one, WAY early. 1c started around 3:30! Whoops, I'll try to drink it anyway. Airflow is something neat and it appears in my case really needed. Due to using a 15kBTU Iwanti burner the flame on full gets sent out the sides of the Huky, The side vents were quite red twice. If I bump the fan to 30/40% via a Variac it actually pulls the flame up. This in turn causes MET to rise and the internal drum temp to rise about 2f/sec. Pumping the fan to 50% causes a rise of about 4f/sec MET. Without airflow the drum and MET rise quite slowly. Sadly I did not find a way to drop the MET or drum temp fairly quickly. Cutting the fire totally and ramping the fan to 100% started a MET drop about 30 seconds later. I am very happy with this little machine and look forward to many more roasts with it. I did use almost a full 8oz of butane in 50 min of running the roaster, this is good for me as I plan 4 to 6 lbs in a roasting day. Clean up of the machine is easy so far as I only have 4 roasts on it, but it does drop chaff on the burner, which randomly flamed up. Second roast was a success  Drop actually happened at 2min. I have to find the shortcuts for Artisan The 4th roast kinda got out of control, lots  No pics of the actual machine yet, was too busy running back to back roasts haha. ET/BT are reversed on these. The machine and I are in Chandler,AZ if anyone wants to take a look, run a roast let me know. |
|
|
|
| MaKoMo |
Posted on 04/16/2014 2:22 PM
|
|
1/4 Pounder Posts: 127 Joined: April 06, 2011 |
Quote ET and BT have to be swapped. Either physically by switching the probes, or in the software using the ET<->BT flag under Extras. All annotations like CHARGE, TP, DRY, FCs,.. are annotated at the BT curve |
|
|
|
| az erik |
Posted on 04/16/2014 3:17 PM
|
|
Newbie Posts: 43 Joined: January 25, 2013 |
I could have swore I swapped them on the second roast, even looked again today and swapped them back. The spikes in the 1st pic is from me unplugging them and plugging them back in. I didn't have time at lunch to run a roast but will try to torch this 1.5yr old decaff later tonight. Fit's on top of a small rolling toolbox with enough room for the fan and laptop.  Little chaffy  but considering that's all from 4 #'s it's still almost cleaner than a Hottop after 3 roasts. but considering that's all from 4 #'s it's still almost cleaner than a Hottop after 3 roasts.
Edited by az erik on 04/16/2014 3:22 PM |
|
|
|
| az erik |
Posted on 04/17/2014 1:32 PM
|
|
Newbie Posts: 43 Joined: January 25, 2013 |
Ok kept flipping the probes around as it didn't make sense to me the BT probe would read higher but it seems common. Swapped the probes during this roast of some nearly 2 yr old decaf. My burner is still too powerful. I've found about 1/2 'throttle' with a 15% fan works pretty well. I don't have the plumeting MET's others seem to, but that's usually because I have too much heat applied. I'm sure the first few pounds are going to taste like fresh cut grass or cedar. 400g loads last night, Backed off the fire big time. Now that I can see a ROR and the digital temps I'm getting better control of this machine.  |
|
|
|
| allenb |
Posted on 04/17/2014 8:20 PM
|
|
Administrator Posts: 3869 Joined: February 23, 2010 |
Thats a beautiful roaster! Your last roaster scope log is looking pretty nice although you'll probably get tastier results by stretching start to 300 BT. Some Huky users are using burners that allow the use of a gas pressure gauge. Is that possible with the burner you're using? A pressure gauge allows one to accurately dial in power levels during the roast versus coarse adjustments. Allen 1/2 lb and 1 lb drum, Siemens Sirocco fluidbed, presspot, chemex, cajun biggin brewer from the backwoods of Louisiana
|
|
|
|
| Contrabass_Bry |
Posted on 04/19/2014 12:13 AM
|
|
Newbie Posts: 4 Joined: January 02, 2014 |
Erik, I'm sure you'll enjoy it. Yes, it's not without it's quirks. But for the price, it's a pretty sweet deal. |
|
|
|
| JasonMck |
Posted on 04/27/2014 12:47 PM
|
 Newbie Posts: 10 Joined: April 20, 2014 |
AZ Erik, Just wondering where you picked up the gas burner? i'm about to receive my Huky 500 and was looking for an alternative to the stock burner? |
|
|
|
| JasonMck |
Posted on 04/27/2014 12:59 PM
|
|
Newbie Posts: 10 Joined: April 20, 2014 |
Sorry the name Iwatani on the front was a quick google for my answer Thanks |
|
|
|
| az erik |
Posted on 04/30/2014 5:18 PM
|
|
Newbie Posts: 43 Joined: January 25, 2013 |
Yep the second roast did go over quite well in Maui this last week. I lied and swapped it in place of a expected Kona a friend bought while on Oahu, he never noticed. I was actually causing myself more roasting issues by attempting to "step on the gas" to recover from the charge temp drop, it's not actually needed with this burner as the burner is convective as well. I'll be building a fan housing and hanging the fan off the side of the cart. This should allow me to dump and just swing the 'exhaust pipe' out of the way rather than pull it when I dump the beans. The funniest thing is actually realizing the size is about that od a Hottop. I was expecting this big box and having to clear all this space. I pretty much am able to work in a corner and very quickly. Allen i can't use the gas pressure as it's an internal can that direct fits to the knob. For now I'm using a MET probe at the top edge of the roaster body. Thats the ET probe on Artisan. I was using the fan and fire to keep it around 450 after the charge. Which was a bit of a juggle really. It looks like I can hit a turn around time under 2 min very easily and can actually drag out the time to 1c if I stay off the gas. I'm going to see how a 500g load will come around without bumping the gas all over. I was in Maui for the last week and actually sitting there going "man I wish I could roast, I can't wait to roast again.." in Maui... I did have a pair of toddlers in tow  |
|
|
|
| az erik |
Posted on 05/03/2014 2:53 PM
|
|
Newbie Posts: 43 Joined: January 25, 2013 |
Found some different ways of getting into 1c slower (cut flame and crank the fan, it ups the ror to 25deg F for about 25 seconds, then 20, 15, 10) some roasts I have to refire the burner to bump the heat back into the beans as I've seen it drop to 4 degrees ror at points. Nice thing is with the Iwanti 15k btu burner I run the flam at about 1/3rd for most of the roast. This actually nets me 6 lbs (1.5 hours) roasting time off one can of butane. I roasted up 6 lbs last night and got much better results. Though trying to get the ROR and air flow under control is taking a reverse thinking to the HT's 'just crank the fan' technique of reducing the ror. This burner does require a different thought process as it's got a lot of convective heating possibilities and way more than enough power.    |
|
|
|
| Vesteroid |
Posted on 06/22/2014 9:55 AM
|
|
Newbie Posts: 2 Joined: June 22, 2014 |
I am a new huky owner and srill setting the unit up. From reading here the analog dial on the huky appears to be the drum temp(I assume that means air inside the drum) and the top digital probe must be the environmental temp, with the middle digital probe being the bean temp. I ordered it with the center 301 and have successfully gotten artisan to read both probes on my Mac laptop (that took some doing to find the serial to usb driver and get it working). My current issue is hooking up the supplied gas stove. It appears to simply have a .5 in not male nipple coming out of the stove. Does anyone have a recommendation on how to find a hose (or assemble parts) that will go from the propane tank to this nipple? Standard grill hoses have a different end on them with different threads and a rounded interior. This nipple is hollow with a brass fitting that is 90 degrees to the nipple wall inside that appears to make the transition to the .125 copper tubing. What I would really like to do is get a quick connect onto that nipple as I have a propane hose that has a quick connect female end on it already from a garage heater. Anyone have any ideas where I can source something like that? |
|
|
|
| Vesteroid |
Posted on 06/22/2014 12:53 PM
|
|
Newbie Posts: 2 Joined: June 22, 2014 |
For reference I suppose I solved it (I think). I had a mr heater hose that went from my propane tank to my garage heater. It had a .25 mip fitting on the heater end. Through trial and error I discovered that what came on mr lis stove is a .375 mip fitting. I went to had and found a .375 fip coupling and a .25 fip to .375mip fitting that allowed me to make it all play nice. I need to go back and get some pipe dope as it has a bit of a leak but other than that I think it's solved. Now to learn how to use this monster . |
|
|
|
| Jeff Peters |
Posted on 07/21/2014 12:05 PM
|
|
Newbie Posts: 3 Joined: June 17, 2014 |
This appears to be the official Huky 500 thread, so as a fellow Huky 500 owner I'm going to join in, giving advice where I can (which isn't much at this point) and seeking help when needed. First off, a big thanks to tamarian and frans for their detailed posts here, and to tarmarian for entertaining my many question on his setup (many aspects of which I used in mine) I bought a Huky 500 (my first roaster) about a month ago and have scouring forums all across the internet for build ideas. I'm an enginner by trade so I'm in the process of building the roaster into a sample roasting 'lab' setup. I just fired it up for the first time this week and have much to learn. Here's my garage sample roasting setup: Huky 500: Stock from the very friendly Khuano Li, with the Solid Drum and Extra MET thermocouple options detailed in the very thorough writeup at home-barista: http://www.home-barista.com/home-roasting/exploring-huky-500-coffee-roaster-part-ii-t20532.html Vent tube is mounted to a cyclone chaff separator with a 100 CFM high-temp blower, the output of which is then routed via dryer ducting to the outdoors. Instead of ordering of the infrared LP burner from My Li, I purchased a stand alone 15,000 BTU BBQ side burner, which I dropped into my stainless steel 'lab' table. I also dropped the cooling fan in the table so that the whole setup sits flush and looks clean. Cooling tray exhaust is routed to the outdoors as well via a separate dryer chute. As for burner control and the gas train in general, I built a gas manifold that has a manual 90 degree ball valve in parallel with a Clipper proporional valve (driven by their valve driver). This allows me to apply heat control manually, or automatically via the Fuji PXG PID that I have coming (thanks again tamarian and frans). Currently using Artisan to log (and eventually control) the roast profiles. A few notes about my setup and future upgrades for others that may follow: 1.) tamarian may be able to confirm this, but using a Clippard proportional valve (even the one with the largest orifice diameter of 0.060") may not be the best for low pressure (Natural Gas) use although using it with Propane shouldn't be a problem. While my 15,000 BTU burner is probably overkill for my setup, I approximate that I'm only getting about 200 BTU worth of flow out of it. I currently trying to fix this, but it's going to be a limiting factor in my setup and is going to limit the maximum rate of change of temperature I can induce. Currently looking at Kelly proportional valves that have about 3x the flow rate. More to follow. 2.) Having to detach the (extremely hot) vent tube to add the initial bean charge is defintely a 'kludge' (as others have put it) and requires welding gloves (and some speed) to accomplish without getting burned. While I eliminated 2nd the reconfiguration required at bean drop buy adding the additional cyclone/blower setup, this initial reconguration dance is a but anoying. However, I'm shopping around for a stainless T that I can install between the vent tube and the exhaust ducting so that I don't have to remove the vent tube to charge the setup. More to follow. Setup summarized, going to post some observations and questions in a separate post. |
|
|
|
| Jeff Peters |
Posted on 07/21/2014 12:32 PM
|
|
Newbie Posts: 3 Joined: June 17, 2014 |
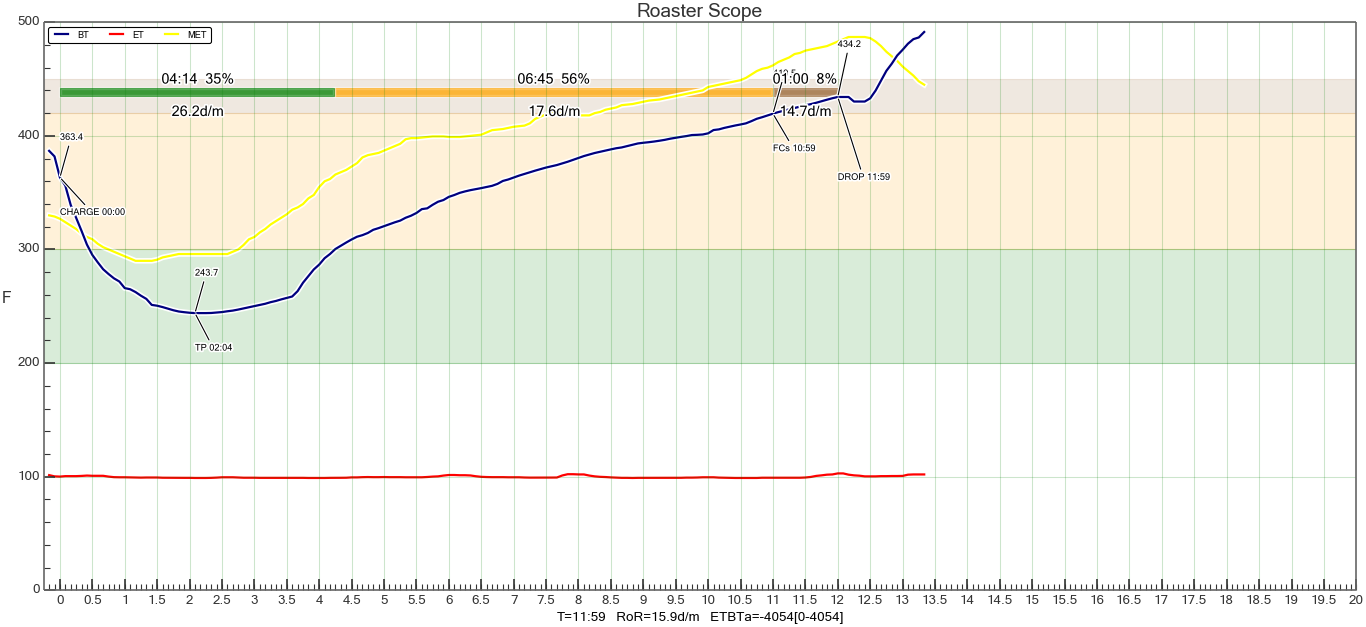
So I'm currently only 6 roasts into evaluating my setup, and have much to learn. For the time being, I'm roasting to characterize my system and the minimum/maximum levels of temperature rise rate that I can accomplish with my setup. At this point, I'm manually adjusting the gas flow to the burner but staying within the range of flow rates that the Clipper valve can achieve. As I mentioned in my previous post, the highest flow rate that the Clipper valve can achieve may be a limiting factor in my setup. My goals with this setup are two fold: first to have fun, and second to use it as a tool to learn how roast profile variation affects the flavor of the resulting coffee. A few things I've noticed immediately about roasting with the Huky 500 are: 1.) To get an accurate (and consistent) BT measurement, I've found that the charge weight probably needs to be 200g or larger. 2.) The amount of thermal energy that the (extremely solid) drum holds is pretty impressive. So as I embark on my journey of roasting exploration, I could use a bit of help from the folks here in the community and other who may also be using this model roaster. My first challenge is in establishing a charge weight, charge temp that results in a turnaround temperature in the ballpark of 200-210F (that is ideal right?) I'm just burning through some inexpensive green coffee at the moment but would like to keep the charge weights down to about 200 grams. Here's my first questions to the community. Other than concerns with tipping/scorching at high initial charge temperatures, does it really matter what this temperature is if the correct turnaround temperature is reached in a reasonable time? As an example, look at the attached profile...be nice, it's literally the third roast I've done in my life....ever (note that currently ET is measure ambient garage air temperature...yes, it's hot in the southwest). Real ET is coming soon once I replace the analog temperature gauge with another thermocouple. MET is the temperature outside of the drum within the roaster. Hopefully I got this nomenclature correct (feel free to correct me if I did not). Ignoring for a minute everything that happens after the turnaround point this appears to the fastest rate / lowest temperature drop I can get in my setup with 200 gram charge (I charged at 400F and turned the burner off entirely). Again, focusing just on the chage to turnaround time, would the suggest here be to lower my pre-heat/charge temperature to 40-50 degrees F to say 350 F? Thanks all for the help.
Jeff Peters attached the following image:
|
|
|
|
| az erik |
Posted on 07/21/2014 6:39 PM
|
|
Newbie Posts: 43 Joined: January 25, 2013 |
100 degrees ET! You sir are in AZ!! I've never tried anything smaller than 400g's. Even with 525g's (I think it could go to 540g without being terrible temp management) I could still hit a ROR of 30degrees with the Iwanti 15k on 3/4 flame with 50% variac flow to the stock Huky fan. there seems to be a point where you can pull so much heat into the drum that you could possibly tip and scorch but so far I havn't managed to do that. Even when dropping at 550+ ET. I'm dropping 500g's at 430/440 now and getting a much better TP of 200 degrees. just about 5 min to 300BT. I can actually pull that even further down to 4 min if I step on the gas but the woodsy taste isn't very appealing in the cup. With the solid drum and open flame you can really mess around with this roaster to totally change the profile. I'll have to flip on the roaster laptop to get the latest profiles off it. I've experianced a world of difference in roast requirements just by changing beans on the Huky. The Guat I have is hard and doesn't absorb the heat like the same weight of Liquid amber or Monkey Spro. The requirement to bump my flame became obvious once my ROR leveled off at about 16deg between 300 to 375. In my case more fan (convection/air roast) up to 380, then I cut flame and ramp to 90% fan. This causes my ror to spike for a min to about 24-28deg ror. however the internal heat clears out quick and then I back down the fan to drum roast through 1c. Some roasts I just continue on drum heat (providing it's around 400deg or higher) some times I have to refire and drop the fan to about 30%. It's kind of a juggle. If I had a welder or welding skills for that matter, I'd have a different roasting bench for sure Might just mod up a cart. A cyclone wouldn't hurt at all.Hows that for a super long answer 250G load, put the charge temp at 350, hold there until BT hits about 300, you can very easily ramp her but all it's going to take is a bump in ET to 400-450 to get through the rest of the roast. If my Huky didn't read 40C when I open the garage I'd say we should make a day of it and roast enough to drive the neighbors crazy |
|
|
|

| Jump to Forum: |
Powered by PHP-Fusion Copyright © 2024 PHP-Fusion Inc
Released as free software without warranties under GNU Affero GPL v3
Designed with ♥ by NetriXHosted by skpacman