
Login

Shoutbox
You must login to post a message.
renatoa
07/26/2024 3:49 PM
Bill grubbe and Jk, 
allenb
07/26/2024 5:15 AM
Spiderkw Welcome to HRO!

renatoa
07/24/2024 8:31 AM
ramiroflores and John123,

 ?
?
?renatoa
07/21/2024 1:18 AM
 , Luislobo
renatoa
07/19/2024 11:28 AM
Koepea,
Forum Threads
Newest Threads
Skywalker roaster modsBackground Roast Iss...
Hello from Arkansas
TC4ESP
Green coffee reviews
Hottest Threads
| Skywalker roaster... | [375] |
| TC4ESP | [115] |
| War on Farmers by... | [47] |
| Adventures in flu... | [26] |
| Hello! (soon) Roa... | [17] |
In Memory Of Ginny

Donations
Latest Donations
dmccallum - 10.00
JackH - 25.00
snwcmpr - 10.00
Anonymous - 2.00
Anonymous - 5.00
dmccallum - 10.00
JackH - 25.00
snwcmpr - 10.00
Anonymous - 2.00
Anonymous - 5.00
Users Online
Guests Online: 11
Members Online: 0
Total Members: 8,393
Newest Member: Bill grubbe
Members Online: 0
Total Members: 8,393
Newest Member: Bill grubbe
View Thread
Who is here? 1 guest(s)
Page 1 of 2: 12
|
 1lb Fluidbed build, progress and photos
|
|
| Erichimedes |
Posted on 09/09/2013 11:22 PM
|
 1/4 Pounder  Posts: 58 Joined: August 07, 2013 |
Well, I've been researching now for about a month, and getting my supplies together. I've got a design nailed down, and I'm going for it. A lot of the elements here aren't new to you guys. I think a lot of you have got this stuff pretty figured out. This is just my little iteration of it. I'm a welder, and so I think I've taken the approach that most suits me. I'm a big fan of simple, so that's my attempt here. Things I wanted out of a roaster: -Ability to do 1lb of green -To try recirculation -Full manual control with the ability to automate in the future -Compact, able to break it down to fit in a (large) kitchen cabinet -To be able to run on under 20 amps. The house I live in is 130 years old, and the electrical is scary, to say the least. We also don't have 220. So I've completed the blower/heater assembly. It's pretty simple. The whole thing will mount on the 4 holes in the rectangular flange at the top and pretty much hang in the center of the enclosure. The blower is a 5.5 amp flow-though from a mini vac, and the heating element is a HAS-043. The roast chamber will attach via tri-clamp fittings and a silicone gasket. This is the progress so far, I'll start on the enclosure this week. 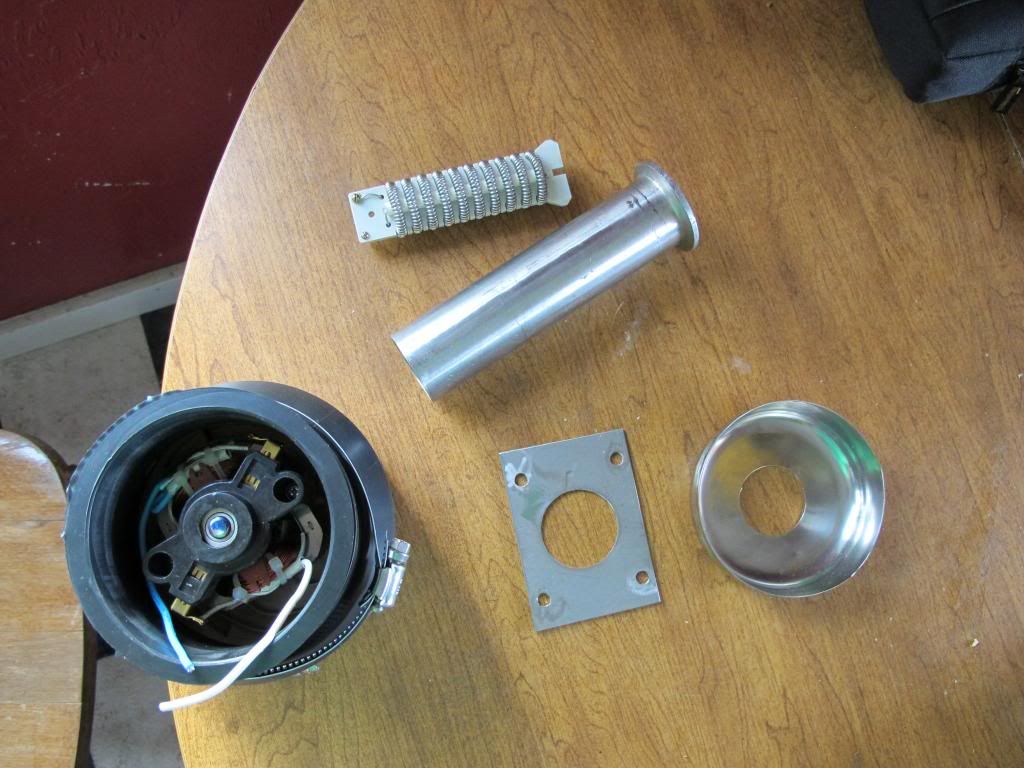 Parts and pieces before welding. 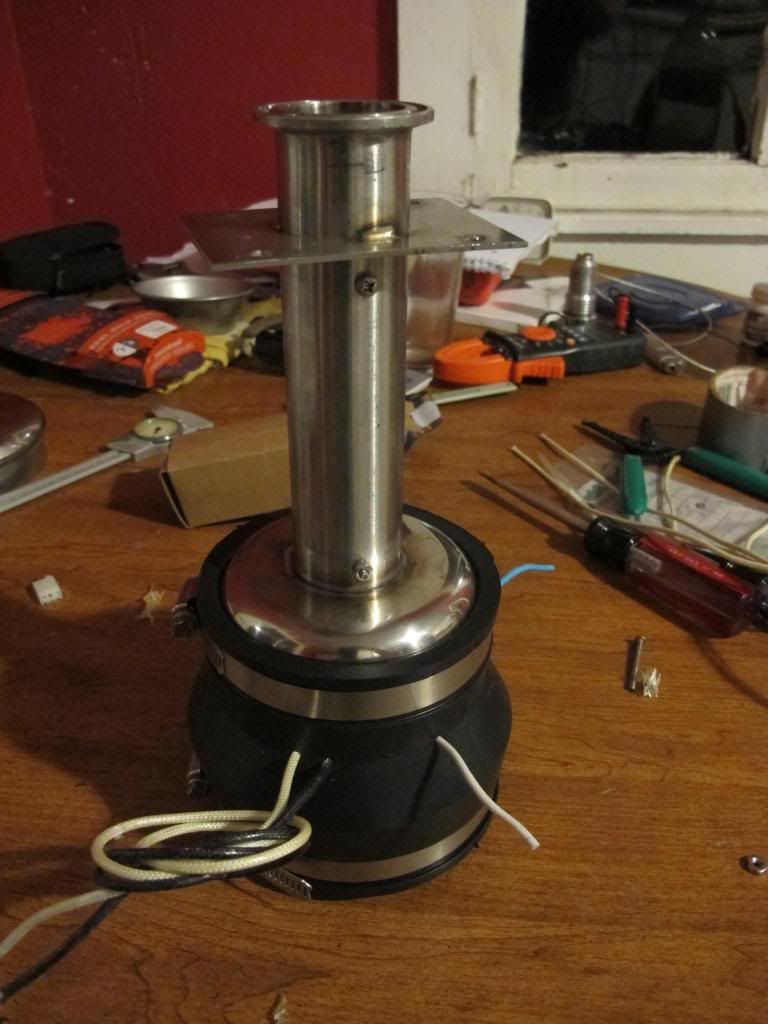 And the whole thing assembled. |
|
|
|
| tamarian |
Posted on 09/10/2013 3:32 AM
|
|
1/2 Pounder  Posts: 320 Joined: January 21, 2012 |
Very clean work! Not sure if the rubber parts will be a problem with heat recirculation. Do they have a heat rating on them? May not be a problem if you will only circulate a small percentage. Not talking from experience though, just wondering if it will be an issue. Welding skills open a lot of DIY possibilities in building stuff, I'm just starting to learn about arc welding to clean up my builds. Looking forward to your progress. Wa'il. 1 Kg PID'ed gas-fired fluid bed roaster, GS/3MPS, K10F
|
|
|
|
| oldgearhead |
Posted on 09/10/2013 7:09 AM
|
 1 1/2 Pounder  Posts: 1128 Joined: February 10, 2011 |
I have reclaimed roasting chamber air as hot as 165?F as a test and once by accident. However, I usually maintain it a 130?F max. The vc motor and the spa boot seem to thrive on the warm air.. /
oldgearhead attached the following image:
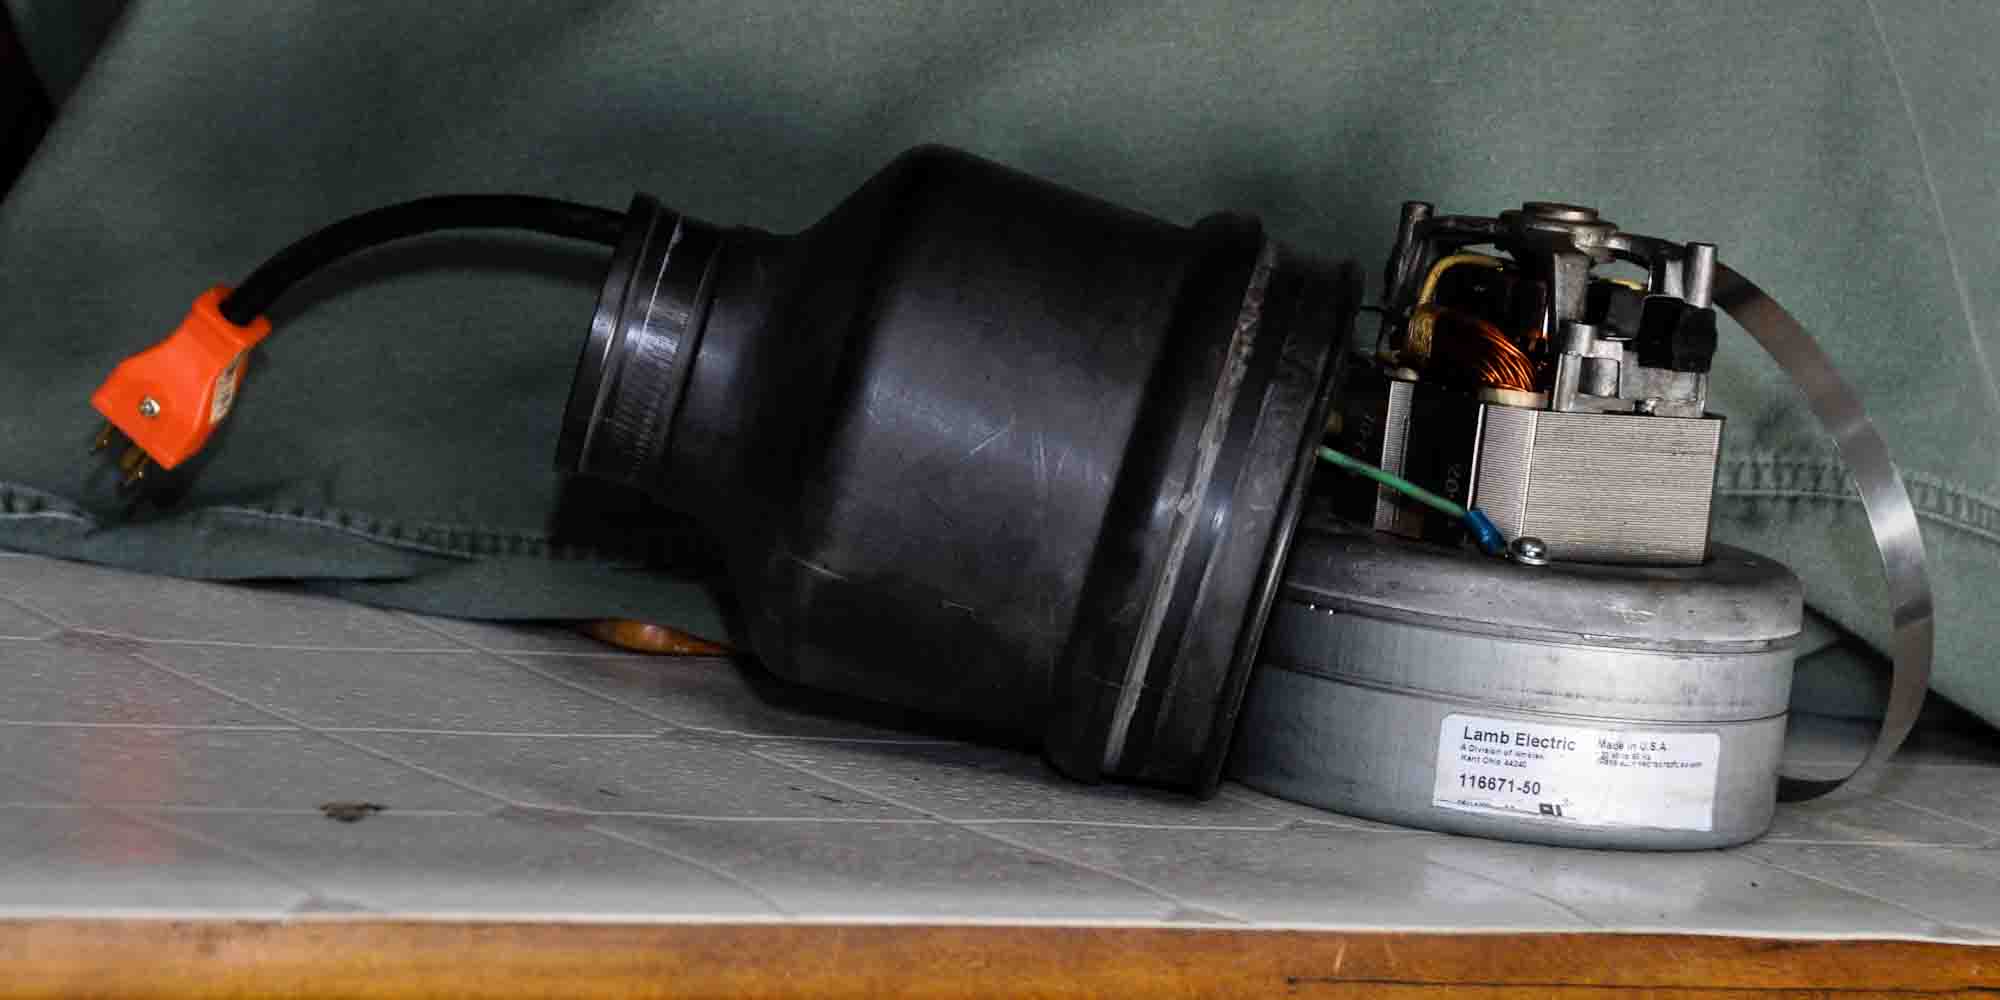
No oil on my beans...
|
|
|
|
| Erichimedes |
Posted on 09/10/2013 8:46 AM
|
|
1/4 Pounder Posts: 58 Joined: August 07, 2013 |
I was mostly going off of OGH's experience with the spa blower. I'm not sure if what I'm using is the same type of rubber, but I don't plan on letting my intake air go above 150F. From what I've read, it doesn't take much to really boost the heat in the RC. |
|
|
|
| Dan |
Posted on 09/10/2013 8:53 AM
|
|
1 1/2 Pounder Posts: 1662 Joined: October 24, 2005 |
Great work. I look forward to seeing the completed roaster.
1 pound electric sample roaster, 3 pound direct-flame roaster, both handmade; modified Mazzer Mini grinder, LaSpaziale Vivaldi II automatic espresso machine. When the electricity goes out I make vacpot coffee from beans ground on my Zassenhaus hand grinder, and heat the water with a teakettle on the gas range.
|
|
|
|
| allenb |
Posted on 09/10/2013 9:02 AM
|
 Administrator Posts: 3869 Joined: February 23, 2010 |
Plus 1 on the great work! This is going to be a rockin roaster. I'm looking forward to seeing another recirc stye roaster in operation. Must be nice being able to weld in-house (or shop that is). I've always hated having to spend the extra $ on out sourcing that part of the build. Keep the progress reports coming with photos/videos! Allen 1/2 lb and 1 lb drum, Siemens Sirocco fluidbed, presspot, chemex, cajun biggin brewer from the backwoods of Louisiana
|
|
|
|
| oldgearhead |
Posted on 09/10/2013 9:50 AM
|
|
1 1/2 Pounder Posts: 1128 Joined: February 10, 2011 |
Current at 120V: HAS-043 = 13.0A My Ametek two-stage, flow-through lofting 1 pound green is 4.0 amp on variable-autotransformer and 6 amp on DC drive. I might re-adjust the current limit on the DC drive someday, but I'm pretty happy with the torque boost. The build-in 30 amp appliance breaker has not tripped. I do see a 1 volt drop (120-119) when the AC is running, and an additional 2 volt drop (119-117) when the element is on. The line is 40 feet of 10 gauge from the box.. No oil on my beans...
|
|
|
|
| JETROASTER |
Posted on 09/10/2013 10:16 AM
|
 Administrator Posts: 1780 Joined: March 06, 2010 |
I'm quickly developing welding envy. Nice clean design. Thanks for sharing...keep the pics coming. Cheers, -Scott |
|
|
|
| Erichimedes |
Posted on 09/10/2013 10:17 AM
|
|
1/4 Pounder Posts: 58 Joined: August 07, 2013 |
Quote allenb wrote:Must be nice being able to weld in-house (or shop that is). I've always hated having to spend the extra $ on out sourcing that part of the build. Welding is a really fun skill to have, and fun to learn, in my opinion. And since you mention it, I do actually weld small projects in my living room! I have a very patient and wonderful girlfriend :P Luckily, my boss lets me weld most of my personal projects at the shop. OGH: Thanks for that info! That sounds good, because I was actually planning on installing a new 20A breaker in my box and running one of my 12ga. extension cords from that. It scares me running that much current on questionable 14ga. wiring in these old, dry walls. At least with the cord I can see and feel it to make sure it's not melting. Thanks for everyone's enthusiasm! I, too, am really excited to see how this turns out :D |
|
|
|
| oldgearhead |
Posted on 09/10/2013 10:39 AM
|
|
1 1/2 Pounder Posts: 1128 Joined: February 10, 2011 |
I would put a 30A in the box. You will have some inrush current to deal with. That is, unless you happen to have a 'D' curve breaker. 13 + 5.5 + 4 (NEMA's 20%) = 22.5A No oil on my beans...
|
|
|
|
| Erichimedes |
Posted on 09/11/2013 1:42 AM
|
|
1/4 Pounder Posts: 58 Joined: August 07, 2013 |
Good to know, thanks for that info OGH. I'm still learning a lot about electric stuff and making sure circuits are safe for their given loads. And on that note, I'm ordering components for the enclosure, and I'd like to add either a fuse or a small circuit breaker. Do you guys see any problem with something like this? http://www.mouser...2A99C10-25 I was also looking at a 30A version. |
|
|
|
| oldgearhead |
Posted on 09/11/2013 7:19 AM
|
|
1 1/2 Pounder Posts: 1128 Joined: February 10, 2011 |
I have the 30A version of it. No problems.
oldgearhead attached the following image:
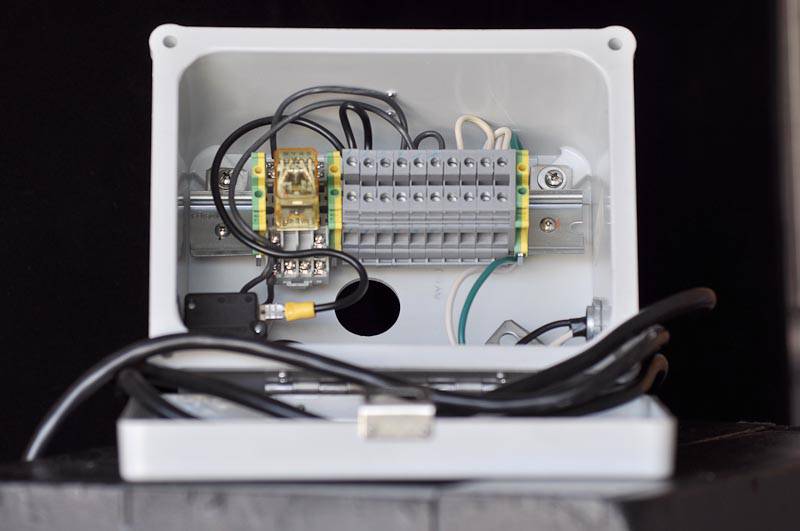
No oil on my beans...
|
|
|
|
| Dan |
Posted on 09/11/2013 7:55 AM
|
|
1 1/2 Pounder Posts: 1662 Joined: October 24, 2005 |
Yeah! Someone else who uses DIN rail! 
1 pound electric sample roaster, 3 pound direct-flame roaster, both handmade; modified Mazzer Mini grinder, LaSpaziale Vivaldi II automatic espresso machine. When the electricity goes out I make vacpot coffee from beans ground on my Zassenhaus hand grinder, and heat the water with a teakettle on the gas range.
|
|
|
|
| Erichimedes |
Posted on 09/14/2013 12:17 AM
|
|
1/4 Pounder Posts: 58 Joined: August 07, 2013 |
Made a little more progress. I've got the roast chamber started and the VC motor hooked up to a DC motor controller! I was helping my boss clean his back yard, and lo and behold, found an old KBIC. He gave it to me, and the motor it was attached to! So I've got the right HP resistor on it's way, but I was able to play around with the one that was already in it. Works great!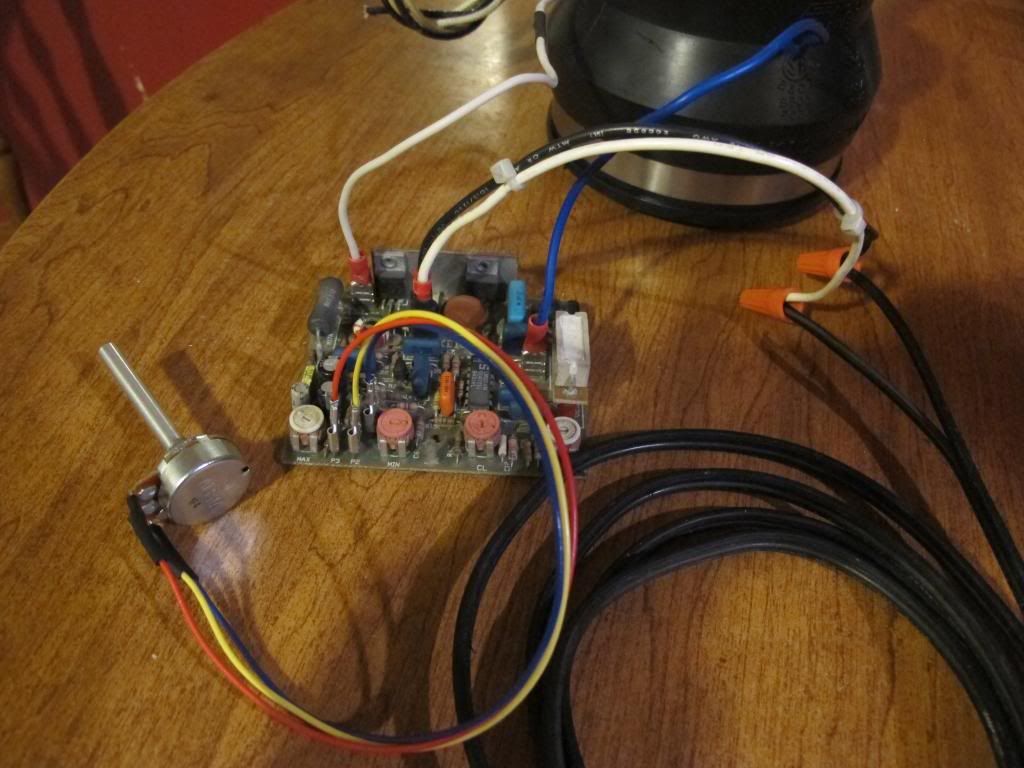 The KBIC all wired up and attached to a power cable for testing. 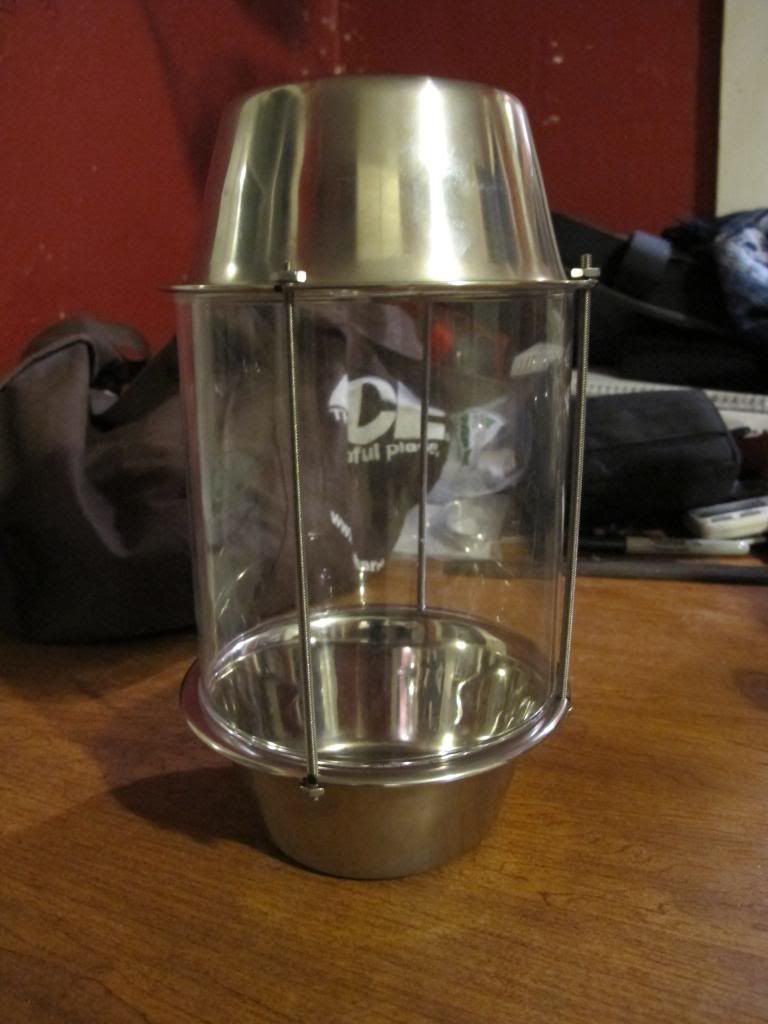 The beginnings of a RC. Building the enclosure tomorrow morning! |
|
|
|
| Erichimedes |
Posted on 09/14/2013 12:22 AM
|
|
1/4 Pounder Posts: 58 Joined: August 07, 2013 |
Also, with the KBIC, does it matter which sides of the motor I have the power positive and negative terminals hooked up to? Will it run differently one way or the other? |
|
|
|
| Erichimedes |
Posted on 09/15/2013 8:36 PM
|
|
1/4 Pounder Posts: 58 Joined: August 07, 2013 |
I hope everyone had a good weekend! Just wanted to post some progress. The wooden part of the enclosure is done, and I've mounted the blower/heater unit inside. I also tested it with the heat on, and she sure moves some hot air! Also, I'm taking a vote, stain or paint this thing? If stained, I'm thinking something really dark brownish, and if painted, I'd like to find a gold that's the same as the beans about 5 or 6 minutes into a roast. 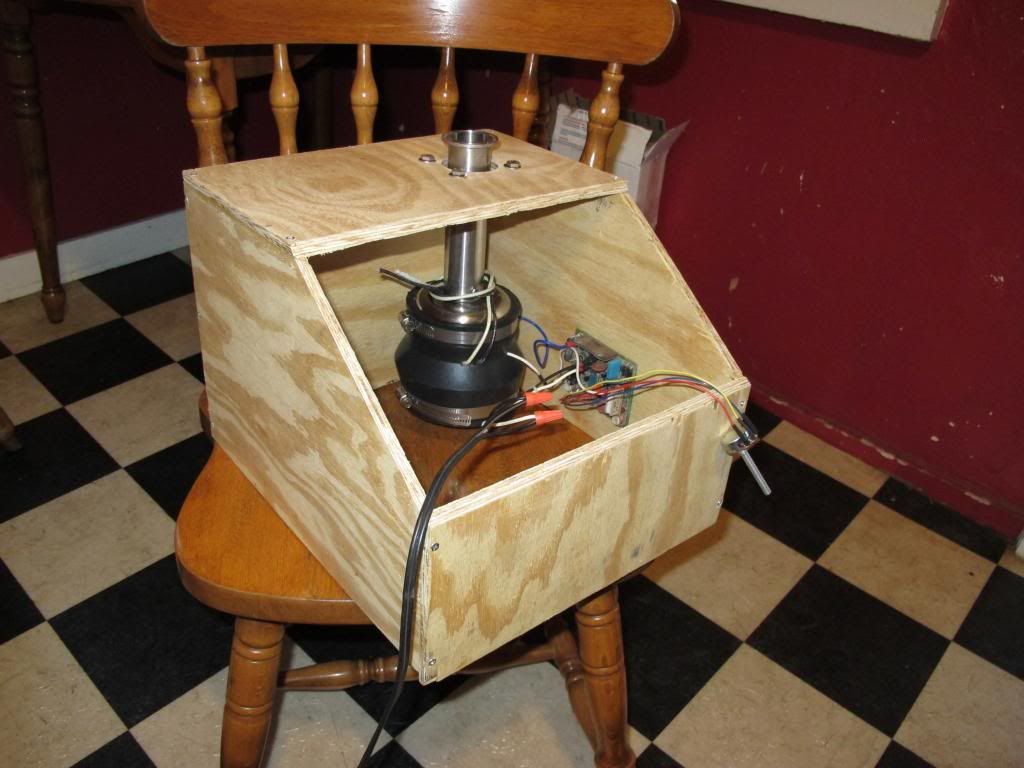 Now it's all effort into the RC, and that's coming along great. Will be out of town for a week, but after that it's full steam ahead. |
|
|
|
| oldgearhead |
Posted on 09/16/2013 8:58 AM
|
|
1 1/2 Pounder Posts: 1128 Joined: February 10, 2011 |
May I suggest insulation? / But both heat and blower in same insulated space bothers me.I think insulating the heater first then us the foam on the wall of the box..
oldgearhead attached the following images:
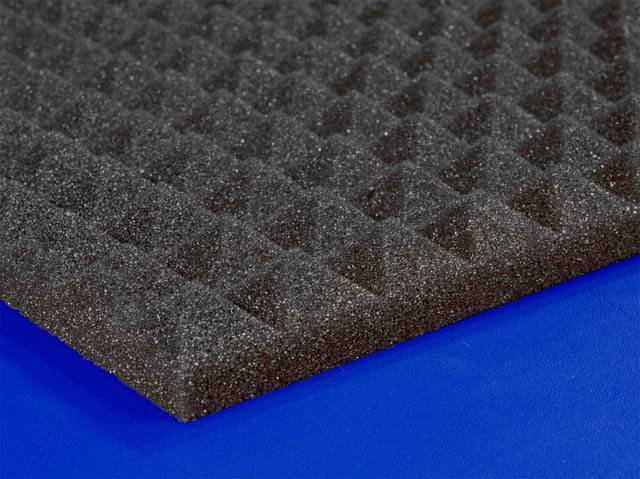
Edited by oldgearhead on 09/16/2013 9:03 AM No oil on my beans...
|
|
|
|
| Dan |
Posted on 09/16/2013 9:18 AM
|
|
1 1/2 Pounder Posts: 1662 Joined: October 24, 2005 |
It is unclear if the inlet for the blower is inside the box. If inside the box, then the constant flow of air will keep the interior cool. The added plus is that it will also reduce noise. At least half the noise from a vacmotor comes from the inlet. I made an enclosure for an industrial machine that I wanted to be cool, quiet, and dry. The blower's inlet is inside the enclosure, all air is drawn from the outside through a serpentine duct lined with sound reduction foam. hope this helps, Dan 1 pound electric sample roaster, 3 pound direct-flame roaster, both handmade; modified Mazzer Mini grinder, LaSpaziale Vivaldi II automatic espresso machine. When the electricity goes out I make vacpot coffee from beans ground on my Zassenhaus hand grinder, and heat the water with a teakettle on the gas range.
|
|
|
|
| Erichimedes |
Posted on 09/16/2013 9:44 AM
|
|
1/4 Pounder Posts: 58 Joined: August 07, 2013 |
Thanks for your input guys. I do plan to insulate the heater tube. Quite a bit, actually. I see this as more heat to the beans, and ultimately the most efficient. Then I plan to insulate the box for sound damping as well. That was one of the main reasons I chose a wooden enclosure, and also chose to keep the VC motor inlet inside the box. Soon, there will be an air vent drilled into the left side of the box. In between that and the VC motor is where the hot air return will come in. OGH, what did you end up using to insulate your heater tube? I saw that you mentioned firewall insulation early on, but it seemed like you might have gone a different route in the end. |
|
|
|
| oldgearhead |
Posted on 09/16/2013 3:20 PM
|
|
1 1/2 Pounder Posts: 1128 Joined: February 10, 2011 |
It's the .25 inch dossmightymatt from eBay. If and when I redo it, I will use the foil-both-sides version. I did have a problem with motor heating that I solved by cross-drilling the manifold between the blower outlet and the heater inlet... No oil on my beans...
|
|
|
|
| Erichimedes |
Posted on 10/16/2013 9:00 PM
|
|
1/4 Pounder Posts: 58 Joined: August 07, 2013 |
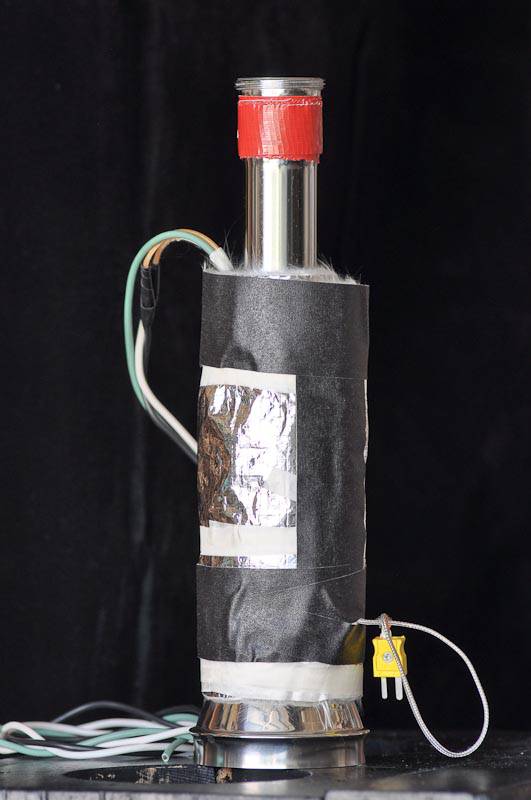
Well, it's been a while since I last posted an update. A couple of things slowed down my progress, but I've finally made enough that I feel an update is in order. My first roast chamber design was far too wide, and the bean circulation wasn't very good. Anticipating this, I'd already picked up a bake-a-round on Ebay, and just built a roast chamber with that. What you'll see here is the base, with a bare minimum of controls installed in the control panel: 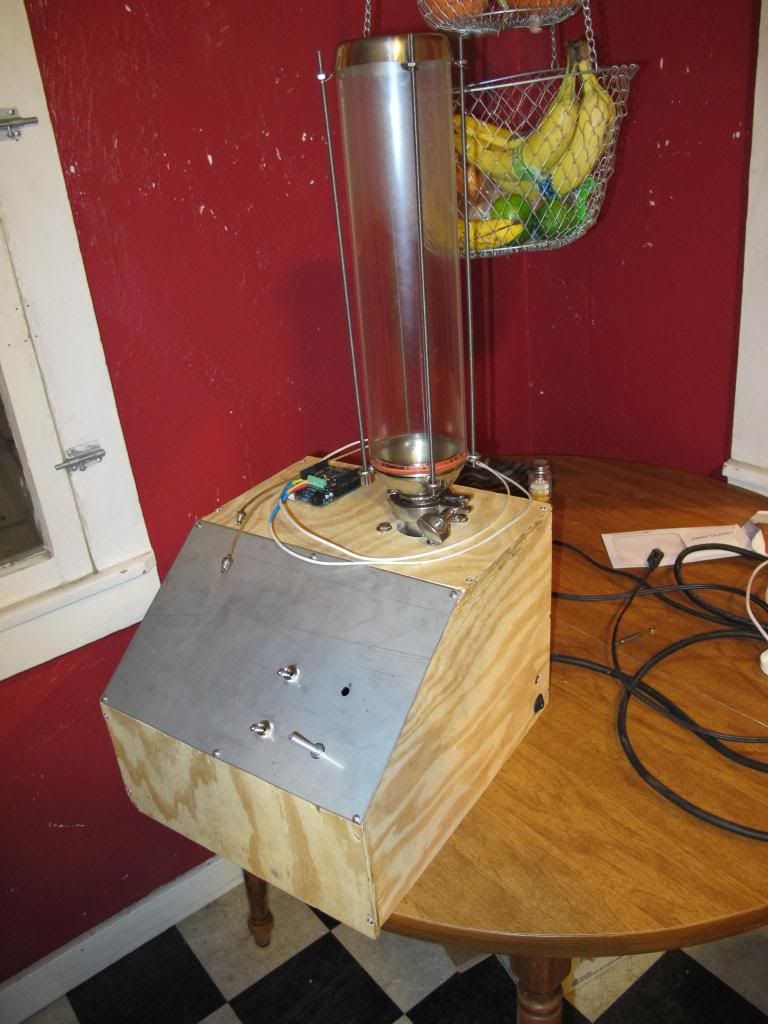 I don't have the hot air return tube fabricated yet, but for now, I'm just going to do 1/2 lb loads to experiment with a few things. I just did a Costa Rican bean, and it turned out really really well! I can't wait to cup it in the morning. The bottom switch and potentiometer control fan power and speed. The top switch currently just turns the heating element on. But the hole to it's right will soon contain a potentiometer that will connect to the TC4 and control the heating element with a SSR. 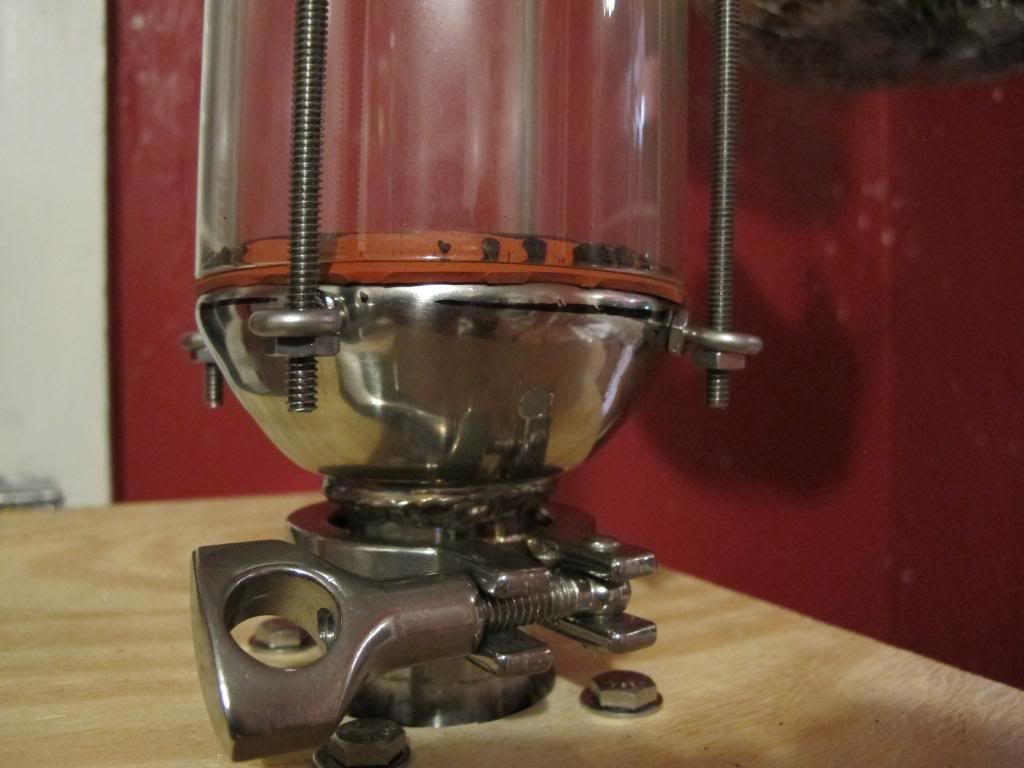 BT thermocouple hole I'll drill and tap a hole just below the tri-clamp for the ET thermocouple probe. I'm not sure how well that will work, but based on my other experimentation, I'm wary. I tried a BT probe in the bottom of the RC about 3/4" below the glass, with a 1/2" probe, and it didn't get very accurate readings. I compared it with a thermocouple dropped in the top right in the middle of the rolling bean mass, and it was about 60 deg F off at the end of the roast. My guess at this point is to try a longer thermocouple probe? What has been others' experience with this? Next things to be worked on: -Install ET thermocouple. -Experiment with other BT thermocouple locations and types. -Install the TC4 into the roaster body -Hook heating element up to SSR controlled by TC4. |
|
|
|
| JETROASTER |
Posted on 10/17/2013 8:20 AM
|
|
Administrator Posts: 1780 Joined: March 06, 2010 |
Great progress! Do you feel that a half pound is the ceiling without recirc? The 60 dg off reading ; Were you reading too high, or low? -Scott |
|
|
|
| Erichimedes |
Posted on 10/17/2013 9:08 AM
|
|
1/4 Pounder Posts: 58 Joined: August 07, 2013 |
Scott, Thanks! I'm really glad I got to see some beans swirling in there. They're being made into coffee as I type this! I feel as though I might be able to roast 3/4 lb, since I was able to roast 1/2 lb in about 10 minutes through second crack. It's less sensitive to ambient temps with recirc though, that's one of the reasons I like the idea. It helps remove the variable of what temperature it is outside today. The thermocouple was reading about 60 deg lower than I think it should have been. The thermocouple dropped in the top was reading right around 460 deg during 2nd crack, while the thermocouple in the wall of the cocktail shaker lid was just making it to 405. I may try making my own thermowell that's a 1/2" longer than my current one and see if it works being a little longer. If not, I assume it's the position that has to change. |
|
|
|
| oldgearhead |
Posted on 10/17/2013 4:07 PM
|
|
1 1/2 Pounder Posts: 1128 Joined: February 10, 2011 |
I would just stick with the BMT probe in the wall of the cocktail shaker and offset the readings to match whatever. There is much to be said for keeping the top clean for things like chaff collection...
No oil on my beans...
|
|
|
|
| Erichimedes |
Posted on 10/17/2013 7:04 PM
|
|
1/4 Pounder Posts: 58 Joined: August 07, 2013 |
Yeah, I don't think I'll put anything in the top, but I think I may make my own slightly longer probe that goes a little further into the bean mass. My theory is that the cocktail shaker lid is sinking heat away from the probe, and it's lowering the temperature reading. We'll see. The upper lip of the cocktail shaker lid was catching beans, and may have been limiting how many hot beans were contacting the BMT probe. I've cut it off, and now for another roast  I'm curious though, to all the fluidbed folks: What have been your adventures with temperature probes? |
|
|
|

Page 1 of 2: 12
| Jump to Forum: |
Powered by PHP-Fusion Copyright © 2024 PHP-Fusion Inc
Released as free software without warranties under GNU Affero GPL v3
Designed with ♥ by NetriXHosted by skpacman