
Login

Shoutbox
You must login to post a message.
renatoa
07/26/2024 3:49 PM
Bill grubbe and Jk, 
allenb
07/26/2024 5:15 AM
Spiderkw Welcome to HRO!

renatoa
07/24/2024 8:31 AM
ramiroflores and John123,

 ?
?
?renatoa
07/21/2024 1:18 AM
 , Luislobo
renatoa
07/19/2024 11:28 AM
Koepea,
Forum Threads
Newest Threads
Skywalker roaster modsBackground Roast Iss...
Hello from Arkansas
TC4ESP
Green coffee reviews
Hottest Threads
| Skywalker roaster... | [375] |
| TC4ESP | [115] |
| War on Farmers by... | [47] |
| Adventures in flu... | [26] |
| Hello! (soon) Roa... | [17] |
In Memory Of Ginny

Donations
Latest Donations
dmccallum - 10.00
JackH - 25.00
snwcmpr - 10.00
Anonymous - 2.00
Anonymous - 5.00
dmccallum - 10.00
JackH - 25.00
snwcmpr - 10.00
Anonymous - 2.00
Anonymous - 5.00
Users Online
Guests Online: 6
Members Online: 0
Total Members: 8,394
Newest Member: Bill grubbe
Members Online: 0
Total Members: 8,394
Newest Member: Bill grubbe
View Thread
Who is here? 2 guest(s)
Page 1 of 2: 12
|
 My first popcorn mod roaster (vahegan)
|
|
| vahegan |
Posted on 03/23/2014 8:37 AM
|
|
Newbie  Posts: 48 Joined: March 23, 2014 |
Hi! This is my first roaster. I am completely new to this forum and this is my very first post. I designed this roaster from the scratch, without any previous knowledge or experience, and much before I found out about this forum. Therefore, please be forgiving about my wrongdoings. I decided to start home roasting in January, and a popcorn machine seemed easiest to me, so I purchased one. It was called Korny, a 1200W model by Italian company Ardes.  I tried a couple of roasts - the results were better than store bought stale coffee, but I was disappointed by the too quick roasts it gave me. My original roast times were between around 3:30 to 4 minutes, and just a 10-20 seconds difference in roast times made a huge difference in roasting - from just after first crack to completely black-burnt oily beans. So I assumed that 1.2kW was somewhat excessive for 85-90g of coffee and I started to think about modifications. I started with adding a thermocouple:  I disassembled the popcorn machine, took out the aluminum barrel, drilled a hole in the bottom center, inserted the thermocouple and affixed with a nut:  I then drilled a hole in the insulator on which the heater coils are attached and pushed the thermocouple wire through it:  I drilled another hole for the thermocouple in the metal flank of the heater unit. Here is the whole stuff assembled back:  Then I purchased a thermocouple-to-digital chip (MAX6675) and connected it to an Arduino Nano. To control heater power, I also connected to Arduino a triac (BTA26-600), controlled to switch with a zero-cross detector (MOC3063). Next, I had to do something to provide power to the blower and the Arduino. The blower motor was initially supplied from a section of the heater, which I assumed was not appropriate for my project since I was going to control heater power. I needed a power supply, powerful enough for the motor. According to my measurements, the motor consumed about 2.5A at its rated 24V, which is about 60W. So I needed a power supply capable of some 70-75W, but small enough to fit in the empty space in the popcorn machine case. I first thought about using an electronic transformer for halogen bulbs. They are rated for 12V output, so I added up some turns on the transformer and added a rectifier bridge with ultra-fast diodes. Initially, it seemed to be a perfect solution for me (especially since 100W electronic transformers were available for just under $4). At first, all worked fine. However the schematic of these electronic transformers is not designed for operation with no load. It worked well when the motor was running, but as soon as I turned it OFF, transistors quickly overheated and broke down. After blowing quite a few units, I finally decided to use its switching transformer, but replaced the circuit by a half-bridge driver (IR2153) and two FETs (IRF840). The resulting power supply was about the size of a match box, was powerful enough and fitted in the case of the popcorn machine. I wound yet another winding, with good filters, to supply the Arduino. I connected a power transistor (TIP122) to one of Arduino's PWM outputs to control the blower speed. I assembled all this stuff on a prototyping board and attached it on the popcorn machine bottom:   Since I've got quite a few free pins on the Arduino, I added a Nokia 5110 graphics LCD screen and an RGB LED for indication, and two buttons for control. The present roaster assembly looks like this:  Then I worked on the software. I used a PID library to control heater power, and added several roast profiles. To start with, I just copied the iRoast 3-stage profiles that I found somewhere on Sweet Marias forum. I assume that there is some difference in temperature readings of iRoast and what my thermocouple is giving: when I use iRoast's standard settings (even when using the real figures of its temperature sensor rather than setting values), i.e. 227C for 390 seconds, then 202C for 180 seconds, and again 227C for 90 seconds, I get dark and oily roasts. I am getting much better results with a profile which the author describes as "too light for most people's taste ": 152C for 120 seconds, 179C for 180 seconds, 213C for 270 seconds. Well, maybe I am also a fan of lighter roasts... All this design and development at my spare time took me more than a month. By the time, I didn't know about the Artisan software, otherwise I would have thought of some output in a compatible format. I am now considering this, along with switching to slower heating in 5 stages, rather than the present 3 stages - hopefully this will make the results closer to drum roasting. For the time being, my software just sends the time stamps and thermocouple readings to the serial port, which I log and then plot roasting graphs in Excel:  The blue graph is the actual temperature measured with the thermocouple, the red is the temperature setting (there is an overshoot at the beginning of the first stage in this graph, which I already mostly fixed by PID adjustments, but I couldn't find more recent graphs on my computer). The green line is the power that PID algorithm applies to the heater. (I am using a constant fan speed during the whole roast process and increase it by 20% at the cooling stage, just after turning OFF the heater). A sample roast using this profile:  Well, this much for now. I will shoot a video and upload it later. I would greatly appreciate your comments and suggestions towards improving this machine. |
|
|
|
| oldgearhead |
Posted on 03/23/2014 9:28 AM
|
 1 1/2 Pounder  Posts: 1128 Joined: February 10, 2011 |
Awesome job! Very nice! My only suggestion would be to be more aggressive in stage two (ramp-to-first crack) and less aggressive in the drying and finish stages. However, the drying phase is somewhat dependent on the ambient temperature and if you use a 'warm up' or not. But any fluid-bed roaster is at the mercy of the blower speed at all times during the roast. Usually more air will lower the 'batch' (BMT) temperature and less air will increase it. Therefore, even though you are not changing the speed of your blower, the 'batch' will cool because the beans get lighter during the roast. So maybe your current 'program' is perfect...
Edited by oldgearhead on 03/23/2014 9:35 AM |
|
|
|
| vahegan |
Posted on 03/23/2014 10:57 AM
|
|
Newbie Posts: 48 Joined: March 23, 2014 |
Thank you, oldgearhead Can you please explain what do you mean by being aggressive between Mayard phase and the first crack? Do you mean higher temperature or faster change of temperature? Quote However, the drying phase is somewhat dependent on the ambient temperature and if you use a 'warm up' or not. Again, not quite clear to me what do you mean? Since I am using a temperature controller, the drying phase temperature does not depend on the ambient, after the initial overshoot, its stable. I think only the steepness of the heating cure somewhat depends on the ambient temp. As for the blower speed - yes, I can control it, but a two-variable PID is rather complicated and I am not quite good at PID tuning, therefore I leave it constant for the time being. |
|
|
|
| vahegan |
Posted on 03/23/2014 1:56 PM
|
|
Newbie Posts: 48 Joined: March 23, 2014 |
Update: I have just uploaded a video of my roaster in operation (a full cycle) to youtube: [video]http://www.youtube.com/watch?v=_EibeHFTing[/video] |
|
|
|
| Airhan |
Posted on 03/23/2014 2:32 PM
|
 1/2 Pounder  Posts: 228 Joined: September 29, 2013 |
Nice video, you did some great work on that popper, and impressive use of the arduino!
Aaron
"Grind it like it did you some great injustice!"D.L.Clark |
|
|
|
| allenb |
Posted on 03/24/2014 8:36 PM
|
 Administrator Posts: 3869 Joined: February 23, 2010 |
Amazing work on your popper! You seem to have an excellent grasp of electronics and microcontrollers which is a real plus when trying to create your own controls for a roaster. A couple of thoughts. Roasting in stages (power level stages) works pretty well in drum roasters with their inherent thermal inertia but roasting in stages with a fluidbed roaster is not advisable unless you use enough stages to prevent stalls in bean temperature rate of rise. For proper development we want the coffee to always see a rise in temperature and never see a flat line (stall). On drying, browning and finish phases of a roast, try as many variations of the 4-4-4 as you can to see what gives you the best cupping for each type of coffee you purchase. After experimenting with fast, medium and slow profiles I've come to the conclusion that there are no rules that can't be broken when it comes to coffee roasting. You have to be willing to try many variations to find the sweet spots with any coffee. Allen 1/2 lb and 1 lb drum, Siemens Sirocco fluidbed, presspot, chemex, cajun biggin brewer from the backwoods of Louisiana
|
|
|
|
| alexcampbell |
Posted on 03/24/2014 10:10 PM
|
|
Newbie Posts: 42 Joined: December 16, 2013 |
The fall in temperature can be fixed with further tuning the PID settings. My arduino controlled Poppery 1 does not have that dip in the profile. I am at P: 1.79 I:0.09 D: 8.99. I am using the built in Roastlogger PID. Would you be willing to share your code? |
|
|
|
| JETROASTER |
Posted on 03/25/2014 8:16 AM
|
 Administrator Posts: 1780 Joined: March 06, 2010 |
Nicely done!! Welcome to HRO. -Scott |
|
|
|
| oldgearhead |
Posted on 03/25/2014 9:13 AM
|
|
1 1/2 Pounder Posts: 1128 Joined: February 10, 2011 |
Quote vahegan wrote: Thank you, oldgearhead Can you please explain what do you mean by being aggressive between Mayard phase and the first crack? Do you mean higher temperature or faster change of temperature? Quote However, the drying phase is somewhat dependent on the ambient temperature and if you use a 'warm up' or not. Again, not quite clear to me what do you mean? Since I am using a temperature controller, the drying phase temperature does not depend on the ambient, after the initial overshoot, its stable. I think only the steepness of the heating cure somewhat depends on the ambient temp. As for the blower speed - yes, I can control it, but a two-variable PID is rather complicated and I am not quite good at PID tuning, therefore I leave it constant for the time being. Again excellent job! First let me say I use no automation on my coffee roaster. However, when I see a super job like yours, I am tempted to take the old A/B SLC504 off the shelf and start in. I'll start by discussing two of the critical fluid-bed coffee roaster temperatures: Bean Mass Temperature (BMT) and Process Variable Temperature (PVT). BMT is the temperature of the beans and the hot air that keeps them moving. PVT is the temperature of the hot air that enters the RC (roasting chamber). If no change is made in blower pressure during the roast as the beans get lighter the BMT probe will be influenced more by the PVT than the BT (bean temp). For two years I always adjusted the PVT during each roast, but recently I have just set a constant PVT temperature, and adjusted the blower pressure about four times during the roast to control the BMT. Answers: 1) "More aggressive' - I mean a quicker RoR (rate of rise of the PVT). 2) 'Ambient temperature' - My roaster lives in an unheated garage in Central Indiana. When the garage is 50F I use no warm-up or reclaim air baffles. But when its 17?F I must use the baffles plus a warm-up to have the same roast time for the same bean. One more tip - Try to cool your beans faster with an external cooler. Great job! Great job!
oldgearhead attached the following image:

Edited by oldgearhead on 03/25/2014 9:20 AM |
|
|
|
| vahegan |
Posted on 03/26/2014 3:26 AM
|
|
Newbie Posts: 48 Joined: March 23, 2014 |
Quote Airhan wrote: Nice video, you did some great work on that popper, and impressive use of the arduino! Quote Quote allenb wrote: Amazing work on your popper! You seem to have an excellent grasp of electronics and microcontrollers which is a real plus when trying to create your own controls for a roaster. Quote oldgearhead wrote: Again excellent job! Thank you, all, guys, for the nice words! Your encouragement is important for continuing the work! Quote allenb wrote: Roasting in stages (power level stages) works pretty well in drum roasters with their inherent thermal inertia but roasting in stages with a fluidbed roaster is not advisable unless you use enough stages to prevent stalls in bean temperature rate of rise. For proper development we want the coffee to always see a rise in temperature and never see a flat line (stall). Thank you for the input, Allen, I am trying to understand what you mean. What do you mean when you say "Roasting in power level stages"? My stages are based on my attempts to stabilize the temperature at certain stages, and the PID controller varies the power to maintain the temperature stable. The power is the green line on my screenshot, and you can see the variations: its not at all stable, while the temperature graph (blue) is attempting to stay close to the temperature setting. So, by using PID, I think I'll be able to program a slow ramp of temperature, similar to a drum roaster, if that is required. I was also not able to grasp the idea of why do we need to keep the temperature rising all the time, and never stall? I think I am missing something important here, can you please offer some more explanation on this point, or direct me to some reading on the matter? So far, I thought that stable temperature during roast stages was the key to success, and have put quite some effort to achieve this. Quote On drying, browning and finish phases of a roast, try as many variations of the 4-4-4 as you can to see what gives you the best cupping for each type of coffee you purchase. After experimenting with fast, medium and slow profiles I've come to the conclusion that there are no rules that can't be broken when it comes to coffee roasting. You have to be willing to try many variations to find the sweet spots with any coffee Again, my knowledge is yet insufficient to quickly grasp the meaning. What do you mean by "variations of the 4-4-4" - do you mean temperature settings, PID values, or roast stage durations? Yes, I like experimenting, and I am constantly doing that, but I lack experience. There are too many variables that can be adjusted, and I just feel confused without understanding what affects what. I roast in small batches (about 1/5 of a pond at a time) that are good for a few days of cupping, which is rather good for experimentation. However it is difficult to judge without objective criteria of roast results. I mean, there are, again, numerous parameters that affect my cupping experience (e.g. weather, quality of night sleep, mood, and air temperature in the house - to mention just a few) and the same batch is perceived very differently each time. I am a physicist by education and it'd be much easier for me to operate with measurable parameters, being able to calculate measurement mean error etc. Otherwise, it feels like wandering with closed eyes in a dark room that is full of obstacles and not... Quote alexcampbell wrote: The fall in temperature can be fixed with further tuning the PID settings. My arduino controlled Poppery 1 does not have that dip in the profile. I am at P: 1.79 I:0.09 D: 8.99. I am using the built in Roastlogger PID. Would you be willing to share your code? Thank you, Alex. Certainly, there is much room to improve the PID control. I am presently at P:3 I:0.4 D: 0.1 but this was found by the method of trial and effort, without applying any consistent approach. Actually, I tried to determine the settings using the Cohen Coon Tuning Method from the ramp graph, but the results were not sensible (I was getting a P setting around 70). How did you arrive at quoted coefficients? In doubt that same coefficients that you use will be applicable to my popper, this depends on numerous factors, including sampling frequency. In my current setup, I am sampling once a second. I tried to update the software to 4 samples per second, and the coefficients were absolutely wrong after the change (I couldn't easily find new PID coefficients and returned back to the old software revision). I will post the code in a separate message. |
|
|
|
| vahegan |
Posted on 03/26/2014 3:29 AM
|
|
Newbie Posts: 48 Joined: March 23, 2014 |
So, here's the Arduino code I have written for my popper. Code Download source /* |
|
|
|
| vahegan |
Posted on 03/26/2014 6:42 AM
|
|
Newbie Posts: 48 Joined: March 23, 2014 |
Quote oldgearhead wrote: If no change is made in blower pressure during the roast as the beans get lighter the BMT probe will be influenced more by the PVT than the BT (bean temp). For two years I always adjusted the PVT during each roast, but recently I have just set a constant PVT temperature, and adjusted the blower pressure about four times during the roast to control the BMT. I do not quite get that. The BMT probe is in the chamber, touching the beans and the hot air. The air that enters the chamber is already hot. and its temperature is determined by the power that is applied to the heater by the PID algorithm. So, regardless of what the ambient temperature is, hot air temperature must correspond to the temperature setting. Of course, blower pressure would also affect the temperature, but that's yet another parameter to control, which would make things more complicated. Besides, there us one more reason I am afraid to fiddle much with the blower: with smaller beans like Yirgacheffe, it is already starting to spit them out at some stage when they get lighter. I am afraid to loose all my coffee if I start playing with the blower speed towards the increase, whereas when adjusting towards decrease, there might be problems with agitation. I was thinking to experiment with maximum and minimum speeds for a given amount of beans, but their weight and size changes at different roast stages. Therefore I decided to leave the blower speed constant for the time being. Speaking of spitting beans, I noticed that more beans are trying to fly out of the roaster mouth somewhere at the final stage, than at the cooler stage when I increase blower speed by some 20%. I don't quite understand this yet, the only explanation I can think of is that beans expand when they are hot, and shrink down when they are cooler. Quote One more tip - Try to cool your beans faster with an external cooler. OK. It currently takes me about 1:40 minutes to cool down from about 214C (about 417F) to 45C (about 113F). I am not sure I will achieve a faster cool in a colander, but can give it a try. |
|
|
|
| oldgearhead |
Posted on 03/26/2014 9:08 AM
|
|
1 1/2 Pounder Posts: 1128 Joined: February 10, 2011 |
Quote vahegan wrote: Quote oldgearhead wrote: If no change is made in blower pressure during the roast as the beans get lighter the BMT probe will be influenced more by the PVT than the BT (bean temp). For two years I always adjusted the PVT during each roast, but recently I have just set a constant PVT temperature, and adjusted the blower pressure about four times during the roast to control the BMT. I do not quite get that. The BMT probe is in the chamber, touching the beans and the hot air. The air that enters the chamber is already hot. and its temperature is determined by the power that is applied to the heater by the PID algorithm. So, regardless of what the ambient temperature is, hot air temperature must correspond to the temperature setting. Of course, blower pressure would also affect the temperature, but that's yet another parameter to control, which would make things more complicated. Besides, there us one more reason I am afraid to fiddle much with the blower: with smaller beans like Yirgacheffe, it is already starting to spit them out at some stage when they get lighter. I am afraid to loose all my coffee if I start playing with the blower speed towards the increase, whereas when adjusting towards decrease, there might be problems with agitation. I was thinking to experiment with maximum and minimum speeds for a given amount of beans, but their weight and size changes at different roast stages. Therefore I decided to leave the blower speed constant for the time being. Speaking of spitting beans, I noticed that more beans are trying to fly out of the roaster mouth somewhere at the final stage, than at the cooler stage when I increase blower speed by some 20%. I don't quite understand this yet, the only explanation I can think of is that beans expand when they are hot, and shrink down when they are cooler. Quote One more tip - Try to cool your beans faster with an external cooler. OK. It currently takes me about 1:40 minutes to cool down from about 214C (about 417F) to 45C (about 113F). I am not sure I will achieve a faster cool in a colander, but can give it a try. Yes, at the start of the roast your temperature probe reflects the temperature of the hot air, the beans, and the plate its mounted in. As the roast progresses the beans double in size, and lose their moisture. Therefore, they are lighter and have more surface area, they require much less air to remain 'fluid', so they 'fly' higher. As the beans become lighter your temperature probe is influenced more by the hot air, and less by the beans and the mounting plate. However, your total roast times (11-15 minutes) appear perfect to me, and if you are happy with the taste of coffee, don't change anything. Cooling - Are the cooling temperatures you reported from your roaster probe or the beans? I'm very surprised the 'popper' can cool that well with only a 20% increase in blower speed. But that's fine, don't bother with the colander. Ambient air - Electric heating units can only raise the temperature of the air supplied to them. Therefore, as long as your ambient air stays within range of your heater's capability you won't see much of an affect.But I know a couple of 'popper' users who rely either a cardboard box or a heat gun when it gets cold. |
|
|
|
| vahegan |
Posted on 03/26/2014 11:05 AM
|
|
Newbie Posts: 48 Joined: March 23, 2014 |
Quote oldgearhead wrote: As the roast progresses the beans double in size, and lose their moisture. Therefore, they are lighter and have more surface area, they require much less air to remain 'fluid', so they 'fly' higher. As the beans become lighter your temperature probe is influenced more by the hot air, and less by the beans and the mounting plate. OK, I now get what you mean Quote However, your total roast times (11-15 minutes) appear perfect to me, and if you are happy with the taste of coffee, don't change anything. Well, this is a tricky point. I've got several coffees and more are yet to arrive (I have to order the good ones from overseas, that takes some time). I am drinking it, and I like the results much better than stale store-bought coffee. But I don't know yet what they will max out, and I am sure it'll be possible to obtain much better results with what I have... I am afraid I am on a slow learning curve now Quote Cooling - Are the cooling temperatures you reported from your roaster probe or the beans? I'm very surprised the 'popper' can cool that well with only a 20% increase in blower speed. But that's fine, don't bother with the colander Yeah, I have just one probe in the bottom of the popper can, all my temperatures are from there. But when I remove the beans just after cooling, they are hardly warm to the touch - just about 40-42C (104-108F) According to the sticker, my blower motor is rated at 24V DC. I measured the voltage in its original connection, and there was about 18V on it. That's what I supply to the motor presently, but its on a PWM control, and my power supply is capable of supplying up to 30V, so I can easily blow all the beans away should I wish to. When I speak about 20% increase of blower speed during cooling, I mean a 20% increase of PWM ratio, which translates into roughly 20% voltage increase on the motor, but it is hard to judge on how much the actual flow changes. Theoretically, for a brushed DC motor, the dependence of RPM on voltage is linear, so I expect that flow increase should also be around 20%. Quote Ambient air - Electric heating units can only raise the temperature of the air supplied to them. Therefore, as long as your ambient air stays within range of your heater's capability you won't see much of an affect.But I know a couple of 'popper' users who rely either a cardboard box or a heat gun when it gets cold. OK, I see your point. Yes, indeed, my friend who was using a 1040W popper reported that he was hardly getting there and baked a batch or two due to too low temps. My popper is 1200W, and this was sufficient even when the ambient was freezing cold (I am roasting at the balcony), although it seems a tad slow to get to the last stage. Well, I think I'll be able speed up this ramp, should I need it, by dropping the blower speed a little bit. By the way, I inserted a meat probe in the chamber during the roast today, and I've got a reading some 10C (about 18F) higher than what my probe reading. I think this explains why I am getting too dark roasts with standard profiles. Will have to check the temperature difference also at the drying and Mayard phases, to find out whether it is a constant error or if it is proportional to measured temperature. to be able to make corrections. I think this difference is due to the cold junction compensation circuit in the thermocouple chip. There is no cold junction in the circuit, and the chip is compensating based on an on-the-chip temperature sensor. I placed the chip below the heater, in the hope that its case temperature will be equal to that of ambient air that is being sucked in by the blower. However, I am not sure what's the chip temperature during roast and this may be affecting my probe readings. The other reason may be a low-quality thermocouple... Anyway, I need to compensate for this error and therefore I shall find out how the error depends on the actual temperature range. |
|
|
|
| vahegan |
Posted on 03/26/2014 11:15 AM
|
|
Newbie Posts: 48 Joined: March 23, 2014 |
Yeah, BTW, thank you for the nice photo with roast temperatures in your last post. I'll give these settings a try once I compensate for my thermocouple error. I've also got a 5-stage profile that someone developed in analogy with a Hottop drum roaster, I am thinking to program this profile as well: * 160C (320F) ? 5 minutes * 190C (374F) ? 4 minutes * 196C (385F) ? 2 minutes * 204C (400F) ? 1 minute * 210C (410F) ? 3 minutes |
|
|
|
| allenb |
Posted on 03/26/2014 4:31 PM
|
|
Administrator Posts: 3869 Joined: February 23, 2010 |
Quote What do you mean when you say "Roasting in power level stages"? My stages are based on my attempts to stabilize the temperature at certain stages, and the PID controller varies the power to maintain the temperature stable. Roasting by holding a setpoint at a steady state by bean temperature or environment temperature for X minutes and seconds and on up through successive stages is what I meant by stages. Quote I was also not able to grasp the idea of why do we need to keep the temperature rising all the time, and never stall? I think I am missing something important here, can you please offer some more explanation on this point, or direct me to some reading on the matter? So far, I thought that stable temperature during roast stages was the key to success, and have put quite some effort to achieve this. For coffee to develop properly, it needs to continually rise in temperature. Numerous studies have been undertaken over the last century that concluded that for the hundreds of chemical reactions to properly take place, bean temperature must never stop increasing (stall) and especially never decrease. When this occurs, reaction X, needed to allow the next reaction to properly execute, itself is compromised which negatively effects all subsequent reactions. It?s fine to use multiple stages as long as the end result allows the beans to continually rise and not stall. For a fluidbed roaster, it?s best to utilize a ramp versus stages so there is a continual rise in environment temperature. Quote Again, my knowledge is yet insufficient to quickly grasp the meaning. What do you mean by "variations of the 4-4-4" - do you mean temperature settings, PID values, or roast stage durations? In general, many in the coffee roasting community have broken down a roast into three phases. The drying phase being from start of roast to when the beans go from green to a yellow or yellow/tan and is at an internal temperature where free moisture has been driven out (around 150C). This relates to the first of the three 4?s in the 4-4-4. The second phase is the browning phase which is from around 150C to first crack and represents the second 4. The last phase is referred to as the finish phase from start of first crack to end of roast. One would typically only hit 4 minutes after first crack if taking the roast beyond a medium roast otherwise would be closer to 2 ? or 3 minutes. The concept of the 4-4-4 is to give someone new to roasting a place to start to prevent them from blindly trying a myriad of profiles that will certainly produce poor results before finally arriving at a profile that produces good coffee. ?wandering with closed eyes in a dark room that is full of obstacles and not...? Great analogy! Just a couple of pointers to help you move forward; Use high enough heat at the start (no need to warm up a fluidbed) to get your beans to 105C in 1 ? to 2 minutes then taper off the heat to allow hitting yellow/tan (150C) by minute 4 or up to minute 5, then keep the beans rising in temperature smoothly to get to first crack in another 3 to 5 minutes then after the beginning of first crack back off the heat enough to allow finishing the roast in another 1 ? to 3 minutes. Then remember to try all sorts of variations on this theme to find each coffee?s sweet spot. On fan speed adjustments during a roast. It?s best to leave the blower of a fluidbed manually adjustable (continuously variable) and make adjustments as needed to keep the beans flowing nicely but not flying chaotically. As you?ve noted, as the beans expand and lighten in weight, they will continually become more airborne and launch themselves out of the roast chamber. If you find a way to automate this process that will be great and please share your process! Allen 1/2 lb and 1 lb drum, Siemens Sirocco fluidbed, presspot, chemex, cajun biggin brewer from the backwoods of Louisiana
|
|
|
|
| vahegan |
Posted on 03/27/2014 12:22 AM
|
|
Newbie Posts: 48 Joined: March 23, 2014 |
Quote Thank you very much, Allen! That's an awesome wealth of new information for me. Will have to digest it, and think what needs be changed in my software. I'll come back  Thanks, again, many things become clearer now. Thanks, again, many things become clearer now.
|
|
|
|
| vahegan |
Posted on 04/04/2014 6:12 AM
|
|
Newbie Posts: 48 Joined: March 23, 2014 |
OK, so after a few days of digesting of the information provided, I modified my software according to Allen's suggestion. I heat up to 105C (it took me about 80 seconds to get there - possibly could do it even quicker after playing with PID settings). Then I ramp the temp to 152C within in 160 seconds, another ramp from 152C to 182C within 220 seconds, the final ramp to 223C in 140 seconds, followed by cooling to 45C in about 100 seconds. Total time is around 12 minutes. I am attaching the log. Would really appreciate your comments on this.  As always, the blue line is the actual temperature measured by thermocouple (I added calibration factors to the thermocouple in this edition of software). the red line is the temperature setting, and the green line is power (%) that is applied to the heater. |
|
|
|
| vahegan |
Posted on 04/04/2014 6:40 AM
|
|
Newbie Posts: 48 Joined: March 23, 2014 |
The ramp rates are as follows: 1. Heating to 105C/221F: 0.9C/sec or 1.6F/sec (my heater is capable of doing twice as quick in this temperature range, but it will be difficult to avoid an overshoot then). 2. Ramp to 152C/305F: 0.3C/sec or 0.5F/sec, 3. Ramp to 182C/360F: 0.14C/sec or 0.7F/sec, 4. Ramp to 223C/433F: 0.3C/sec or 0.5F/sec 5. Cooling to 45C/113F: 1.8C/sec or 3.2F/sec. I plan to buy a kerosene lamp glass and install instead of the plastic cap - then I will be able to improve the cooling speed by driving more power to the motor. In my present setup it will blow the beans out of the popper if I increase the motor speed. |
|
|
|
| allenb |
Posted on 04/04/2014 8:29 AM
|
|
Administrator Posts: 3869 Joined: February 23, 2010 |
Looking much better! What temperature are you seeing at start of first crack? I would alter your program to allow stretching the period between the start of first crack and end of roast to between 1 1/2 and 3 minutes. Many find best results to be anywhere between 7 and 10 degrees per minute rate of rise during the finish phase. You'll find lots of variation in body and acidity by varying the rate of rise during this phase especially if you're going for a very light roast. For light roasts with coffees that are inherently high in acidity, stretching this phase can reduce acidity and add body. Allen 1/2 lb and 1 lb drum, Siemens Sirocco fluidbed, presspot, chemex, cajun biggin brewer from the backwoods of Louisiana
|
|
|
|
| vahegan |
Posted on 04/04/2014 8:53 AM
|
|
Newbie Posts: 48 Joined: March 23, 2014 |
Thank you for your notes, Allen! Quote allenb wrote: Looking much better! What temperature are you seeing at start of first crack? I have just finished working on the software and I was testing it on an old batch of beans that have been roasted 10 times already I will roast a test batch with this new settings today and will tell the first crack timeQuote I would alter your program to allow stretching the period between the start of first crack and end of roast to between 1 1/2 and 3 minutes. Many find best results to be anywhere between 7 and 10 degrees per minute rate of rise during the finish phase. You'll find lots of variation in body and acidity by varying the rate of rise during this phase especially if you're going for a very light roast. For light roasts with coffees that are inherently high in acidity, stretching this phase can reduce acidity and add body. 7-10F/sec is about twice slower than I am currently using. OK, so I'll update the final stage ramp rate before I roast my actual test batch. |
|
|
|
| allenb |
Posted on 04/04/2014 10:25 AM
|
|
Administrator Posts: 3869 Joined: February 23, 2010 |
Quote 7-10F/sec is about twice slower than I am currently using. OK, so I'll update the final stage ramp rate before I roast my actual test batch. 7 to 10F/sec would be a supersonic finish! I would initiate the final stage ramp to be somewhere around the temperature where first crack is a few seconds underway. Allen 1/2 lb and 1 lb drum, Siemens Sirocco fluidbed, presspot, chemex, cajun biggin brewer from the backwoods of Louisiana
|
|
|
|
| vahegan |
Posted on 04/04/2014 12:28 PM
|
|
Newbie Posts: 48 Joined: March 23, 2014 |
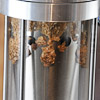
Quote OK, OK, just a small error. 60 times difference, not much ;) Quote I would initiate the final stage ramp to be somewhere around the temperature where first crack is a few seconds underway. Well, I just roasted another batch. Here's the result:  First crack was somewhere around 10:50 to 11:00 minute, at around 210C (410F). I indicated first crack with the vertical line. After that ramp continued for some 1:50 minutes. Per your suggestion, I may prolong the final stage time just a little bit more next time. I've got a nice light roast, a few beans are maybe even too light:  Roast color is not very even, I am not sure, it may be characteristic for this particular bean type. Will cup in the morning. Edited by vahegan on 04/04/2014 12:34 PM |
|
|
|
| allenb |
Posted on 04/04/2014 4:16 PM
|
|
Administrator Posts: 3869 Joined: February 23, 2010 |
I've had a couple of costas and some dry process coffees that look very similar to the color variation I see in your photo. It's most likely the coffee and not related to your roasting. Let us know how this cups and be sure to try variations on your profiles with a little faster rate of rise getting to 1st crack and slower rate of rise from 1st crack to finish and compare them. Some coffees love to go slow and some of the high growns like to zip along a faster clip. Allen 1/2 lb and 1 lb drum, Siemens Sirocco fluidbed, presspot, chemex, cajun biggin brewer from the backwoods of Louisiana
|
|
|
|
| vahegan |
Posted on 04/05/2014 1:38 AM
|
|
Newbie Posts: 48 Joined: March 23, 2014 |
Just cupped the new roast. This time it has much more aroma than I have seen in this bean ever before. Thanks so much, Allen, for your very useful tips. I will try to work further on... |
|
|
|

Page 1 of 2: 12
| Jump to Forum: |
Powered by PHP-Fusion Copyright © 2024 PHP-Fusion Inc
Released as free software without warranties under GNU Affero GPL v3
Designed with ♥ by NetriXHosted by skpacman