
Login

Shoutbox
You must login to post a message.
renatoa
07/26/2024 3:49 PM
Bill grubbe and Jk, 
allenb
07/26/2024 5:15 AM
Spiderkw Welcome to HRO!

renatoa
07/24/2024 8:31 AM
ramiroflores and John123,

 ?
?
?renatoa
07/21/2024 1:18 AM
 , Luislobo
renatoa
07/19/2024 11:28 AM
Koepea,
Forum Threads
Newest Threads
Skywalker roaster modsBackground Roast Iss...
Hello from Arkansas
TC4ESP
Green coffee reviews
Hottest Threads
| Skywalker roaster... | [375] |
| TC4ESP | [115] |
| War on Farmers by... | [47] |
| Adventures in flu... | [26] |
| Hello! (soon) Roa... | [17] |
In Memory Of Ginny

Donations
Latest Donations
dmccallum - 10.00
JackH - 25.00
snwcmpr - 10.00
Anonymous - 2.00
Anonymous - 5.00
dmccallum - 10.00
JackH - 25.00
snwcmpr - 10.00
Anonymous - 2.00
Anonymous - 5.00
Users Online
Guests Online: 7
Members Online: 0
Total Members: 8,393
Newest Member: Bill grubbe
Members Online: 0
Total Members: 8,393
Newest Member: Bill grubbe
View Thread
Who is here? 1 guest(s)
Page 1 of 2: 12
|
 Gas Fired Drum Roaster - Lets Build It
|
|
| Turingalad |
Posted on 12/09/2015 1:12 AM
|
 Newbie  Posts: 30 Joined: November 18, 2014 |
(Someone let me know if I'm jacking this thread... I'd be happy to post elsewhere if more appropriate.) Allen, I've got a 1k solid drum roaster, and I'm wanting to improve my propane setup from the ground up. For immediate purposes, I'm interested in having adequate BTUs/gas power, and a way to gauge BTU's/bars/PSI/water column (like I said, I'm a novice with LP). I'm also interested in what it would take to get a setup like Russ... Automated. I know my current setup is underpowered because my flames look more like a bunch of Bic lighters and less like a torch. It wasn't always like this. Perhaps my new (used) propane tank/hose are different than the ones I had before? I just don't have any gauges/controls on the line, other than a manual gas-line on/off valve (see pics) that I tweak as I roast, watching the height/color of flame, and keeping an eye on my machine temp thermometer. I purchased my roaster from a guy who made them in his garage, and have lost touch, so I don't know exact specs on everything. Pics of my setup: 1. Burner: https://drive.goo...cslist_api 2. Intake: https://drive.goo...cslist_api 3. More pics: https://drive.goo...JfRlk/edit 4. Even more pics: https://drive.goo...VKSU0/edit The burner is nearly identical to one of these Outdoor Burner/Fryers (minus the frame, of course) http://www.turkey-fryers.com/SQ14_propane_patio_stove.htm What do I need to gauge gas pressure? What's ideal gas power for a 1k setup like mine? (And how to know if what I have is adequate). Side question, while I'm thinking about it... After I work out my gas setup to gauge/adjust accurately, I'd like to figure out a good starting point for using my setup to run small samples (I've never been able to get a good batch under 1Lb...) Thanks -Devin |
|
|
|
| allenb |
Posted on 12/09/2015 10:23 AM
|
 Administrator Posts: 3869 Joined: February 23, 2010 |
Quote (Someone let me know if I'm jacking this thread... I'd be happy to post elsewhere if more appropriate.) Actually this would be a good idea since it will end up being it's own project and for allowing others to find your build. Copy and paste your last post into a new thread and we'll delete it from Russ's thread. Allen 1/2 lb and 1 lb drum, Siemens Sirocco fluidbed, presspot, chemex, cajun biggin brewer from the backwoods of Louisiana
|
|
|
|
| Turingalad |
Posted on 12/09/2015 4:07 PM
|
|
Newbie Posts: 30 Joined: November 18, 2014 |
Got it. You can delete my post now. I found another couple threads on here including posts from Russ and Allen that are helpful. Russ, sorry for jacking your thread. I'll be following your project for sure! I like what you're doing here. |
|
|
|
| Lylabrown |
Posted on 05/14/2017 4:02 PM
|
 1/4 Pounder  Posts: 158 Joined: February 15, 2012 |
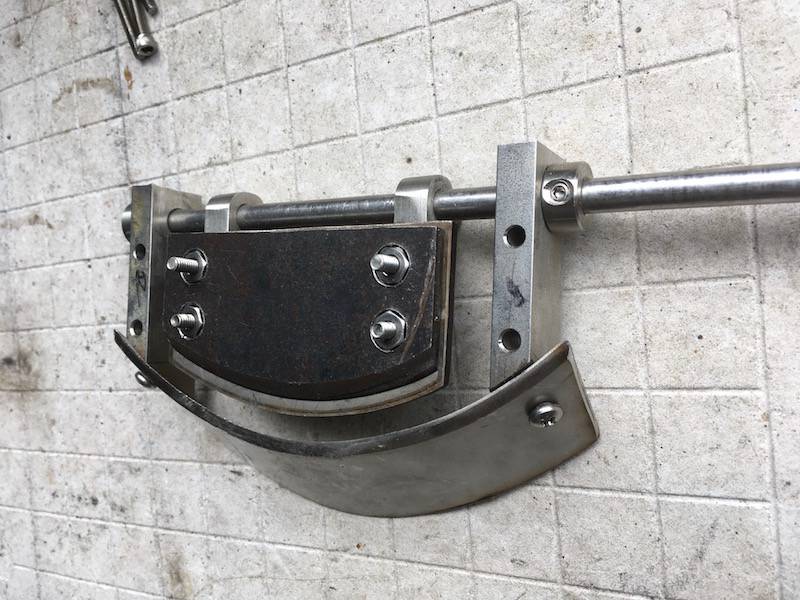
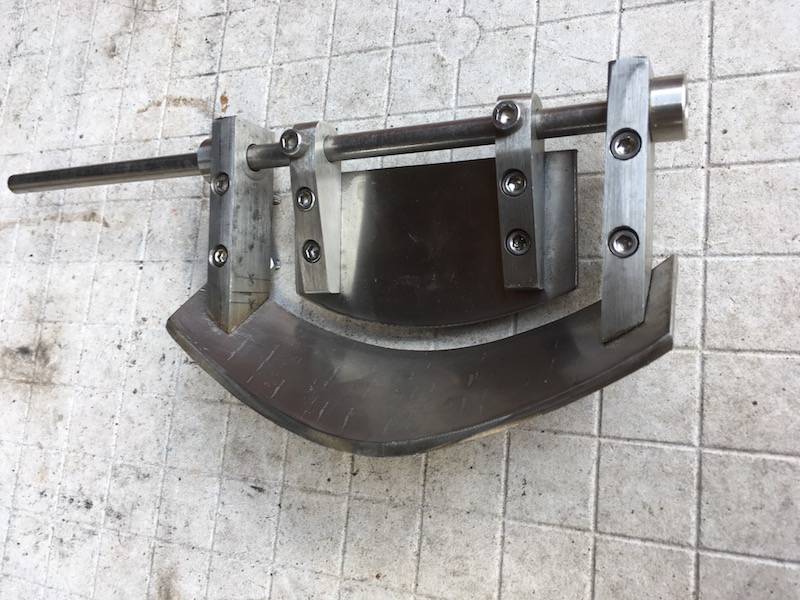
I'm finally back into working on this roaster after a long break. Two years ago I started doing contract work for a large timber company to collect data in the mountains of western oregon. My days were spent driving out to remote areas & bushwhacking through rugged terrain to collect detailed information on the flora of the forest. It was an amazing feeling working alone in a natural setting with no distractions of any kind. However, the work left me no free time or energy to tinker, which was a bummer. Anyways, the roaster should start coming together quickly now! Attached are photos of the dump door and trier assemblies I'm currently putting together.
Lylabrown attached the following images:


|
|
|
|
| allenb |
Posted on 05/15/2017 8:37 PM
|
|
Administrator Posts: 3869 Joined: February 23, 2010 |
Hey Russ, glad to see you back in the saddle! That's some very nice craftsmanship to say the least! Can't wait to see all this come together. Allen 1/2 lb and 1 lb drum, Siemens Sirocco fluidbed, presspot, chemex, cajun biggin brewer from the backwoods of Louisiana
|
|
|
|
| dmccallum |
Posted on 06/05/2017 3:32 PM
|
|
1/4 Pounder Posts: 93 Joined: November 24, 2015 |
All sorts of dramas have kept my roaster parked. I took a few ideas from this build - good to see it on the move again. |
|
|
|
| Lylabrown |
Posted on 06/10/2017 12:29 PM
|
|
1/4 Pounder Posts: 158 Joined: February 15, 2012 |
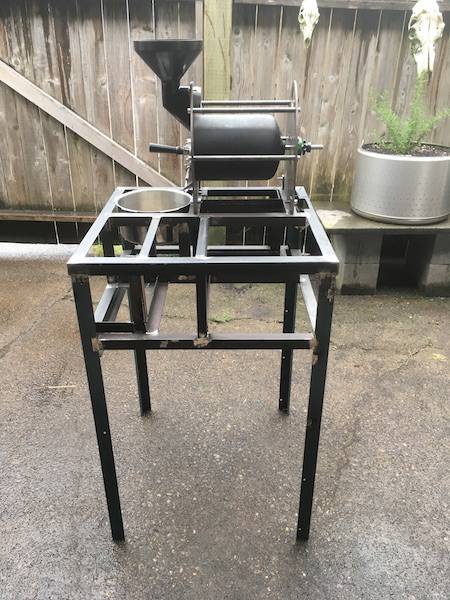
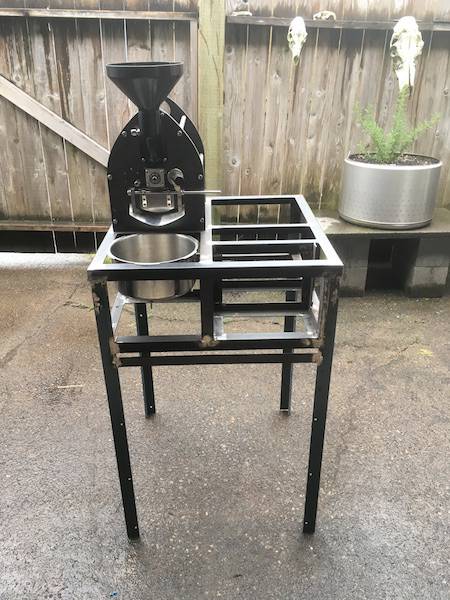
Allen: Greetings and Thank You! Hey thanks Derek: On the bright side - delays can actually help flesh out some aspects of the design that weren't clear, and possibly prevent do-overs. I hope you get back at it soon, Ive been watching your build with great interest! I decided to go with an all-in-one roasting cart instead of a bench top design. That simplifies quite a few things and complicates others. The roaster will live on an outdoor covered patio next to the BBQ so extra precautions need to be taken to prevent rust and corrosion over time. Ive constructed a skeleton using angle iron from bed frames which are commonly left at the curb on garbage day this time of the year (college town). On the left half will be the roaster & cooling tray. On the right is a work surface for a laptop etc. with the cyclone at the back. Below that is a cubby for the gas and electric controls. And at the very bottom a space for the propane tank. It'll be sheathed with steel and mounted on casters. The total footprint is 24" square. Next up will be sheathing and painting.
Lylabrown attached the following images:


|
|
|
|
| allenb |
Posted on 06/11/2017 9:57 AM
|
|
Administrator Posts: 3869 Joined: February 23, 2010 |
Wow! This is going to be a high end build. Love the vintage Probat gothic shape. BTW, is that planter in the background formerly a clothes dryer drum? Allen 1/2 lb and 1 lb drum, Siemens Sirocco fluidbed, presspot, chemex, cajun biggin brewer from the backwoods of Louisiana
|
|
|
|
| Lylabrown |
Posted on 06/11/2017 9:07 PM
|
|
1/4 Pounder Posts: 158 Joined: February 15, 2012 |
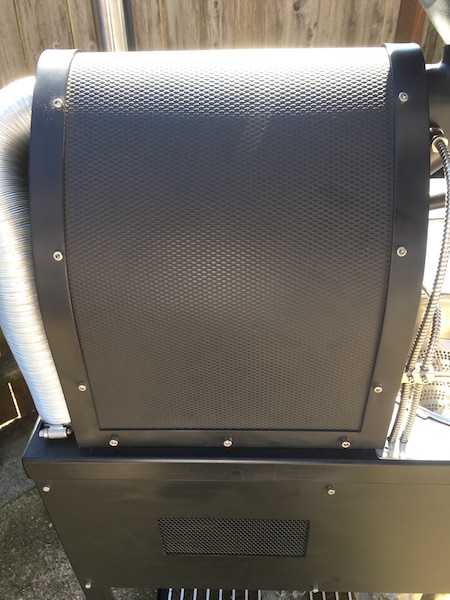
Hey Allen, it's a stainless drum from an old washing machine. I like how the perforations help prevent plants from becoming root bound by air-pruning them. The aesthetic of the Probat style gothic arch is pleasing to my eye compared to the standard exhaust line enclosed within a round dome or an exposed pipe above it. Yeah, it's ending up looking fancier than what was planned. Luckily - most of the expense is the time related, the materials costs are under $300 so far. For me, half the fun is scavenging materials from scrapyards or re-use stores while out and about. One of the primary goals is to make a "platform" that is easy to modify as needed. The previous two roasters I built were great at first, but became tiresome to deal with their quirks and limitations. Hopefully, this one will be more trouble free in its operation and maintenance. Russ |
|
|
|
| eschlukebir |
Posted on 06/12/2017 2:57 PM
|
|
Newbie Posts: 22 Joined: October 06, 2016 |
my dad has one of those drums that they welded a hinge and a cover on, he uses it as a live well for fish next to his dock on the lake. All kinds of uses. I'm also glad you revived this thread. I've been working on my pipe burner, but don't like the way its burning. Getting a better look at yours makes me think I've cut the slots to deep and closer than they need to be. |
|
|
|
| SmokNmirz |
Posted on 07/10/2017 9:09 AM
|
 Newbie Posts: 30 Joined: September 11, 2013 |
Russ, your project is beautiful! You are a true craftsman. Did you decide to enclose the exhaust air tube to keep it warm so the particulate did not condense out more quickly leaving more residue in the tube? L-1p, HG-1-motorized, Monolith Flat, (ordered) mini500Plus.
If whatever you do does not put a smile on your face then rethink what you are doing. |
|
|
|
| Lylabrown |
Posted on 04/26/2018 4:32 PM
|
|
1/4 Pounder Posts: 158 Joined: February 15, 2012 |
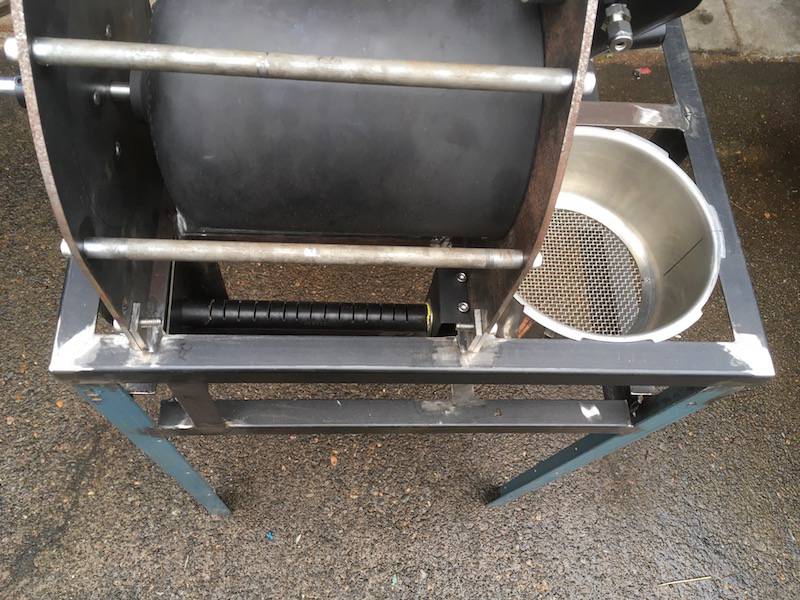
Quote SmokNmirz wrote: Did you decide to enclose the exhaust air tube to keep it warm so the particulate did not condense out more quickly leaving more residue in the tube? After another long hiatus I finally found the time to work on this project again. Ive cobbled a cyclone together out of 5" gas vent tube and bits of aluminum & stainless steel. The Bill Pentz cyclone calculator provided all the dimensional measurements needed. In order to make it stronger i enclosed the cone within the cylinder and used end caps to keep it all together. Once assembled it's surprisingly rigid given how thin the stainless tube material is. The bottom ring is for attaching a wide-mouth mason jar as others have done. I gave it a test using the draft inducer exhaust fan with a paint filter bag on the exit port to see if any chaff escaped. The drum was loaded with a pint of pure chaff and rotated manually to get it airborne, and....Success! The cyclone captured even the dust of broken up chaff as none exited the fan. Hat's off to Mr. Pentz! Russ
Lylabrown attached the following images:


|
|
|
|
| Lylabrown |
Posted on 05/22/2018 4:26 PM
|
|
1/4 Pounder Posts: 158 Joined: February 15, 2012 |
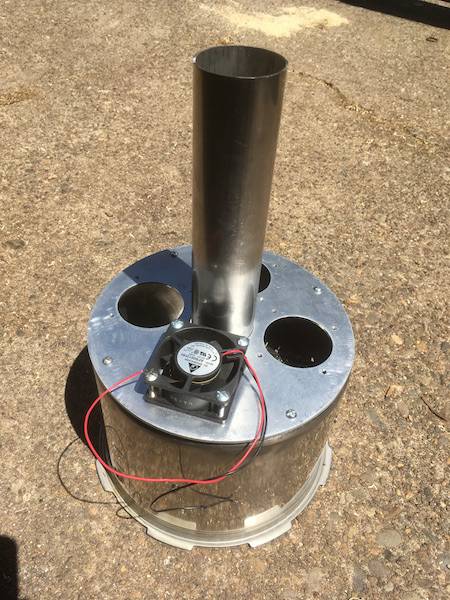
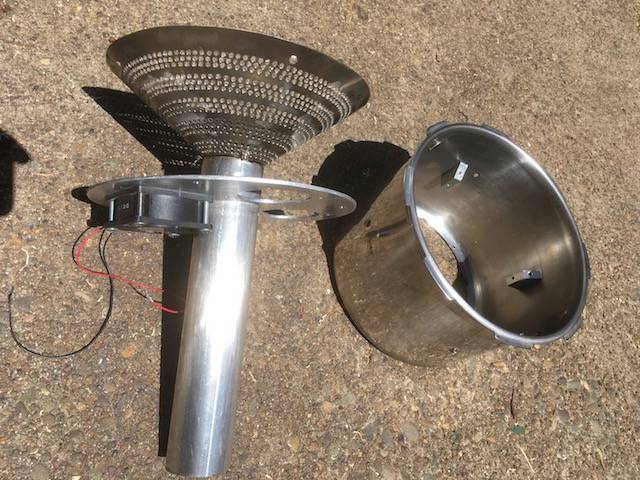
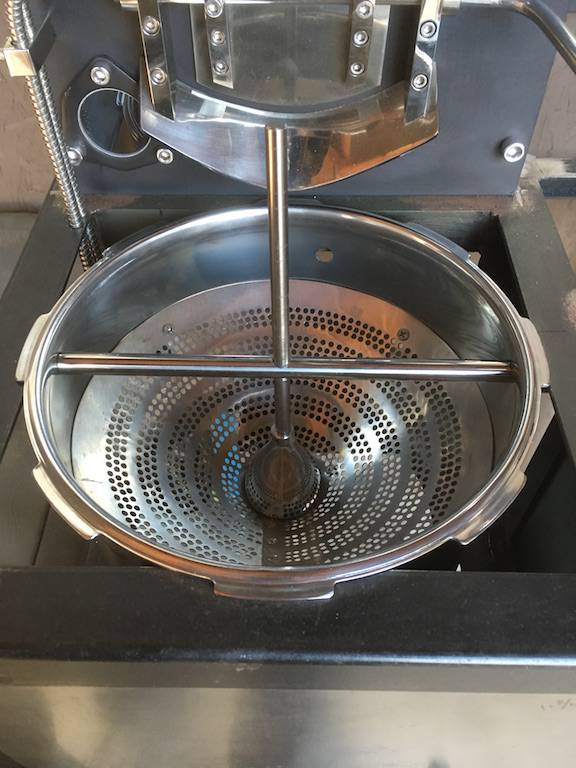
I found a solution to the problem of getting the beans out of the cooling tray without the use of sweepers or sliding openings. The perforated base of the tray is funnel shaped and feeds into a tube that leads to a canister beneath. The cooling fans are mounted axially around the tube. There will be 4 fans which move 27 CFM each. Heres a video of it in action: https://vimeo.com... Edited by Lylabrown on 05/22/2018 4:32 PM |
|
|
|
| Lylabrown |
Posted on 05/22/2018 6:55 PM
|
|
1/4 Pounder Posts: 158 Joined: February 15, 2012 |
Here are the photos I tried to upload earlier:
Lylabrown attached the following images:


|
|
|
|
| Lylabrown |
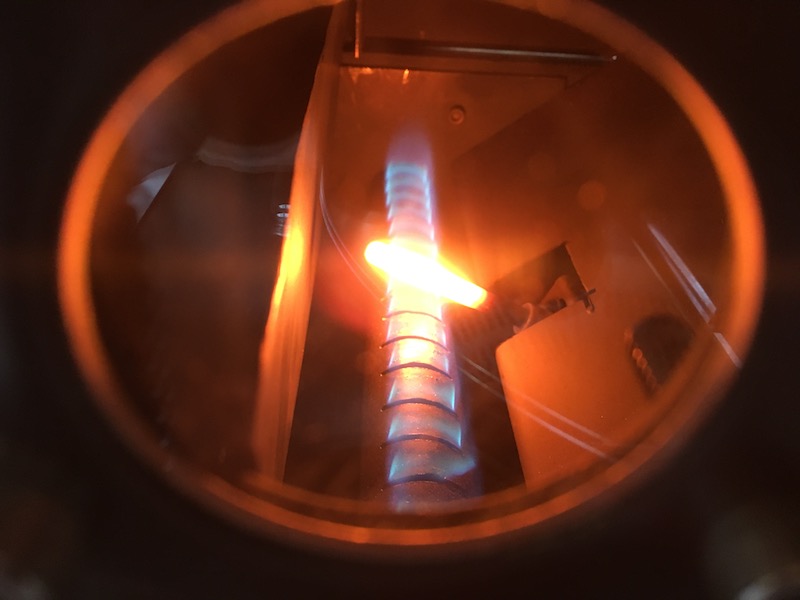
Posted on 05/30/2018 9:55 PM
|
|
1/4 Pounder Posts: 158 Joined: February 15, 2012 |
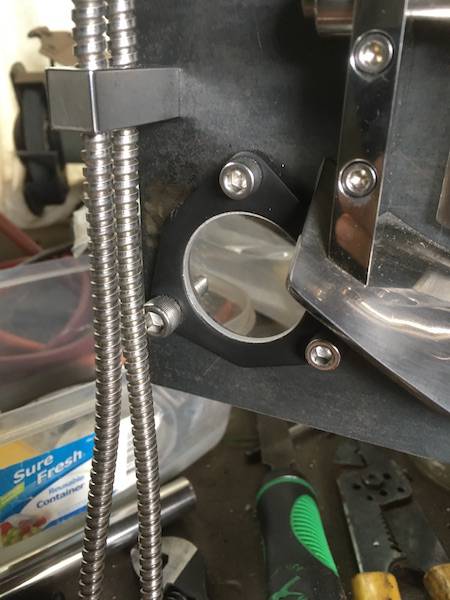
I constructed a burner flame sight-glass from a 1-3/8" borosilicate round encased in some kind of automotive intake/exhaust three bolt fitting that had a 1-1/2" ID. The glass is adhered using grey RTV silicone rated at 550*f. It survived a burner test where the chamber reached ~800* for 30 minutes. Due to the the sight-glass being on the same side as the bean & environmental probes I had to do some cable management theatrics to keep the thermocouple wires from obstructing the view of the flame. Three hours were spent fabricating a stainless steel cable organizer fitting with locking bolts to keep the wires in check. Absurdity at its finest! This stuff is my favorite part. -Russ
Lylabrown attached the following images:

|
|
|
|
| allenb |
Posted on 05/31/2018 7:10 PM
|
|
Administrator Posts: 3869 Joined: February 23, 2010 |
Hi Russ, this must be your favorite part indeed! This looks like a shot of a high end European drum roaster coming off the assembly line after the polishing stage. I'm extremely jealous! Get this one finished soon so we can see the works. Allen 1/2 lb and 1 lb drum, Siemens Sirocco fluidbed, presspot, chemex, cajun biggin brewer from the backwoods of Louisiana
|
|
|
|
| Lylabrown |
Posted on 06/04/2018 7:22 PM
|
|
1/4 Pounder Posts: 158 Joined: February 15, 2012 |
Hey there Allen, thank you so much! After nearly four years this finally has the finish line in sight. It's turning out way better than expected. I figured out a simple drain stopper mechanism for the bean cooler. It consists of two pieces on stainless rod scavenged from a dead inkjet printer and a stainless bathroom towel hook base that had the right shape. See the attached photos.
Lylabrown attached the following images:

|
|
|
|
| Lylabrown |
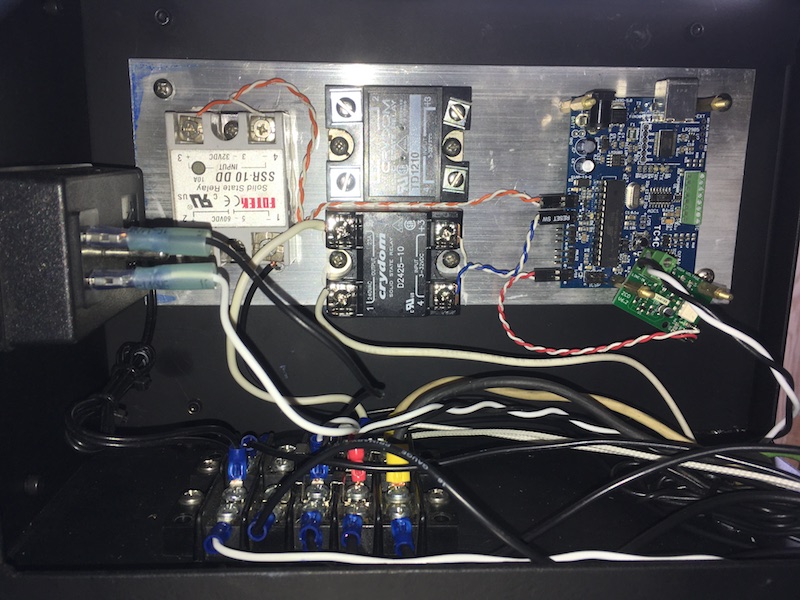
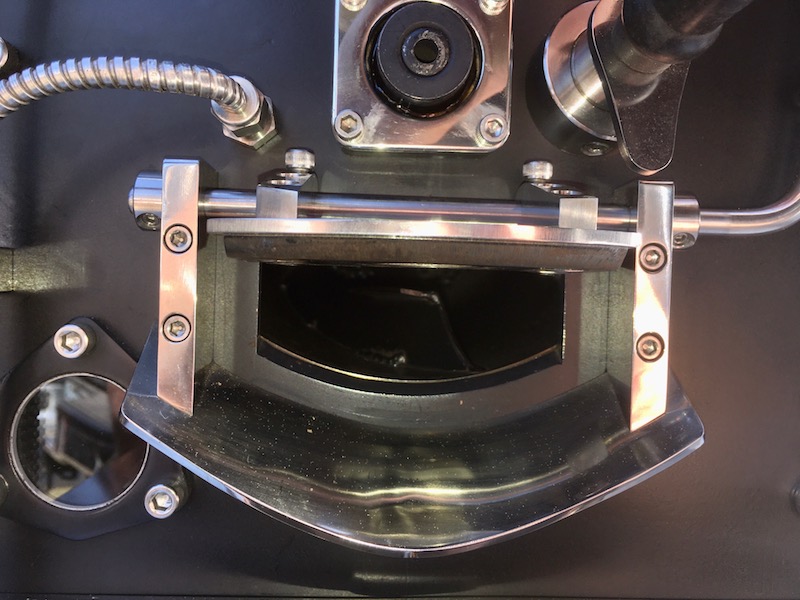
Posted on 04/09/2020 2:29 PM
|
|
1/4 Pounder Posts: 158 Joined: February 15, 2012 |
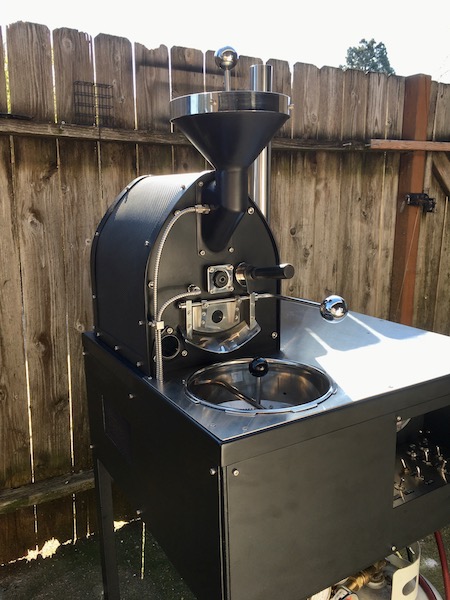
It took a global pandemic to find some free time to finish this thing! The next step is learning how to use it. -Russ
Lylabrown attached the following images:


|
|
|
|
| Lylabrown |
Posted on 04/09/2020 2:33 PM
|
|
1/4 Pounder Posts: 158 Joined: February 15, 2012 |
additional photos:
Lylabrown attached the following images:

|
|
|
|
| Lylabrown |
Posted on 04/09/2020 2:40 PM
|
|
1/4 Pounder Posts: 158 Joined: February 15, 2012 |
And some more:
Lylabrown attached the following images:


|
|
|
|
| Ringo |
Posted on 04/10/2020 1:31 PM
|
 Pounder  Posts: 474 Joined: January 14, 2010 |
Very nice, such beautiful quality work.
All you need in life is ignorance and confidence, and then success is sure. Mark Twain
|
|
|
|
| pisanoal |
Posted on 04/13/2020 8:22 AM
|
|
1/4 Pounder Posts: 97 Joined: October 11, 2019 |
What a beautiful build! I wish I had the patience and skills to pull something like this off. Nice work! |
|
|
|
| JackH |
Posted on 04/13/2020 10:49 AM
|
 Administrator Posts: 1809 Joined: May 10, 2011 |
Quote pisanoal wrote: What a beautiful build! I wish I had the patience and skills to pull something like this off. Nice work! My thoughts exactly! ---Jack
KKTO Roaster. |
|
|
|
| allenb |
Posted on 04/13/2020 4:20 PM
|
|
Administrator Posts: 3869 Joined: February 23, 2010 |
Beautiful coffee art in metal!
1/2 lb and 1 lb drum, Siemens Sirocco fluidbed, presspot, chemex, cajun biggin brewer from the backwoods of Louisiana
|
|
|
|
| goat4hooves |
Posted on 06/05/2020 11:18 PM
|
|
Newbie Posts: 17 Joined: June 04, 2020 |
That is a great looking roaster. Excited to see how it roasts! Thanks for sharing your efforts with us. |
|
|
|

Page 1 of 2: 12
| Jump to Forum: |
Powered by PHP-Fusion Copyright © 2024 PHP-Fusion Inc
Released as free software without warranties under GNU Affero GPL v3
Designed with ♥ by NetriXHosted by skpacman