
Login

Shoutbox
You must login to post a message.
renatoa
07/26/2024 3:49 PM
Bill grubbe and Jk, 
allenb
07/26/2024 5:15 AM
Spiderkw Welcome to HRO!

renatoa
07/24/2024 8:31 AM
ramiroflores and John123,

 ?
?
?renatoa
07/21/2024 1:18 AM
 , Luislobo
renatoa
07/19/2024 11:28 AM
Koepea,
Forum Threads
Newest Threads
Skywalker roaster modsBackground Roast Iss...
Hello from Arkansas
TC4ESP
Green coffee reviews
Hottest Threads
| Skywalker roaster... | [375] |
| TC4ESP | [115] |
| War on Farmers by... | [47] |
| Adventures in flu... | [26] |
| Hello! (soon) Roa... | [17] |
In Memory Of Ginny

Donations
Latest Donations
dmccallum - 10.00
JackH - 25.00
snwcmpr - 10.00
Anonymous - 2.00
Anonymous - 5.00
dmccallum - 10.00
JackH - 25.00
snwcmpr - 10.00
Anonymous - 2.00
Anonymous - 5.00
Users Online
Guests Online: 7
Members Online: 0
Total Members: 8,393
Newest Member: Bill grubbe
Members Online: 0
Total Members: 8,393
Newest Member: Bill grubbe
View Thread
Who is here? 1 guest(s)
 Cheap high performance bean cooler!
|
|
| Omega |
Posted on 07/25/2014 5:21 PM
|
 1/4 Pounder  Posts: 132 Joined: June 13, 2014 |
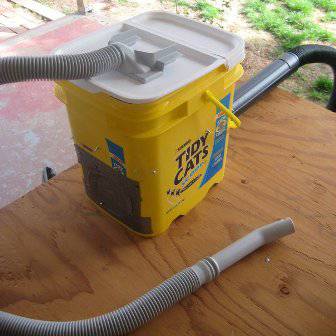
What's better than cheap and high performance? Not much! Below are a few pics of a bean cooler that I put together yesterday. I had the fan and the cat litter box already. I bought a large piece of hardware cloth for about $5 and some 8-32 machine screws, washers and self-locking nuts. I got a power cord from a resale shop for 25 cents! The assembly is pretty much self explanatory. I cut the round hole in the bottom of the bucket with a jigsaw, using a scrolling blade at a low speed. The hardware cloth was cut with tin snips and is very easy to cut. I kept cutting and bending until I was happy with the fit into the bucket. I will mention something that makes a big difference in how well the cooler works. The amount of air flow through the material that supports the beans is very important, in this case, hardware cloth (1/8"). In the past, I used a stainless steel colander and found that air wouldn't flow freely through the widely spaced holes. Unless the beans are exposed to freely moving air, they won't cool very well. If you can't easily see through the containment media, cooling will be mediocre. The screen allows almost 100% free flow; a colender, about 10% or so. Big difference. This cooler takes beans from 430* to 105* or so in about a minute, with an ambient temperature of 60*. (Living in the PNW has it's benefits somtimes!) I don't have to agitate the beans, just spread them evenly over the screen and the fan does the rest. I can't tell you how much easier and more effective this is than my previous method! Here's the pics! 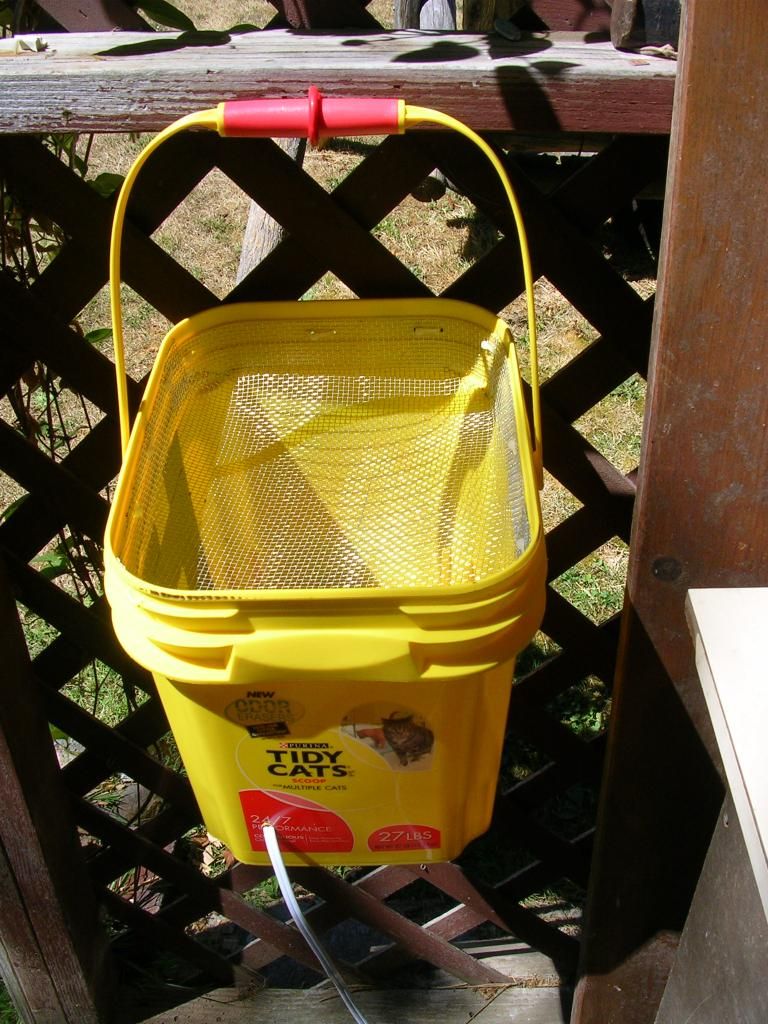 The cooler is suspended by the built-in handle! This is right next to my roasting table, on the back porch. 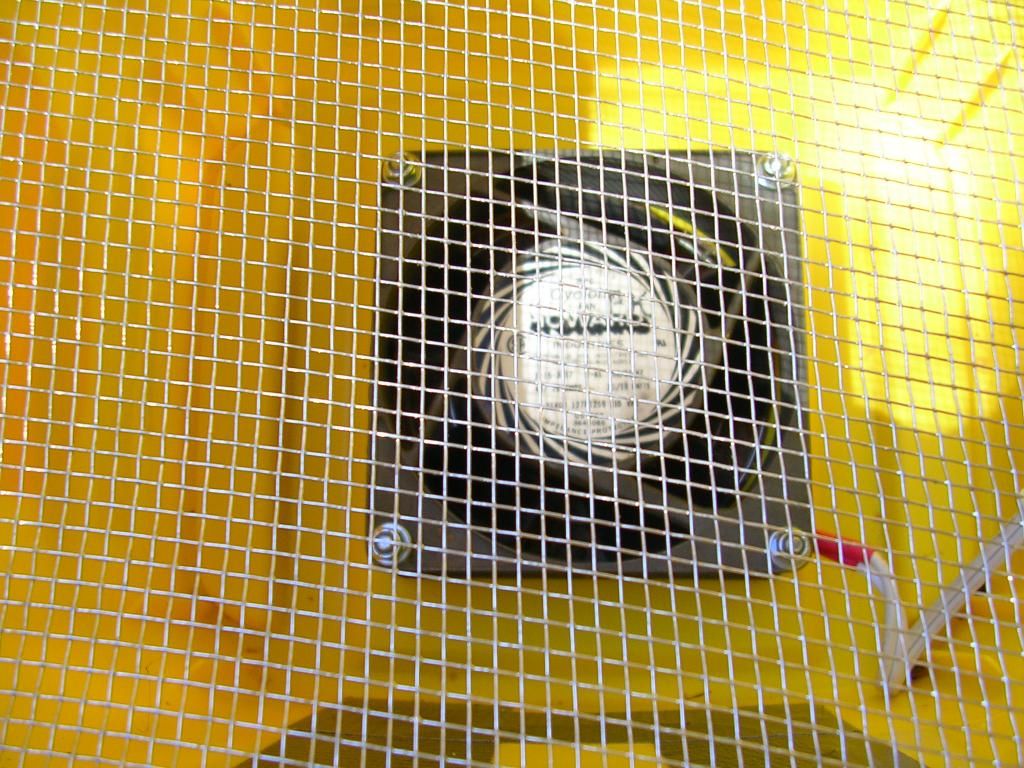 Here's a pic of the fan, securely mounted in the center of the bottom of the bucket. The fan is mounted inside the bucket, blowing upward. To me, this makes sense, because hot air rises and the fan doesn't blow hard enough to blow the beans out of the bucket (it only draws 21 watts!). 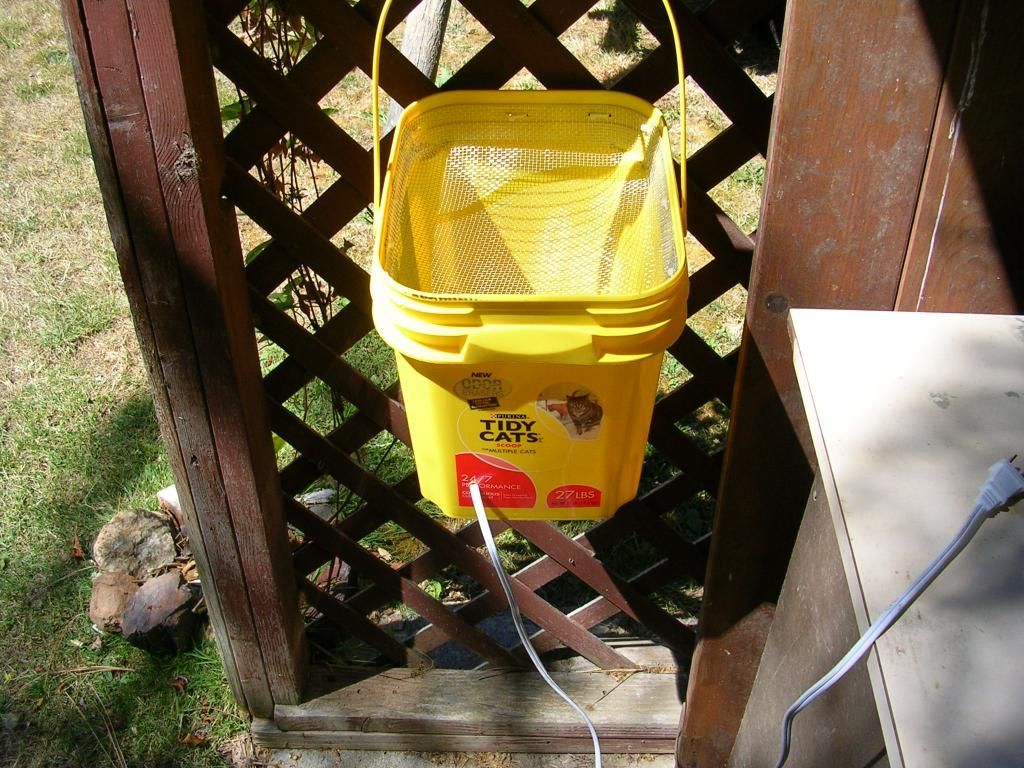 Here's a shot that shows the power cord exiting the bucket. 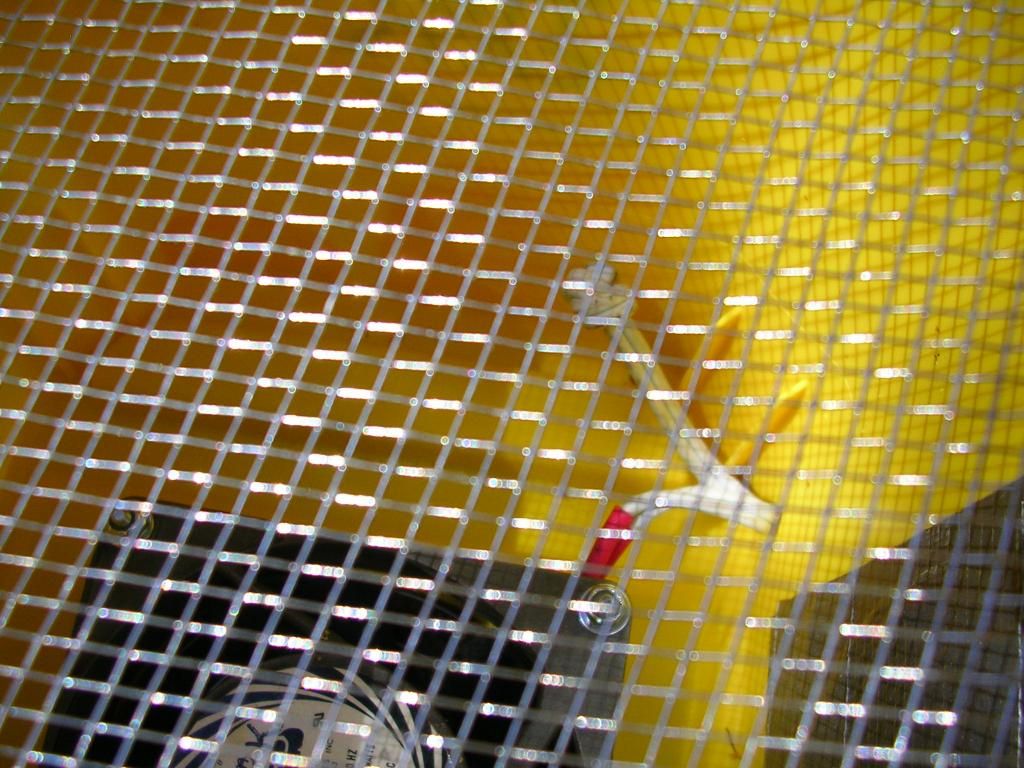 This pic shows the knot in the power cord to act as a stress relief; that keeps the cord from being yanked and damaging the connection to the fan terminals. 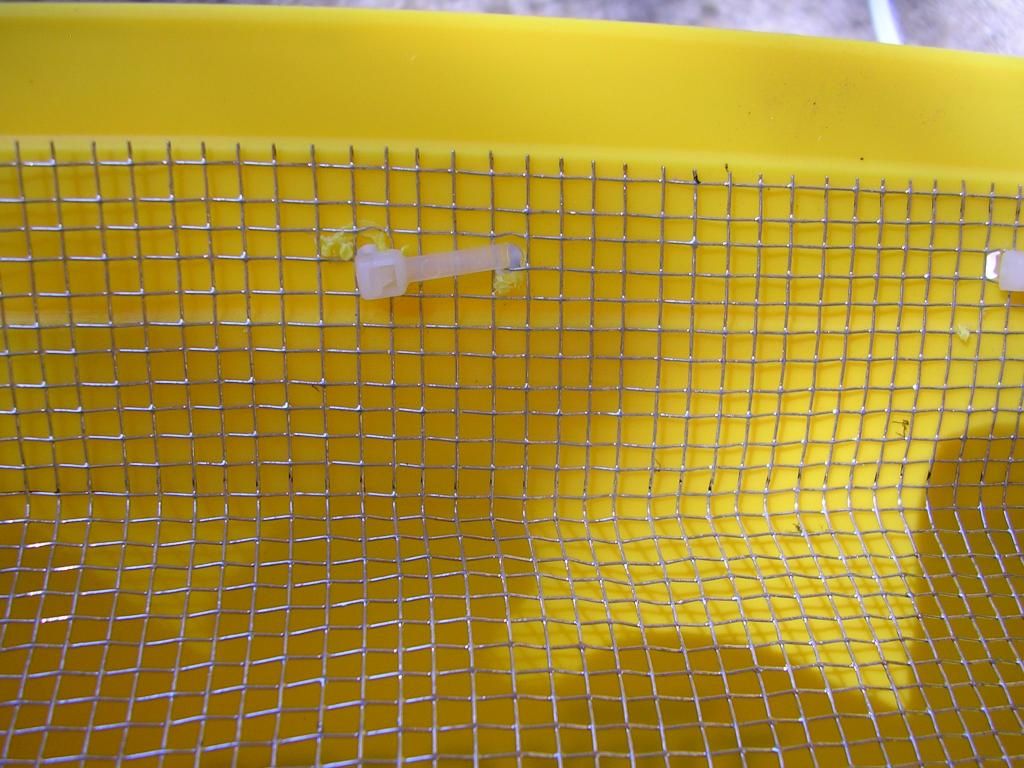 I used very small zip ties to secure the hardware cloth to the inside of the bucket. Holes were drilled through the bucket and the zip ties run through the holes. 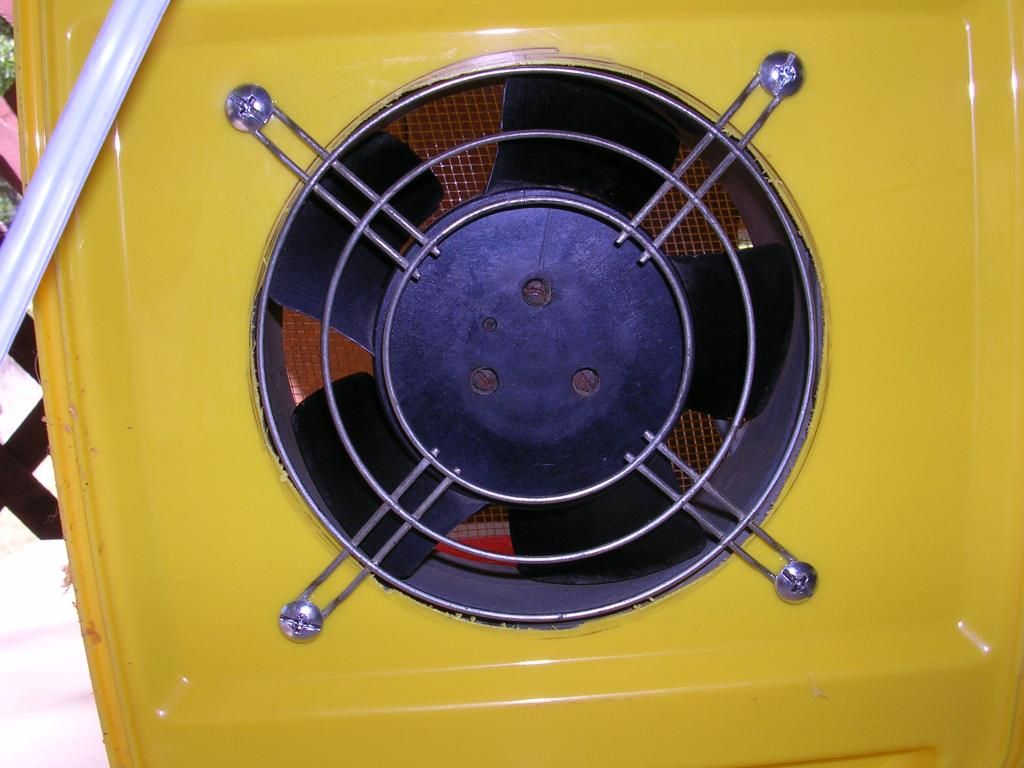 This is a pic of the bottom of the bucket, the fan and a fan shroud. I've had the fan for about 25 years and now it's got a great job helping me in my coffee roasting efforts! I hope that this submission helps to motivate some members to fab up a nice cooler! Barry Edited to add: I tried mounting the fan in the side of the bucket, since I had seen it done that way somewhere on the 'net. That didn't work very well; the air exited the bucket on the top side opposite the fan. In other words, lots of flow on one side, almost none on the other side. After moving the fan to the bottom, air flow was perfectly uniform across the entire bucket opening. Edited by Omega on 07/25/2014 5:26 PM |
|
|
|
| Lawnmowerman |
Posted on 07/25/2014 9:14 PM
|
 Pounder  Posts: 546 Joined: March 14, 2012 |
Very nice cooler. I agree with you about screen versus small holes. My cooler uses a colander, and much more power to make it work. I would have liked to switch over to a screen, but now I'm not even using it. Cooling in rc at the moment. An added Plus is to see anything old get put back into service, so I can really appreciate the repurposing of the fan.
Bad coffee prevails when good coffee roasters stand by and do nothing.
|
|
|
|
| DavidG |
Posted on 07/28/2014 11:41 AM
|
 1/2 Pounder  Posts: 218 Joined: April 20, 2009 |
Nicely done, Omega! My cooler is also a cat litter bucket with hardware cloth. Different from your design, I use a shop vac to draw ambient air downward through the coffee. My downside is huge noise. One mod I made was to keep the cat litter lid. I fitted it with an extra vacuum hose. Then, I can snap the lid in place, which seals the bucket. I use the extra vacuum hose to literally vacuum the hot beans out of the roaster. No more picking up the popper or breadmaker pan--juggling gloves, pan, metal, glass, etc. Just flip the shop vac on and suck up the roast. Cheers, David
DavidG attached the following image:
europiccola | yama + coryrod | chemex | AP | clever
wbp1 | wepp1 | bm/hg | co hybrid (still coming soon...) |
|
|
|
| Omega |
Posted on 07/28/2014 5:16 PM
|
|
1/4 Pounder Posts: 132 Joined: June 13, 2014 |
Pretty cool, DavidG! But, I've got to ask you, were your cats impressed with the engineering marvel you constructed? My cats were indifferent and I was SHOCKED I tell you!  Barry |
|
|
|
| Koffee Kosmo |
Posted on 07/28/2014 8:20 PM
|
 Administrator Posts: 1621 Joined: December 31, 2008 |
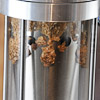
Here is my cooler build based on similar design http://forum.home...ad_id=1183 I have made one additional change to the screen section Now I use 2 Gold prospecting sieves ( they lock stack on each other ) The top sieve has larger holes but still just keeps the beans from passing through The lower sieve has smaller holes and catches any chaff dragged down from above preventing any chaff to enter the fan chamber The sieves pull apart for easy cleaning KK I home roast and I like it. Designer of the KKTO
Roaster Build information https://homeroast...ad_id=1142 https://docs.goog...lide=id.i0 Blog - http://koffeekosm...gspot.com/ Bezzera Strega, Mazzer Robur Grinder, Pullman Tamper Convex, (KKTO) Turbo Oven Home Roaster. |
|
|
|
| DavidG |
Posted on 07/28/2014 10:04 PM
|
|
1/2 Pounder Posts: 218 Joined: April 20, 2009 |
KK, That looks great. Nearly all my homebuilt roasters and coolers were inspired by work discussed and displayed here at HRO. I remember marveling at the ingenuity of the Cooler Contest several years ago (maybe 2009?). Cheers, DavidG europiccola | yama + coryrod | chemex | AP | clever
wbp1 | wepp1 | bm/hg | co hybrid (still coming soon...) |
|
|
|
| oldgearhead |
Posted on 07/30/2014 8:37 AM
|
 1 1/2 Pounder  Posts: 1128 Joined: February 10, 2011 |
I put this together in 2008 as a cooler for my highly-modified Zach & Dani. I do most of my cooling in the RC, so I use it as a cleaner every time I roast. Very simple, high cost, 4-piece, design that will last as long as there are shop vacs.
oldgearhead attached the following image:
|
|
|
|

| Jump to Forum: |
Powered by PHP-Fusion Copyright © 2024 PHP-Fusion Inc
Released as free software without warranties under GNU Affero GPL v3
Designed with ♥ by NetriXHosted by skpacman